Tutorial – Creating a Simple Portlet
Overview
Developers build applications by...
- Creating models
- Adding builders to those models
- Profile-enabling builder inputs
- Associating those inputs with entries in profile sets
In this tutorial, you will
- Build a simple model by following step-by-step instructions.
- Add profiling to the application. Profiling allows WebSphere Portlet Factory to build several versions of an application dynamically by supplying sets of alternative values for various parts of the application.
- Create a portlet from the application. Any application built with WebSphere Portlet Factory can be deployed as a WebSphere or Java Standard portlet.
Setup Requirements
The following setup is required to run the tutorial.
- You need to have created and deployed a project. The project must include the "Tutorials and Samples / Applications" feature set.
- WebSphere Portal server must be running.
Create the First Application
- Create a new WebSphere Portlet Factory model.
- Launch the Eclipse or Rational Application Developer client into which you installed WebSphere Portlet Factory Designer.
- Open...
MyFirstProject | File | New | WebSphere Portlet Factory Model
This command will invoke a wizard to assist you in creating a new model.
- Choose the project in which this model should be created. The MyFirstProject WebApp project should be highlighted. Click Next to continue.
- When creating a new model, you can choose from a list of starter models. In the Select Model page, choose Main and Page from the Factory Starter Models category and click Next.
- Since you have chosen the Main and Page starter model, you get the option to specify what the contents of the first page should be. You can choose an existing HTML file or choose Simple Page to get a very basic HTML page. Choose Simple Page and click Next.
- Every model needs to be stored under the models folder in the project. Since this project already contains the Samples and Tutorials feature set, there are some tutorial-related folders you should use. Expand the models folder and choose the folder called...
models\tutorials\solutions\basics
- Every model must have a file name. In the Model Name field, enter MyFirstPortlet and click Finish. WebSphere Portlet Factory Designer will now create your new model and open it for you.
A model is a set of calls to builders, which in turn generate the application components representing the behavior, structure, data, and presentation of the application. Underneath the covers, a model is simply an XML file containing a series of calls to builders.
When you want to create a new application, you will create a new model, and then add the appropriate builder calls to the model.
- Examine and run the new model
- In the lower left corner of the workspace, there is a tab labeled Outline which contains the model's builder call list. Models are constructed from builders, and each builder in a model is represented by a builder call. Builder calls can be edited by double-clicking them in the builder call list.
A builder is a highly adaptive software component that generates code (including Java, JSP, and XML) for specific application functionality.
For example, WebSphere Portlet Factory provides builders that are as simple as automating the creation of the code to place a button on a web page. WebSphere Portlet Factory also includes many builders like the View & Form builder, which creates all the necessary variables, JSP, schemas, and Java code needed to create an entire application that retrieves and displays data from a data source (database, web service, bean, variable, and so on).
Builders have easy-to-use, wizard-like user interfaces, which make it both fast and easy to develop applications. Builders, however, are much more powerful than wizards, since builders can be used iteratively throughout the entire development process. You can always go back and change a builder's input values, and have the entire application update instantly.
Behind the scenes, a builder is made up of a Java class that performs the appropriate automation task (like creating the JSP for the button) and an XML document that defines the builder's characteristics.
- In the builder call list, double-click the action list builder call named main. The builder call editor will open to the right and will show the current values of that builder's inputs. As you can see, there is only one element in the action list. That element opens the page called page1.
- In the builder call list, double-click the Page builder call named page1. It contains some very basic HTML with some named <span> tags. Portlet Factory uses named tags in order to generate code into the appropriate spot on the page. Other UI elements such as text or tables can be placed on these <span> tags to add more functionality to this page. At the moment, this page simply displays the simple HTML you can see in the Page Contents field.
- Run the model by clicking
 from the row of icons immediately below the menu at the top of the workspace. A web browser will launch and display this simple application containing a simple page.
- Close the page and return to WebSphere Portlet Factory Designer by closing the browser.
- In the lower left corner of the workspace, there is a tab labeled Outline which contains the model's builder call list. Models are constructed from builders, and each builder in a model is represented by a builder call. Builder calls can be edited by double-clicking them in the builder call list.
- Construct the basic page layout
- The simple HTML provided in the Page builder is not sufficient for this application because it needs a few more placeholders or named <span> tags that the Portlet Factory will use to generate the application. There is a text file in your project that was installed with the Samples and Tutorials feature set that you will use to replace the contents of page1.
- Double-click...
MyFirstProject\WebContent\samples\tutorials\pages\starting_page.txt
- Select all of the content of this file and copy it to the clipboard.
- Click the My First Portlet tab so the MyFirstPortlet model is visible. In the Outline view, double-click the Page builder call named page1. Then replace all of the contents of the Page Contents (HTML) field by pasting from the clipboard. Be sure to replace all of the contents instead of appending the clipboard contents.
- Run the model again to see what the page looks like now. Whenever you change the model's properties and settings, a dialog box asks you to select the resources to save. Click OK. A message box then asks you if you wish to apply modified builder calls in the model. Click Yes. You are prompted to save your changes. Make a mental note of page contents, such as, "Header goes here," as you will soon replace that contents with other builder calls.
- Make sure you have closed the builder by clicking ok and take a moment to examine the Application Tree and the corresponding views on the right.
What is shown in the Application Tree?
The Application tree shows all of the artifacts that are generated by the builders in the current model. It allows you to select these artifacts to show details about the object. These can be Java, XML, HTML, JSP etc…
There are a couple of ways to see the details of an object. The Source tab shows a text representation of what was created and the Design tab shows a visual representation of the object. Currently, the Design tab is only available for pages.
If the Application Tree is not visible, be sure you have the MyFirstPortlet model open and selected. If it is not, find the MyFirstPortlet model in the Project Explorer window and double-click it
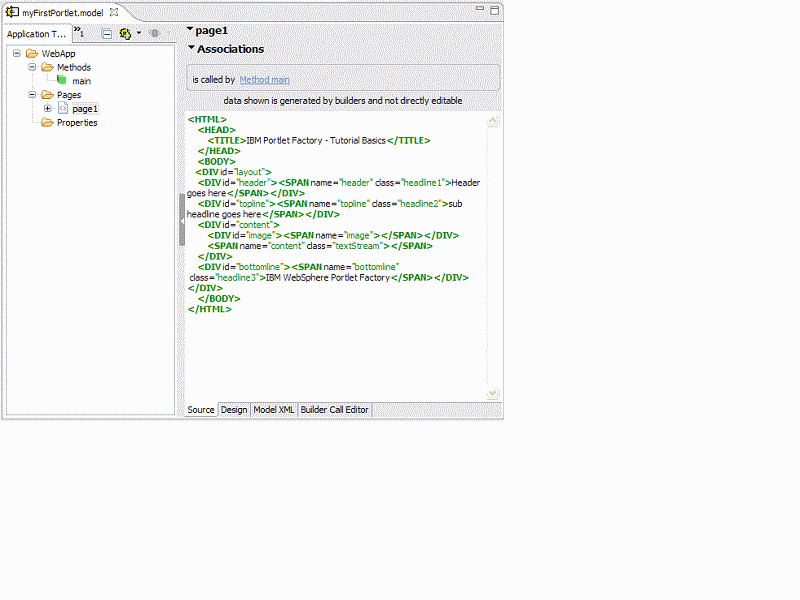
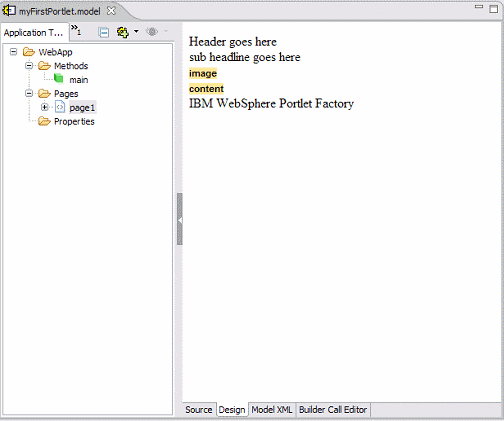
In the following images, the page is selected in the Application tree. In first image the Source tab is displaying the HTML from the page. The next image shows the Design tab is selected and this gives a visual preview the application as it will appear in the browser. The Design tab is not exactly what will render in the browser when you run the application but it does help to preview many changes as you are creating your application. In addition to the static text in the HTML page, the Design tab also shows the named tags that do not currently have any content in them. The WebSphere Portlet Factory uses named tags (in this case SPAN tags) as indicators of where to generate code. As you add builders to the application you will have some of those builders point to these named tags and generate code or place text there.
Try choosing different elements in the Application Tree and watch for the corresponding elements in the Source and Design views become highlighted.
- Double-click...
- Add a Text builder call to the model to replace the <span> tag called header.
- Select page1 in the Application Tree.
- Above the builder call list, click
 to display a list of builders that can be added to this model.
The default selected category is Recommended which lists the builders that would be commonly used based on your current selection in the Application Tree. Since there are many builders that can modify a page, many choices are displayed.
- Type the word text in the search box and select Text as the type of builder call to add and click OK.
- The Page Location section of this builder call contains several inputs. Page and Tag contain drop-down lists of choices. Choose page1 for the Page field and header for the Tag field.
This Text builder will now know to replace the contents of the named <span> tag called header with whatever text expression you specify in the Text input.
- The input labeled Text is where you enter the text that this builder call will add to the page. Locate this input and enter Tutorial Basics – News Portlet.
- Click OK.
- The design tab now shows that the header tag has a text builder that added the words Tutorial Basics – News Portlet . Run the model again and view it in a web browser. This time you will see that the phrase, Tutorial Basics - News Portlet has replaced the static text, Header goes here.
- In similar fashion, add another Text builder to the topline tag of the page1 page using the text expression, News Article of the Day.
- Either Run the model or take a look in the Design tab to see if this new text phrase has replaced the static text, Sub headline goes here
- Add a Style Sheet builder to provide some structure to the page.
- Above the builder call list, click to display a list of builders that can be added to this model. You can also right click on the page in the Application tree or Design tab to bring up the builder picker as well.
- Choose Style Sheet as the type of builder and click OK. You will use this builder to apply an existing style sheet to the model.
- Use the following table for the details about what values to provide for the various inputs to this builder call. Click OK when you are finished entering these values.
Input Value Location Type In HEAD tag Page page1 CSS Source Type Link to file/URL CSS URL or File Location /samples/tutorials/styles/basics.css - Either Run the model or take a look in the Design tab to see your changes.
Web application content can come from many sources. To keep things simple, you will use a static HTML page for the content. An Imported Page builder is an easy way to inject an existing HTML page into a web application. First you will import a page, then you will apply this imported page to the content <span> tag on page1.
- Above the builder call list, click
- Add an Imported Page builder to the model following the same procedure you used to add the header, topline, and Style Sheet builders. Use the following table for the details about what values to provide for the various inputs to this builder call. Click OK when you are finished entering these values.
Input value Name ContentPage Page to Import /samples/tutorials/pages/basics_content_news.html - Add an Inserted Page builder to the model. Use the following table to for the details about what values to provide for the various inputs to this builder call. Click OK when you are finished entering these values.
Input Name Value Page page1 Tag content Page in Model ContentPage - Run the model again and view it in a web browser. You should see the application with some simple text content. You should also notice that the page has a well-defined structure which is provided by the basics.css style sheet.
- The simple HTML provided in the Page builder is not sufficient for this application because it needs a few more placeholders or named <span> tags that the Portlet Factory will use to generate the application. There is a text file in your project that was installed with the Samples and Tutorials feature set that you will use to replace the contents of page1.
- Add another Style Sheet builder to give this application some color and font styling. You could put all of this in one style sheet, of course, but this is a good way to see how builders can modify and add to what other builders have already generated.
- Use the following table for the details about what values to provide for the various inputs to this builder call. Click OK when you are finished entering these values.
Input Value Name appearance Location Type In HEAD tag Page page1 CSS Source Type Link to file/URL CSS URL or File Location /sample/tutorials/styles/elegant.css - Either Run the model or take a look in the Design tab to see the changes. This time the model should have a more attractive appearance.
- Use the following table for the details about what values to provide for the various inputs to this builder call. Click OK when you are finished entering these values.
Apply Profiling to the Application
Models can be used in conjunction with profiling to generate multiple versions of the same application by combining different sets of predefined parameters with the same code base.
In this section, you will profile a set of builder inputs and link those inputs to an existing profile set. The profile set contains two different sets of values for the profiled builder inputs. One set of values makes the application behave one way and the other set of values makes it behave another way. When you have finished, you will have two versions of the application each of which can be invoked by flipping a switch and re-running the model.
- Profile two Text builders.
- In the MyFirstPortlet model, find the Text builder call named header and open it by double-clicking it in the builder call list.
- There is a builder input named Text with a value of Tutorial Basics – News Portlet. Click
 .
.
- Associate this builder input with the profile set named TutorialBasics_MyFirstPortlet and the profile entry named Header.
As part of the Tutorials and Samples feature set, a profile set named TutorialBasics_MyFirstPortlet was installed. This profile set was preconfigured with two profiles:
- Default
- DidYouKnow
This profile set has also been preconfigured with several profile entries. In this section of the tutorial, you will associate these entries with various builder inputs. By switching back and forth between the two profiles WebSphere Portlet Factory will automatically generate two different versions of the application.
For the profile entry named Header, there are two values:
- Tutorial Basics – News Portlet
- Tutorial Basics – Interesting Facts
When the Default profile is applied to the model and the model is regenerated, the contents of the Text builder call is Tutorial Basics – News Portlet. When the DidYouKnow profile is applied, the contents of the Text builder call is Tutorial Basics – Interesting Facts.
By profiling several inputs from several builder calls in the same model and making several profiles in a profile set, a single model can produce several variations of the same application using the same code base. In this case, there are only two profiles, thus, there are only two possible versions of the application. If more profiles with different values are added to this profile set, more versions of the application can be generated automatically.
- Click OK when finished.
- Repeat the profiling process for the Text builder call named topline. Associate the Text input for this builder call with the profile entry named Topline found in the same profile set used above: TutorialBasics_MyFirstPortlet. Click OK when finished.
- Apply a profile and test the application.
- Before applying the DidYouKnow profile, run the model again to see what values appear in the header and topline sections of the application. At this moment, there should be no changes and the application should behave exactly as it did the last time you tested it.
- Close the browser to return to WebSphere Portlet Factory Designer, and look to the bottom section of the workspace. There should be a panel with tabs labeled Problems, Tasks, and Applied Profiles. If these tabs are not displayed, choose...
Window | Reset Perspective
- In the Applied Profiles tab, there is a drop-down list containing the names of all of the profiles in the TutorialBasics profile set. This profile set appears in this tab because there are builder inputs in this model associated with profile entries in that profile set. Choose DidYouKnow from the list and click the Apply button.
By choosing the DidYouKnow profile and applying it, WebSphere Portlet Factory initiates a process called regeneration. During regeneration, the model and the inputs supplied by the chosen profile are combined to create an XML representation of the DidYouKnow version of the application. This XML representation is then used by WebSphere Portlet Factory to generate a specific version of the application as a J2EE-compliant web application.
You can also examine the contents Application Tree. As you switch between the two profiles and click the Apply button, you can see the changes in the application. For example, if you expand the Application Tree to...
WebApp | Page | page1
To the right you will see a few of the <div> tags with their content replaced by static text, filenames, and JSP scriptlets and expressions.
- Either take a look at the Design tab or Run the model to see the changes. This time you should see the text values from the DidYouKnow profile instead of the Default profile.
- Profile-enable the content and appearance of the application.
- The TutorialBasics_MyFirstPortlet profile set contains profile entries for the HTML page to import and which style sheet to use for the colors and fonts. Use the table below as a guide to associate the specified builder inputs with existing profile entries. You select the builder inputs by double-clicking the builder name in the builder call list and then invoking the Profile Input dialog box for the specific input.
Builder Call Type - Name Builder Call Input Associated Profile Entry Name Imported Page - ContentPage Page to Import Content Style Sheet - appearance CSS URL or File Location Appearance_Styles - Using the Applied Profiles tab at the bottom of the workspace, apply the DidYouKnow profile and run the model. When you view the application in a web browser or the Design tab, you will see a dramatic difference in the content and the appearance of the application. Pay particular attention to the following items:
- The style sheet changed the color scheme, fonts, and placement of the two text expressions.
- The content of the two text labels is Interesting Facts and Did You Know? rather than News Portlet and News Article of the Day.
- The content of the article is very different than the article that appears when using the Default profile.
- The TutorialBasics_MyFirstPortlet profile set contains profile entries for the HTML page to import and which style sheet to use for the colors and fonts. Use the table below as a guide to associate the specified builder inputs with existing profile entries. You select the builder inputs by double-clicking the builder name in the builder call list and then invoking the Profile Input dialog box for the specific input.
- Add an Image builder and profile it for use with only the DidYouKnow profile.
In this step, you will add an Image builder and use profiling to determine when this builder should be enabled or disabled. Disabled builders do not make any contributions to the XML representation and behave as if they do not exist at all. Associating a builder's enable/disable value to a profile entry allows builders to be added or deleted automatically by regeneration based solely upon which profile is applied at regeneration time.
- In WebSphere Portlet Factory Designer, add an Image builder to the model. Use the table below to assign its inputs:
Input Value Location Technique On Named Tag Page page1 Tag image Image Source Click  to the right of this field to bring up a reference chooser. Click the Choose File tab and choose
/sample/tutorials/images/tutorial_basics_image.jpg
- Inside the builder call editor, look to the top of the Image builder call and expand the section called Properties by clicking on it. You will see an input named Enable Builder. Click to associate this builder input with the profile entry named Image_OnOff and click OK to close the Profile Input dialog box.
- In WebSphere Portlet Factory Designer, add an Image builder to the model. Use the table below to assign its inputs:
- Test both profiles again to ensure everything is working.
- Using the Applied Profiles tab, apply the Default profile and run the application. In the web browser, you should see the default version of the application. This version should not display the image file.
- Now apply the DidYouKnow profile and run the application again. This time you should see the image file.
Turning the Application into a Portlet
To this point, you have created J2EE applications but you have not created any portlets. In this section, you will enable the model to run within the WebSphere Portal framework as a portlet using the Portlet Adapter builder.
What is a Portlet Adapter builder?
A Portlet Adapter builder configures a model automatically so that it can function as a portlet in WebSphere Portal. Useful information for a portlet such as a title, a description, and a portlet help file name is entered in a builder call of this type. The title and description are visible to portal administrators when managing portlets and applying them to portal pages. Help files are accessed by users via the ? icon in the portlet.
When a Portlet Adapter builder call is added to a model containing profile-enabled inputs, those profiles can be exposed to the portlet's Configure and Edit pages. When exposed to the Configure page, the portlet administrator can choose how the portlet should behave by choosing from a list of profile names or by providing values for the enabled inputs. When exposed to the Edit page, the user makes the choices in order to personalize their experience when using the portlet.
The default user interfaces (UIs) for the Configure and Edit pages are fairly plain. Richer UIs for these pages can be created separately in individual HTML pages or WebSphere Portlet Factory models. These pages and models can be referred to in a Portlet Adapter builder call and the builder will automatically add them to the portlet.
You will add a Portlet Adapter builder call to the MyFirstPortlet model and tell it to enable the Configure page to use the profiles in the TutorialBasics_MyFirstPortlet profile set. You will test your work by adding the portlet to a portal page and using the Configure page to control the portlet's behavior.
- Enable the model to function as a portlet.
- Open the MyFirstPortlet model.
- Click to add a new builder call to the model. Choose the category All if not yet chosen.
- Choose Portlet Adapter builder and click OK.
- Use the following table for the details about what values to provide for the various inputs to this builder call. Click OK when you are finished entering these values.
Input Name Value Name tutorial_basics Portlet Title Tutorial Basics – Portlet with Configure options Portlet Description Simple example to demonstrate core concepts Profile Sets TutorialBasics_MyFirstPortlet Choose Show profile names in Configure - Click OK.
- Save the model.
- Right-click the project's name and choose...
Portal Server WAR | Build Portlet WAR
Why Rebuild the Portlet WAR?
A portlet Web Application Archive or WAR was created when you created the project in an earlier tutorial. As changes are made to the models and profile sets in the project, these changes get redeployed on the portal server automatically.
Some changes to a model, however, require that the portlet WAR be rebuilt. Adding a Portlet Adapter builder to a model is one of those changes. In order for the portal framework to be aware of the new portlet, the portlet WAR on the portal server must be replaced with a new one. Rebuilding the existing portlet WAR in WebSphere Portlet Factory Designer also automatically deploys the new WAR replacing the old one.
- Create the WebSphere Portlet Factory work pages
To help you complete this tutorial and support other tutorials you may do later, in this step you will create a small hierarchy of pages under...
My Portal | My Work page
...in the portal
- Log into WebSphere Portal as an administrator.
- Click...
Administration | Portal User interface | Manage Pages Context Root | My Work | New Page
Create a page called WebSphere Portlet Factory. Accept the default values and click OK. The WebSphere Portlet Factory page should now be in the list.
- Click the link to the WebSphere Portlet Factory page. Create a new page called Tutorials. Click OK to save the page.
- Create the Basics page and add MyFirstPortlet.
- Click the link to the Tutorials page. Create a new page called Basics. Click OK to save the page. You should now be able to add a portlet to the page.
- Click Open Portlet Palette to open the Portlet Palette.
- Use the search feature to find your portlet in the list.
- Click on the portlet and continue to hold the mouse key down.
- Drag the portlet to a destination on the page. A horizontal bar appears as you drag the portlet over areas on the page available for deployment. When you drag the portlet within close proximity of a permissible drop zone, the color of the horizontal bar changes from a muted to a more saturated tone.
- Drop the portlet to the page as appropriate by releasing the mouse key to add the portlet where you view a horizontal bar.
- Click Close Portlet Palette to close the Portlet Palette.
You should now see your portlet. It should look like the default version of the application.
- Configure the Portlet.
In its current state, the portlet shows the News Article of the Day. By choosing a different profile, however, the portlet administrator can invoke a different version of the application. If this portlet were copied to another page, one portlet could have one configuration and the other portlet could have another. Here you will simply change which profile is selected in the Configuration page to get a sense of how configuration works.
- In WebSphere Portal 6.0, click on the triangle in the upper right and choose Configrure.
- You should be able to choose the DidYouKnow profile from the list. Choose that profile and click OK.
- You should now see the DidYouKnow version of the application.
Parent topic: Learning about WebSphere Portlet Factory