Creating a Java project
Java projects are not defined in the Java SE specification, they are used as the lowest unit to organize the workspace and contain all resources needed for a Java application as images, source, class, and properties files.
With Application Developer started, we recommend that you switch to the Java perspective as described in Switching perspectives.
Here we create a new Java project from the New Java Project wizard. Launch the New Java Project wizard using the New Project dialog (Figure | -12). Select File Ć New Ć Project in the workbench and then select Java Project or Java Ć Java Project and click Next.

Figure 8-12 New Project dialog
Another way to launch the New Java Project wizard is directly from the workbench by selecting File Ć New Ć Java Project or clicking the New Java Project icon  in the toolbar.
| In the New Java Project - Create a Java Project dialog, enter the project name and accept the default settings for each of the other fields (Figure | -13, left side): |

|
|
|
|
|
|
|
|
|
| In the New Java Project - Java Settings dialog, accept the default settings for each of the tabs by just clicking Finish (Figure | -13, right). This dialog allows you to change the build path settings for a Java project. The build class path is a list of paths visible to the compiler when building the project. |
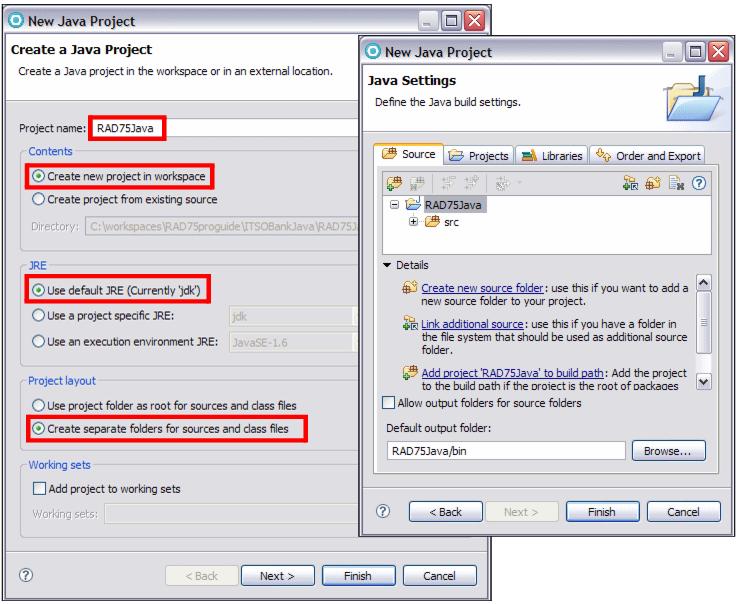
Figure 8-13 New Java Project: Create a Java project and Java Settings
| Click Finish. |
The New Java Project wizard dialogs options are described in Table | -8 and Table | -9, explaining the dialog's capabilities.
Table 8-8 New Java Project - Create a Java Project options
| Option | Description |
|---|---|
| Project name | Type a name for the new project. |
| Contents | Create new project in workspace: Create a new project with the specified name in the workspace. Create project from existing source: Retrieves an existing Java project, setting up the build path automatically. Click Browse for a location of an existing Java project. |
| JRE | Use default JRE: Uses the workspace default JRE and compiler compliance. Click Configure default to configure JREs. Use project specific JRE: Specify the JRE to be used for the new Java project and also set the matching JRE compiler compliance. Use an execution environment JRE: Specify the execution environment and compiler to be used for the new Java project. |
| Project layout | Use project folder as root for sources and class files: The project folder is used both as source folder and as output folder for class files. Create separate folders for sources and class files: Creates a source folder for Java source files and an output folder which holds the class files of the project. |
| Working sets | Add project to working sets: The new project will be added to the working sets shown in Working Sets drop down field. The drop-down field shows a list of previous selected working sets. Click Select to select working sets to which to add the new project. |
Table 8-9 New Java Project - Java Settings options
| Tab | Description |
|---|---|
| Source | Allows you to add and remove source folders from the Java project. The compiler translates all .java files found in the source folders to .class files and stores them to the output folder. The output folder is defined per project except if a source folder specifies an own output folder. Each source folder can define an exclusion filter to specify which resources inside the folder are not visible to the compiler. |
| Projects | Allows to add another project within the workspace to the build path for this new project (project dependencies). |
| Libraries | Allows you to add libraries to the build path. There are five options: Add JARs-Allows you to navigate the workspace hierarchy and select JAR files to add to the build path. Add External JARs-Allows you to navigate the file system (outside the workspace) and select JAR files to add to the build path. Add Variable-Allows you to add classpath variables to the build path. Classpath variables are an indirection to JARs with the benefit of avoiding local file system paths in a classpath. This is needed when projects are shared in a team. Variables can be created and edited in the Classpath Variable preference page. Select Window Ć Preferences Ć Java Ć Build Path Ć Classpath Variables. Add Library-Allows you to add predefined libraries like JUnit or Standard Widget Toolkit (SWT). Add Class Folder-Allows you to navigate the workspace hierarchy and select a class folder for the build path. Add External Class Folder-Allows you to navigate the file system (outside the workspace) and select a class folder for the build path. Migrate Jar-Allows you to migrate a jar on the build path to a newer version. If the newer version contains refactoring scripts the refactoring stored in the script will be executed. |
| Order and Export | This tab allows you to change the build path order. You specify the search order of the items in the build path. Select an entry in the list if you want to export it. Exported entries are visible to other projects that require the new Java project being created. |
|
ibm.com/redbooks |