XML encryption and digital signature - Web services security with WebSphere Application Server V6 -- Part 3
Determining the relevant security standards to be used for a given set of business requirements mandates careful analysis. It is best to develop a process that can serve as a guide for implementing Web services security for a given Web service. The focus of this article is on XML Encryption and XML Digital Signature, and one such process relevant to these standards is as follows: (As used here, "data" might refer to input data to a Web service, the response from a Web service, or both.)
- Determine data disclosure risk. This risk may be high/low or none (public information).
- Determine data alteration risk. This risk may be high/low or none.
- Determine network type. For example, public internet, intranet, extranet.
- Apply further rules based on the network type and applicable risks above to determine the standard to be used. For example, for confidential information with disclosure risk = low and data alteration risk = low, you may opt to use no security if used within an intranet. The same information, if sent over the public internet, may require the use of XML Digital Signature and XML Encryption. The set of rules you come up with will depend on the specifics of your environment.
One should keep in mind that encryption and digital signature are both computation intensive operations that can lead to performance penalties. They also add additional management and administrative overhead. Therefore, they should be used after due consideration has been given to their applicability. Having a process like the one above should be a prerequisite before you actually implement security for your Web services.
The rest of the article discusses developing Web services with XML Digital Signature and XML Encryption using IBM Rational® Application Developer and deployed on WebSphere Application Server v6. In what follows:
- Alice represents the Web service requestor and Bob represents the Web provider.
- You will create our own self-signed X509 certificates and key stores.
- You will configure digital signatures for Web service clients and for the service.
- You will use the TCP/IP Monitor to examine the security information embedded within SOAP messages as appears on the wire.
This article describes the configuration of encryption and digital signatures in the context of Web services and XML, and assumes that you are familiar with these concepts.
Use XML encryption to encrypt a SOAP message sent to a Web service
This section describes the steps for encrypting a SOAP message sent to the a Web service using XML encryption.
Create key stores for encryption and digital signature
You can use the keytool to create key stores. The keytool is available in the Download section. The key store used to encrypt SOAP request messages is senderkeys.jks, and we'll use Bob's public key to encrypt. The key store used to decrypt SOAP response messages is rec-keys.jks, which contains Bob's private key.
Extract the ZIP file to your C drive.
Create the following key stores used in the encryption part of this article. You can either run the file createKeysForEncryption.bat to create these key stores, or use the files that are included in the download file, if you prefer not to create our own files.
- Create a keystore to store Alice's private key:
-
keytool -genkey -v -alias alice -keypass senderkeys -ksenderkeys.jks -storepass
senderkeys -storetype jks -dname "cn=alice,o=IBM,c=US" -keyalg "RSA"
- Export Alice's public keys in a file called alice.cert:
-
keytool -export -v -alias alice -file alice.cert -rfc -keystore senderkeys.jks
-storepass senderkeys -storetype jks
- Create reckeys.jks key store to store Bob's keys:
-
keytool -genkey -v -alias bob -keypass reckeys -keystore reckeys.jks -storepass
reckeys -storetype jks -dname "cn=bob,o=IBM,c=US" -keyalg "RSA"
- Export Bob's public keys in a file called bob.cert:
-
keytool -export -v -alias bob -file bob.cert -rfc -keystore reckeys.jks -storepass
reckeys -storetype jks
- Import Bob's public key into Alice's key store, viz. senderkeys.jks:
-
keytool -import -v -noprompt -alias bob -file bob.cert -keystore senderkeys.jks
-storepass senderkeys -storetype jks
- Import Alice's public key into Bob's key store viz. reckeys.jks:
-
keytool -import -v -noprompt -alias alice -file alice.cert -keystore reckeys.jks
-storepass reckeys -storetype jks
- Next, create the key stores used for digital signatures. You can use the same certificates that you have used for encryption. If you use the same certificates, you can skip steps 7-10. You can run the file C:\WSS-ENCAndDigSig\DigSig\createKeysForDigitalSig.bat to create the keys below:
- Create a keystore called clientkeys.jks to store client's private key:
-
keytool -genkey -v -alias myclient -keypass password -keystore clientkeys.jks
-storepass password -storetype jks -dname "cn=myclient,o=IBM,c=US" -keyalg "RSA"
- Export the cient's public keys in a file called myclient.cert:
-
keytool -export -v -alias myclient -file myclient.cert -keystore clientkeys.jks
-storepass password -storetype jks -rfc
- Create myservice.jks key store to store service's keys:
-
keytool -genkey -v -alias myservice -keypass password -keystore myservice.jks
-storepass password -storetype jks -dname "cn=myservice,o=ibm, c=us" -keyalg "RSA"
- Export service's public keys in a file called myservice.cert:
-
keytool -export -v -alias myservice -file myservice.cert -keystore myservice.jks
-storepass password -storetype jks -rfc
- Create a Trust Store for service:
-
keytool -import -v -noprompt -alias myclient -file myclient.cert -keystore
servertrust.jks -storepass servertrust -storetype jks
Import the sample applications
Create a new workspace and import the two EAR files, ConverterEAR.ear and ConvertClientEAR.ear from C:\WSS-ENCAndDigSig\WSSENC\begin to the workspace. Refer to Import and examine the sample Web service enterprise application in Part 2 for information on importing applications.
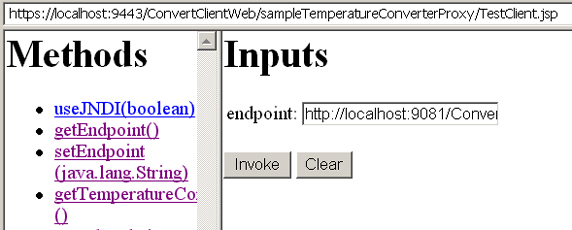
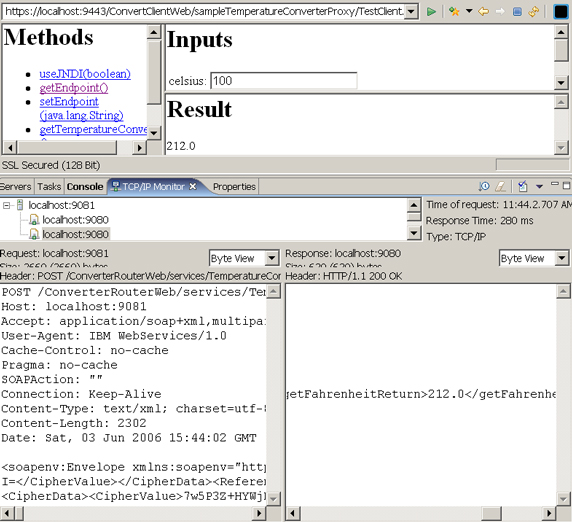
- Start the server. After the server has started, add the applications to the server, and test using the following URL:
https: //localhost:9443/ConvertClientWeb/sampleTemperatureConverterProxy/TestClient.jsp
Click getEndpoint and you should see:
http://localhost:9081/ConverterRouterWeb/services/TemperatureConverter
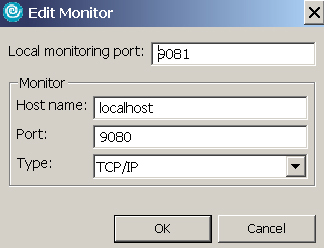
- Start the TCP/IP Monitor on port 9081. Refer to Test the Web services using TCP/IP Monitor in Part 2 for how to configure a TCP/IP Monitor.
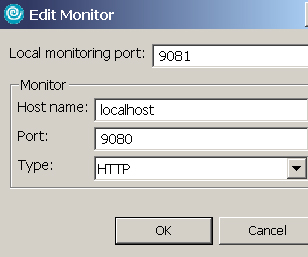
- Click Start to start the TCP/IP Monitor with Rational Application Developer.
- Go the following Web page: https:
//localhost:9443/ConvertClientWeb/sampleTemperatureConverterProxy/TestClient.jsp.
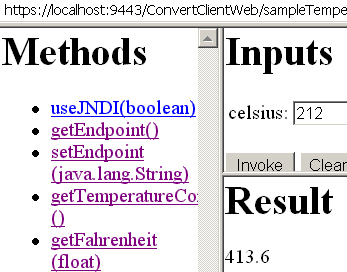
- Verify the SOAP request is sent to the TCP/IP Monitor port 9081. Click getFahrenheit on the left.
Enter Celsius 212, and click Invoke. You should get a result of 413.6.
Look at the SOAP request:
<wsse:Security xmlns:wsse="http://docs.oasis-open.org/wss/2004/01/oasis-200401-
	wss-wssecurity-secext-1.0.xsd" soapenv:mustUnderstand="1">
<wsse:UsernameToken>
<wsse:Username>bob</wsse:Username>
<wsse:Password Type="http://docs.oasis-open.org/wss/2004/01/oasis-200401-
	wss-username-token-profile-1.0#PasswordText">bob1</wsse:Password>
</wsse:UsernameToken>
</wsse:Security></soapenv:Header><soapenv:Body><p153:getFahrenheit
	xmlns:p153="http://converter.com"><celsius>212.0</celsius>
</p153:getFahrenheit></soapenv:Body></soapenv:Envelope>
The UsernameToken is in clear text. In the next steps, you'll encrypt the UsernameToken and the message body.
Configure the client to encrypt SOAP messages
First, let's encrypt the message body and UsernameToken of the SOAP request using the deployment descriptor of the Web service client. Since we have a Web client, the deployment descriptor that we'll use is web.xml. From the J2EE perspective of Rational Application Developer, do the following:
- Click Dynamic Web Projects => ConvertClientWeb => Web Content => WEB-INF => web.xml.
- Right-click web.xml and click Open With => Deployment Descriptor Editor.
- Click WS-Extension and expand Request Generator Configuration => Confidentiality. Confidentiality refers to encryption, while integrity refers to digital signatures.
- Click Add.
- In the Confidentiality dialog, enter the following information, as shown in Figure 4:
- In the Confidentiality Name field, enter request_confidentiality.
- In the Order field, enter 1. This value specifies the order of message encryption or signature when there is more than one encryption or signature applied to a message.
- Click Add to add a message part. Change the message parts keyword to usernametoken. This action encrypts the UsernameToken.
- Click Add to add another message part to encrypt, and specify bodycontent for the keyword.
- Click OK.

- Click WS-Binding, and expand Security Request Generator Binding Configuration. Expand Key Locators, then click Add.
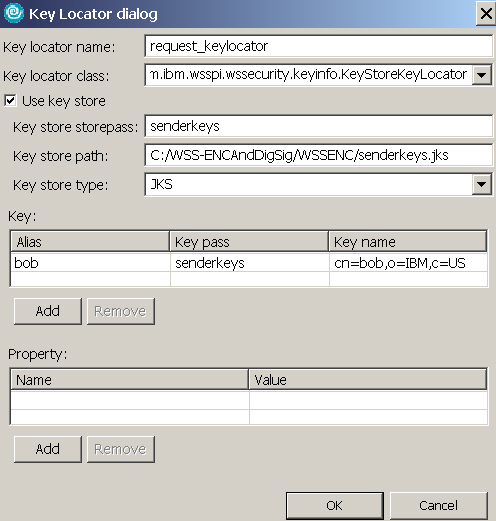
- In the Key Locator dialog, enter the following, as shown in Figure 5:
- In the Key locator name field, enter request_keylocator.
- Check Use key store.
- In the Key store storepass field, enter senderkeys.
- In the Key store path field, enter C:/WSS-ENCAndDigSig/WSSENC/senderkeys.jks or wherever you have the file senderkeys.jks.
- In the Key store type field, select JKS (Java™ Key Store).
- In the Key field, enter Alias: bob, Key pass: keypass, and Key name: cn=Bob,o=ibm,c=us.
- Click OK. Alice is the sender and Bob is the receiver. The key used to encrypt the request message is Bob's public key. Bob will use his private key to decrypt the message.
- Expand Key Information and click Add to specify the information to generate the key used to encrypt the message parts. Enter the following information:
- In the Key name field, enter request_keyinfo.
- In the Key type field, select KEYID. This populates the class to com.ibm.ws.webservices.wssecurity.keyinfo.KeyIdContentGenerator.
- Check Use key locator.
- Select request_keylocator for KeyLocator, and bob's DN for Key name, as shown in Figure 6:
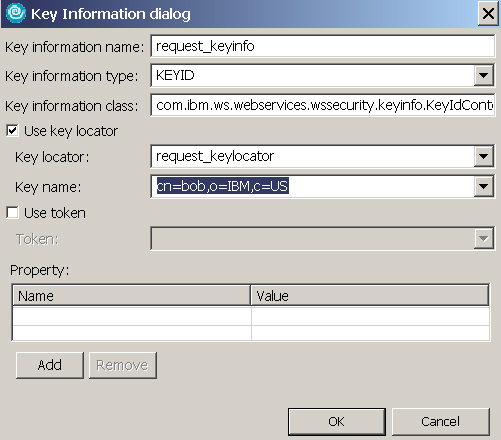
- Click OK. Note that the Key information type field specifies how to reference a security token in a SOAP message. Following is the complete list of key information types:
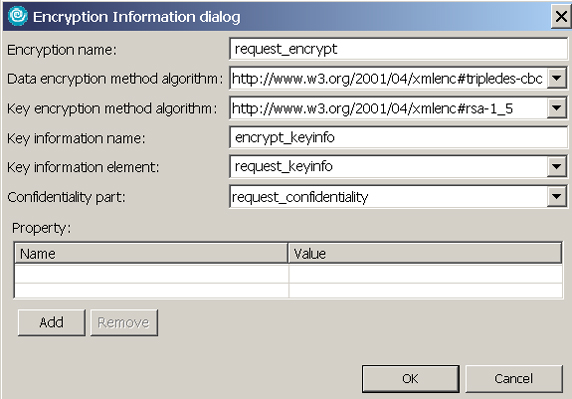
Key information type Explanation KEYID The security token is referenced using a keyword that uniquely identifies the token. KEYNAME The security token is referenced using a name that can be used to extract a key from a key locator. STRREF (Security Token reference) The security token is referenced directly using URIs. Embedded token EMB The security token reference is embedded in the <keyinfo> element. It usually exists outside of this element. X509ISSUER (X509 issuer name and issuer serial) The security token is referenced by an issuer and serial number of an X.509 certificate. - Expand Encryption Information and click Add. In the Encryption Information dialog, enter the following information (Figure 7).
- In the Name field, enter request_encrypt.
- Leave the defaults for Data encryption method algorithm and Key encryption method algorithm. These algorithms are applied to encrypt the message. The former is for the data, while the latter is for the key contained in the message.
- In the Key information name field, enter encrypt_keyinfo.
- In the Key information element field, select request_keyinfo. This is the key used to encrypt.
- In the Confidentiality part field, select request_confidentiality. This is the part of the message that will be encrypted.
- Click OK.
- Save the web deployment descriptor, and close the file.
The following table summarizes the encryption configurations on the client:
| WS-Extension tab on web.xml | WS-Binding tab on web.xml |
|---|---|
| WS Extension: Request Generator Configuration => Confidentiality => Add a part called request_confidentiality containing the message parts to be encrypted. These contain the UsernameToken and message body. | Add Key locator called request_keylocator.
In request_keylocator add senderkeys.jks and specify Bob's public key as the key used to encrypt request messages. Add Key Information called request_keyinfo with the Key Type as KEYID and map it to request_keylocator. Add Encryption Information where you specify the encryption information and the algorithm used to encrypt the data and the key. |
| Edits go into the file: WEB-INF/ibm-webservicesclient-ext.xmi | Edits go into the file: WEB-INF/ibm-webservicesclient-bnd.xmi |
You have now completed the client configurations.
Configure the service to decrypt SOAP messages
In this section, you'll configure the ConverterEJB project to decrypt the SOAP messages sent by the client, using the Web services deployment descriptor (webservices.xml).
- Ensure that you've imported ConverterEAR.ear and you are in the J2EE perspective. Navigate to EJB Projects => ConverterEJB => ejbModule > META-INF => webservices.xml . Right-click webservices.xml and select Open With => Web Services Editor.
- Click the Extensions tab.
- Expand Request Consumer Service Configuration Details, then expand Required Confidentiality and click Add.
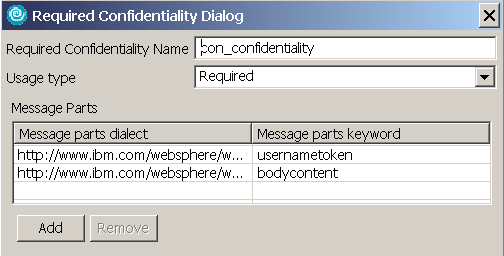
- Enter the following information in the Required Confidentiality dialog as shown in Figure 8:
- In the Required Confidentiality Name field, enter con_confidentiality.
- In the Usage Type, select Required.
- In the Message Parts section, add usernametoken and bodycontent message parts.
- Click OK.
- Click the Binding Configurations tab and expand Request Consumer Binding Configuration Details.
- You need to specify a token consumer to retrieve the key used to encrypt the message. Expand Token Consumer. You'll see req_username_token_consumer. This is for the username token. You need to add another token consumer. To do that, click Add.
- In the Token Consumer dialog, enter the following information as shown in Figure 9:
- In the Token consumer name field, enter con_encrypt_tcon.
- In the Token consumer class field, select com.ibm.wsspi.wssecurity.token.X509TokenConsumer. This class retrieves the binary security token, decodes the base64 encryption if applied, and invokes JAAS to validate the X509 token.
- Check Use value type.
- Select X509 certificate token for the Value type.
- Leave the default for Local Name.
- Check Use jaas.config, and enter system.wssecurity.X509BST as the jaas.config.name.
- Check Use certificate path settings, and select Trust any certificate.
- Click OK.

- Now you'll follow steps similar to what you did on the client side to add a key locator to specify a key store, add key information, and add decryption information.
Expand Request Consumer Binding Configurations => Key Locators and click Add. In the key Locator dialog, enter the following information as shown in Figure 10:
- In the Key locator name field, entercon_encrypt_keylocator.
- Class name is automatically populated.
- Check Use key store.
- In the Key store storepass field, enter reckeys. This is the password of reckeys.jceks.
- In the Key Store path field, enter C:/WSS-ENCAndDigSig/WSSENC/reckeys.jks.
- In the Key store type, enter JKS.
- In the Key section, for Alias, enter Bob, for Key pass, enter reckeys (password of Bob's keystore), and for Key name, enter cn=Bob,o=ibm,c=us. The key used to decrypt the message is Bob's private key (remember that Alice is the sender and Bob is the receiver).
- Click OK.

- Expand Key Information and click Add. In the Key Information dialog, enter the following, as shown in Figure 11:
- In the Key information name field, enter con_encrypt_keyinfo.
- In the Key information type field, select KEYID.
- In the Key information class field, enter com.ibm.ws.webservices.wssecurity.keyinfo.KeyIdContentConsumer should get populated when you select KEYID
- Check Use key locator, then select con_encrypt_keylocator for Key locator and cn=bob,o=IBM,c=US for Key name.
- Check Use token, and select con_encrypt_tcon for token.
- Click OK.

- Expand Encryption Information and click Add. Enter the following as shown in Figure 12:
- In the Encryption name field, enter con_decrypt.
- Leave the defaults for Data encryption method algorithm and Key encryption method algorithm.
- In the Encryption key information section, click Add. For Key information name, enter con_encrypt_key. Select con_encrypt_keyinfo for Key information element.
- Select con_confidentiality for RequiredConfidentiality part.
- Click OK.

- Save webservices.xml.
| Extension tab on webservices.xml | Binding configurations tab on webservices.xml |
|---|---|
| Add a confidentiality part within Request Consumer Service Configuration Details => Required Confidentiality => add a required confidentiality part | Add Token Consumer
Add Key_locator Add Key Information Add Encryption Information |
| Edits go into the file: META-INF/ibm-webservices-ext.xmi | Edits go into the file: META-INF/ibm-webservices-bnd.xmi |
Congratulations for coming this far! You have now completed the service configurations and are ready to test the encryption.
Test the Web service for encryption with TCP/IP Monitor
Now you're ready to test the Web service using TCP/IP Monitor. Refer to the section Test the Web services using TCP/IP Monitor in Part 2 of this series for details. Add ConverterEAR and ConvertClientEAR to the Application Server. You should have global security enabled in the Application Server V6 test environment.
- Start the TCP/IP Monitor created earlier on port 9081 to forward traffic to port 9080. Verify the TCP/IP Monitor is started correctly. Click OK to close the Preferences window. The TCP/IP Monitor displays only when it gets traffic.
- Navigate to Dynamic Web Projects => ConvertClientWeb => Java Resources => JavaSource => com.converter.servlets => ManagedClientServlet.java. Open ManagedClientServlet.java and look at the doPost method.
- Uncomment the following line:
TemperatureConverterProxy convProxy = new TemperatureConverterProxy();
convProxy.setEndpoint("http://localhost:9081/ConverterRouterWeb/services/
TemperatureConverter");

 ((javax.xml.rpc.Stub)converterStub)._setProperty("javax.xml.rpc.service.endpoint.
 address",
"http://localhost:9081/ConverterRouterWeb/services/TemperatureConverter");
and ensure that the following line is commented:
// "https:
//localhost:1234/ConverterRouterWeb/services/TemperatureConverter");
- Click Save and close ManagedClientServlet.java.
- Navigate to Dynamic Web Projects => ConvertClientWeb => WebContent => ConverterManagedClientForm.jsp. Right-click ConverterManagedClientForm.jsp and select Run => Run on Server. Or, enter the following URL in a browser: https: //localhost:9443/ConvertClientWeb/ConverterManagedClientForm.jsp.
- Enter a value for Temperature, such as 100 and click Submit.
You should see the following request message in the TCP/IP Monitor.
<soapenv:Envelope xmlns:soapenc="http://schemas.xmlsoap.org/soap/encoding/" ..>
<soapenv:Header>
<wsse:Security ... >
<EncryptedKey xmlns="http://www.w3.org/2001/04/xmlenc#">
<EncryptionMethod Algorithm="http://www.w3.org/2001/04/xmlenc#rsa-1_5"/>
<ds:KeyInfo xmlns:ds="http://www.w3.org/2000/09/xmldsig#">

<!â128;”The key identifier in bold remains the same because it is the reference to the key - - >

<wsse:SecurityTokenReference>
<wsse:KeyIdentifier ValueType="http://docs.oasis-open.org/wss/2004/01/oasis-200401-
wss-x509-token-profile-1.0
#X509SubjectKeyIdentifier">/62wXObED7z6c1yX7QkvN1thQdY
=</wsse:KeyIdentifier>
</wsse:SecurityTokenReference>

</ds:KeyInfo>
<CipherData>
<CipherValue>ESSm056CWUXdep+tFubbIB45Aq6AC0zdNDwPmbwg9pj8+
FD0viyzsgTYNDuFBT+Xhz4V7WAPezhVAnxdX/K/QLnOLft8+
vxwRzD6iBwsgSb7ikZU1VQ4zX/egx5dVV29bz5HkK6P3NL6hpm0ZpF0cgA0qAKKuUStRoI6lyCnbr2M=
</CipherValue>
</CipherData>
<ReferenceList>

<DataReference URI="#wssecurity_encryption_id_0"/>
<DataReference URI="#wssecurity_encryption_id_1"/>
</ReferenceList>
</EncryptedKey>

<!-- wssecurity_encryption_id_0 is a reference to the encrypted data within the SOAP Header - - >

<EncryptedData xmlns="http://www.w3.org/2001/04/xmlenc#"
Id="wssecurity_encryption_id_0"
Type="http://www.w3.org/2001/04/xmlenc#Element">

<!- -Note that the encryption algorithm is tripledes, which is what we selected by default - - >

<EncryptionMethod Algorithm="http://www.w3.org/2001/04/xmlenc#tripledes-cbc"/>
<CipherData>
	<CipherValue>J/DAN1e6reSyLv9tiHLadbmuKDZEgihP5DoZD6MgFnBQzDemWe
	Wvh6GB5UrJ9oubbwKQ+2fVC8EkOIs1fs/C1xOA669xeG1X7bgA9HzJKjD9uFSw
	+N+OyKssVrhbr4o0t3gN5zy6zEhqeGJfX4nA0Jfo2lvh/Jfh3t3J1RT0M4ZeEgJjMC5
	g8fklWTEc5TuM5aCsDvVbDk/cCBl5/M2alWSrIaCDFCI2Kh0MxB9YAUv+nIQ39
	dk4Kaq3zmInACqs1WT01UXhep5ZdoaUs60zrv4Tnhgq9FYjCajtMsRCN7Y=
	</CipherValue>
</CipherData>
</EncryptedData>
</wsse:Security>
</soapenv:Header>
<soapenv:Body>

<!-- wssecurity_encryption_id_1 is a reference to the encrypted data within the SOAP Body - - >

<EncryptedData xmlns="http://www.w3.org/2001/04/xmlenc#"
Id="wssecurity_encryption_id_1" Type="http://www.w3.org/2001/04/xmlenc#Content">

<!- -Note that the encryption algorithm is tripledes, which is what we selected by default - - >

<EncryptionMethod Algorithm="http://www.w3.org/2001/04/xmlenc#tripledes-cbc"/>

<! - - CipherData is the encrypted data - - >

<CipherData>
	<CipherValue>he5C/zxBviDiq7YAvvK2KxbKZb528Yp678woGw/QsvlwLtMEW8
	\k4fZJV0vsKapKhi+T7+I1XcDslQkVV9zUppgW7S3YPI0pc6otYDkKFVYsBnv7JdnLu9/
	Ci2xpuBbxLte/frku/aJnCi2XZOp4MWw==</CipherValue>
</CipherData>
</EncryptedData>
</soapenv:Body>
</soapenv:Envelope>
Notice that the <usernametoken> elements previously sent are now encrypted by replacing these elements and their children with an <EncryptedData> element. The <EncryptedKey> element that is highlighted is used to encrypt <usernametoken> elements.
Use digital signature to sign the SOAP message sent to the Web service
Now that you've enabled encryption to an XML message, you need to consider the scenario where a message can be modified in transit. WS-Security describes enhancements to the SOAP message to provide integrity. In order to ensure that SOAP messages are not modified in transit, the message is signed by the sender and the receiver verifies the signature using XML signature specification. WS-Security builds on XML signatures and describes the syntax for attaching multiple signatures and signature formats to different (even overlapping) parts of the message.
The following section describes the steps to digitally sign the SOAP request:
- Start the TCP/IP Monitor as shown:
- Right-click TestClient.jsp and select Run => Run on Server.
- Click getEndpoint and you'll see 9081. The TCP listener forwards from 9081 to the Application Server Web container port 9080.

- Enter 100 for Inputs and click Invoke.
Now we'll add digital signatures by doing the following:
- Switch to the client deployment descriptor and open the WS-Extensions page. Since we have a Web client, navigate to Dynamic Web Projects => ConvertClientWeb => WebContent => WEB-INF => web.xml.
- Right-click web.xml and click Open With => Deployment Descriptor Editor.
- Click the WS-Extensions tab and expand Request Generator Configuration.
- Expand Integrity and click Add.
- In the Integrity dialog, enter req_integrity for Integrity Name. Change the order to 2, and click OK, as shown in Figure 16.

- Switch to the WS-Bindings page. Under Security Request Generator Binding Configuration, expand Token Generator and click Add. In the Token Generator dialog, enter the information shown in Figure 17. Note that the key name is cn=myclient,o=IBM,c=US. Click OK.

The Token Generator is used to insert a security token into the message for signing. The Token Generator invokes the callback handler to create an X509 token from the X509 certificate specified in the key store. It then encodes the token using base64 format and inserts the XML representation into the SOAP message. - Add a key locator for the signing key myclient. Expand the Key Locator section within Security Request Generator Binding Information. Click Add to create a new key locator.
- In the Key Locator dialog, enter the information shown in Figure 18, and click OK.
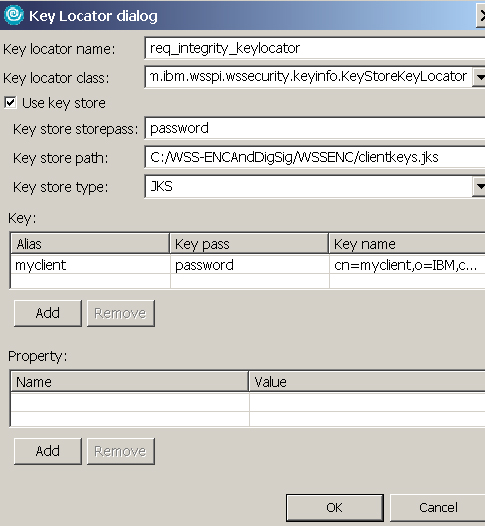
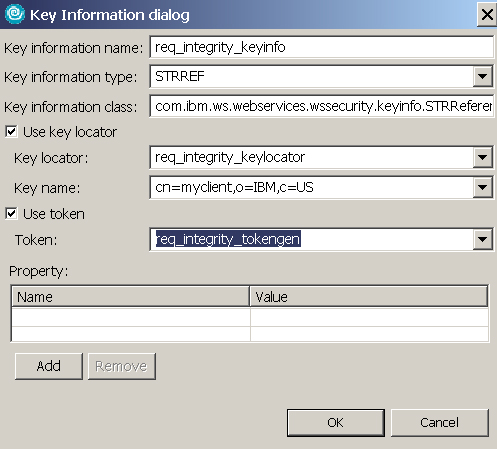
This key locator is used to retrieve certificates used to sign/encrypt SOAP messages. The Web service client signs every outgoing SOAP request message with the myclient certificate. - In the Key information dialog, specify the information needed to generate a key that is used to sign the SOAP message, as shown in Figure 19, then click OK.
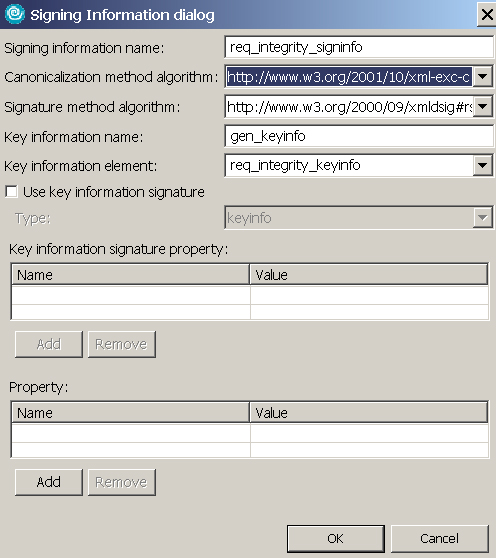
- Specify the key and algorithm used to sign the SOAP message. Expand the Signing Information section and click Add. In the Signing Information dialog, enter the information as shown in Figure 20, and click OK. (Select the first entry in the drop-down menu for Canonicalization method algorithm).
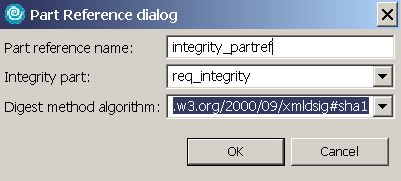
- Expand Part References and click Add. In the Part Reference dialog, enter the information as shown in Figure 21, and click OK:
- Expand Transform and click Add. In the Transform dialog, enter the information as shown in Figure 22, and click OK. This specifies the transform algorithm to apply to the integrity parts.

- Save the Web deployment descriptor. You've now completed the configurations required on the Web service client.
- Next, you'll configure the converter Web service deployment descriptor to validate the signature in the SOAP message sent by the client. Switch to the Web service deployment descriptor by navigating to EJB Projects => ConverterEJB => ejbModule => META-INF => webservices.xml . Right-click webservices.xml and select Open With => Web Services Editor.
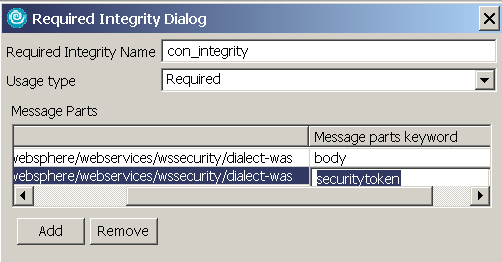
- Click Extensions. Expand Request Consumer Service Configuration Details and then expand Required Integrity and click Add.
- In the Integrity dialog, specify that both the body and securitytoken need to be signed, and click OK, as shown in Figure 23:
- Click Binding Configurations. Expand Request Consumer Binding Configuration Details. Click and expand Trust Anchor and click Add.
- In the Trust Anchor dialog, point to the keystore that holds your trusted signer certificates as shown in Figure 24, and click OK. More sophisticated PKI installations may also require a certificate store list that contains certificates required to process certificate chains.

- Add a Token Consumer to validate the X509Token that is passed in the request message. Expand Token Consumer and click Add.
- Enter the information as shown in Figure 25, then click OK:
- In the Token consumer name field, etner con_sign_tokenconsumer.
- In the Token consumer class field, select com.ibm.wsspi.wssecurity.X509TokenConsumer.
- Check Use value type.
- In the Value type field, select X509 certificate token.
- The Local name field, gets populated automatically.
- Check Use jaas.config.
- In the Jaas.config name field, enter system.wssecurity.X509BST.
- Check Use certificate path settings.
- Select Certificate path reference.
- In the Trust anchor reference field, select DigSigTrustAnchor.

Note: The JAAS configuration name that you specify must be for the security token specified for this token consumer. Following is a list of the JAAS configuration names for the different security tokens specified by the value type:
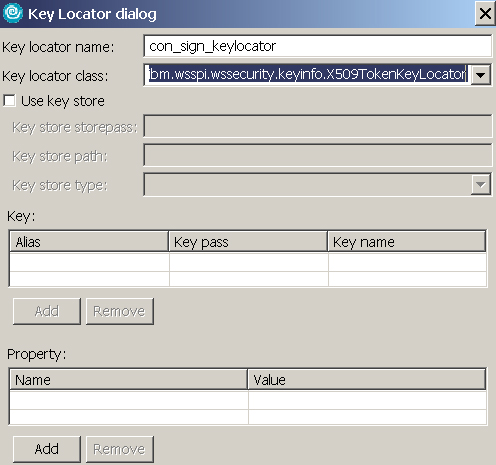
jaas.config name Value type system.wssecurity.UsernameToken Username Token system.wssecurity.IDAssertionUsernameToken Username Token (for IDAssertion) system.wssecurity.X509BST X509 certificate token system.wssecurity.PKCS7 X509 certificates and CRLs in a PKCS#7 - Expand Key Locators and click Add. Enter the information as shown in Figure 26, and click OK:
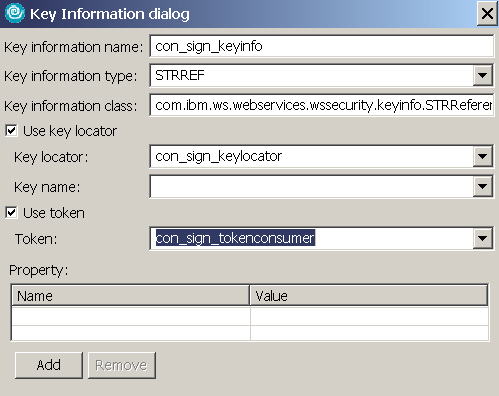
- Expand Key Information and click Add. Enter the information as shown in Figure 27, and click OK:
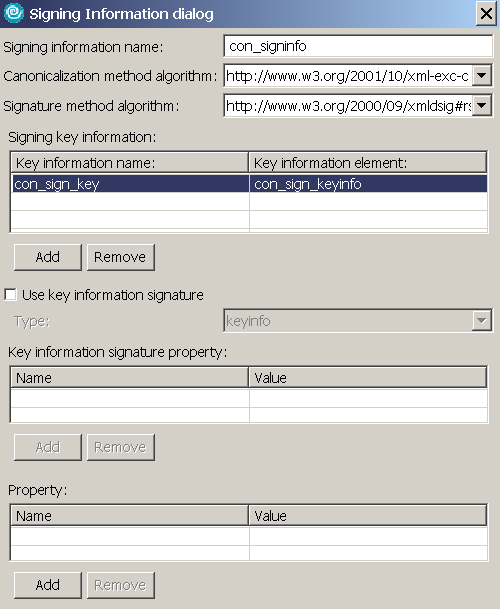
- Expand Signing Information and click Add. Enter the information as shown in Figure 28. Select con_sign_key and con_sign_keyinfo from the drop-down menus, then click OK:
- Add a part reference as shown in Figure 29, and click OK:

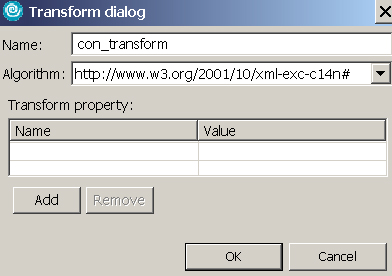
- Add a transform as shown in Figure 30, then click OK:
- Save the Web services deployment descriptor.
- Invoke the converter Web service with message integrity applied to the SOAP body and UsernameToken. You must restart the server to apply the configurations.
