Part 2: Using Username Token and SSL
User name and password-based security is so prevalent in Web services that the Web services Interoperability Organization (WS-I) has defined a standard for it called the WS-Security UsernameToken Profile 1.0. WS-I has refined the standard to ensure interoperability.
Identification, authentication, and authorization
Some Web service providers require that the service requestor provide information that identifies its origin or its owner before accessing the service. This is commonly referred to as making a claim. WS-Security has standardized header blocks, known as tokens, that can be used to store this information. The Web service consuming the request...
- Attempts to authenticate the token; that is, find out if the requestor is a valid user in the system.
- Attempts to see if the user associated with the request has authority to do what he or she is attempting to do.
Some Web service providers require that requestors authenticate themselves using a username/password combination. With UsernameToken Profile 1.0 SOAP message requests can provide username and password information (or password equivalent, shared secret). UsernameToken is similar to HTTP Basic authentication and provides minimal features, but is effective in a broad range of scenarios.
UsernameToken Profile 1.0 overview
Tokens are placed in a WS-Security header inside the SOAP:envelope header element. The UsernameToken is associated with the element
UsernameToken. You can use it to provide a user name. You can include a Password element to provide a password or shared secret. You can also specify the type of password, either in digest form (PasswordDigest) or clear text (PasswordText).
The following sample SOAP message shows a SOAP header containing a UsernameToken. Note that namespaces have been left out, leaving only the prefixes for clarity.
<soapenv:Envelope>
<soapenv:Header>
<wsse:Security >
<wsse:UsernameToken>
<wsse:Username>bob</ wsse:Username>
<wsse:Password Type="PasswordText">bob1</ wsse:Password>
</wsse:UsernameToken>
</wsse:Security>
</soapenv:Header>
<soapenv:Body> ... </soapenvBody>
</soapenv:Envelope>
UsernameToken Profile interoperability
Interoperability is an important concern when developing Web services. WS-I focuses on interoperability issues, and has restricted the UsernameToken Profile 1.0 OASIS standard for interoperability purposes. Most Java™ 2 Extended Edition (J2EE) and Microsoft™ .NET™ servers interoperate well and can easily consume each others' Username Tokens.
Securing the Username Token with WAS V6
WAS V6 supports Username Token Profile 1.0, but only if the password is specified in clear text. The UsernameToken specification allows for the use of a one-way secure hash to protect the password called a digest, but this functionality is not provided in WAS V6.
A simple hash, as sometimes used in HTTP Basic authentication, is subject to replay attacks because one can easily sniff the traffic and replay the hash without knowing the password.
The UsernameToken specification recognizes this and specifies that the password digest, whenever used, must contain a nonce (a random number) and a creation timestamp within the Password Digest in order to bind the digest to the nonce and timestamp. When used in conjunction with nonce and timestamp checking, this can effectively thwart replay attacks. The onus is on the WAS to ensure that the same nonce is not being sent more than once.
The UsernameToken specification recommends the following counter-measures to deal with this threat:
- Web service producers should reject any UsernameToken not using both nonce and creation timestamps.
- Web service producers should provide a timestamp freshness limitation, and any UsernameToken with stale timestamps should be rejected. As a guideline, you can use a value of five minutes as a minimum to detect, and thus reject, replays.
- Used nonces should be cached for a period at least as long as the timestamp freshness limitation period, and UsernameTokens with nonces that have already been used (and are thus in the cache) should be rejected.
A malicious attacker can still sniff the wire (note that password digest is not encrypted by default) and replay the entire UsernameToken, so nonce and timestamp checking are imperative. You can further encrypt data using SSL, but this is only good in a point-to-point scenario, and is not foolproof in a scenario that has intermediaries. For a more end-to-end approach, you should encrypt the UsernameToken with XML Encryption in WS-Security.
Without the above safeguards in place, the UsernameToken may be completely ineffective in achieving its objective.
Use UsernameToken in the following scenarios:
- When a service requires message-level security authentication based on user name and password or a shared secret/password equivalent.
- When interoperability is critical. The UsernameToken profile is a good way to pass authentication information between applications running in a heterogeneous environment.
- When the extra complexity of X.509 certificates, XML Encryption and XML Digital Signature is not worth the effort because security is not the primary concern. (Remember that you need to encrypt the UsernameToken for it to be properly secure). UsernameToken is easy to use, configure and maintain.
In this article, you'll go through the following sample scenario for configuring and securing UsernameToken.
- The Web service is a simple temperature converter and runs on WAS V6. The Web service (ConverterEAR.ear) is a stateless session bean with two methods:
-
getCelsius: Convert a Fahrenheit temperature to Celsius:
-
public float getCelsius(float Fahrenheit ) throws Exception { }
-
getFahrenheit: Convert a Celsius temperature to Fahrenheit
-
public float getFahrenheit(float Celsius) throws Exception { }
- We will configure the Web service to...
- accept the SOAP headers
authenticate the identity passed in the UsernameToken
The authentication is done by WAS using IBM Directory Server as the user registry, and requires that the SOAP requestor messages contain the user name and password in the SOAP header.
The temperature converter service uses J2EE authorization to ensure that users have appropriate permission to execute the methods in the service. It contains a J2EE role called Agents that is mapped to an LDAP group called Managers. To execute the methods the user must be a member of the Managers group in LDAP.
- accept the SOAP headers
- The Web service client is a servlet and runs on WAS V6. The client passes the user name and password in a UsernameToken. We will configure client extensions to generate the UsernameToken headers and insert them in the SOAP message request.
- The SOAP request is sent to WAS over SSL, so that the UsernameToken is secured.
The sample scenario was tested with WAS V6 and IBM Tivoli Directory Server V6.
To run the samples...
- IBM Tivoli Directory Server is installed and configured with the suffix o=ibm,c=us.
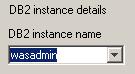
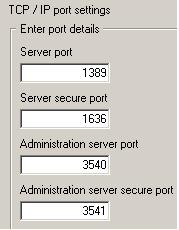
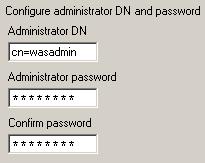
To set up an IBM Tivoli Directory Server instance, you can use the Instance Administration Tool...

- Set instance details...
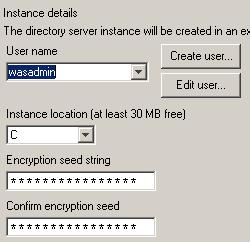
- Set instance name...
- Set ports...
- Set administrator...
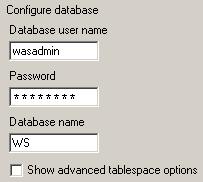
- Set database...
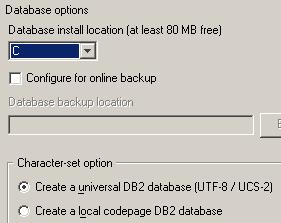
- Set database options...
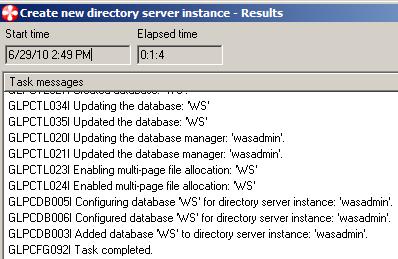
- Click Finish. The new directory server instance is created.
- Set instance details...
- Start the directory server instance...


- Click on Manage and Create o=ibm,c=us suffix

- Create the following users...
- cn=bob,o=ibm,c=us
- cn=wasadmin,o=ibm,c=us
- cn=ldapbind,o=ibm,c=us
You can use any LDAP that implements LDAP V3 protocol.
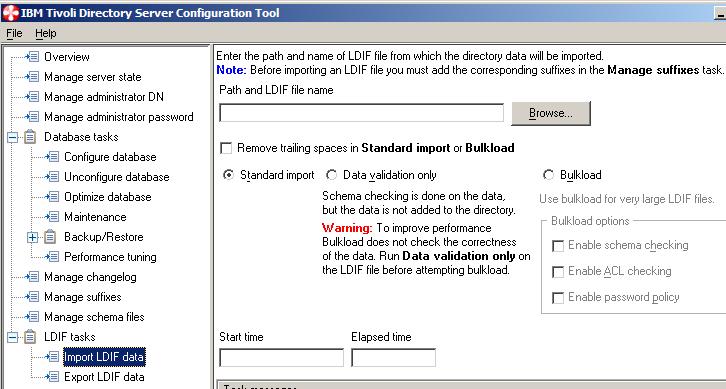
- Import the LDIF file provided with this article to create the users in your LDAP. This will ensure that your registry is set up correctly for the sample scenario.
- WAS global security is enabled with Lightweight Third Party Authentication (LTPA) and using LDAP, using the following parameters:
- Active Authentication Mechanism = LTPA
- Active User Registry = Lightweight Directory Access Protocol (LDAP) user registry
- Server User Id = cn=wasadmin,o=ibm,c=us
- Base Distinguished Name = o=ibm,c=us
- Bind distinguished Name =cn=ldapbind,o=ibm,c=us
- Advanced LDAP Settings = User Filter: (&(cn=%v)(objectclass=organizationalPerson))
- Group Filter = (&(cn=%v)(objectclass=groupOfUniqueNames))
- User Id Map = *:cn
- Group Id Map = *:cn
Leave the rest as defaults.
- WAS binds to LDAP using Bind id cn=ldapbind,o=ibm,c=us. Therefore, ensure that the user cn=ldapbind,o=ibm,c=us has access to read and search the LDAP Directory Tree with the suffix o=ibm,c=us.
- We will need Rational® Application Developer V6 for running the samples. Ensure that:
- Rational Application Developer is installed and updated.
- An WAS V6 test server is created in Rational Application Developer test environment
- The test server is updated to WAS V6.0.2.5
- Download the zip file included in this article exract it to your C: drive. This creates a directory called C:\UsernameTokenArticle and places the following files in that directory:
- ConverterEAR.ear
- ConvertClientEAR.ear
- importldif.ldif.
The Web service producer is called ConverterEAR.ear and the client is called ConvertClientEAR.ear. We will complete the following steps in this article:
- Import and examine the sample Web service application
- Import and examine web service client application
- Configure web services client security extensions and bindings for a Username token
- Configure web services security extensions and bindings for validating the Username token
- Test the Web services using TCP/IP Monitor:
- View the SOAP Message in clear text
- Use SSL and view using TCP Monitor.
Step 1: Import and examine the sample Web service enterprise application
Import the sample Web service application included in this article. The application includes:
- A web service called ConverterEAR.ear.
- A web service client called ConvertClientEAR.ear.
- An importldif.ldif file you'll use to build your LDAP users and groups,
Enable Web services development capabilities
You need to enable Web services development capabilities in your Rational Application Developer workspace. To do this:
- Click Window => Preferences => Workbench => Capabilities.
- Ensure that all the capabilities for Advanced J2EE, Web service Developer and Web Developer (advanced) are enabled. You may need to expand each of these to make sure that the capabilities are all enabled, as shown in Figure 1:

Import the enterprise application
To import the ConverterEAR.ear file:
- Launch Rational Application Developer, and go to the J2EE perspective. If J2EE is not one of the choices listed, select >Other => J2EE.
- Select File => Import to launch the File Import wizard.
- Select EAR File, then click Next.
- Enter the EAR file name. If you extracted the download materials to your C: drive, the name is: C:\UsernameTokenArticle\ConverterEAR.ear.
- Accept the defaulst for the project names and make sure that WebSphere WAS V6 is selected for Target Server.
- Click Finish. (If you receive a warning about unused imports, you can ignore them. You can also disable this warning in the Java Compiler section in the Workspace Preferences.)
Import and examine the enterprise application
In this section, we'll import and review the enterprise application.
- The ConvertEAR is an enterprise project containing an EJB module called ConverterEJB.jar and a Web module called ConverterRouterWeb.war. From the J2EE perspective, select EJB Projects => ConverterEJB => Session Beans.
- There is one stateless session bean TemperatureConverter. Open the TemperatureConverterBean.java class and note that it has the following two methods which are exposed as Web services:
 public float getCelsius(float Fahrenheit ) throws Exception {  }
 public float getFahrenheit(float Celsius) throws Exception  {  }
These methods can be called by Web service clients.
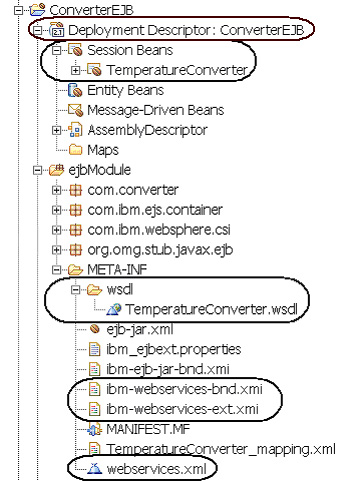
- Now select ConverterEJB => Deployment Descriptor: ConverterEJB to look at the EJB deployment descriptor.
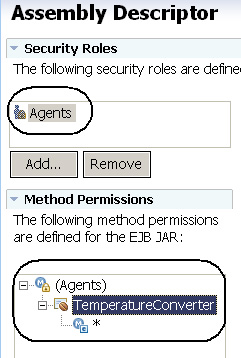
- Click the Assembly tab. We will see a J2EE security role called Agents. You can see that we've mapped the methods of the EJB to the Agents security role, as shown in Figure 3.
- Close the EJB deployment descriptor.
- Next we need to ensure that Agents role is mapped to the actual users and groups in the LDAP registry in the application deployment descriptor. To do this...
- Select Enterprise Applications => ConverterEAR.
- Double-click Deployment Descriptor:ConverterEAR to open the application deployment descriptor.
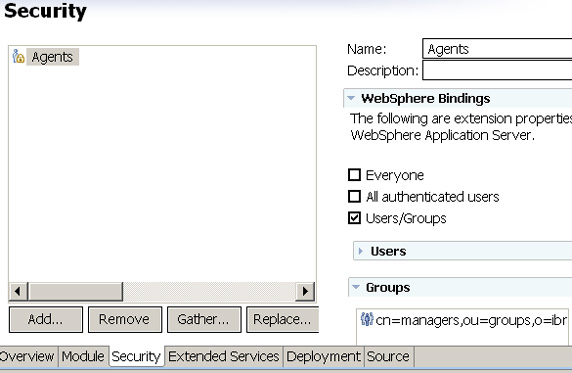
- Click on Security tab and select Agents. You can see that the Agents role is mapped to an LDAP group cn=managers,ou=users,o=ibm,c=us.
- Close the application deployment descriptor
- Now take a look at the WSDL file for the Web service by selecting EJB Projects => ConverterEJB => ejbModule => META-INF-wsdl => TemperatureConverter.wsdl.
- Open the file and click the Source tab. The wsdl file defines two SOAP operations corresponding to the two methods of the TemperatureConverter stateless session bean. Note that this wsdl also defines the location for the Web service as https: //localhost:9443/ConverterRouterWeb/services/TemperatureConverter.
- Close the WSDL file.
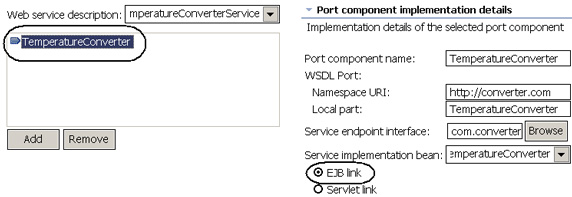
- Next take a look at the Web services deployment descriptor, webservices.xml in the META-INF directory of the ejbModule, as shown in Figure 5. Double-click to open the file and click on Port Components.
- Select TemperatureConverter and examine its properties. Note that the EJB Link selection indicates that the implementation bean is a stateless session bean.
- Close webservices.xml.
- Finally, take a look at the Router Web project by selecting Dynamic Web Projects => ConverterRouterWeb and expand it. This Web project is used to accept SOAP requests from the client and forward the requests to the TemperatureConverter session bean in the ConverterEJB project. This router project is needed, in this example, because clients send SOAP messages over HTTP and the EJBs cannot be called directly over HTTP. Therefore, the Web project accepts the requests from the client and forwards them to the ConverterEJB. Note that this project contains a servlet defined as TemperatureConverter, which has a URL mapping to services/TemperatureConverter. You can access this servlet with the URL ConverterRouterWeb/services/TemperatureConverter.
- Close any open files.
Step 2: Import and examine the Web service client application
In this section, we'll import and review the Web service client application.
JSR 109 defines a managed client model for accessing Web services. This client must run in a container and use JNDI look-up to locate the service instance. The client container binds the service interface described by that reference in the java:comp/env client environment naming context. Therefore, you need to declare a local service reference in the client's deployment descriptor.
The following code snippet shows how to get a reference to a J2EE-based Web service using JNDI lookup:
InitialContext ctx = new InitialContext();
MyWebService myService =
(MyWebService)ctx.lookup("java:comp/env/services/MyWebService");
Import the Web service client application
Follow the same steps as those in Import the enterprise application to import the Web service client C:\UsernameTokenArticle\ConvertClientEAR.ear. Now take a look at the Web service client:
The Web service client is a Web client that was generated from TemperatureConverter.wsdl. There are two important files that weren't created by Rational Application Developer: ConverterManagedClientForm.jsp and ManagedClientServlet.java.
- Select Dynamic Web Projects => ConvertClientWeb => Java Resources => JavaSource => com.converter.servlets => ManagedClientServlet.java.
- Open this file and examine the doPost method. Note that this is a managed client and we're using a local JNDI lookup for the service.
InitialContext ctx = new InitialContext(); TemperatureConverterService locator = (TemperatureConverterService) ctx.lookup("java:comp/env/service/TemperatureConverterService"); TemperatureConverter converterStub = locator.getTemperatureConverter(); - Close the file.
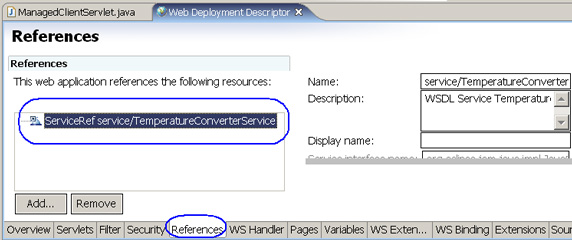
- Select Open Dynamic Web Projects => ConvertClientWeb => WebContent => WEB-INF => web.xml and click References.
- Select ServiceRef service/TemperatureConverterService and examine the details on the right. We will see the Service file, WSDL, JAX-RPC mapping file.
- Configure the web.xml Port Qualified Name Binding Details for the Web service web client:
- Select Dynamic Web Projects => ConvertClientWeb => WEB-INF => web.xml => WS-Binding.
- Click the WS-Binding tab of web.xml.
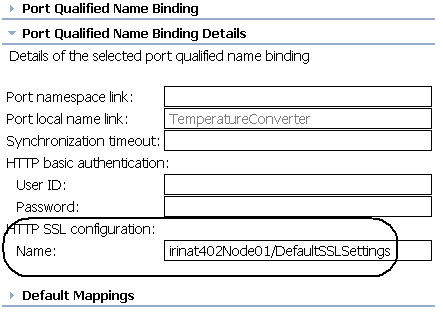
- Expand Port Qualified Name Binding Details.
- In the HTTP SSL Configuration Name field, enter <Your Node Name>/DefaultSSLSettings, where <Your Node Name> is the node of the WAS test environment. To find out the node name, log onto the WAS administration console, click application servers, select server1, and then look at the runtime configuration, as shown in Figure 7. Replace irinat402Node01 with your node name.
Note that to invoke services provided by other organizations, you may need to configure a specific SSL configuration for the other organization. For a discussion on how to configure SSL for use with Web services, see "Configure Web Services Security with WebSphere: Part 1, HTTPS, .NET, and UsernameToken".
- Close any open files.
Step 3: Configure Web services client security extensions and bindings for UsernameToken
Once Web services security is enabled, the client-side SOAP security handlers generate the SOAP headers and insert them in the SOAP message request. The server-side SOAP security handlers parse the SOAP request message for the UsernameToken, then use the user ID and password contained in the token to authenticate the user with the user registry configured with WAS.
In order to add Web services security, you need to edit the Web service deployment descriptor file, webservices.xml, on the server and Web deployment descriptor, web.xml, on the client. You can use the Rational Application Developer graphical editor to do this..
First, configure WS-security for the Web services client:
- In the J2EE perspective, open the ConvertClientWeb deployment descriptor by selecting Dynamic Web projects => ConvertClientWeb.
- Double-clickDeployment Descriptor: ConvertClientWeb. The Web deployment descriptor contains WS-Extension and WS-Binding which are used to configure WS-security.
- Click WS-Extension, and expand Request Generator Configuration. Select TemperatureConverter in Port QName Bindings as shown in Figure 8:

- Expand Security Token and click Add.
- In the Security Token dialog, enter Client_username_token in the Name field.
- In the Token type field, select Username.
- Leave the URI field blank as shown in Figure 9.
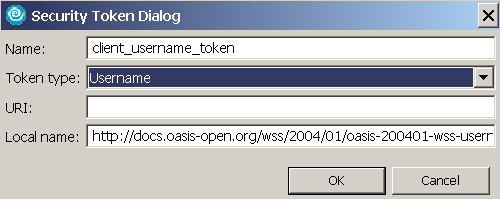
- Click OK to create the security token.
- Now you need to add a callback Handler to add the security headers Username token type to the SOAP request.
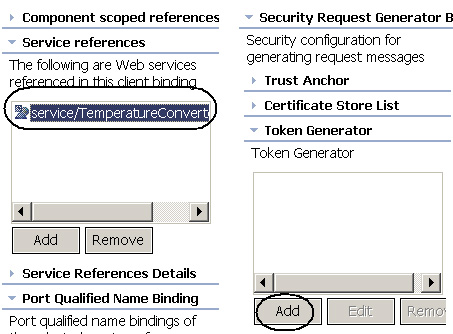
- Click WS-Binding. Expand Security Request Generator Binding Configuration.
- Select the service reference Service/TemperatureConverterService.
- Expand Token Generator and click Add, as shown in Figure 10:
- In the Token Generator dialog, enter the following, as shown in Figure 11:
- Token generator name: client_username_token_gen.
- Token generator class: Select UsernameTokenGenerator.
- Security token: Select client_username_token to indicate that you are actually associating a generator class with the token defined in WS-Extension
- Check Use Value Type to indicate that any values you enter here will be used in the token.
- Value Type: Select Username Token.
- Local name This gets populated automatically.
- Call back handler Select NonPromptCallBackHandler. This handler does not prompt the client, and returns the user name and password specified on this dialog.
- User ID: Enter bob or any other user ID that is associated with the LDAP group managers. This is very important because the Web service is mapped to the Agents security role, which is mapped to the LDAP group cn=managers,ou=groups,o=ibm,c=us.
- Password: enter bob's password.

- Click OK, then save and close web.xml.
The following table summarizes the configuration:
Table 1. Web service client configuration in web.xml
| WS-Extension tab on web.xml | WS-Binding tab on web.xml |
|---|---|
| Add Security Token (called client_username_token) | Add Token Generator (callbackhandler class, along with the appropriate token type and values) |
| Edits go into the file: WEB-INF/ibm-webservicesclient-ext.xmi | Edits go into the file: WEB-INF/ibm-webservicesclient-bnd.xmi |
You have now completed the client configurations.
Step 4: Configure Web services security extensions and bindings for validating the UsernameToken
In this step, you'll configure the Web service to appropriately process the security token sent within the SOAP request by the Web service client. The Web services deployment descriptor contains Extensions and Binding Configurations pages for specifying Web services security.
- >From the Project Explorer view, expand EJB Projects => ConverterEJB => ejbModule => META-INF
- Double-click webservices.xml to open the Web services deployment descriptor.
- Click the Extensions tab. Within Port Component Binding => Select TemperatureConverter.
- Expand Request Consumer Service Configuration Details.
- Expand Required Security Token and click Add. (Note: If the Add button is grayed out, select Port Component Binding => Select TemperatureConverter on the left.
- In the Required Security Token dialog, specify the following, as shown in Figure 12:
- Name: Enter reqcon_username_token.
- Token type: Select Username.
- Local name is already populated.
- Usage type: Select Required so that requests must contain the token.
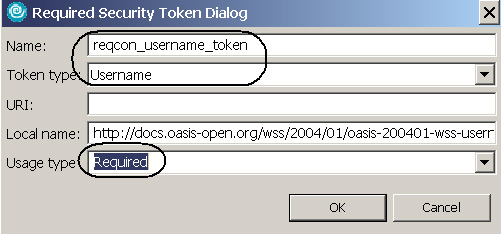
- Click OK.
- Expand Caller Part and click Add.
- In the Caller Part dialog, specify the following as shown in Figure 13:
- Name: Enter basicAuth.
- Token type: Select Username.
- Local name is already populated.

- Click OK. The caller part is used to identify the UsernameToken as the token identity. The caller part indicates to WAS that it can use the token identity to authenticate the users in its own registry.
- Click the Binding Configurations tab.
- Expand Request Consumer Binding Configuration Details. Expand Token Consumer and click Add.
- Enter the following information as shown in Figure 14.
- Token consumer class: Select UsernameTokenConsumer.
- Security token: Select reqcon_username_token.
- Check Use value type.
- Value Type: Select UsernameToken
- Check Use jaas.config.
- Jaas.config name: Enter system.wssecurity.UsernameToken.

- Click OK and save webservices.xml.
The following table summarizes the configuration you completed for the Web service deployment descriptor:
Table 2. Web service configuration in webseervices.xml
| Extensions tab on webservices.xml | Binding Configurations tab on webservices.xml |
|---|---|
| Add Required Security Token of type Username and set usage to required (called reqcon_username_token in this sample) | Add Token consumer class (UsernameTokenConsumer class, associate it with the security token created in extensions tab, set token type to Username, Set jaas.config name to system.wssecurity.UsernameToken) |
| Add Caller part with the token type set to Username token.(called basicAuth in this sample) | |
| Edits go into the file: ejbModule/META-INF/ibm-webservices-ext.xmi | Edits go into the file: ejbModule/META-INF/ibm-webservices-bnd.xmi |
Step 5: Test the Web services using TCP/IP Monitor
You're now ready to test the Web services using TCP Monitor. To do this, add ConverterEAR and ConvertClientEAR to WAS V6. Make sure that you have global security enabled in the WAS test environment. Complete these steps:
- Double-click your WAS V6 test server in Rational Application Developer.
- In the server settings, make sure that you have SOAP enabled (not RMI) for the server connection type, as shown in Figure 15.

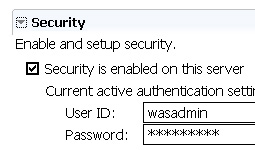
- Expand Security and ensure that the server user ID and password are the same as those you entered on the WAS Administration console. These security settings are used by the WAS test environment.
- Select Dynamic Web Projects => ConvertClientWeb =>Web Content => ConverterManagedClientForm.jsp.
- Riight-click and select Run on Server. Check the option to make the WAS V6 test server your default server. Enter a value and click Submit.
- Navigate to RAD_Install_ROOT\runtimes\base_v6\profiles\default\logs\server1\SystemOut.log.
Find the following line of output:
EJB******************: Principal - bob
This indicates that WAS is able to authenticate the userit received in the SOAP headers and was able to authorize that Bob belonged to the Agents role; that is, that Bob is a member of the managers LDAP group. If the Web service executed correctly, you should see a result back.
Enable TCP Monitor to review SOAP headers
You can use the TCP monitor to intercept and examine the SOAP traffic coming in and out of a Web service. This monitor is a proxy to the server hosting your Web service. You need to complete two steps to tool: configure the TCP/IP monitor and redirect your client to send messages to the monitor instead of to the Web service.
- Select Navigate to Window => Preferences => Internet => TCP/IP Monitor. Click Add to create a new TCP Monitor. Enter the information as shown in Figure 17:
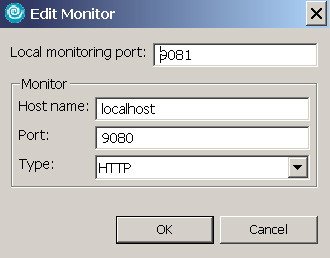
- Click OK.
- Click Start to start the TCP monitor. The monitor is created at 9081 and forwards traffic to 9080.
- Click OK to close the preferences window. The TCP monitor displays only when it gets traffic.
- Configure the Web service client to send Web service requests to port 9081, instead of port 9080 or 9443 (because you have security enabled). To do this, you need to set the endpoint address property on the stub to call the Web service at http://localhost:9081/ ConverterRouterWeb/services/TemperatureConverter. The TCP/IP monitor receives the Web service request and routes the message to the same endpoint on port 9080.
- Select Dynamic Web Projects => ConvertClientWeb => Java Resources => JavaSource => com.converter.servlets => ManagedClientServlet.java. Open this file and examine the doPost method. Uncomment the following line:
((javax.xml.rpc.Stub)converterStub)._setProperty(
"javax.xml.rpc.service.endpoint.address",
"http://localhost:9081/ConverterRouterWeb/services/TemperatureConverter");
- Save and close ManagedClientServlet.java.
- Select Dynamic Web Projects => ConvertClientWeb => WebContent => ConverterManagedClientForm.jsp.
- Right-click ConverterManagedClientForm.jsp and select Run => Run on Server. Or you can enter the following URL in a browser: https: //localhost:9443/ConvertClientWeb/ConverterManagedClientForm.jsp
- Enter a value, such as 100, for temperature.
- Go back to the TCP Monitor and expand it. Select the XML view to format the XML message. Notice that this message now contains a soapenv element with a Security; element that contains the UsernameToken. However, the user name and password are both in clear text.
<soapenv:Header>
<Security xmlns:wsse="http://docs.oasis-open.org/wss/2004/01/oasis-200401-wss-wssecurity-secext-1.0.xsd"
 soapenv:mustUnderstand="1">
<UsernameToken>
<Username>bob</Username>
<Password Type="http://docs.oasis-open.org/wss/2004/01/oasis-200401-wss-username-token-profile-1.0
 #PasswordText"> bob1</Password>
</UsernameToken>
</Security>
</soapenv:Header>
Use SSL for communication and view messages on TCP Monitor
Sending messages in clear text is not an acceptable solution. Messages are not secure because an outside observer can read the user name and password in them. To solve this problem, we'll use SSL to communicate from the client to server.
Since the client is running on WAS V6, which has global security enabled, WAS is listening at an SSL port using the default store files. The WAS Web container uses 9443 for SSL requests. (Note: You can find the SSL port for your Web container by logging into the administration console and navigating to Servers => WASs => server1 or your application server =>. Expand Web Container Settings => Web Container Transport Chains. The port number assigned to WCInboundDefaultSecure is the SSL port for the default host for your application server. By default the WCInboundDefaultSecure uses 9443.)
You need to configure a TCP monitor to forward requests to 9443, your SSL port for the WAS Web container:
- Select Windows => Preferences => Internet => TCP/IP Monitor, and click Add.
- In the Local monitoring port field, enter 1234.
- In the Monitor Port field, enter 9443
- In the Monitor Type field, select TCP/IP, as shown in Figure 18.
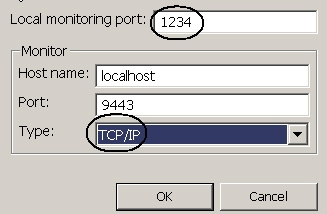
This means the TCP Monitor takes requests at 1234 and forwards them to 9443. - Start the TCP Monitor.
- Open Dynamic Web Projects => ConvertClientWeb => Java Resources => JavaSource => com.converter.servlets => ManagedClientServlet.java.
- In the doPost method, uncomment the following line:
((javax.xml.rpc.Stub)converterStub)._setProperty(
"javax.xml.rpc.service.endpoint.address",
"https:
//localhost:1234/ConverterRouterWeb/services/TemperatureConverter");
Make sure that you have the following line commented:
// "http://localhost:9081/ConverterRouterWeb/services/TemperatureConverter");
- Save and close ManagedClientServlet.java.
- Navigate to Dynamic Web Projects => ConvertClientWeb => WebContent => ConverterManagedClientForm.jsp.
- Right-click ConverterManagedClientForm.jsp and select Run => Run on Server. Or, enter the following URL in abrowser: https: //localhost:9443/ConvertClientWeb/ConverterManagedClientForm.jsp.
- Enter 212 as the temperature and watch the TCP Monitor. It doesn't show you any text.
Using a UsernameToken with a dynamic user ID and password
Go back to Step 3, where you configured the Web services client with a UsernameToken containing the user ID bob and password as is shown in Steps 3 through 4h. In this article, you added a user name and the password to the client's deployment descriptor. However, sometimes, you need to dynamically retrieve the authentication data (such as user ID and password) in the client based on some criteria. For example, you might not have the password and might need to retrieve it from a user repository. In such cases, you need to write a custom CallbackHandler.
WAS provides a framework to generate security tokens on the sender side of the message and to validate these security tokens on the receiver side of the message. The framework is based on the JAAS APIs. If you want to generate the UsernameToken with dynamic authentication data, you need to write a custom callbackHandler implementation. Here are some general guidelines:
- For our own CallbackHandler implementation, provide the javax.security.auth.callback.CallbackHandler interface; for example, myCallbackHandler(). The class looks like this:
myCallbackHandler implements javax.security.auth.callback.CallbackHandler
{
}
- In this class, you can handle either the javax.security.auth.callback.NameCallback or the javax.security.auth.callback.PasswordCallback implementation. If either of them is populated with data, then a wsse:UsernameToken element is created.
- Implement the interface...
-
com.ibm.wsspi.wssecurity.auth.callback.CallbackHandlerFactory
...which is a factory for instantiating the javax.security.auth.callback.CallbackHandler implementation.
- The Web services security run-time invokes the myCallbackHandler() in the factory...
-
com.ibm.wsspi.wssecurity.auth.callback.CallbackHandlerFactory
...to obtain an instance of the javax.security.auth.CallbackHandler object. The object is passed to the JAAS login configuration.