WebSphere Commerce integration with WebSphere eXtreme Scale XC10 appliance
|
| ||||||
|---|---|---|---|---|---|---|
| Task | Resource | DEV | DR | PRD | Notes | |
| Define objectives | Team | Comp | Comp | Comp | | |
| Review online resources | Team | Comp | Comp | Comp | | |
| Verify system prerequisites | Architect | Pend | Pend | Pend | | |
| Acquire XC10 appliances | | Comp | Comp | Comp | | |
| Generate WCS history report | WCS admin | Pend | Pend | Pend | /historyInfo.sh | |
| Generate WCS version report | WCS admin | Pend | Pend | Pend | ./versionInfo.sh | |
| Cache design process | Architect | Pend | Pend | Pend | | |
| Review current cachespec.xml | Architect | Pend | Pend | Pend | | |
| Review current wc-server.xml | Architect | Pend | Pend | Pend | | |
| Set up X-windows | Architect | Pend | Pend | Pend | | |
|
| ||||||
| Task | Resource | DEV | DR | PRD | Notes | |
| Install XC10 appliances | Architect | Pend | Pend | Pend | | |
| Initialize XC10 appliances | Architect | Pend | Pend | Pend | | |
| Set DNS server | Architect | Pend | Pend | Pend | | |
| Set NTP server | Architect | Pend | Pend | Pend | | |
| Set SMTP server | Architect | Pend | Pend | Pend | | |
|
| ||||||
| Task | Resource | DEV | DR | PRD | Notes | |
| Review end-to-end steps | Architect | Pend | Pend | Pend | | |
| Review existing WCS cache settings | Architect | Pend | Pend | Pend | | |
| Set up installation repository | Architect | Pend | Pend | Pend | | |
| Install WXS client on dmgr and nodes | Architect | Pend | Pend | Pend | | |
| Configure catalog service | Architect | Pend | Pend | Pend | | |
| Create Dynamic Cache data grids | Architect | Pend | Pend | Pend | One for base, servlet, and object caches | |
| Configure baseCache instance | Architect | Pend | Pend | Pend | | |
| Configure additional servlet cache instances | Team | Pend | Pend | Pend | See: cachespec.xml | |
| Verify setup | Team | Pend | Pend | Pend | | |
| Monitor WXS caches | Team | Pend | Pend | Pend | | |
| Extended Cache Monitor | Architect | Pend | Pend | Pend | Optional. Issues with cache monitor and WXS v8.6? | |
| Optional: Create object caches | Architect | Pend | Pend | Pend | Use DMAP recommended destinations as guide. | |
|
| ||||||
| Task | Resource | DEV | DR | PRD | Notes | |
| Load testing and tuning | Architect | Pend | Pend | Pend | | |
| Monitor grids | Architect | Pend | Pend | Pend | | |
| Determine number of cached entries | Architect | Pend | Pend | Pend | | |
| Generate reports with xsadmin | Architect | Pend | Pend | Pend | | |
| Tune | Architect | Pend | Pend | Pend | | |
Objectives
This document how to configure WebSphere eXtreme Scale v8.6 running on XC10 appliances with WebSphere Commerce v7.
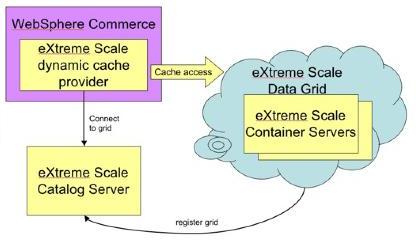
| Default WCS dynamic cache... | eXtreme scale dynamic cache... |
|---|---|
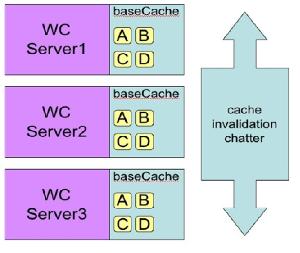
| 
|
WebSphere eXtreme Scale client is installed into the WCS topology. WXS catalog and container servers run on the XC10 appliances.
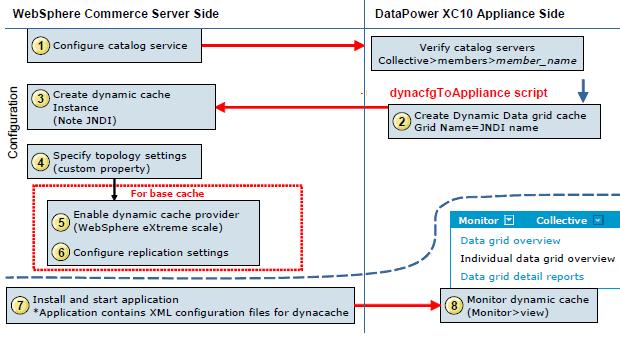
WXS with XC10 install procedure
- Review end-to-end steps
- Review existing WCS dynamic cache settings
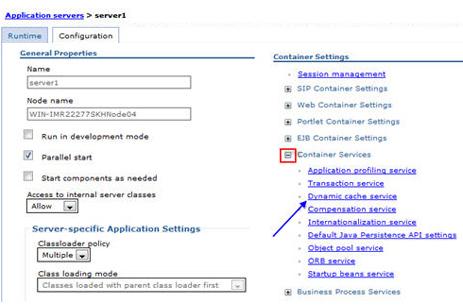
- Log on to dmgr console
- Go to...
-
Servers | WebSphere application servers | server_name | Container Settings | Dynamic cache service
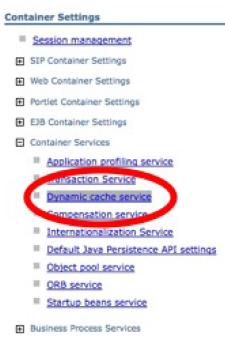
- Note that the Cache provider is set to Default dynamic cache.
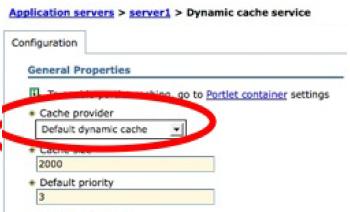
After we augment our WAS profiles with the WXS client later in this procedure, clicking on the drop-down list will show alternative choice of WXS.
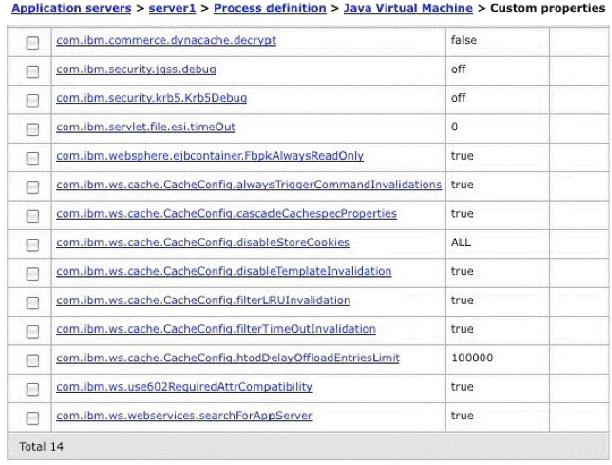
- Go to...
-
Servers | WebSphere application servers | server_name | Server Infrastructure | Java and Process Management | Process definition | Java Virtual Machine | Custom properties
...and review com.ibm.ws.cache* custom properties...
- Set up installation repository
- Download WXS install repository
- Extract WXS install archive
Extract archive to a shared drive, or a local location on each host
-
cd /tmp/repo
tar xvf repository.tar - On each dmgr and wcs node, install Installation Manager.
As user wasadmin...
-
cd IM_INSTALL
./groupinst - Set up WXS product repositories in Installation Manager
- Install WXS client on dmgr and nodes
- Use Installation Manager to install the WXS client on all Dmgr and Commerce application server profiles.
- For install option, select Client
- For install directory, select either DMGR or WCS home directories.
During the WXS client installation, the installer will ask if we want to augment the nodes. Augmentation can also be performed after the install using the profile management tool.
- If you augment the nodes during the install, to verify that augmentation was successful, run...
-
./versionInfo.sh
- Use Installation Manager to install the WXS client on all Dmgr and Commerce application server profiles.
- Configure catalog service domain
After the installation of the WebSphere eXtreme Scale client is complete, the first step in configuring WebSphere Commerce with the XC10 is to create the catalog server domain. WebSphere has to know how to communicate with the catalog service that is running on the DataPower XC10 appliance. The appliance uses the catalog service to track how data is partitioned within the appliance and across a collective.
- In the dmgr console, click...
-
System administration | WebSphere eXtreme Scale | Catalog service domains

- On the catalog services domains panel, click New
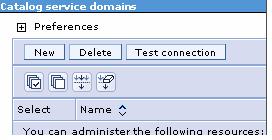
- On the Catalog service domain panel, enter an administrative name for the catalog service domain.
Note that by default the check box for...
-
Enable this catalog service domain as the default unless another catalog service domain is explicitly specified
...is checked. If there is another catalog servive enabled as the default, uncheck this box.
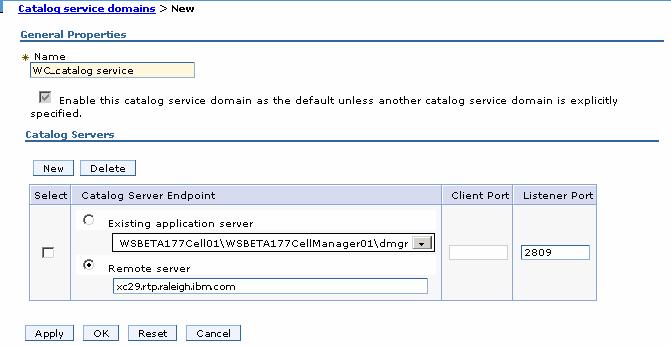
- We can also define more than one catalog server endpoint on one catalog service domain. Each endpoint corresponds to an appliance. There is no need to create several domains for several endpoints.

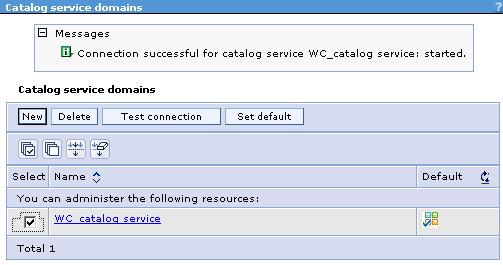
- Test the connection to the catalog service domain...
-
System administration | WebSphere eXtreme Scale | Catalog service domains
Select the catalog service domain to test and click Test connection. When you click this button, all of the defined catalog service domain end points are queried one by one. If any one endpoint is available, WebSphere returns a message that indicates that the connection to the catalog service domain was successful.
- If the appliance has transport layer security enabled, enable global security in the WAS admin console.
- In the dmgr console, click...
- Create Dynamic Data grid caches
To use the dynaCfgToAppliance to create the Dynamic Cache data grid, log on to the dmgr host machine and run...
cd DMGR_PROFILE/bin
./dynaCfgToAppliance IP_address \
                     cache_name \
                     appliance_admin \
                     admin_pw \
                     SOAP_port \
                     /path/to/soap.client.props
...where...
IP_address IP address of the appliance cache_name JNDI name of the dynamic cache. Slashes are converted to dashes. For example, if dynamic cache name is...
-
services/cache1
...the data grid created on the appliance is named...
-
services-cache1
appliance_admin Administrator ID for logging in to the DataPower XC10 appliance user interface. admin_pw Administrator password for logging in to the DataPower XC10 appliance user interface. SOAP_port SOAP port for the dmgr if we are using a port number other than the default of 8879. /path/to/soap.client.props Enable SOAP security and specify dmgr user name and password -
com.ibm.SOAP.securityEnabled=true
com.ibm.SOAP.loginUserid=
com.ibm.SOAP.loginPassword=<dynaCfgToAppliance is the preferred way to create a cache data grid because it not only creates the grid on the appliance, but also performs additional WebSphere configuration.
The script...
- Creates the data grid on the appliance
- Set the appliance ID and password credentials with the following custom properties:
- xc10.<data_grid_name>.userid
- xc10.<data_grid_name>.password
If we run the script again after the initial configuration, the custom properties are updated.
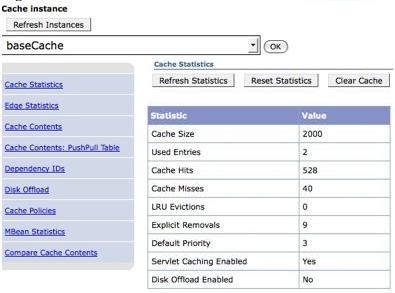
If an explicit dynamic cache instance for an application is not set, the application will use the default baseCache (the default dynamic cache instance). baseCache is only a servlet cache instance. The baseCache grid is not configured on the appliance by default. We can create the baseCache using the dynaCfgToAppliance script or from the DataPower XC10 appliance console. The cache name must be baseCache.
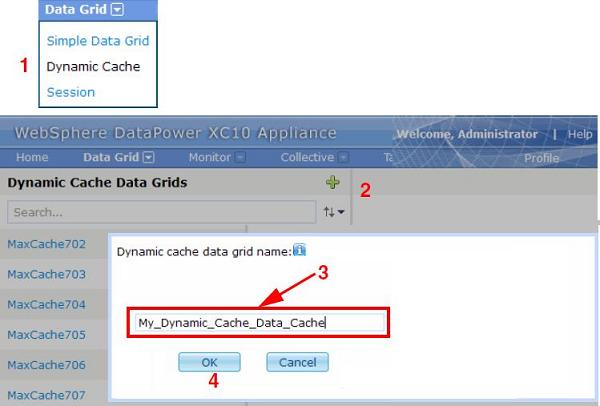
cd DMGR_PROFILE/bin
./dynaCfgToAppliance IP_address \
                     baseCache \
                     appliance_admin \
                     admin_pw \
                     SOAP_port \
                     /path/to/soap.client.props
An alternate way to create the dynamic cache data grid is to use the XC10 appliance user interface
- Select the data grid type we want to create from the Data Grid menu
- Click the + sign to open a popup for creating a new grid
- In the popup, enter a grid name. The grid name must match the JNDI name in the WebSphere Commerce Server configuration.
- Click OK
The XC10 console page contains...
Catalog servers Item 1 Display the catalog server host address and port. Security settings Item 2 If Enable security is selected, provide an authenticated user name and password to access the cache. If Enable authorization is checked, the user be granted specific permissions to the data cache: read, write, create, and all. They are checked each time you perform an action against the data cache. Access granted to Item 3 Select user name that can access and modify this cache and the permissions of this user Show advanced attributes Item 4 If you expand this option we can see the replication settings. The settings can be from zero to five synchronous replicas, and from zero to five asynchronous replicas. These settings default to zero synchronous and one asynchronous replicas. Eraser icon Item 5 Clear grid. If you enabled security on the dynamic cache data grid, add a cache user name and password to the WebSphere configuration
- In the Dmgr console, select...
-
System administration | Cell | Custom Properties

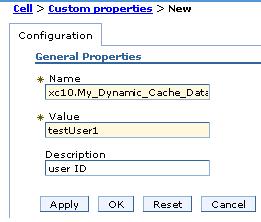
- Click New to create a property for the user name.
- Type the property name...
-
xc10.data_grid_name.userid
data_grid_name is the name of the cache created on the appliance. userid is the user name created with admin permissions to access the cache on the XC10 console. Once that user is created, when you create the custom properties on the WAS side, you only need to specify the cache data_grid_name, which will retreive the information for the user associated with that cache.
- Click OK to complete the creation.
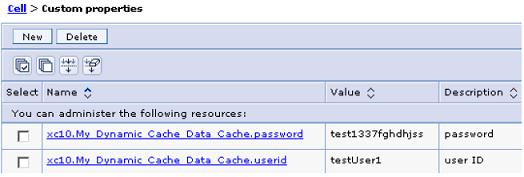
- Click New to create a property for the user's password
- Type property name...
-
xc10.data_grid_name.password
Like with the userid, the password is automatically pulled in when data_grid_name is specified. The password value should be encrypted, or encoded, using the encodePassword script, located in the bin directory of the deployment manager. Encoding can be done prior to creating this custom property.
- Configure the baseCache to use the eXtreme Scale service provider
- The custom property specifying the baseCache uses a remote topology which must be set on the JVM of the WebSphere Commerce Server. From the Dmgr console, select...
-
Servers | Server types | WebSphere Application Servers | WebSphere ommerce_Server_name | Java and process management | Process definition | Java virtual machine | Custom properties | New
...and specify custom prooperties
JVM custom property Value com.ibm.ws.cache.CacheConfig.filterLRUInvalidation true com.ibm.ws.cache.CacheConfig.filterTimeOutInvalidation true com.ibm.ws.cache.Cache.Config.filterInactivityInvalidation true com.ibm.ws.cache.CacheConfig.disableTemplateInvalidation true com.ibm.ws.cache.CacheConfig.ignoreValueInInvalidationEvent true com.ibm.ws.cache.CacheConfig.useServerClassLoader true com.ibm.websphere.xs.dynacache.disable_recursive_invalidate true com.ibm.websphere.xs.dynacache.ignore_value_in_change_event true com.ibm.websphere.xs.dynacache.enable_compression true com.ibm.websphere.xs.dynacache.topology remote Configuring the baseCache instance sets all properties of the cache instances in the JVM. We can override the values of the baseCache custom properties by creating custom properties on the individual cache instances.
- Set user ID and password properties at the WebSphere cell level.
- Go to...
Servers | Server Type | WebSphere application servers | myWCSappserver | Container services | Dynamic cache service
- In the Dynamic cache service configuration window, select the drop-down menu for Cache provider and select...
-
WebSphere eXtreme Scale
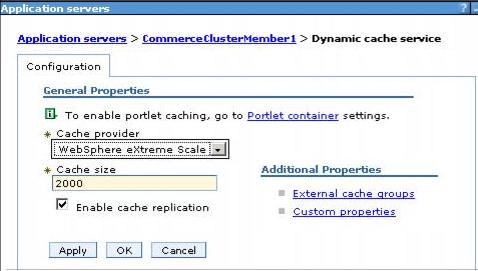
- In the Cache size field, specify a cache size.
- Select the check box...
-
Enable cache replication
If this setting is not checked and only WXS client is installed, initialization of the client might fail and the cache instance will default to using the default cache implementation.
- Enable servlet caching on the Commerce Server. Go to...
-
Servers | Server Type | WebSphere application servers | your_ commerce_server | Web Container settings | Web container
...and check box...

- Repeat steps for other Commerce appservers.
- The custom property specifying the baseCache uses a remote topology which must be set on the JVM of the WebSphere Commerce Server. From the Dmgr console, select...
- Configure additional servlet cache instances
After you have configured the catalog service domain and created the data grid, the next step is to create a dynamic cache instance on WCS configuration.
There are two types of dynamic cache instances that can be created on WebSphere Commerce Server:
Object cache Used by Java EE applications. Locations, in addition to the default dynamic cache. Servlet cache Used by servlets. The JNDI name specified for the cache instance is mapped to the name attribute in the <cache-instance> tag in cachespec.xml included with applications. In general, use WXS for servlet caches, and local Dynamic Cache for Object caches
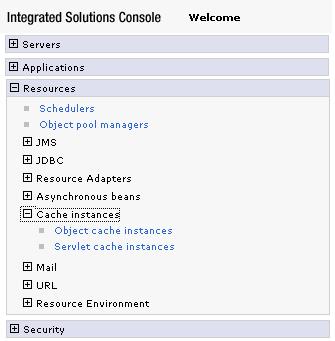
- On the Dmgr console, click...
-
Resources | Cache instances | Servlet cache instances
- Specify the scope of the cache instance from the drop-down list.
- Click New to create a new servlet cache instance.
- Enter the JNDI name
The JNDI name is the name attribute specified in the <cache-instance> element in cachespec.xml.

Typically, the cache parses cachespec.xml when the server starts and extracts a set of configuration parameters from each cache-entry element. Every time a new servlet initializes, the cache attempts to match each of the cache-entry elements to find the configuration information for that object.
Here is an example of a JNDI name specified in cachespec.xml:
-
<cache-instance name="services/cache/instance_one">
Specify a <cache-instance> element whose name is the same as the JNDI Name for this cache instance in your application. If a name is not specified for <cache-instance>, baseCache will be used as a default
The JNDI name must also match the data grid name created in the DataPower XC10 appliance.
In certain situations, it might be necessary to create a WebSphere cache instance with a JNDI name containing ./., such as...
-
services/cache/cache1
If such a JNDI is created, a corresponding grid for this cache instance will be created by running the dynaCfgToAppliance script specifying...
-
services/cache/cache1
...as the grid. However, if an attempt is made to create the grid manually on the DataPower XC10 appliance console, the ./. will need to be replaced with "_". Thus, in this example, the grid name services_cache_cache1 would be specified on the appliance console.
- From the cache provider drop-down list, select...
-
WebSphere eXtreme Scale
- Check...
-
Enable cache replication
...for cached data to be sent to the XC10 appliance. If you do not check this entry, the XC10 client will provide a local cache only.
- Click OK and save the changes.
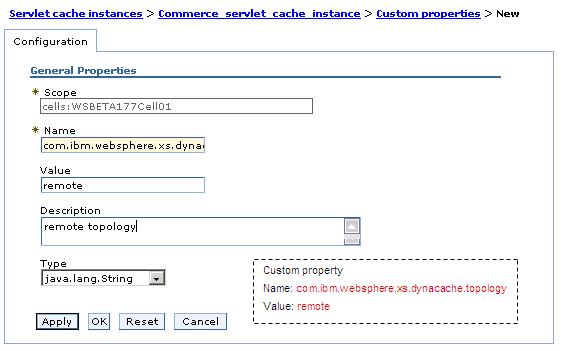
- Configure topology settings...
-
Resources | Cache instances | cache_instance_type | cache instance name | Custom properties | New
and set...
-
com.ibm.websphere.xs.dynacache.topology = remote
- On the Dmgr console, click...
- Verify success of WXS integration with WCS
After server restart, look for entries in SystemOut.log that indicates the WebSphere eXtreme Scale Dynamic provider created the baseCache with remote topology...
-
[10/25/10 8:46:08:538 CDT] 00000000 CacheProvider 1 CWOBJ45001: WebSphere eXtreme Scale Dynamic Cache provider is successfully initialized.
[10/25/10 8:46:09:913 CDT] 00000000 Object GridImp 1 CWOBJ47001: The map name IBM_DC_PARTITIONED_baseCache matched the regular expression of template map IBM_DC_PARTITIONED_.*. The IBM_DC_PARTITIONED_baseCache map has been created for ObjectGrid DYNACACHE_REMOTE.
[10/25/10 8:46:09:991 CDT] 00000000 CacheProvider 1 CWOBJ45081: The WebSphere eXtreme Scale provider has created a Dynamic Cache instancd with name baseCache using topology remote. - Monitor WXS caches
- Generate web content by pulling WCS pages, for example, the WebSphere Commerce administration page...
-
http://myhost:myport/adminconsole
Activity on the page generates web content that is saved in the dynamic cache. Allow some time to pass for the statistics to become available on the DataPower XC10 appliance. With a dynamic cache data grid, statistics are not available until a WebSphere Commerce Server that is running a dynamic cache connects to the dynamic cache data grid on the appliance. If we are using a collective, the collective initialization must be complete before statistics are available. In general, wait up to one minute after a major configuration change to see the changes in your statistics.
- Log on to the DataPower XC10 appliance and navigate to Monitor menu...
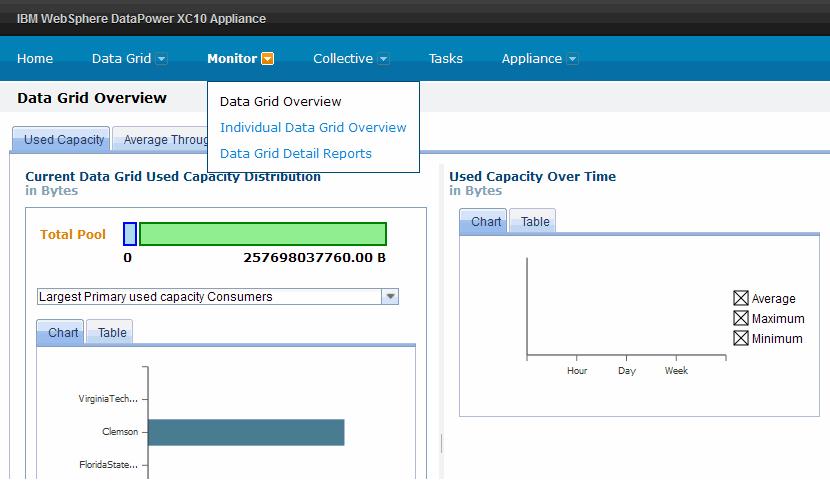
- To view your specific dynamic cache grid, expand...
-
Monitor | Individual Data Grid | Overview | dynamic_data_grid_name
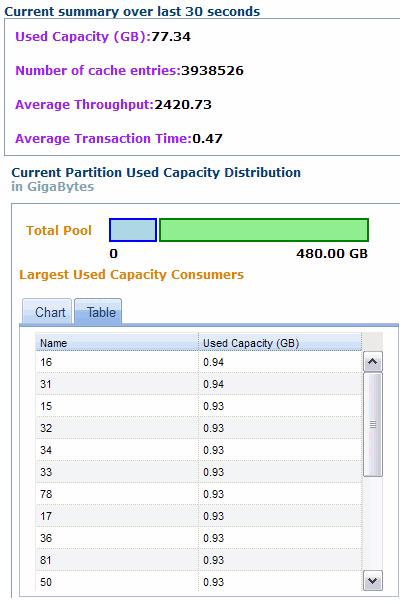
The resulting summary page shows the number of cache entries, the average transaction time, average throughput, cache hit rate, and the percentage of limited capacity over the last 30 seconds.

For dynamic cache data grids, 166 cache entries are created by default for every dynamic cache data grid (83 partitions x 2):
- Each partition exists as a primary copy, or shard, and also as a replica shard for backing up the data.
- Each shard has two entries, one to keep track of statistics and the other to store the configuration.
However, because the grid does not get initialized until at least one entry is placed on the grid, the minimum number of entries we are likely to see is 167. This number will be displayed before you add any data to the grid. These cache entries contain dynamic cache provider statistics and the dynamic cache configuration for your WebSphere Commerce Server.
- Used Capacity tab
Shows used capacity vs the actual number of entries. The level of detail depends on selected time range. Available in chart or table form.
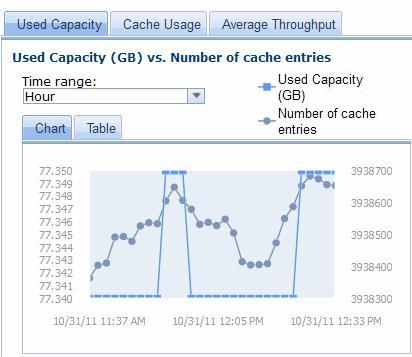

- Cache Usage tab
Number of successful queries to the cache. Includes attempts, hits, and hit rate.

- Average Throughput tab
Average number of transactions per second that are being processed over a given time range. Average length of time for each transaction.

- Data grid/map details
To further view specific details of the data grid, select...
-
Monitor | Data grid detail reports
A tree displays the data grids. Select your data grid and drill down to see the specifics of that grid. We can view the used capacity and a list of zones to which the data grid belongs from the detail reports.

- Select a map to view its total number of cache entries, average throughput, average transaction time, and the total capacity
- Generate web content by pulling WCS pages, for example, the WebSphere Commerce administration page...
- Extended Cache Monitor
To monitor WXS grid caches from WAS console, download and install the Extended Cache Monitor.
To view cache monitor statistics, from a browser, go to...
-
http://hostname:port/cachemonitor
- Optional: Configure session management
- Create Session data grid

- On WAS console, configure session management settings
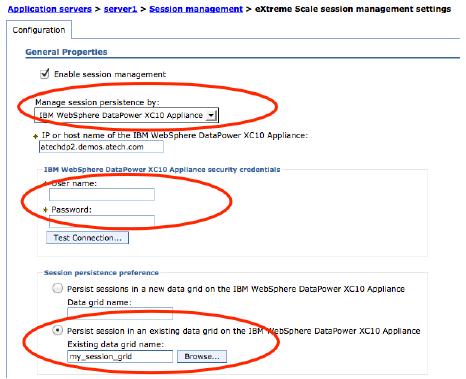
- Create Session data grid

Appendix
WCS and WXS: Cache design process
A typical WebSphere Commerce solution has cacheable entities...
- external system integration
- database operations
- business computations
| Object cache | Java objects containing WCS data. We especially want to cache data if it accessed frequently by the application and remains fairly constant. |
| Command cache | Java objects executed as part of satisfying an inbound request. Business logic tier. Includes operations that take a lot of system resources and time...
|
| HTTP response cache | Java objects that represent the http response generated by an inbound http request. JSP or View cache. Cache entries are typically larger than the corresponding Command cache entities. The full-page cache option may be preferred over the fragment cache, because aggregating many fragment caches has performance costs and implications. |
Preference Cache type and preference ranking...
- WebSphere Commerce data cache
- Command cache
- HTTP response cache (full page cache)
- HTTP response cache (fragment cache)
The caching design and the application design must be complementary. Instead of using the data bean directly with JSPs, we can use a pattern in the Business logic tiers (commands) to create an aggregate value object or value object that is then passed to JSP or View Cache to create the response. This helps in the caching of business logic commands that are invoked frequently by the application.
Entities that require frequent invalidation
Avoid the use of the WebSphere eXtreme Scale cache provider for the cacheable entities that require frequent invalidation. Set the do-not-cache property.
Personalized customer data
For personalized customer data or operations, command cache is preferred to full page cache. An example is a personalized product recommendation or marketing content recommendation that is displayed on the web site. The personalization could be based on...
- a customer's registration state (registered or anonymous)
- member group affiliations
- various other parameters
To effectively implement the caching personalized data entities, use the user identifier or member group association based on the request attributes (example: a cookie) to identify the user state or the member group affiliation and use it to create a cache ID for the cached-entity.
For a relatively static data or response, use JSP cache. A good example of this situation is the Contact Us or Help pages. These are pages where the information is not personalized or dynamic in nature.
WebSphere Commerce data cache (object cache) implementation
WebSphere Commerce data cache is classified in two types...
| Cross transaction cache | Recommended cache pattern. Persists across multiple user transactions. Long life. |
| Local transaction cache | Persists only until transaction boundary associated with a specific user's request. For objects that use database information multiple times during a single transaction scope. |
WCS data cache is implemented with either of two approaches:
| Distributed map caching | Recommended. Uses object-cache instances. A sub-set of object-cache instances will be configured to use WXS data grids. |
| Command caching | Uses cachespec.xml for the cache entry specification. Cache entries, by default, go to baseCache instance. Not recommended. |
Best practices for WebSphere Commerce distributed maps
The baseCache, which is the default servlet cache, should be configured on the WebSphere DataPower XC10. Similarly, servlet caching is also available on WebSphere DataPower XC10. WebSphere Commerce assumes all data is local, and therefore makes frequent access to certain types of data, such as user data. Caching these small but frequently accessed pieces of data on the DataPower XC10 can impact performance, therefore, in general, object caches for distributed map data should be configured to use WebSphere's default dynamic cache provider.
| Cache type | Description | Best cache environment |
|---|---|---|
| baseCache | Default servlet cache. Assume all web content fits into this category | WebSphere DataPower XC10 |
| Servlet caching | Specific caches used for various web content | WebSphere DataPower XC10 |
| Object caches | Used for DistributedMap data | Default dynamic cache provider |
We can use WXS for for WCS distributed maps (DMAPs) containing entities that are...
- Used frequently across multiple user transactions
- Not invalidated frequently
Cached entities that are invalidated frequently, either programmatically or using DynaCacheInvalidationCmd, should be configured to use the traditional DynaCache provider. Frequent invalidation messages can cause an increase in CPU utilization on WXS servers. For this reason, invalidation frequency and count is an important design and implementation consideration.
For example, the business context service (BCS) cache, implemented using the class...
-
com.ibm.commerce.component.contextservice.commands.ContextDataSerValueCache CmdImpl
... is frequently invalidated based upon the user's action on the web site. So, IBM recommends to not offload this cache entry to WXS.
DMAP recommended destinations
The table below provides the recommended destination for some of the DMAPs available with WCS data cache. Table is accurate as of WebSphere Commerce V7.0 FEP 4.
| DMAP Name | Preferred Destination | Comments |
|---|---|---|
| WCSystemDistributedMapCache | WXS | Set cache size based on commerce foundational data setup, such as the supported languages, currency, country, states, shipping, and fulfillment data. Initially, you keep the cache count size at 20000. Optimize based on cache hit-or-miss ratio and LRU evictions. |
| WCSessionDistributedMapCache | DynaCache | Holds BCS cache related data. Initially, we can keep the cache count size at 5000. Optimize based on cache hit-or-miss ratio and LRU evictions. |
| WCContractDistributedMapCache | WXS | Initially, set cache count size to 5000. Optimize based on the cache hit-or-miss ratio and LRU evictions. |
| WCPromotionDistributedMapCache | WXS | Commerce promotion engine-related runtime data. DMAP size is determined by looking at the types of promotions that are configured, the number of promotions that are configured, and the creation of a shopping cart by the guest on the web site. Initially, set cache count size at 30000. Optimize based on the cache hit-or-miss ratio and LRU evictions. |
| WCMarketingDistributedMapCache | WXS | Initially, set cache count size at 3000. Optimize cache count based on the cache hit-or-miss ratio and LRU evictions. |
| WCUserDistributedMapCache | DynaCache | Initially, we can keep the cache count size at 3000. Optimize cache count based on the cache hit-or-miss ration and LRU evictions. We can start with Traditional DynaCache. However, you must also test with WebSphere eXtreme Scale as the destination. If the invalidation cost is NOT high in WebSphere eXtreme Scale, then we can use WebSphere eXtreme Scale as the destination. |
| WCCatalogGroupDistributedMapCache | WXS | Determine appropriate cache size based on the catalog structure and setup. Initially, keep cache count size at 20000. Optimize based on cache hit-or-miss ratio and LRU evictions. |
| WCCatalogEntryDistributedMapCache | WXS | Determine cache size that based on the catalog structure and setup. Initially, keep the cache count size at 20000. Optimize based on the cache hit-or-miss ratio and LRU evictions. |
| WCPriceDistributedMapCache | WXS | Determine appropriate cache size based on your price rule and offer setup. Initially, keep cache count size at 20000. Optimize based on cache hit-or-miss ratio and LRU evictions. |
| WCDistributedbutedMapCache | WXS | Initially, keep cache count size at 1000. Optimize based on the cache hit-or-miss ratio and LRU evictions. |
Resources
xscmd utility