Importing a log file
- Select File > Import.... The Import wizard opens to the Select page.
- From the list of import source types, select Log File. Click Next.
The Import Log File page opens.
- Add log files to be imported by clicking Add.
- Select the type of log. Click the Host tab.
- Select either the local host or a remote host from the Default
Hosts list.
- If you choose to import a log file from a remote host, ensure
that the Agent Controller is running and appropriately configured on the
remote host.
- If the required host is not in the list, type either its name or IP address in
the appropriate field and click Add.
Click the Details tab.
- Type the path of the file being imported.
- Select the version details of the server that created the log. Click the Destination tab.
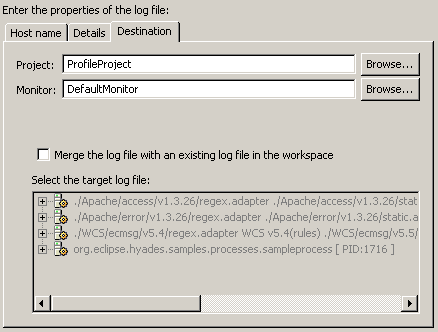
- Input the destination project in the Project field and the name for
the grouping logical unit in the Monitor field.
- Specify whether the destination is an existing log file.
If it replaces an existing file or appends to one, follow these
steps:
- Select the check box Merge the log file with an existing log file in
the workspace.
- Select the log file that will be replaced or appended. Click Next.
- Choose whether to Replace or Append. Click OK.
- If you are importing the log into an existing log file, click OK and then Finish
to import the file.
The imported file is then opened in the Log view.

By default, all the imported log files will be serialized in a Default Log Set
preference, which allows you to easily re-import the files.
Note: Ensure the version of the log you are importing matches
the application version selected in the Details tab. A mismatched
version number will cause the wrong parser to be used when the log is imported.
The Log Navigator view will list the log, but the Log view will be empty.
Related concepts
Overview of the Log and Trace Analyzer
Related tasks
Importing and using a symptom database
Working with a log file
Working with log sets
Related references
Supported log file types