Developing Eventing Portlets - Project setup
We use two projects for this application:
| RAD75PortletEventEAR | Enterprise application |
| RAD75PortletEvent | Application with two portlets (based on JSR 286) |
Import these projects from the interchange file located at:
C:\7672code\portal\RAD75PortletEventStart.zip
Structure of the sample application
The sample application consist of the following two portlets:
| CityPortlet | Contains a list of cities for the user to select |
| CityInfoPortlet | Displays detailed information about the city selected |
Adding the event logic to the two portlets
We have to put logic into the processAction method of the CityPortlet class and the processEvent method of the CityInfoPortlet class.
When the user submits the CityPortlet, the processAction method is called. We have to trigger an event with the value of the selected city to the CityInfoPortlet to process this event.
- Open the CityPortlet class and change the processAction method...
public void processAction(ActionRequest request, ActionResponse response) throws PortletException, java.io.IOException
{
   //Initialize the fields in the class as per your requirement

   java.lang.String sampleObject = new java.lang.String();
   response.setEvent("cityEvent", sampleObject);
   String city = request.getParameter("cityCombo");
   response.setEvent("cityEvent", city);
}
- Open the CityInfoPortlet class and change the processEvent method to get the value of the event received and delegate this value to the CityDB helper class, which returns a CityInfoBean object with the information about the selected city...
public void processEvent(EventRequest request, EventResponse response) throws PortletException, IOException
{
  Event sampleEvent = request.getEvent();

  if(sampleEvent.getName().toString().equals("cityEvent"))
  {
     Object sampleProcessObject = sampleEvent.getValue();
     String city = (String) sampleEvent.getValue();
     cityInfoBean = CityDB.getCityInfo(city);
  }
}
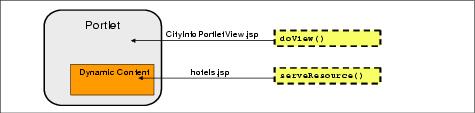
- The doView method of the CityInfoPortlet class puts the cityInfoBean on request scope and forwards processing to a JSP to display the result...
public void doView(RenderRequest request, RenderResponse response) throws PortletException, IOException { // Set the MIME type for the render response response.setContentType(request.getResponseContentType()); request.setAttribute("info",cityInfoBean); // Invoke the JSP to render PortletRequestDispatcher rd = getPortletContext().getRequestDispatcher (getJspFilePath(request, VIEW_JSP)); rd.include(request,response); } - The CityInfoPortletView.jsp in the CityInfoPortlet retrieves the cityInfoBean and displays the information about the selected city.
Deploying and running the event handling portlets
In the Enterprise Explorer...
-
RAD75PortletEvent (right-click) | Run As | Run on Server
In the subsequent dialog, click Finish to complete publishing to the WebSphere Portal server.
After the application has been deployed RAD opens a browser in the Workbench .

Connecting the portlets
We have to use wires to exchange information or actions between portlets. To access the wiring tool, follow these steps:
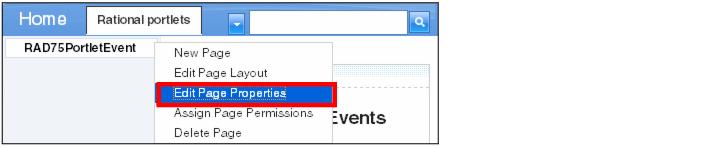
- With the browser opened with the CityPortlet, pass the mouse over the RAD75PortletEvent label.
- An arrow appears on the right side; click the arrow to open a menu.
- In the menu, select Edit Page Properties .
- In the Page Properties dialog, type rad75.portlet.page as Unique name, and click OK.
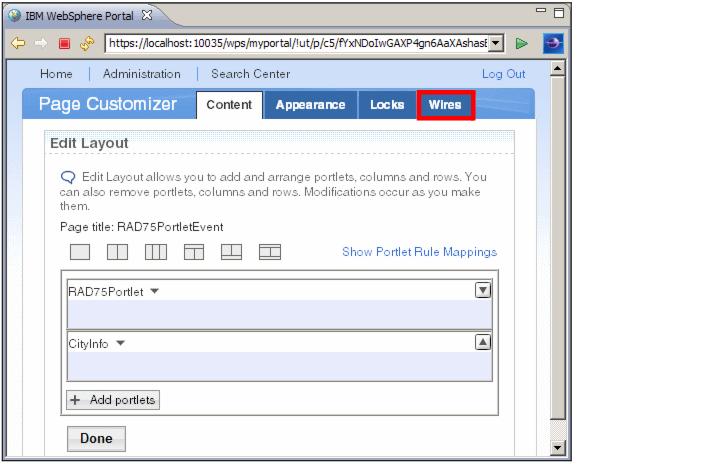
- Again, pass the mouse over the RAD75PortletEvent label, and in the menu, select Edit Page Layout.
- In the Page Customizer dialog, select the Wires tab .
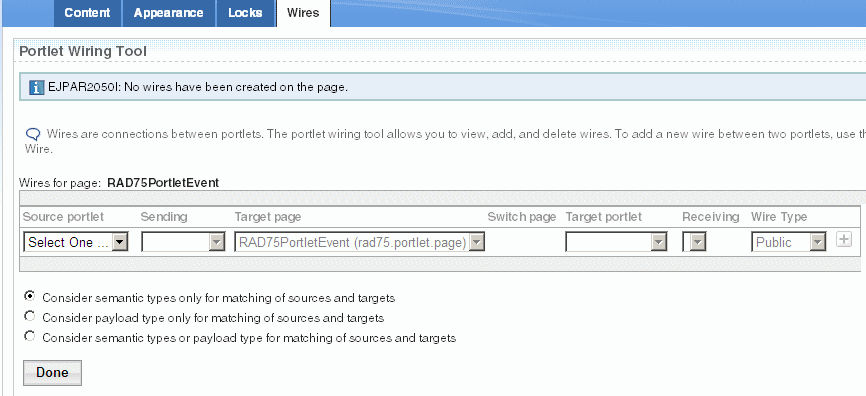
- In the Portlet Wiring Tool, we connect the portlets :
- Fill in...
Source Portlet RAD75Portlet Sending publish.{http://RAD75Portlet/}cityEvent. Target Page RAD75PortletEvent (rad75.portlet.page) Target portlet CityInfo Receiving: process.{http://RAD75Portlet/}cityEvent - Click the plus icon
 to add the wire.
- Click Done, then click Home.
- Fill in...
Testing the application
To test the event link between the two portlets:
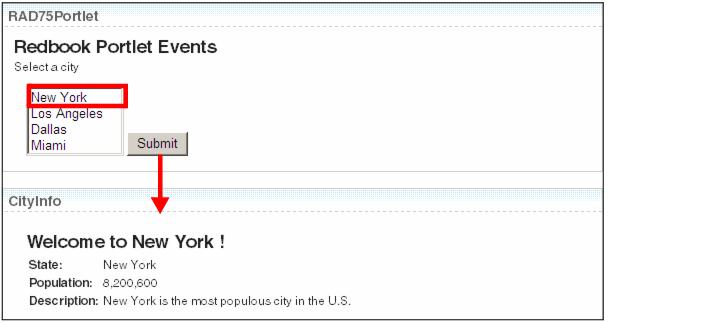
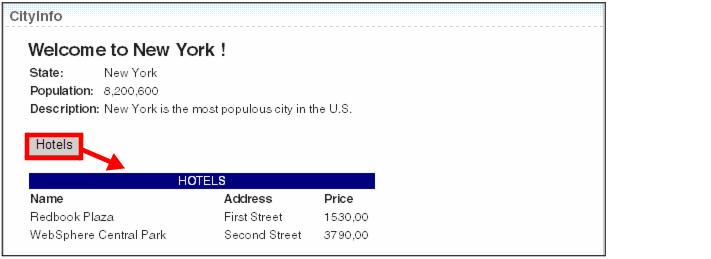
- Select New York in the first portlet and click Submit.
- The second portlet shows information about the selected city .
Ajax using JSR 286 resource serving
Serve resource requests, for example PDFs, with resource URLs.
Resources are portal context aware, because the context information is passed directly over the WSRP 2.0 protocol.
Resource serving allows Ajax support inside portlets, and the portlets have a way to return XML, JSON, HTML fragments, or other content. Only the portlet that made the requisition is updated, not the entire page .

To make a resource serving portlet, implement...
The output for the serveResource method must have a separate content page.
Resource serving example
Here, we adapt the previous portlet events example to add Ajax behavior. The CityInfoPortlet will have a button to retrieve a list of hotels about the current city .
Project setup
We have two projects:
| RAD75PortletEventAjaxEAR | Enterprise application |
| RAD75PortletEventAjax | Application with two portlets (based on JSR 286) |
Import these projects from the interchange file...
C:\7672code\portal\RAD75PortletEventAJaxStart.zip
Import some other required files...
- Select...
-
File | Import | General | File System | Next
- In the File system dialog:
- For From directory, click Browse to locate...
-
C:\7672code\portal
- Select hotel.jsp in the right frame.
- For Into folder, click Browse and locate:
RAD75PortletEvent/WebContent/_CityInfo/jsp/html
- Click Finish.
- For From directory, click Browse to locate...
- Repeat the import to place HotelInfoBean.java into package...
-
com.ibm.rad75portlet.bean
- Repeat the import to place HotelDB.java into the com.ibm.rad75portlet.db package.
Tip: You can also drag and drop a file from a Windows Explorer folder directly into the appropriate folder or package in RAD v7.5.
Developing the Ajax code
Open the CityInfoPortlet class in the editor and perform these steps:
- Add an implements clause to the class declaration...
public class CityInfoPortlet extends GenericPortlet implements ResourceServingPortlet
{
To resolve the import...
-
Source | Organize Imports (or Ctrl+Shift+O)
- Right-click in the editor window, and select Source | Override/Implement Methods. Select the serveResource method, After processEvent(...) for Insertion point, and click OK.
- When the serveResource method is called, we have to find the hotels of the selected city and set a parameter with the hotel list to the JSP file. Add the code as shown to the serveResource method...
public void serveResource(ResourceRequest request, ResourceResponse response) throws PortletException, IOException
{
 String cityId = request.getParameter("cityId");
 request.setAttribute("hotels", HotelDB.getHotels(cityId));

 PortletRequestDispatcher rd = getPortletContext().getRequestDispatcher(JSP_FOLDER + "/html/hotel.jsp");
 rd.include(request, response);
}
Select Source | Organize Imports (or Ctrl+Shift+O) to resolve the import.
- Add the code as shown (in bold) in the doView method to create the resource URL and add it to the request...
public void doView(RenderRequest request, RenderResponse response) throws PortletException, IOException { // Set the MIME type for the render response response.setContentType(request.getResponseContentType()); request.setAttribute("info",cityInfoBean); String resourceUrl = response.createResourceURL().toString(); request.setAttribute("resourceUrl", resourceUrl); // Invoke the JSP to render PortletRequestDispatcher rd = getPortletContext().getRequestDispatcher(getJspFilePath(request, VIEW_JSP)); rd.include(request,response); } - Locate the JavaScript snippet file and copy its contents:
C:\7672code\portal\SnippetJavaScriptAjax.txt
- Paste the code into the CityInfoPortletView.jsp after the tags <portlet-client-model:init......</<portlet-client-model:init>. This code has JavaScript functions that call Ajax functions.
- Next, we create a Hotels button with an event click that targets the resource URL, and a <div> tag where the list of hotels will appear. Add the code as shown into CityInfoPortletView.jsp after the </table> tag...
</table>
<br> <================== existing tag
<form>
 <input type="button"
  onclick="<portlet:namespace/>getHotels('${requestScope.resourceUrl}',
     'hotels','${requestScope.info.cityId}')" value="Hotels" >
</form>
</c:if> <================== existing tag
<div id="hotels"> </div>
Deploying and running the application
In the Enterprise Explorer...
-
RAD75PortletEvent (right-click) | Run As | Run on Server
In the subsequent dialog, click Finish to publish the application to the WebSphere Portal server.
After the application has been deployed RAD opens a browser in the Workbench.
Note: After deploying the application, you have to connect the portlets. Follow the instructions in Connecting the portlets.
Testing the application
To test the Ajax functionality, perform these steps:
- In the first portlet, select New York from the list box and click Submit.
- The second portlet shows the information about New York city.
- Click Hotels to call an Ajax function that retrieves a list of Hotels .
More information
For more information about portal technology, refer to these resources:
- Building Composite Applications, SG24-7367
- Portal Application Design and Development Guidelines, REDP-3829
- IBM WebSphere Portal V5 A Guide for Portlet Application Development, SG24-6076
- IBM WebSphere Portal V5.1 Portlet Application Development, SG24-6681
- IBM RAD V6 Portlet Application Development and Portal Tools, SG24-6681
- WebSphere Portal 6.1 Info Center
- WebSphere Portal and Lotus Web Content Management Product documentation
- WebSphere Portal zone
- WebSphere Portal family wiki
- What's new in the Java Portlet Specification v2.0 (JSR 286)
- What's new in WebSphere Portal v6.1: JSR 286 features
- Develop Web portal sites and portlets with IBM RAD v7.0
- WebSphere Portal v6.0 Refresh Pack 1 and instructions (WP v6.0.1)
- WebSphere Portal Version 6.0.1
- WebSphere Portal Update Installer:
- WAS v6.0.2 Fix Pack 17 (WAS v6.0.2.17) for Windows platforms
- Update Installer for WAS v6.0 releases
- Troubleshooting - RAD v7.x cannot sense the proper state of Portal Server v6.x:
- Configure WebSphere Portal v6.0 servers for development with RAD and Software Architect v7.0