Generating a JSF client
We now generate a Java Server Faces client to test the EJB and the access to the CICS system.
Creating a Web project and enterprise application
Follow these steps:

| Create a new Dynamic Web Project:
|

 Project name: Taderc99Web
|
|
Target Runtime: WebSphere Application Server v7.0
|
|
Dynamic Web Module version: 2.5
|
|
EAR membership: Taderc99EAR
|
|
Click Finish.
|
|
| Add the projects Taderc99 and cicseci7102 to the Java EE Module dependencies list of the EAR project and of the Web project:
|
|
Right-click Taderc99EAR and select Properties. Select Taderc99 and cicseci7102 and click OK.
|
|
Right-click Taderc99Web and select Properties. Select Taderc99.jar and cicseci7102.rar and click OK.
|
Creating a Web page
Follow these steps:
|
| Add a new Web page called CustomerPage:
|
|
Right-click WebContent (in Taderc99Web) and select New Ć Web Page.
|
|
Type CustomerPage, as name, select Basic Templates Ć JSP, and click Finish.
|
Creating a data component
Follow these steps:
|
| Look at the Page Data view:
|
If you do not see a Services folder, click the Create a new data component icon  , select Services, and click OK (Figure | 0-12).

Figure 20-12 New data component dialog
|
| In the Page Data view, right-click Services and select New Ć EJB Session bean.
|
|
| In the Add Session Bean dialog:
|
|
Click Add to open the Add EJB Reference dialog.
|
|
In the EJB Reference dialog (Figure | 0-13), select Taderc99EAR Ć Taderc99 Ć CustomerImpl.
|
|
The Name becomes ejb/CustomerImpl.
|
|
For RefType, select Local.
|
|
Click Finish.
|
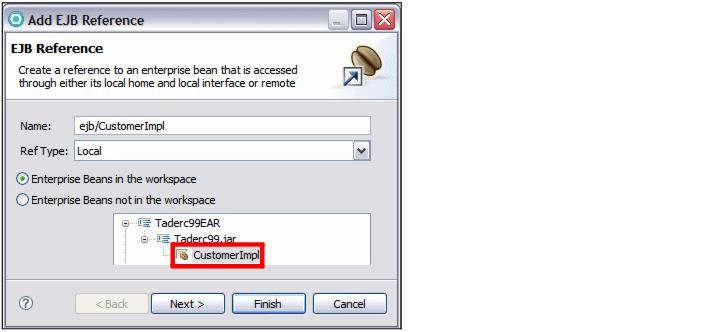
Figure 20-13 Creation of an EJB reference in the Web project
|
| The ejb/CustomerImpl service is added to the Add Session Bean dialog. The getCustomer method is selected (Figure | 0-14). Click Finish.
|

Figure 20-14 Add Session Bean
|
A customer_GetCustomer method with an input Param Bean and an output Result Bean both of type sample.cics.data.CustomerInfo
|
|
An action customer_GetCustomer.doAction
|

Figure 20-15 Page data view with Service bean to expose EJB 3
Creating the Web page content
Follow these steps:
|
| Expand customer_GetCustomer Ć Param Bean Ć arg.
|
|
| Select customerNumber and drag it into the editor of the Web page.
|
When prompted for Configuring Data Controls:
|
Select Inputting data.
|
|
Change the label to Customer number.
|
|
Click Options and verify that a Submit button is created.
|
|
Click Finish.
|
|
This adds an Input Control and a Button to the page
|
|
| Drag and drop the action: customer_GetCustomer.doAction onto the Submit button.
|
|
| Drag and drop the Result Bean below the Submit button.
|
When prompted for Configuring Data Controls:
|
Select the fields that were present in DFHCOMMAREA (starting with customerNumber).
|
|
Optionally tailor the labels and the sequence.
|
|
Click Finish.
|
|
| Save and close the Web page.
|