Creating a Web service JavaServer Faces client
The Web Service Discovery Dialog allows you to discover a Web service that exists online or in the workspace, create a proxy to the Web service, and then place the methods of the proxy on a Faces JSP file:
| Remove the RAD75WebServiceClientEAR from the server using Add and Remove Projects (we will add a project to the EAR and automatic publishing gets into the way). Alternatively, expand the server, right-click the project, and select Remove. |
| Create a dynamic Web project by selecting File Ć New Ć Dynamic Web Project. |

|
|
|
|
|
|
|
|
|

Figure 18-18 New Faces Project
| In the RAD75WebServiceJSFClient project, right-click the WebContent and select New Ć Web Page. |
| Enter WSJSFClient as the file name. Select JSP as the basic template and click Finish. |
| The WSJSFClient.jsp opens in an editor. Select the Design or Split tab. |
| In the Palette, select the Data and Services category. Select Web Service and click into the JSF page (Figure | 8-19). |

Figure 18-19 Drag and drop Web Service to JSF design view
| In the Add Web Service dialog (Figure | 8-20), click Add. The Web Services Discovery Dialog opens. Select Web services from your workspace. |

Figure 18-20 Add Web service
| In the Web Services, from your workspace page (Figure | 8-21), click BankService with the URL of the RAD75WebServiceWeb project (not the RAD75WebServiceWeb2 project). |
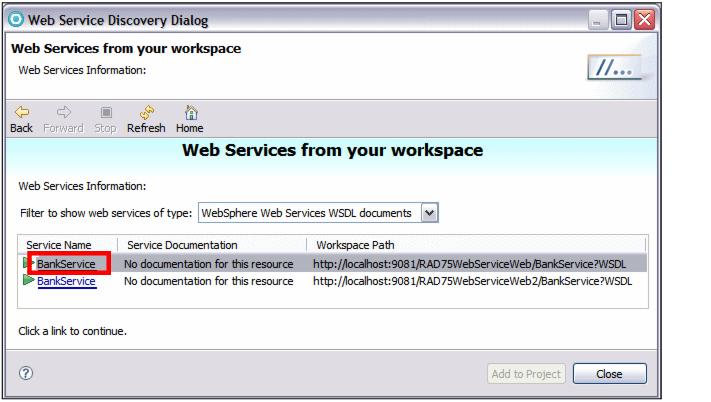
Figure 18-21 Web Services Discovery Dialog: Web Services from your workspace
| The service is listed with its port. Select Port: BankPort and click Add to Project (Figure | 8-22). |

Figure 18-22 Web Services Discovery Dialog: Add to Project
| The Web service you selected is now listed in the list of Web services. Select Bank as the service, retrieveCustomerName(String) as method, Create input form and results display, and click Next (Figure | 8-23). |

Figure 18-23 Select Web service method
| In the Input form page (Figure | 8-24): |
|
|
|
|
|
|

Figure 18-24 Web service input form
| In the Results form page, change the Label to Customer's full name is:. |
| Click Finish to generate the input and output parts into the JSF page (Figure | 8-25). Save the file. |

Figure 18-25 JSF page with Web service invocation
| Right-click WSJSFClient.jsp and select Run As Ć Run on Server. The client application is deployed to the server for testing. Type 111-11-1111, click Get Full Name, and the result is displayed (Figure | 8-26). |
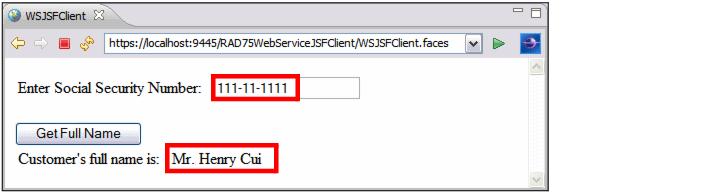
Figure 18-26 JSF client run
|
ibm.com/redbooks |