Working with the Design view
The XML editor allows the XML source for the schema to be edited directly but also features a Design view. The Design view presents the XML document in such a way that it makes editing and navigation through the document easier. The Design view can be used with any type of XML document, but because we are working with an XML schema, a format understood by the editor, the editor can help with the creation of the schema document. We will create the schema in the Design view.

| Select the Design view. Notice that the top-right corner displays View: | mplified.
|

 Simplified-The Simplified view hides many of the complicated XML schema capabilities so that you can only create XML schemas that conform to best practice authoring patterns.
|
|
Detailed-The Detailed view exposes the full set of XML schema capabilities so you can create XML data structures using any authoring pattern. XML schema elements such as xsd:choice, xsd:sequence, xsd:group, and element references are not displayed in the Simplified view and actions in the editor that enable the creation of these elements are not available.
|
We use the Detailed view for this exercise.
|
| Select Detailed from the View: drop down list . Dismiss the pop-up about switching view modes.
|
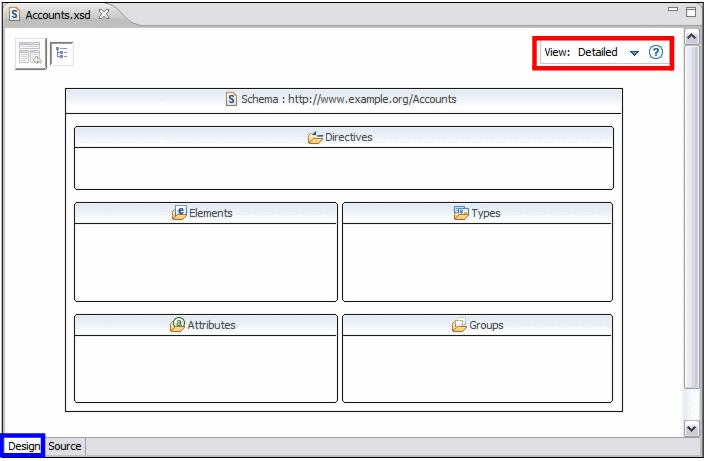
Figure 10-1 XML schema editor: Design view, Detailed
|
Note: In the detailed view, the top level view is called the schema index view. We can navigate to this at any time while editing the schema by clicking the Show schema index view button in the top left of the design view. The button has the icon  . In Figure | -1, this is currently greyed out because we are already viewing the schema index. . In Figure | -1, this is currently greyed out because we are already viewing the schema index.
|
|
| Change the namespace prefix and target namespace:
|
|
In the Properties view, select the General tab. You can see the current namespace prefix and target namespace. The values are tns and http://www.example.org/Accounts.
|
|
Change the Prefix to itso.
|
|
Change the Target namespace to http://itso.rad75.xml.com.
|
|
| The Accounts.xsd file must contain a complex type element where we will define the account information, including account id, account type, balance, interest, and customer information:
|
|
In the Design view, right-click the Types category and select Add ComplexType. Overtype the name provided with the value Account.
|
|
Tip: Alternatively, you can change the element name in the Properties view, General tab, Name field. The Properties view provides many options for modifying the properties of an XML schema.
|
|
| Right-click the Account complex type, and select Add Sequence. The design view switches from showing the schema index to only showing the Account complex type:
|
|
Clicking the Show schema index view icon returns to the schema index.
|
|
Double-clicking the Account complex type shows only this type in the detailed view.
|
|
Note: In simplified view you are not able to see the Add Sequence option in the context menu, because the Simplified view hides many of the more complicated XML elements.
|
|
| Right-click the Account complex type, and select Add Element.
|
|
| Change the element name to accountID .
|
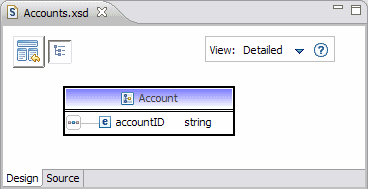
Figure 10-2 Account complex type
|
| In our bank, the account ID is 6 to 8 characters long and takes numerical values in the range 0-9:
|
|
In the Specific constraint values section, select Patterns and click Add. The Regular Expression Wizard opens.
|
|
In the Regular Expression Wizard :
|
 Type [0-9]{6,8} in the current regular expression field, and click Next.
|
|
In the Sample text area, type 123456. Note that the warning at the top of the dialog box disappears.
|
|
Click Finish.
|
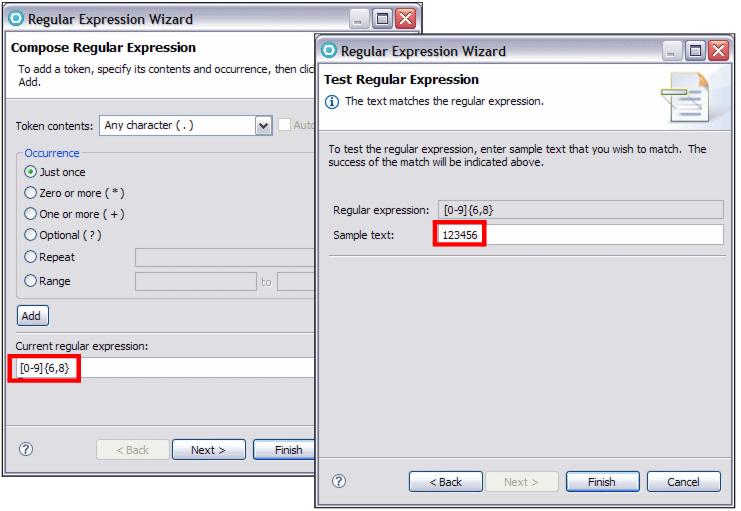
Figure 10-3 Regular Expression Wizard
|
Note that the type for accountID changes from string to AccountIDType, because we have constrained the string to create a new type.
|
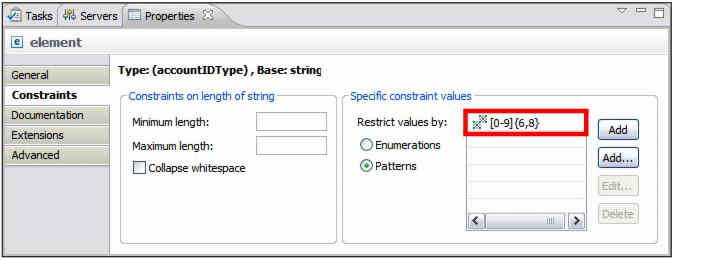
Figure 10-4 Properties view with constraint
|
| In the Design view, right-click the sequence icon  and select Add Element. Change its name to accountType. A bank account has three account types: Savings, Loan, and Fixed: and select Add Element. Change its name to accountType. A bank account has three account types: Savings, Loan, and Fixed:
|
|
In the Properties view, select the Constraints tab. Under Specific constraint values, select Enumerations.
|
|
Click Add and enter Savings.
|
|
Click Add and enter Loan.
|
|
Click Add and enter Fixed.
|
In the Design view, right-click the sequence icon  and select Add Element. Change its name to balance. and select Add Element. Change its name to balance.
|
|
Select Browse from the drop-down menu, then select decimal.
|
|
Add an element named interest and set the type to decimal as before.
|
|
In the Properties view Constraints tab, set the Minimum value to 0 and Maximum value to 100.
|
|
In the Properties view, General tab, select the drop-down menu for the Type and select New.
|
|
In the New Type dialog, select Complex Type and Create as local anonymous type, then click OK .
|
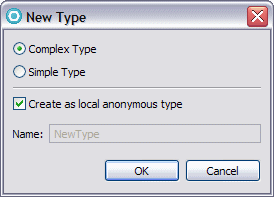
Figure 10-5 new Type dialog
|
| Click the plus sign to the right of customerInfo, and a (CustomerInfoType) box appears to the right of the Account box.
|
|
| Right-click (CustomerInfoType) and select Add Element. Change the name to firstName.
|
|
| Add another element named lastName.
|
|
| Add another element named phoneNumber, which holds values with a format such as (408) 456-7890:
|
|
Click Add.... In the Current regular expression area, type \([0-9]{3}\) | -9]{3}-[0-9]{4}, and click Next. Note that there is a space between the area code and the local phone number.
|
|
Enter (408) 456-7890 as Sample text and click Finish.
|
The Design view is shown in Figure | -6.
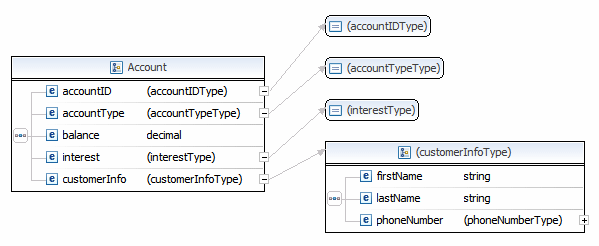
Figure 10-6 Account type complete
|
Tip: The Design view can be exported as an image for use elsewhere by selecting XSD Ć Export Diagram as Image from the menu.
|
|
| If this XML schema is to define the structure of an XML document that can actually be created, the XML schema must have a global element. All we have at present is a complex type definition. We have to define at least one element of this type. We can add a global element named accounts as follows:
|
Click the show schema index view icon  at the top left corner. at the top left corner.
|
|
In the Design view of the schema, right-click the Elements category and select Add Element.
|
|
Change the name to accounts.
|
|
In the Properties view, General tab, select the drop-down menu for Type and select New. In the New Type dialog, select Complex Type and Create as local anonymous type, and click OK.
|
|
Double-click accounts and you are switched to the detailed view for the accounts element. Right-click accountsType and select Add Element.
|
|
Change the name to account.
|
|
Right-click account and select Set Type Ć Browse Ć Account.
|
|
In the Design view, make sure account is selected. In the Properties view, General tab, set the Minimum Occurrence to 1 and Maximum Occurrence to unbounded.
|