WAS v8.5 Administration
- Class Loaders
- WAS and Java EE application class loaders
- WebSphere extensions class loader
- Application and web module class loaders
- Handling Java Native Interface code
- Configuring class loaders for Java EE applications
- Application server class loader policies
- Class loading and delegation mode
- Shared libraries
- Class loader viewer
- Learning class loaders for Java EE by example
- Example 1: Simple web module packaging
- Example 2: Adding an EJB module and utility jar
- Example 3: Changing the WAR class loader delegation mode
- Example 4: Sharing utility JAR files using shared libraries
- OSGi class loaders
- Packaging EJB 3.1 modules
- Packaging JPA persistence units
- JPA access intent
- Packaging resource adapters
- Packaging Web modules
- Packaging EJB 3.1 content in Web modules
- Sample application
- Download the application
- Import the application to the development tool
- Customize the sample application
- Create the ITSO Bank DB2 database
- Configure web module extensions
- Package recommendations
- Create WebSphere-enhanced EAR files
- Configure the JDBC provider and data source for DB2
- Configure substitution variables
- Configure a virtual host
- Set the default virtual host for web modules
- Examine the WebSphere-enhanced EAR file
- Export an application project to an EAR file
- Prepare the runtime environment for the application
- Create an environment variable for the application file directory
- Create the ITSO Bank application server
- Define the ITSO Bank virtual host
- Create the virtual host for the IBM HTTP Server
- Create a DB2 JDBC provider and data source
- Deploy
- Deploy using the monitored directory support feature
- Deploy applications using the job manager
- Deploying business-level applications
- Create a business-level application
- Deploy application clients
- Installing application client environments
- Preparing the sample application
- Launching the J2EE client
- Working with applications
- Replacing an entire application EAR file
- Replacing or adding an application module
- Replacing or adding single files in an application or module
- Removing application content
- Removing files from an EAR file
- Performing multiple updates to an application or module
- Rolling out application updates to a cluster
- Application version rollout
- Application edition management and rollout
- Installing an application edition
- Activating an edition
- Create routing policies for application editions
- Validating an edition
- Rolling out an edition
- Rolling back an edition
- Hot deployment and dynamic reloading
Class Loaders
Class loaders enable the JVM to load Java classes for use by applications during deployment and operation.When you start a JVM, it uses the following class loaders:
- Bootstrap class loader
Loads only the core Java libraries in...
- JAVA_HOME/jre/lib
This class loader, which is part of the core JVM, is written in native code.
- Extensions class loader
Loads the code in the extensions directories...
-
JAVA_HOME/jre/lib/ext
...or any other directory specified by the property...
-
java.ext.dirs system
This class loader is implemented by the class...
-
sun.misc.Launcher$ExtClassLoader
- Application class loader
Loads code found on...
-
java.class.path
...which ultimately maps to the system CLASSPATH variable. This class loader is implemented by the class...
-
sun.misc.Launcher$AppClassLoader
Each JVM has its own set of class loaders. In an environment that is hosting multiple application servers (JVMs), the class loaders for the JVMs are completely separate even if they are running on the same physical machine.
The parent-delegation model states that a class loader delegates class loading to its parent before trying to load the class itself. The parent class loader can be either another custom class loader or the bootstrap class loader. However, a class loader can delegate requests only to its parent class loader and never to its child class loaders. A class loader can go up the hierarchy but never down.
The extensions class loader is the parent for the application class loader. The bootstrap class loader is the parent for the extensions class loader. hierarchy.
- Bootstrap class loader
- Extensions class loader
- Application class loader
If the application class loader needs to load a class, it first delegates to the extensions class loader, which in turn delegates to the bootstrap class loader. If the parent class loader cannot load the class, the child class loader tries to find the class in its own repository. In this manner, a class loader loads only classes that its ancestors cannot load.
WAS and Java EE application class loaders
When working with Java EE applications, two additional types of class loaders are involved:
- The application server class loaders, which loads all of the classes needed for the application server in which the enterprise applications are running.
- The application class loaders, which loads the application classes as defined in web.xml.

WAS provides several custom delegated class loaders, similar to those class loaders, but it implements the extensions as OSGi packages.

The top box represents the Java class loaders (bootstrap, extensions, and application). WebSphere loads just enough here to get itself bootstrapped and to initialize the WebSphere extensions class loader.
WebSphere extensions class loader
The WebSphere extensions class loader is where WAS itself is loaded. WebSphere is packaged as a set of OSGi bundles with each OSGi bundle loaded separately by its own class loader. This network of OSGi class loaders is then connected to the extensions class loader, and the remainder of the class loader hierarchy through an OSGi gateway class loader.
Beginning with WebSphere V6.1, extensions began using OSGi packaging and the runtime classes are stored in...
-
INSTALL_ROOT/plugins
The class path used by the extensions class loader is retrieved from the property...
-
ws.ext.dirs
...which is initially derived from the WAS_EXT_DIRS environment variable set in the setupCmdLine script file.
Each directory listed in the ws.ext.dirs environment variable is added to the WebSphere extensions class loaders class path, and every .jar file and .zip file in the directory is added to the class path.
Although the classes and installedChannels directories no longer exist in the INSTALL_ROOT directory, the setupCmdLine script still adds them to the extensions class path. Thus, if you added our own JAR files to one of these directories in previous releases, we can create this directory and add your JAR files to it, and the JAR files are still loaded by the extensions class loader. However, avoid this situation by migrating away from such a setup.
Alternatively, if you developed Java applications that rely on the WebSphere JAR files that were in...
-
INSTALL_ROOT/lib
...prior to V6.1, modify the application to retain compatibility. WAS provides the following thin client libraries that are designed specifically for such applications:
- The administrative client library
- The web services client library
We can find these thin client libraries in...
-
INSTALL_ROOT/runtimes
- com.ibm.ws.admin.client_8.5.0.jar
- com.ibm.ws.webservices.thinclient_8.5.0.jar
These libraries provide everything the application might need to connect to and work with WebSphere.
WAS V8.5 provides the ability to restrict access to internal WebSphere classes so that applications do not make unsupported calls to WebSphere classes that are not published in the official WAS API. Select the option...
-
Access to internal server classes
...in the main WAS configuration page under...
-
Servers | Server Types | WebSphere Application servers | YourAppSrvName
The default setting for this option is Allow, meaning the applications can make unrestricted calls to non-public internal WebSphere classes. This function might be prohibited in future releases. Therefore, as an administrator, consider switching this setting to Restrict to see whether applications still work as expected. If applications depend on non-public WebSphere internal classes, you will receive a ClassNotFoundException. In this case, we can switch back to the Allow setting. To retain compatibility with future WAS releases, developers can migrate applications so the applications do not make unsupported calls to the WebSphere internal classes.
Application and web module class loaders
Java EE 6 applications consist of the following primary elements:- Web modules
- EJB modules
- Application client modules
- Resource adapter archives (RAR files)
- Utility JAR files
Utility JAR files contain code used by both EJB and servlets. Utility frameworks, such as log4j, are good examples of a utility JAR file.
EJB modules, utility JAR files, resource adapter files, and shared libraries that are associated with an application are always grouped together into the same class loader. This class loader is called the application class loader. Depending on the class loader policy, this class loader can be shared by multiple applications (EAR files) or can be unique for each application, which is the default.
By default, web modules receive their own class loader, a WAR class loader, to load the contents of the WEB-INF/classes and WEB-INF/lib directories. We can modify the default behavior by changing the application's WAR class loader policy. We can find this policy setting in the dmgr console by clicking...
-
Applications | WebSphere enterprise applications | application_name | Class loading and update detection | WAR class loader policy
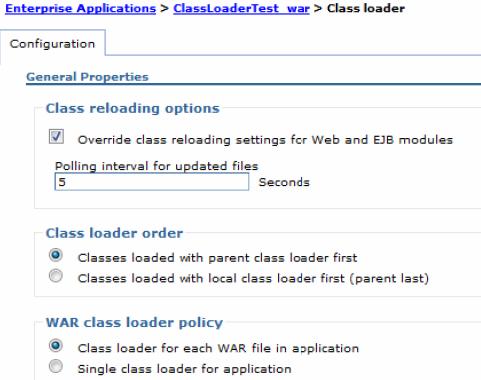
The default WAR class loader policy setting is the Class loader for each WAR file in application option. Called Module in previous releases and in the application deployment descriptor, as viewed in Rational Application Developer.
If the WAR class loader policy is set to the Single class loader for application option, the web module contents are loaded by the application class loader in addition to the EJB, RAR files, utility JAR files, and shared libraries. The application class loader is the parent of the WAR class loader.
The application and the WAR class loaders are reloadable class loaders. They monitor changes in the application code to reload modified classes automatically. We can modify this behavior at deployment time.
Handling Java Native Interface code
Because a JVM has only a single address space and because native code can be loaded only once per address space, the JVM specification states that native code can be loaded only by one class loader in a JVM. This design might cause a problem if, for example, we have an application (EAR file) with two web modules that both need to load the same native code through a JNI. Only the web module that first loads the library will succeed.To solve this problem, we can break out just the few lines of Java code that load the native code into a class on its own and place this file on WebSphere's application class loader (in a utility JAR file). However, if you deploy multiple such applications (EAR files) to the same application server, we have to place the class file on the WebSphere extensions class loader instead to ensure the native code is loaded only once per JVM.
If the native code is placed on a reloadable class loader (such as the application class loader or the WAR class loader), it is important the native code can unload itself properly if the Java code needs to reload. WebSphere has no control over the native code, and if the native code does not unload and load properly, the application might fail.
If one native library depends on another library, the handling of JNI code can become even more complicated.
Configuring class loaders for Java EE applications
We provided an overview of WebSphere class loaders and how they work together to load classes. WAS includes settings that allow you to influence the class loader behavior. We provide information about these options in this section.
Application server class loader policies
For each application server in the system, we can set the class loader policy to either Single or Multiple. From the dmgr console, click...
-
Servers | Server Types | WebSphere application servers | server_name
Next, on the Configuration tab under the Server-specific Application Settings section, select the appropriate class loader policy.
When set to Single, a single application class loader is used to load all EJB, utility JAR files, and shared libraries within the application server (JVM). If the WAR class loader policy is set to use the Single class loader for application option, the web module contents for this particular application are also loaded by this single class loader.
When set to Multiple, which is the default, each application receives its own class loader for loading EJB, utility JAR files, and shared libraries. Depending on whether the WAR class loader policy is set to use the Class loader for each WAR file in application option or the Single class loader for application option, the web module might or might not receive its own class loader.
Here is an example to illustrate. Suppose that we have two applications, Application1 and Application2, running in the same application server. Each application has one EJB module, one utility JAR file, and two web modules. If the application server has its class loader policy set to Multiple and the class loader policy for all the web modules are set to use the Class loader for each WAR file in application option

Each application is completely separated from the other application, and each web module is completely separated from the other web module in the same application. WebSphere's default class loader policies results in total isolation between the applications and the modules.
Now, if we change the class loader policy for the WAR2-2 module to use the Single class loader for application option

Web module WAR2-2 is loaded by Application2's class loader and classes, and for example, classes in the Util2.jar file can see classes in WAR2-2's /WEB-INF/classes and /WEB-INF/lib directories.
As a last example, if we change the class loader policy for the application server to Single and also change the class loader policy for WAR2-1 to use the Single class loader for application option, the result is as shown below.

There is now only a single application class loader loading classes for both Application1 and Application2. Classes in the Util1.jar file can see classes in the EJB2.jar, Util2.jar, WAR2-1.war, and WAR2-2.war files. However, the classes that are loaded by the application class loader still cannot see the classes in the WAR1-1 and WAR1-2 modules because a class loader can find only classes by going up the hierarchy, never down.
Class loading and delegation mode
The WebSphere application class loader and WAR class loader both have a setting called the class loader order. Determines whether the class loader order follows the normal parent delegation model or wether the class loader overrides it.
The class loading mode uses one of the following options:
- Classes loaded with parent class loader first (default)
- Classes loaded with local class loader first (parent last)
In previous WebSphere releases, these settings were called PARENT_FIRST and PARENT_LAST, respectively.
If the class loading policy is set to classes loaded with local class loader first (parent last), the class loader attempts to load classes from its local class path before delegating the class loading to its parent. This policy allows an application class loader to override and provide its own version of a class that exists in the parent class loader.
Terminology note: The settings page for a web module includes the following options for class loader order:
- Classes loaded with parent class loader first
- Classes loaded with local class loader first (parent last)
However, in this context, the local class loader really refers to the WAR class loader, so the Classes loaded with local class loader first option actually refers to classes loaded with WAR class loader first.
Assume that we have an application, similar to Application1 in the previous examples, and it uses the popular log4j package to perform logging from both the EJB module and the two web modules. Also, assume that each module has its own, unique log4j.properties file that is packaged into the module. We can configure log4j as a utility JAR file so that we have only a single copy of it in the EAR file.
However, if you use this configuration, you might be surprised to see that all modules, including the web modules, load the log4j.properties file from the EJB module. The reason is that when a web module initializes the log4j package, the log4j classes are loaded by the application class loader. The log4j package is configured as a utility JAR file. Thus, it looks for a log4j.properties file on its class path and finds it in the EJB module.
Even if we do not use log4j for logging from the EJB module and the EJB module does not, therefore, contain a log4j.properties file, log4j does not find the log4j.properties file in any of the web modules. Remember that a class loader can find classes only by going up the hierarchy, never down.
To solve this problem, use one of the following approaches:
- Create a separate file, for example, a Resource.jar file.
Configure the file as a utility JAR file, move all the log4j.properties files from the modules into this file, and make their names unique, such as...
- war1-1_log4j.properties
- war1-2_log4j.properties
- ejb1_log4j.properties
When initializing log4j from each module, tell it to load the proper configuration file for the module instead of the default file (log4j.properties).
- Keep the log4j.properties file for the web modules in its original directory...
-
/WEB-INF/classes
...add the log4j.jar file to both web modules...
-
/WEB-INF/lib
...and set the class loading mode for the web modules to use the Classes loaded with local class loader first (parent last) option. When initializing log4j from a web module, it loads the log4j.jar file from the module itself, and log4j finds the log4j.properties file on its local class path, which is the web module itself. When the EJB module initializes log4j, it loads from the application class loader, and it finds the log4j.properties file on the same class path, which is the one in the EJB1.jar file.
- If possible, merge all log4j.properties files into one file and place this file on the application class loader (for example, in a Resource.jar file).
The singleton pattern is used to ensure that a class is instantiated only once. However, once only means once for each class loader. If we have a singleton instantiated in two separate web modules, two separate instances of this class are created, , one for each WAR class loader. Thus, in a multi-class loader environment, take care when implementing singletons.
Shared libraries
Shared libraries are files used by multiple applications. Examples of shared libraries are commonly used frameworks, such as Apache Struts or log4j. You use shared libraries typically to point to a set of JAR files and associate those JAR files to an application, a web module, or the class loader of an application server. Shared libraries are especially useful when we have different versions of the same framework to associate to different applications.Shared libraries are defined using the administration tools. They consist of a symbolic name, a Java class path, and a native path for loading JNI libraries. They can be defined at the cell, node, server, or cluster level. However, simply defining a library does not cause the library to be loaded. You must associate the library to an application, a web module, or the class loader of an application server for the classes represented by the shared library to be loaded. Associating the library to the class loader of an application server makes the library available to all applications on the server.
If associate a shared library to an application, do not associate the same library to the class loader of an application server.
We can associate the shared library to an application using one of the following methods:
- We can use the dmgr console.
The library is added using the Shared libraries references link under the References section for the enterprise application.
- We can use the manifest file of the application and the shared library.
The shared library contains a manifest file that identifies it as an extension. The dependency to the library is declared in the application's manifest file by listing the library extension name in an extension list.
Shared files are associated with the class loader of an application server using the administrative tools in the Server Infrastructure section.
To define a new class loader...
-
Application Server Configuration | Java and Process Management | Class loader | New
After you define a new class loader, we can modify it. We can also use the Shared library references link to associate it to the shared libraries that you need.
When designing the application, consider how every class is loaded to avoid having to add classes in different directories to make the application work.
Class loader viewer
If the class loader viewer service is not enabled, the class loader viewer displays only the hierarchy of class loaders and their class paths, but not the classes that are actually loaded by each of the class loaders. Thus, in this case, the search capability of the class loader viewer is lost.
To enable the class loader viewer service, click...
-
Servers | Server Types | WebSphere application server | server_name | Class Loader Viewer Service | Enable service at server startup option
Restart the application server for this setting to take effect.
Learning class loaders for Java EE by example
We described all of the different options for influencing class loader behavior. In this section, we take an example and use the options that we discussed so that we can better evaluate the best solution for the applications.
We created a simple application with one servlet and one EJB. Both call a class, VersionChecker. This class can print the class loader that was used to load the class. The VersionChecker class also has an internal value that can be printed to check the version of the class that we are using. This information is used later to demonstrate the use of multiple versions of the same utility JAR file.
VersionChecker class source code...
package com.itso.classloaders;

public class VersionChecker
{
    static final public String classVersion = "v1.0";

    public String getInfo()
    {
        return ("VersionChecker is " + classVersion + ". Loaded by " + this.getClass().getClassLoader());
    }
}
After being installed, the application can be invoked through...
-
http://localhost:9080/ClassLoaderTestWeb/ExampleServlet
This invokes the ExampleServlet, which calls VersionChecker and then displays the classloader.
The VersionCheckerV1.jar file contains the VersionChecker class file that returns Version number 1.0. For all of the following tests, we have, unless otherwise noted, left the class loader policies and loading modes to their defaults. In other words, we have one class loader for the application and one for the WAR file. Both have their delegation modes set to use the Classes loaded with parent class loader first option.
Example 1: Simple web module packaging
For this example, we start with the assumption that our utility class is used only by a servlet. We placed the VersionCheckerV1.jar file under the WEB-INF/lib directory of the web module.
Place JAR files used by a single web module or a JAR file that only this web module can see in the WEB-INF/lib directory.
Results of running the application with such a configuration...
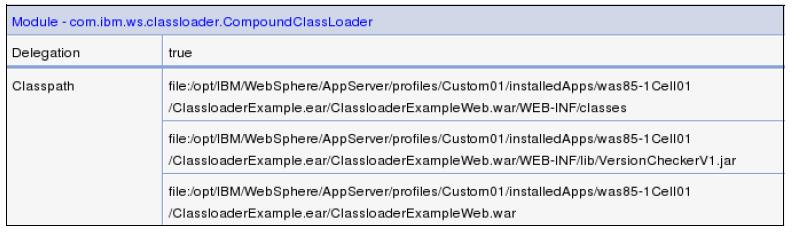
VersionChecker called from Servlet

VersionChecker is v1.0.
Loaded by com.ibm.ws.classloader.CompoundClassLoader@6c2c0f37[war:ClassloaderExample/ClassloaderExampleWeb.war]

Local ClassPath:
/opt/WAS/AppServer/profiles/Custom01/installedApps/Cell01/ClassloaderExample.ear/ClassloaderExampleWeb.war/WEB-INF/classes:

/opt/WAS/AppServer/profiles/Custom01/installedApps/Cell01/ClassloaderExample.ear/ClassloaderExampleWeb.war/WEB-INF/lib/VersionCheckerV1.jar:

/opt/WAS/AppServer/profiles/Custom01/installedApps/Cell01/ClassloaderExample.ear/ClassloaderExampleWeb.war

Parent:com.ibm.ws.classloader.CompoundClassLoader@f1a5f601[app:ClassloaderExample]
Delegation Mode: PARENT_FIRST
We can learn the following information from this trace:
- The type of the WAR class loader is:
com.ibm.ws.classloader.CompoundClassLoader
- It searches classes in the following order:
- ClassLoaderTestWeb.war/WEB-INF/classes
- ClassLoaderTestWeb.war/WEB-INF/lib/VersionCheckerV1.jar
- ClassLoaderTestWeb.war
The WEB-INF/classes folder holds unpacked resources (such as servlet classes, plain Java classes, and property files), and the WEB-INF/lib folder holds resources that are packaged as JAR files. Choose to package your Java code in JAR files and place them in the WEB-INF/lib directory, or we can put them unpacked in the WEB-INF/classes directory. Both directories are on the same class path. Because we developed and exported our sample application from Rational Application Developer, our servlet goes into the WEB-INF/classes folder, because the Java classes are not packaged in a JAR file when exporting an application.
We can also put code or properties in the root of the WAR file. Note, however, that this folder is also the document root for the web server if the File Serving Servlet capabilities are enabled. In this case, any files in this folder are then accessible from a browser. According to the Java EE 6 specification, the WEB-INF folder is protected, which is why the classes and lib folders are under the WEB-INF folder.
The class loader class path is built dynamically at application start.
We can also use the class loader viewer to display the class loader. In the administrative console, click...
-
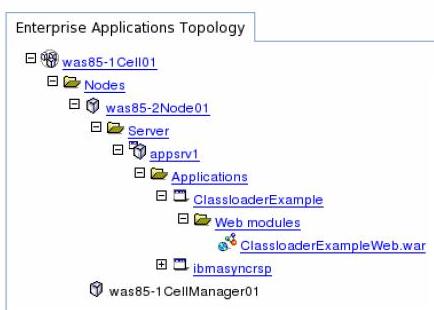
Troubleshooting | Class Loader Viewer. Next, expand appserver_name | Applications | ClassLoaderTest | Web modules | ClassLoaderTestWeb.war
When the web module is expanded, the class loader viewer shows the hierarchy of class loaders, from the JDK extensions and application class loaders at the top to the WAR class loader at the bottom, called the compound class loader.
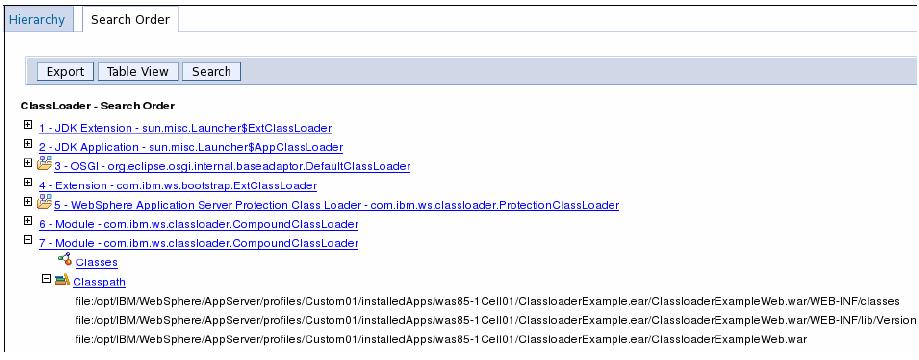
If you expand the class path for com.ibm.ws.classloader.CompoundClassLoader, you see the same information as the VersionChecker class prints...
For the class loader viewer to display the classes that are loaded, it must be enabled
The class loader viewer also has a table view that displays all of the class loaders and the classes that are loaded by each of them on a single page. The table view also displays the Delegation mode. For the Delegation mode, true means that classes are loaded with parent class loader first, and false means that classes are loaded with local class loader first (parent last) or the WAR class loader in the case of a web module.
The WAR class loader loaded our example servlet and the VersionChecker class, as expected. Table view is enabled by clicking Table View at the top of the class loader viewer.
The class loader viewer also has a search feature where we can search for classes, JAR files, folders, and so on. This search capability can be particularly useful if we do not know which of the class loaders loaded a class in which we are interested. The search feature is case sensitive but allows wild cards. So, a search for *VersionChecker* finds our VersionChecker class.
Example 2: Adding an EJB module and utility jar
Next, we add an EJB to our application that also depends on the VersionChecker.jar file. For this task, we added a VersionCheckerV2.jar file to the root of our EAR file. The VersionChecker class in this JAR file returns v2.0. To make it available as a utility JAR on the extensions class loader, we add a reference to it in the EJB module's manifest file...Manifest-Version: 1.0 Class-Path: VersionCheckerV2.jar
The result is that we now have a web module with a servlet in the WEB-INF/classes folder and the VersionCheckerV1.jar file in the WEB-INF/lib folder. We also have an EJB module that references the VersionCheckerV2.jar utility JAR file in the root of the EAR file.
VersionChecker called from Servlet

VersionChecker is v2.0.
Loaded by com.ibm.ws.classloader.CompoundClassLoader@22da9c28[app:ClassloaderExample]
Local ClassPath:
/opt/WAS/AppServer/profiles/Custom01/installedApps/was85-1Cell01/Classlo
aderExample.ear/ClassloaderExampleEJB.jar:/opt/WAS/AppServer/profiles/Cu
stom01/installedApps/was85-1Cell01/ClassloaderExample.ear/VersionCheckerV2.jar

Parent: com.ibm.ws.classloader.ProtectionClassLoader@5bfa0027
Delegation Mode: PARENT_FIRST

VersionChecker called from EJB
VersionChecker is v2.0.
Loaded by com.ibm.ws.classloader.CompoundClassLoader@22da9c28[app:ClassloaderExample]
Local ClassPath:
/opt/WAS/AppServer/profiles/Custom01/installedApps/was85-1Cell01/Classlo
aderExample.ear/ClassloaderExampleEJB.jar:/opt/WAS/AppServer/profiles/Cu
stom01/installedApps/was85-1Cell01/ClassloaderExample.ear/VersionCheckerV2.jar
Parent: com.ibm.ws.classloader.ProtectionClassLoader@5bfa0027
Delegation Mode: PARENT_FIRST
As the results show, the VersionChecker is v2.0 when called both from the EJB module and the web module. The reason is the WAR class loader delegates the request to its parent class loader instead of loading it itself. Thus, the utility JAR file is loaded by the same class loader regardless of whether it was called from the servlet or the EJB.
Example 3: Changing the WAR class loader delegation mode
For this example, we consider that we now want the web module to use the VersionCheckerV1.jar file from the WEB-INF/lib folder. For that task, we have to change the class loader delegation from parent first to parent last.
Set the delegation mode to PARENT_LAST:
- Select the All applications entry in the navigation area.
- Select the ClassloaderExample application.
- Select Manage modules under the Modules section.
- Select the ClassloaderExampleWeb module.
- Change the Class loader order to the Classes loaded with local class loader first (parent last) option. Remember, this entry must really be called classes loaded with WAR class loader first
- Click OK.
- Save the configuration.
- Restart the application.
The VersionCheckerV1 in...
-
WEB-INF/lib
...returns a class version of 1.0. Example 23-5 shows that this is the version now used by the WAR file.
VersionChecker called from Servlet

VersionChecker is v1.0.
Loaded by com.ibm.ws.classloader.CompoundClassLoader@cf9e0ce5[war:ClassloaderExample/Classlo
aderExampleWeb.war]
Local ClassPath:
/opt/WAS/AppServer/profiles/Custom01/installedApps/was85-1Cell01/Classlo
aderExample.ear/ClassloaderExampleWeb.war/WEB-INF/classes:/opt/WAS/AppSe
rver/profiles/Custom01/installedApps/was85-1Cell01/ClassloaderExample.ear/Classloa
derExampleWeb.war/WEB-INF/lib/VersionCheckerV1.jar:/opt/WAS/AppServer/pr
ofiles/Custom01/installedApps/was85-1Cell01/ClassloaderExample.ear/ClassloaderExam
pleWeb.war
Parent:com.ibm.ws.classloader.CompoundClassLoader@cac8c5a0[app:ClassloaderExample]
Delegation Mode: PARENT_LAST

VersionChecker called from EJB
VersionChecker is v2.0.
Loaded by com.ibm.ws.classloader.CompoundClassLoader@cac8c5a0[app:ClassloaderExample]
Local ClassPath:
/opt/WAS/AppServer/profiles/Custom01/installedApps/was85-1Cell01/Classlo
aderExample.ear/ClassloaderExampleEJB.jar:/opt/WAS/AppServer/profiles/Cu
stom01/installedApps/was85-1Cell01/ClassloaderExample.ear/VersionCheckerV2.jar
Parent: com.ibm.ws.classloader.ProtectionClassLoader@5bfa0027
Delegation Mode: PARENT_FIRST
Use this technique to specify that a web module must use a specific version of a library, such as Struts, or to override classes coming with the WebSphere runtime. Put the common version at the top of the hierarchy and the specialized version in the WEB-INF/lib folder.
Keep in mind that if the library being loaded in turn depends on other libraries, make sure these depencies are compatible. This problem usually arises when the depency classes are the same as those from libraries packaged and shipped in WAS. The depency libraries must also be loaded overriding the internal classes to keep constancy of versions and compatibility.
If you use the search feature of the class loader viewer to search for *VersionChecker*, you see the two entries...
Class Loader Viewer search feature...
WAS Module Compound Class Loader (WAR class loader):

file: / opt / IBM / WebSphere / AppServer / profiles / Custom01 / installedApps /
was85-1Cell01 / ClassloaderExample.ear / ClassloaderExampleWeb.war / WEB-INF / lib
/ VersionCheckerV1.jar

WAS Module Jar Class Loader (Application class loader):

file: / opt / IBM / WebSphere / AppServer / profiles / Custom01 / installedApps /
was85-1Cell01 / ClassloaderExample.ear / VersionCheckerV2.jar
Example 4: Sharing utility JAR files using shared libraries
In this example, the VersionCheckerV2.jar file is used by a single application. To share the JAR file among multiple applications, we can package it within each EAR file. However, changes to this utility JAR file require that you redeploy all applications. To avoid this situation, we can externalize global utility JAR files using a shared library.
Shared libraries can be defined at the cell, node, application server, and cluster levels. After you define a shared library, associate it to the class loader of an application server, application, or individual web module. Depending on the target to which the shared library is assigned, WebSphere uses the appropriate class loader to load the shared library.
We can define as many shared libraries as you want. We can also associate multiple shared libraries with an application, web module, or application server.
Using shared libraries at the application level
To define a shared library named VersionCheckerV2_SharedLib and associate it to our ClassLoaderTest application:
- In the dmgr console, click Environment | Shared Libraries.
- Select the scope at which you want this shared library to be defined, such as Cell, and click New.
- Specify the following properties
Name VersionCheckerV2_SharedLib. Class path List of entries on the class path. Press Enter between each entry. Note that if provide an absolute path, we can use WebSphere variables, such as... -
%FRAMEWORK_JARS%/VersionCheckerV2.jar
Make sure that you declare this variable at the same scope as the shared library for cell, node, server, or cluster. Also, if in a ND Environment, verify the contents of the directory referenced here are also present and accessible in the remote nodes. WAS does not replicate its contents if it is not in the master repository directory.
Native library path Enter a list of DLLs and .so files for use by the JNI code. To have only one instance of a version of a class shared among applications, select the option...
-
Use an isolated class loader for this shared library
- Click OK.
- Click...
- Applications | Application Types | WebSphere enterprise applications | ClassloaderExample | References | Shared library references | Application | ClassloaderExample | Reference shared libraries | VersionCheckerV2_SharedLib
- Click the arrow button to move it to the Selected column.
- Click OK and save the configuration.
If we remove the VersionCheckerV2.jar file from the root of the EAR file, remove the reference to it from the EJB module's manifest file, and restart the application server, we see the results. Remember the class loader order for the web module still uses the Classes loaded with local class loader first (parent last) option.
-
VersionChecker called from Servlet
VersionChecker is v1.0.
Loaded by com.ibm.ws.classloader.CompoundClassLoader@c779cc83[war:ClassloaderExample/ClassloaderExampleWeb.war]
Local ClassPath: /opt/WAS/AppServer/profiles/Custom01/installedApps/was85-1Cell01/ClassloaderExample.ear/ClassloaderExampleWeb.war/WEB-INF/classes
opt/WAS/AppServer/profiles/Custom01/installedApps/was85-1Cell01/ClassloaderExample.ear/ClassloaderExampleWeb.war/WEB-INF/lib/VersionCheckerV1.jar
opt/WAS/AppServer/profiles/Custom01/installedApps/was85-1Cell01/ClassloaderExample.ear/ClassloaderExampleWeb.war
Parent:com.ibm.ws.classloader.CompoundClassLoader@727540a4[app:ClassloaderExample]
Delegation Mode: PARENT_LAST
VersionChecker called from EJB
VersionChecker is v2.0.
Loaded by
com.ibm.ws.classloader.CompoundClassLoader@727540a4[app:ClassloaderExample]
Local ClassPath:
/opt/WAS/AppServer/profiles/Custom01/installedApps/was85-1Cell01/ClassloaderExample.ear/ClassloaderExampleEJB.jar
opt/WAS/Examples:/opt/IBM/WebSphere/Examples/VersionCheckerV2.jar
Parent: com.ibm.ws.classloader.ProtectionClassLoader@7c23bd5c
Delegation Mode: PARENT_FIRST
As expected, because of the delegation mode for the web module, the VersionCheckerV1.jar file was loaded when the servlet needed is the VersionChecker class. When the EJB needed the VersionChecker class, it was loaded from the shared library, which points to...
-
/opt/WAS/Examples/VersionCheckerV2.jar
If we want the web module to also use the shared library, we restore the class loader order to the default option...
-
Classes loaded with parent class loader first
...for the web module.
Using shared libraries at the application server level
A shared library can also be associated with an application server. All applications deployed on this server see the code listed on that shared library.
To associate a shared library to an application server, first create an additional class loader for the application server, as follows:
- Select an application server.
- In the Server Infrastructure section, expand Java and Process Management. Select Class loader.
Click OK.
- Choose New, and select a class loader order for this class loader, either...
- Classes loaded with parent class loader first (parent first)
- Classes loaded with local class loader first (parent last)
- Click the class loader created.
- Click Shared library references.
- Click Add, and select the library to associate to this application server.
Repeat this operation to associate multiple libraries to this class loader. For our example, we selected the entry...
-
VersionCheckerV2_SharedLib
- Click OK.
- Save the configuration.
- Restart the application server for the changes to take effect.
Because we attached the VersionCheckerV2 shared library to the class loader of the application server, we obtain the results
VersionChecker called from Servlet

VersionChecker is v1.0.
Loaded by com.ibm.ws.classloader.CompoundClassLoader@ed3b6b7[war:ClassloaderExample/ClassloaderExampleWeb.war]

Local ClassPath:
/opt/WAS/AppServer/profiles/Custom01/installedApps/was85-1Cell01/Classlo
aderExample.ear/ClassloaderExampleWeb.war/WEB-INF/classes:/opt/WAS/AppSe
rver/profiles/Custom01/installedApps/was85-1Cell01/ClassloaderExample.ear/Classloa
derExampleWeb.war/WEB-INF/lib/VersionCheckerV1.jar:/opt/WAS/AppServer/pr
ofiles/Custom01/installedApps/was85-1Cell01/ClassloaderExample.ear/ClassloaderExam
pleWeb.war
Parent:
com.ibm.ws.classloader.CompoundClassLoader@e2af7a6b[app:ClassloaderExample]
Delegation Mode: PARENT_LAST

VersionChecker called from EJB
VersionChecker is v2.0.
Loaded by com.ibm.ws.classloader.ExtJarClassLoader@20f56ae6[server:0]
Local ClassPath: /opt/WAS/Examples/VersionCheckerV2.jar
Parent: com.ibm.ws.classloader.ProtectionClassLoader@18bdbd69
Delegation Mode: PARENT_FIRST
The new class loader that we defined is called ExtJarClassLoader, and it loads the VersionCheckerV2.jar file when requested by the EJB module.
The WAR class loader continues to load its own version due to the delegation mode.
OSGi class loaders
Because the EAR deployment descriptors are no longer required, the current development tools do not generate them automatically. If you choose to include deployment descriptors:
- Start a developer tool.
We can use...
- IBM Rational Application Developer v8.5 for WebSphere Software
- IBM WAS Developer Tools
- IBM Assembly and Deploy Tools for WebSphere Administration
- Create a new Java EE application project or import an existing project. Complete the following actions to create or import projects:
- To create a new project, click...
-
File | New | Enterprise Application Project
...and then follow the wizard instructions.
- To import an existing project, click...
-
File | Import
...and then follow the wizard instructions.
- To create a new project, click...
- In the Enterprise Explorer view, right-click the Java EE project, and click Java EE | Generate Deployment Descriptor Stub.
- Expand the Java EE projects META-INF folder to reveal the created application.xml deployment descriptor file.
To edit it, either double-click the file or double-click the EAR file's deployment descriptor icon
- On the right side of the deployment descriptor editor is a pane with fields for the information that can be entered into the deployment descriptor.

- To create other optional Java EE EAR-file level deployment descriptors, click the corresponding link under the WebSphere Deployment Descriptors heading
The options are noted in the following list:
- WebSphere Bindings Descriptor
- WebSphere Extensions Descriptor
- WebSphere Programming Model Extensions Descriptor
Selecting any of these options creates the corresponding deployment descriptor file. If it does not exist, in the Java EE EAR file's META-INF folder, the file can then be accessed two other ways. We can either double-click it in the META-INF folder or click the corresponding link under the WebSphere Deployment Descriptors heading on the main Java EE EAR deployment descriptor editor.
Packaging EJB 3.1 modules
The EJB 3.1 and EJB 3.0 specifications are similar. However, EJB 3.1 content can be packaged and deployed as a part of a WAR file.
EJB 3.1 modules can also be packaged without a deployment descriptor. To package a module without a deployment descriptor, create a JAR file or WAR file with metadata in annotations located in the EJB component.
The EJB 3.0 or later specification does not support the use of container-managed persistence or bean-managed persistence (BMP). JPA is used for data persistence. The EJB 2 and EJB 2.1 specifications continue to support CMP and BMP as per the J2EE specifications. WAS V8.5 also supports CMP and BMP.
Deployment descriptors for an EJB 3 or later module...
| File name | Required Content |
| ejb-jar.xml | No EJB and EJB method definitions, transaction attributes, resource references, and so on |
| ibm-ejb-jar-bnd.xml | No Explicit binding names for EJB and resource references |
| ibm-ejb-jar-ext.xml | No Configuration of WebSphere extensions to the Java EE EJB module specification |
| ibm-web-ext-pme.xml | No Configuration for WebSphere programming model extensions to the Java EE specification |
EJB interface bindings
WAS V8.5 binds EJB 3.1 interfaces and homes into two distinct JNDI namespaces, one JVM-local and one global namespace. Local interfaces and homes are bound to the JVM-local namespace, and remote interfaces and homes are bound to the global namespace.
Unless overridden by explicitly assigned bindings, the interfaces are bound using default names that are generated automatically by the EJB container. Each default name has a short version and a long version. The short name consists of only the Java package name and class name of the interface. The long name prefixes the short name with a component ID, which is composed of the enterprise application name, the module name, and the component name.
The auto-generated default names can be overridden by placing a file named ibm-ejb-jar-bnd.xml in the EJB JAR module's META-INF directory with the preferred names. By overriding the default names, we can define our own naming convention independently from how the beans are packaged into the application or module hierarchy.
-
java:[scope] namespaces
The java:global, java:app, and java:module namespaces are introduced by the Java EE 6 specification. They provide a mechanism for binding and looking up resources that are portable across application servers.
The server always creates a default long-form binding for each EJB interface, including the no-interface view, and places them into the java:global, java:app, and java:module namespaces. If the bean exposes only one interface, including the no-interface view, a short-form binding is also created and placed into the java:global, java:app, and java:module namespaces. The default bindings are only created for session beans. They are not created for entity beans or message driven beans. For example, the bean component MyBeanComponent exposes just the one com.foo.MyBeanComponentLocalInterface interface, and is packaged in the myModule.jar module in the myApp.ear file. As a result, the following bindings are created in the java:[scope] namespaces:
- java:global/myApp/myModule/MyBeanComponent!com.foo.MyBeanComponentLocalInterface
- java:global/myApp/myModule/MyBeanComponent
- java:app/myModule/MyBeanComponent!com.foo.MyBeanComponentLocalInterface
- java:app/myModule/MyBeanComponent
- java:module/MyBeanComponent!com.foo.MyBeanComponentLocalInterface
- java:module/MyBeanComponent
The EJBLink and AutoLink features
When an EJB client (typically a servlet, or another EJB) wants to call an EJB, it first needs to locate the EJB home in the JNDI namespace. In EJB 2.1 and earlier, this call was completed with a few lines of code written explicitly by the EJB client developer. However, with the EJB 3 or later support and source code annotations, WAS V8.5 supports two different mechanisms that resolve references:
- EJBLink feature, defined by the EJB specification
- AutoLink feature a WAS extension
When the EJB container encounters an annotation for an EJB reference, it tries to look up the referenced EJB automatically. The EJBLink and AutoLink features use different search criteria to locate the targeted bean component.
- EJBLink searches for the targeted bean component using the explicitly specified bean name.
- AutoLink searches for the targeted bean component using the interface the bean implements.
If no explicit bindings are provided, but a bean name is provided, the EJBLink feature is used. If no explicit bindings are provided, and no bean name is provided, the AutoLink feature is used. The EJBLink and AutoLink features are never used together as part of the same search process
The scope of EJBLink and AutoLink is limited to the enterprise application in which the EJB reference appears and within the application server on which the referring module is assigned. If the target EJB resides in an application other than the client's or if it is deployed on an application server other than the client's, EJBLink or AutoLink does not work. In this case, target bindings must be defined explicitly in the client's bindings file.
For an EJB module, this bindings file is ibm-ejb-jar.bnd.xml. For a web module, it is ibm-web-bnd.xmi.
The AutoLink feature handles only EJB references and are available for clients running in the EJB container, web container, or application client container.
Just-in-time generation of EJB deployed code
EJB modules must contain EJB deployed code in order for an application server to be able to run the EJB. EJB-deployed code contains application-server specific code that bridges the EJB interface and implementation code to the application server's EJB implementation.
In previous versions of WAS and with previous versions of Java EE, the EJB deployed code was generated using one of the following methods:
- During development, using the Prepare for Deploy action in Rational Application Developer or the WAS Toolkit
- Before installing an EAR file to WAS using the EJBDeploy tool from a command line
- During installation of an EAR file to WAS using the installation windows in the dmgr console WAS V8.5 and EJB 3.x support a feature called just-in-time (JIT) deployment.
JIT removes the need to process the EJB modules to generate the deployed code. Instead, the EJB container dynamically generates the necessary code in-memory as needed when the application is running.
For EJB 3 or later, clients that are not running inside a web container, EJB container, or client container that was upgraded to the EJB 3 or later level, the JIT development does not generate the necessary classes. In this case, use the createEJBStubs tool to make the generated classes available on the client's class path. An example of this situation is a servlet running in WAS V6.1 calling an EJB 3 or later bean running in WAS V8.5. In this case, the EJB stubs are created manually, and the generated classes are added to the servlet's web module.
Mixing different EJB versions in an EAR file
WAS V8.5 allows you to mix EJB 1.1, 2 or later, and 3 or later beans in the same Java EE 6 enterprise application. However, EJB 3.x beans are not recognized in EJB 2.x or EJB 1.x modules.
The EJB 3.1 specification does not support the use of BMP and CMP entity beans in EJB 3 or later modules. EJB entity beans can be used on v8.5, but they must be packaged in an EJB 2.1 or earlier module. This method gives you time to migrate to the newest specification while you use your existing modules.
Packaging JPA persistence units
Persistence units using JPA can be packaged either into the module that uses the persistence unit or in a separate utility JAR file (packaged as a standard .jar file). If packaged as a separate utility JAR file, it must be referenced from the module that uses the persistence unit using the module's META-INF/MANIFEST.MF class path directive.
Persistence units require a persistence.xml file, which defines a JPA entity manager's configuration. Among other information, the persistence.xml file lists the entity classes and the data source to use.
A persistence unit can also include an optional orm.xml file that specifies the object-relational mapping configuration. The orm.xml file is an alternative to using annotations and can be used to override annotations in the source code to specify how the objects are persisted to the database.
JPA access intent
WAS provides an optimization enhancement for EJB 2 or later entity beans called access intent. However, because the EJB 3 or later specifications do not support entity beans, access intent support is not available for EJB 3 or later beans. Instead, WAS V8.5 provides JPA access intent, which is used to specify the isolation and lock levels used when reading data from a data source.
Restrictions...
- Access intent is available for the application in the Java EE server environment.
- Access intent is applicable to non-query entity manager interface methods. Query uses a query hint interface to set its isolation and read lock values.
- Access intent is only available for DB2 databases.
- Access intent is in effect only when pessimistic lock manager is used. To specify a pessimistic lock manager, add the following statement to the persistence unit's property list:
-
<property name="openjpa.LockManager" value="pessimistic"/>.
Packaging resource adapters
A resource adapter archive (RAR) module, also called a connector module, contains code that implements a library for connecting with a back-end enterprise information system (EIS), such as CICS, SAP, and PeopleSoft. RAR files (called connectors) are packaged as a standard Java archive with a .rar file extension. A resource adapter can be installed as a stand-alone adapter or as part of an enterprise application, in which case the resource adapter is referred to as an embedded adapter.
A connector module contains a mandatory deployment descriptor file named ra.xml that resides in the module's META-INF directory.
Packaging Web modules
Java EE 6 web modules are packaged just like web modules in earlier Java EE versions. A web module can contain servlet code, JSPs, static HTML pages, images, JavaScript, style sheets, and so on.A common challenge when working with web modules is to verify the correct version of a required Java library is loaded. Often web application developers need to include specific third-party libraries, such as log4j or Xalan/Xerces, and must verify the correct version of a library is loaded for an application.
A web module supports several deployment descriptors...
| File | Purpose |
|---|---|
| web.xml | Servlet definitions, URL mappings, and init parameters, servlet listeners, and so on |
| ibm-web-bnd.xml | Mapping of logical resources used by the web module to their runtime managed resources |
| ibm-web-ext.xml | Configuration of WebSphere extensions to the Java EE web module specification |
| ibm-web-ext-pme.xml | Configuration for WebSphere programming model extensions to the Java EE specification |
| webservices.xml | Configuration of web services and implementation code |
Because the web deployment descriptors are no longer required, the current development tools do not generate them automatically.
To create the web deployment descriptor in Rational Application Developer, right-click the web module in the Enterprise Explorer view and select...
-
Generate Deployment Descriptor Stub
If an application.xml deployment descriptor is not included in the EAR file, the context root for a web module defaults to the web module's name with out the .war extension.
WebSphere extensions to web modules
WAS provides extensions for web modules. These extensions are configured in the ibm-web-ext.xml deployment descriptor in the web module.
To create this file in Rational Application Developer, right-click the web module in the Enterprise Explorer view, and click...
-
Java EE | Generate WebSphere Extensions Deployment Descriptor
This works if the project has the facet...
-
WebSphere Web (Extended) 8.5
To edit the file, use either of the following methods:
- Expand the web module's WebContent/WEB-INF folder, and then double-click ibm-web-ext.xml.
- Click the link...
-
Open WebSphere Extensions Descriptor
...WebSphere Deployment Descriptors heading on the web module's deployment descriptor editor for web.xml...

The following sections provide information about the options in the web module extensions.
File serving
When dealing with static content (HTML pages, images, style sheets, and so on), we can choose to have these resources served by WebSphere or have them served by the HTTP server itself.
If you want WebSphere to serve the static content of the application, enable file serving in the web module extensions deployment descriptor . Enabling this feature activates a servlet that serves up any resource file packaged in the WAR file.
The file serving enabled attribute is set to true by default. By changing it to false, the web server plug-in does not send requests for static content to WebSphere but leaves it up to the HTTP server to serve them.
To enable this option, select the Enable File Serving option.
We can experience better performance serving static content from the web server than using WebSphere to serve the static content of the application because the web server serves the content directly. Moreover, a web server has more customization options than the file servlet can offer.
However, using the WebSphere file serving servlet has the advantage of keeping the static content organized in a single, deployable unit with the rest of the application. Additionally, it allows you to protect the static pages using WebSphere security.
Web application auto reload
If you select the option...
-
Enable Reloading
...in the web module extensions, the class path of the web application is monitored and all components, JAR files, or class files are reloaded when a component update is detected. The web module's class loader is shutdown and restarted. The Reload Interval is the interval between reloads of the web application. It is set in seconds.
The automatic reload feature plays a critical role in hot deployment and dynamic reload of the application.
Set the Enable Reloading enabled option to true for JSP files to be reloaded when they are changed on the file system. Reloading a JSP does not trigger the reload of the web module because separate class loaders are used for servlets and JSP.
This option is enabled by default with the reload interval set to three seconds. Thus, the classloader checks the classes on the class path for updates every three seconds. If any changes are found, those classes are reloaded. If no changes are detected, nothing happens to the classloader or the classes that are loaded. In production mode, you might consider turning this feature off or making the reload interval much higher.
Serving servlets by class name
We can use the invoker servlet to invoke servlets by class name. Note there is a potential security risk with leaving this option set in production. Use it more as a development-time feature for testing servlets quickly.
A better alternative than this option is to define servlet mappings in the web deployment descriptor for the servlets that must be available.
You configure the invoker servlet using the Enable Serving Servlets By Class Names option.
Default error page
This page is invoked to handle errors if no error page is defined or if none of the defined error pages matches the current error.
Directory browsing
This option defines whether it is possible to browse the directory if no default page is found.
Turn off this option for improved security.
Pre-compile JSPs
When a JSP is hit for the first time, it is compiled automatically into a servlet and then executed. To avoid this performance penalty the first time a JSP is hit, WebSphere allows JSPs to be pre-compiled during application installation, instead of at first invocation. Selecting this option causes the installation of the application to WebSphere to take longer, but the JSPs are served faster on the first hit. We can enable this feature from the deployment descriptor...
Automatic HTTP request and response encoding
The web container no longer automatically sets request and response encodings and response content types. The programmer is expected to set these values using the methods available in the Servlet 3.0 API. If you want the application server to attempt to set these values automatically, select the Auto Encode Requests option to have the request encoding value set. Similarly, we can select the Auto Encode Responses option to have the response encoding and content type set.
The default value of the autoRequestEncoding and autoResponseEncoding extensions is false, which means that both the request and response character encoding is set to the Servlet 3.0 specification default of ISO-8859-1. Different character encodings are possible if the client defines character encoding in the request header or if the code uses the setCharacterEncoding(String encoding) method.
The web container tries to determine the correct character encoding for the request parameter and data in any of the following cases:
- If the autoRequestEncoding value is set to true
- If the client did not specify character encoding in the request header
- If the code does not include the setCharacterEncoding(String encoding) method
The web container performs each step in the following list until a match is found:
- Looks at the character set (charset) in the Content-Type header.
- Attempts to map the server's locale to a character set using defined properties.
- Attempts to use the DEFAULT_CLIENT_ENCODING system property, if one is set.
- If a match is not found, uses the ISO-8859-1 character encoding as the default.
If you set the autoResponseEncoding value to true and the following conditions are also true:
- The client did not specify character encoding in the request header.
- The code does not include the setCharacterEncoding(String encoding) method.
Next, the web container performs the following actions:
- Attempts to determine the response content type and character encoding from information in the request header.
- If it fails, uses the ISO-8859-1 character encoding as the default.
Packaging EJB 3.1 content in Web modules
In Java EE 6 applications, it is possible to package EJB content in Web modules. A bean that is packaged inside a Web module has the same behavior as a bean packaged inside an EJB JAR module, but the rules for packaging vary, depending on the type of module being used.
The bean class files must be placed in one of two locations within the WAR file:
- WEB-INF/classes
- Within a JAR file placed in...
- WEB-INF/lib
In the first approach, the Java file is developed as a part of the same Web project. When the class is compiled, it is placed in...
- WEB-INF/classes
The second approach imports the JAR file containing the EJB contents. This JAR file can also be the result of the packaging of other projects.
If the same class is placed in both...
-
WEB-INF/classes
WEB-INF/lib...the instance of the class placed in...
- WEB-INF/classes
...is loaded, and the instance placed in a JAR file in...
- WEB-INF/lib directory is ignored.
If the same bean class is placed in two different JAR files in...
- WEB-INF/lib
...the server arbitrarily picks one class instance and loads it, ignoring the other class. This method can result in erratic behavior.
If you need to use deployment descriptors, place them in WEB-INF directory.
Preparing to use the sample application
As an example of how to package and deploy a Java EE 6 application using EJB 3.1, we use the ITSO Bank application that was developed forRational Application Developer for WebSphere Software V8 Programming Guide, SG24-7835. The structure of this application, as seen in the Enterprise Explorer view in Rational Application Developer, is shown below.
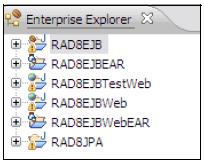
When the application is imported, the workspace has two EAR projects, called RAD8EJBEAR and RAD8EJBWebEAR. RAD8EJBEAR contains EJBs and a simple servlet for testing (in the RAD8EJBTestWeb project). A more sophisticated web application is available in the RAD8EJBWeb project. We use this application in our example.
The RAD8EJBWeb project uses the EJB in the RAD8EJB project, which in turn relies on the Persistence Unit in the RAD8JPA project.
Downloading the application
To download the sample application:
- Go to the following website: http://www.redbooks.ibm.com/abstracts/sg247835.html?Open
- Click the Additional Material link.
- Click the sg247835.zip file, and select Save to save the compressed file to your computer.
- Extract the contents of the compressed file. You will have two directories called 7835code and 7835codesolution.
Importing the application to the development tool
If you navigate to the 7835codesolution directory, you notice a number of directories. For our discussion in this section, we use the ejb directory. Contains two compressed files that include Rational Application Developer project interchange files:
To use the sample application for our exercise, import both files into Rational Application Developer for WebSphere Software:
- Start Rational Application Developer for WebSphere Software.
- To import the code, click...
-
File | Import General | Existing projects into workspace | Next
- Click the Select archive file option. Click Browse next to the Select Archive file field, and browse to the ejb directory where you extracted the sample code. Select the RAD8EJB.zip file, and click Open.
- Click Select All to select all projects in the file. Click Finish.
- You might see a pop-up window during the import process that says the project needs to be migrated. If so, click Next until the migration completes.
- Repeat the process for the RAD8EJBWeb.zip project.
If you see errors in the Markers view:
- Make sure we have the WAS V8.5 runtime environment installed and an application server defined when you import the application.
- If we have a server defined, but see errors that indicate a build path error, right-click each module where the error occurs, and click Properties | Java Build Path. Click the Libraries tab. Click JRE System Library (WAS V8.5 JRE) and then click Edit. Select Alternate JRE and then in the drop-down menu, select WAS JRE. Click Finish and then OK.
- If we have errors in the persistence.xml file, select RAD8JPA/src/META-INF/persistence.xml in the Enterprise Explorer view. Right-click and select JPA Tools | Synchronize Class List.
- If you see an error in the ejb-jar.xml file of the RAD8EJB project, we can ignore it. That file will be deleted in the next section.
Customizing the sample application
We can use the ITSO Bank application without customizing it. The team that created the application did all of the necessary development for the application to work. However, to illustrate common packaging tasks, customize the application for this example by completing the following steps:
- Remove the unnecessary deployment descriptors that were included in the application by the development team as follows:
- Expand the RAD8EJB project, and expand the ejbModule folder. Expand the META-INF folder, and delete the ejb-jar.xml file.
- Expand the RAD8EJBWebEAR project, and expand its META-INF folder. Delete application.xml.
- Expand the RAD8JPA project, and expand the src folder. Expand the META-INF folder, and delete the orm.xml file.
- The RAD8EJB project depends on the Persistence Unit defined in the RAD8JPA project.
To verify that this dependency is set up correctly, use the Deployment Assembly properties sheet. The integrated development environment (IDE) updates application.xml automatically, if one exists.
To access the Deployment Assembly properties sheet, right-click the RAD8EJBEAR project, and select Properties. Click Deployment Assembly in the left pane.
- In the EAR Module Assembly window, the list of projects included in the EAR must look like Figure 24-9. All three projects, including the RAD8JPA.jar project, are in the list.

If all three packages shown above are not listed in your properties:
- Click Add.
- In the New Assembly directive wizard, locate the Select Directive Type window, click Project, and click Next.
- In the New Assembly directive wizard, in the Project window, select the missing module, for example RAD8JPA, and click Finish. Otherwise, click Cancel.
Create the ITSO Bank DB2 database
If you plan to deploy and test this application, create the database on a DB2 system.
In the extracted files for the sample application, locate the 7835code folder. The database directory in this compressed file contains scripts that we use to prepare the database for the application.
To set up the DB2 database, verify DB2 is installed and running and then complete the following steps:
- Open a command prompt.
- cd 7835code/database/db2 folder in the extracted files for the sample application.
- Execute the createbank.bat file to define the database and table.
- Execute the loadbank.bat file to delete the existing data and add records.
- Execute the listbank.bat file to list the contents of the database.
Each command opens a new window where the DB2 script executes. Each command also leaves a connection to the database open, so you might want to execute a db2 connect reset command in each window opened to disconnect from the database so no unused connections are kept open. The database is now configured for the ITSO Bank application.
Configure web module extensions
To prepare an application for deployment, to review and possibly customize the WebSphere web module extensions. In this example, the serve servlets, by class name and directory browsing options, are disabled. It is a best practice to disable these options in production environments so that only the servlets and folders the developers intended to be accessible are accessible.
To configure the webs module extensions.
- Expand the RAD8EJBWeb project, and double-click the RAD8EJBWeb heading to open the web module deployment descriptor.
- When the window opens, click the Open WebSphere Extensions Descriptor link in the bottom right corner, to open the extensions editor.
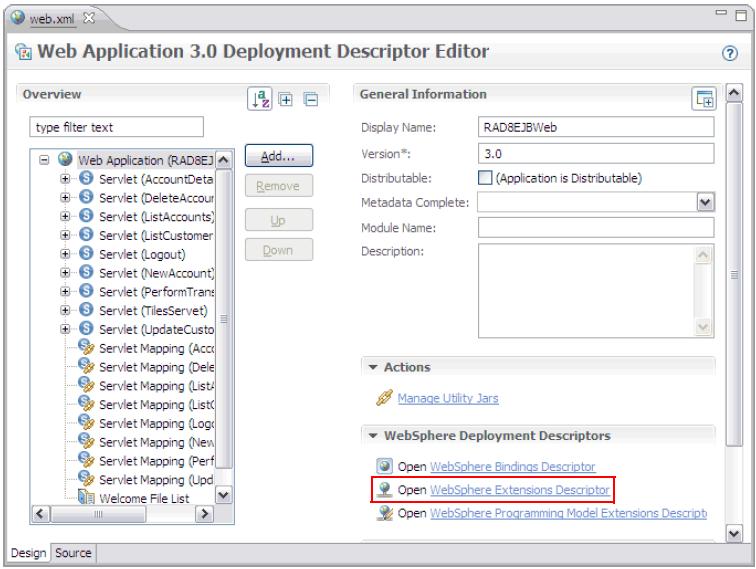
- The web module extensions editor contains options to configure the optional WebSphere extensions to web modules. In our application, we clear the Enable Directory Browsing and Enable Serving Servlets By Class Names options.

- When finished, press Ctrl+s to save the deployment descriptor and then close both the extensions file (ibm-web-ext.xml) and web.xml in the editor window.
Packaging recommendations
Package EJB JAR and WAR modules together in the same EAR module, and execute them within the same JVM process.
Avoid remote EJB calls (RMI/IIOP) across application server JVM processes, which is costly from a performance perspective.
Place utility classes used by a single web module only within the web module's WEB-INF/lib folder.
Place utility classes used by multiple modules within an enterprise application at the root of the EAR file as Utility Projects so they are accessible by both servlets and EJB.
Place utility classes used by multiple enterprise applications outside the applications on a directory referenced through a shared library definition.
Keep the class path clean and reference only required libraries for the application.
Creating WebSphere-enhanced EAR files
A WebSphere-enhanced EAR file is a regular Java EE EAR file but with additional configuration information for resources required by Java EE applications. This information is processed by WAS. Any other application server ignores this information. Although adding this extra configuration information at packaging time is not mandatory, it can simplify deployment of Java EE applications to multiple run times if the environments are similar.
When an enhanced EAR is deployed to WAS, the resources specified in the enhanced EAR are automatically configured at application level scope. When an enhanced EAR is uninstalled, the resources that are defined at the application level scope are removed as well. However, resources that are defined at a scope other than application level are not removed because they might be in use by other applications. Resources created at the application level scope are limited in visibility to only that application. Table 24-7 shows the resources that are supported by the enhanced EAR and the scope in which they are created.
| Resource | Scope |
| JDBC providers | Application |
| Data sources | Application |
| Resource adapters | Application |
| JMS resources | Application |
| Substitution variables | Application |
| Class loader policies | Application |
| Shared libraries | Server |
| JAAS authentication aliases Cell | |
| Virtual hosts | Cell |
To view the application scoped resources using the dmgr console, click Applications | Application Types | WebSphere Enterprise Applications | <application>. Select Application scoped resources in the References section. If there are no application scoped resources, we do not see this option.
Configure a WebSphere enhanced EAR
We can modify the supplemental information in an enhanced EAR using the WAS Deployment editor of any of the assembly tools. The deployment information is contained in XML files in a folder called ibmconfig in the EAR file's META-INF folder.
In the sample application, the provider is changed to use DB2. To make this change, the following configuration items are added to the deployment file:
- JAAS authentication alias
- JDBC provider for DB2
- Data source for DB2 database
A new virtual host for a domain called www.itsobank.ibm.com is also added.
To access the enhanced EAR deployment options, right-click the RAD8EJBWebEAR project, and select Java EE. Click Open WAS Deployment to open the editor.

Configure application options
The Application section contains the class loader policies and class loader mode configured for each of the containing modules. ITSO Bank runs with the default policies and modes. We do not need to change them. The Auto start feature is new with WAS V8.5. When set to Yes, the application starts at the application server start.

Configuring class loader mode and class loader policies
To configure the JAAS authentication alias required to access the application database:
- Expand the Authentication section.
- Click Add.
- In the window that opens, enter the following information:
- An alias of itsobank
- A user ID with access to the MyCo database (db2inst1 in our case)
- The password for the user ID
- An optional description of ITSO Bank
- Click OK.

Configuring JAAS authentication alias for ITSO Bank
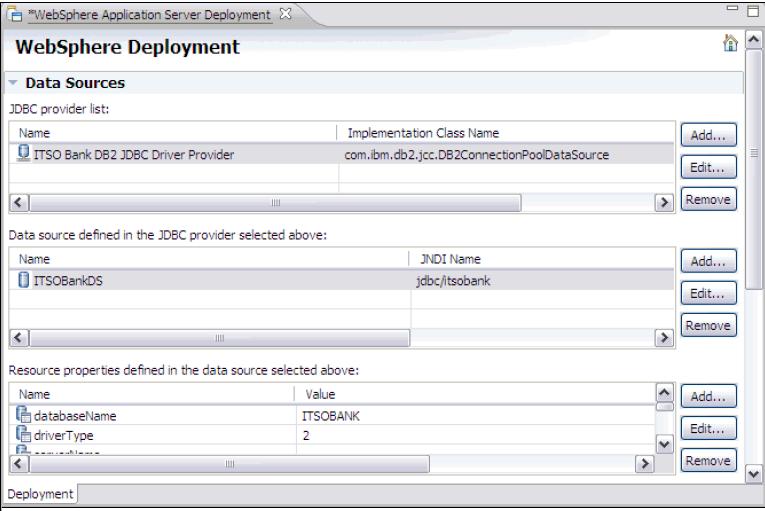
Configure the JDBC provider and data source for DB2
To configure JDBC providers, expand the Data Sources section. Before you add the DB2 provider, delete the pre-configured Derby JDBC Provider (XA) provider by selecting it and by clicking Remove.
To configure the DB2 JDBC provider:
- Click Add next to the JDBC provider list.
- In the window that opens, select the following options
� IBM DB2 as the Database type.
� DB2 Universal JDBC Driver Provider as the JDBC provider type.
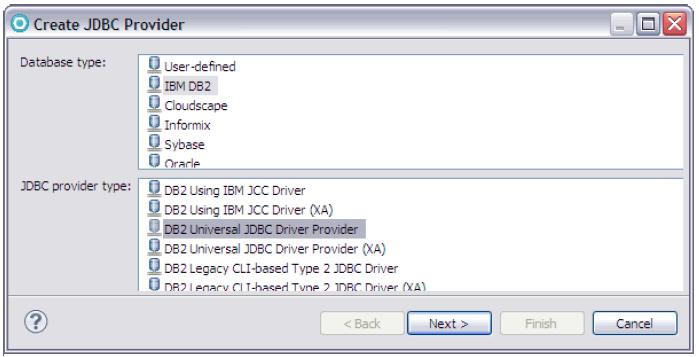
Creating a DB2 JDBC provider - Selecting the JDBC provider type
- In the next window, enter a name for the JDBC provider (for administration purposes only),
and leave the other properties as the default values

Creating a DB2 JDBC provider - Additional configuration
- Click Add next to the Data source list.

Creating a DB2 data source
- In the Create a Data Source window, select DB2 Universal JDBC Driver Provider as the JDBC provider type and v5.0 data source as the data source type
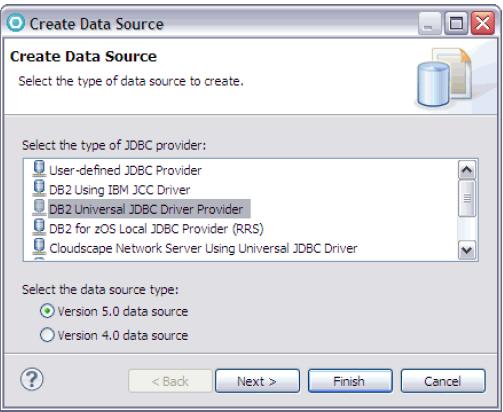
Creating a DB2 data source - Selecting the driver
- In the window that opens, enter the appropriate values for the DB2 data source:
- Enter ITSOBankDS as the name.
- Enter jdbc/itsobank as the JNDI name.
- Enter DB2 Data Source for ITSO Bank as the description.
- Select itsobank as the component-managed authentication alias
You might need to scroll the window to the far right to see the drop-down menu. In most cases, you only need to supply the container-managed authentication alias. Setting the component-managed authentication alias allows the application to supply credentials to the application server when component-managed authentication is used.
- Select itsobank as the container-managed authentication alias.
- Clear the Use this data source in container manager persistence (CMP) option.
The ITSO Bank application uses JPA for persistence, so we do not need to add support for CMP Entity beans for this data source.

- Enter ITSOBankDS as the name.
- Select the databaseName property in the Resource properties section. Enter MyCo in the Value field. Select the driverType property, and change the value from type 4 to type
- Finally, select the serverName property, and enter the IP address or host name of the database server.
Type 2 means the driver supports only one-phase commit capabilities. Type 4 means the driver supports two-phase commit capabilities. In this example, we do not need two-phase commit capabilities.
Click Finish.

When you are finished, your data source configuration looks similar to the window shown in
Configure substitution variables
The JDBC driver provider configuration relies on the following variables:
- DB2UNIVERSAL_JDBC_DRIVER_PATH
- UNIVERSAL_JDBC_DRIVER_PATH
- DB2UNIVERSAL_JDBC_DRIVER_NATIVEPATH
We need to configure the values these variables take when the application is deployed.
To configure substitution variables:
- Expand the Substitution variables section of the Deployment tab, and click Add next to the variables list.
- Enter DB2UNIVERSAL_JDBC_DRIVER_PATH as the name of the variable.
- Enter the location where the DB2 JDBC driver is located in the server, for example /opt/ibm/SQLLIB/java or C:\Program Files\IBM\SQLLIB\java.
- Optionally enter a description.
- Click OK.
- Repeat the previous steps for the second and third variables.
Configure a virtual host
To configure a virtual host:
- Expand the Virtual Hosts section of the Deployment tab, and click Add next to the Virtual host name list.
- In the Add Host Name Entry dialog box, enter itsobank_host, and click OK. Your new virtual host displays in the Virtual Hosts list.
- Click Add next to the Host aliases list.
- In the Add Host Alias Entry dialog box, enter...
-
www.itsobank.ibm.com
...for the host name and 80 for the port number. Click OK. Repeat the procedure, and add number 9080 too. You use this port when you deploy the application later. If your server uses another port, use that port number instead. We can have as many host aliases as you want.
The virtual hosts and host aliases appear in lists
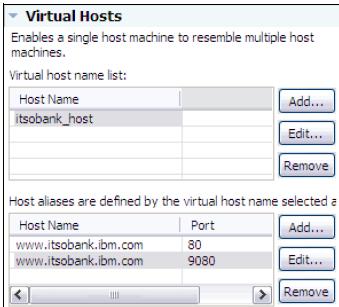
- When you are finished, press Ctrl+s to save the deployment descriptor editor.
Setting the default virtual host for web modules
Although you configured a new virtual host, itsobank_host in the enhanced EAR file, the web modules do not use it automatically. The default virtual host for a web module created in Rational Application Developer or IBM Assembly and Deploy Tools for WebSphere Administration is default_host, which is also the case for the ITSO Bank application.To modify the web modules to use itsobank_host instead:
- Expand the RAD8EJBWeb project, and double-click the RAD8EJBWeb heading to open the web module deployment descriptor.
- In the lower-right corner of the window, click the Open WebSphere Bindings Descriptor link.
- Change the Virtual Host Name to itsobank_host.
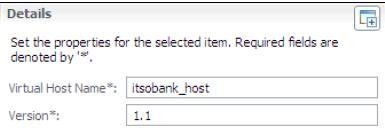
- Save the deployment descriptor by pressing Ctrl+s and then close it.
Examining the WebSphere-enhanced EAR file
The information about the configured resources is stored in the ibmconfig subdirectory of the EAR file's META-INF directory. Expanding this directory reveals the directory structure for a cell configuration. We can also see the scope level where each resource is configured.
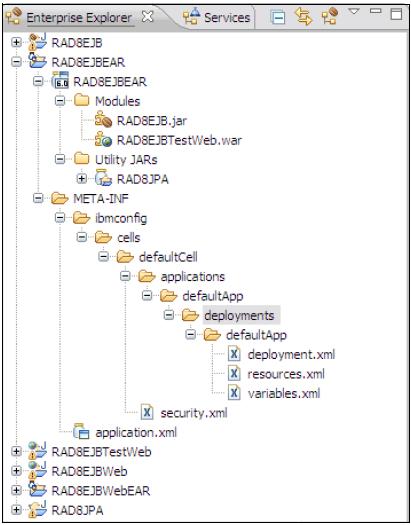
At deployment time, WAS uses this information to create the resources automatically.
Exporting an application project to an EAR file
To deploy an application, package the application as an EAR file. To export the RAD8EJBWebEAR application as an EAR file with all its dependent modules:
- Select the RAD8EJBWebEAR project, and right-click Export | EAR file from the pop-up menu.
- In the Export dialog box, browse to a destination
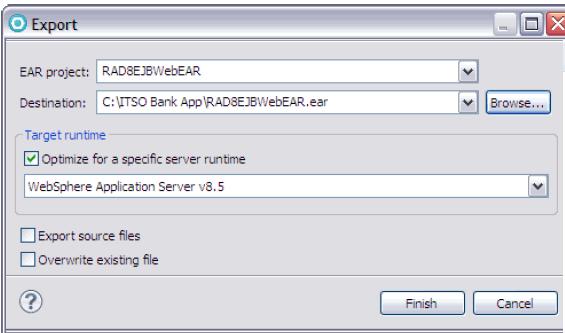
- Click Finish.
The EAR file that you export is now prepared for installation in WAS V8.5.
Version note: If you select the Optimize for a specific server runtime option, the application runs only on the version specified or on later versions. In this case, for example, the application will not run on WAS V8 if you select this option.
Preparing the runtime environment for the application
In this section, we show you how to set up a complete environment for the ITSO Bank application and how to deploy the EAR file. You will not always need or want to customize the environment as extensively as we do in this example. Some steps are optional. If all to do is deploy the application quickly.
To deploy the ITSO Bank application:
- Optional: Create an environment variable for the application file directory.
- Optional: Create an application server to host the application.
- Optional: Customize the IBM HTTP Server configuration.
- Define a JDBC provider, data source, and authentication alias. If we are using an enhanced EAR file, this step is optional.
- Define virtual hosts. If we are using an enhanced EAR file, this step is optional.
If the application to be deployed is a WebSphere enhanced EAR file, the resources configured in the enhanced EAR file are created automatically when the application is deployed. The resources that can be configured in the enhanced EAR are described in the following sections.
Create an environment variable for the application file directory
Use WebSphere environment variables, rather than hardcoded paths, when deploying an application. In this step, a variable called MyCo_ROOT is defined. The variable represents the root directory where application resources are stored. You use this variable in subsequent configuration processes when specifying, for example, the JVM log location.- We can create a directory for each application, such as...
-
/apps/application_name
...and keep all resources and directories required by the application in subdirectories under this directory. This strategy works well when deploying only one application per application server because the application server's log files can then all be changed to point to...
-
/apps/application_name/logs
An alternative is to organize resources by resource type and create directories, such as...
-
/apps/logs/application_name.log
/apps/properties/application_name.propertiesFinally, we can keep the vendor defaults as much as possible. For WebSphere, vendor defaults mean the applications are installed in...
- PROFILE_HOME/installedApps
...and the logs files are written to...
-
PROFILE_HOME/logs/server_name
In this example, we deploy a single application to a single application server. A directory called /apps/MyCo will be used to contain the application resources.
- Create the target directory on the application server operating system: /apps/MyCo
If you define and use the variable in configuration steps, but the directory is not created, the application server might not start.
- Create a MyCo_ROOT variable with a value of /apps/MyCo.
If we define this variable at the application server scope, it is known only at that level. If we are using the ND edition, and we create a cluster of application servers, define MyCo_ROOT at the cluster or cell level.
Create the ITSO Bank application server
In a distributed server environment, we can use a single application server or create multiple application servers or clusters.
The advantage of deploying multiple applications to a single application server is that it consumes less resources. There is no impact for any extra application server processes. Another benefit is that applications can make in-process calls to each other. For example, servlets in one EAR file can access the local interfaces of the EJB beans in another EAR file.
One alternative to using a single application server is to deploy each application to its own server. The advantages of deploying only one application on an application server is that it gives you greater control over the environment. The JVM heap sizes and environment variables are set at the application server level. Thus, all applications running in an application server share the JVM memory given to the application server and all see the same environment variables. Running each application in its own application server can also make it easier to perform problem determination. For example, if an application consumes a lot of CPU resources, we can determine which application is consuming CPU resources by looking at the process ID of the application server.
In our example, we have a unique application server on which we run the ITSO Bank sample application.
Change the application server working directory
This step changes the working directory for the application server process. This directory is the relative root for searching files. For example, if you perform a File.open("filename.gif") command, filename.gif must be present in the working directory. Create a specific working directory for each application server.
To change the working directory:
- Create the working directory:
-
/apps/MyCo/workingDir
The working directory is not created automatically. Create the path before starting the application server or the start sequence fails.
- In the dmgr console, click...
-
Servers | Server Types | WASs | ITSOBankServer1 | Server Infrastructure | Java and Process Management | Process Definition
- Scroll down the window and change the working directory from...
-
${USER_INSTALL_ROOT}
...to...
-
${MyCo_ROOT}/workingDir
- Click OK.
Save the changes to the master configuration.
Change the application server logging and tracing options
Next, customize the logging and tracing properties for the application server. The properties are updated so the logs are stored in...
-
MyCo_ROOT/logs
To customize logging and tracing properties:
- Create the directory...
-
/apps/MyCo/logs
- Update the logging and tracing properties to use this directory.
The following list notes several ways to access the logging and tracing properties for an application server in the dmgr console:
- Troubleshooting | Logs and Trace bar | server
- Servers | Server Types | WebSphere application servers | server | Logging and Tracing
- Servers | Server Types | WebSphere application servers | server | Process definition
Because you just updated the application server process definition, we can use the third navigation path to customize the location of the JVM logs, the diagnostic trace logs, and the process logs. Then, select Logging and Tracing from the Additional Properties section. For this example, we use basic logging. However, you might want to use HPEL.
- Select JVM Logs.
Allows you to change the JVM standard output and error file properties. Both the JVM standard output and the error file properties are rotating files. Choose to save the current file and create a new one, either when it reaches a certain size or at a specific moment during the day. We can also choose to disable the output of calls to System.out.print() or System.err.print().
Specify the new file name using an environment variable similar to the following syntax:
-
${MyCo_ROOT}/logs/SystemOut.log for System.out
${MyCo_ROOT}/logs/SystemErr.log for System.errIn this window, we can also modify how WebSphere rotates log files. Click OK.
- Select Diagnostic Trace.
Each component of the WAS is enabled for tracing. This trace can be changed dynamically while the process is running using the Runtime tab or can be added to the application server definition from the Configuration tab. As shown in
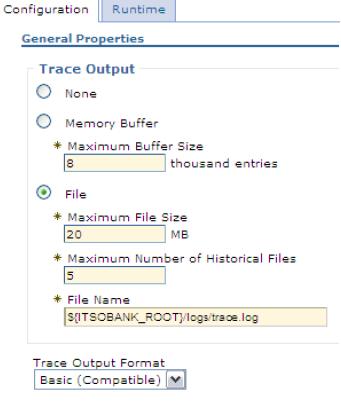
Change the trace output file name so the trace is stored in a specific location for the server using the MyCo_ROOT variable, similar to the following syntax:
-
${MyCo_ROOT}/logs/trace.log
Select the Basic format.
- Select Process Logs.
Messages written by JNI to standard out and standard error streams are redirected by WebSphere to process logs, usually called native_stdout.log and native_stderr.log. Change the native process logs to use the following paths:
-
${MyCo_ROOT}/logs/native_stdout.log
${MyCo_ROOT}/logs/native_stderr.log - All log files produced by the application server are now redirected to...
-
${MyCo_ROOT}/logs
Define the ITSO Bank virtual host
Verify the port number: The remainder of this example assumes a default HTTP port of 9080 for the web container. Before you continue, check the application server you created to determine the port that you use:- Click...
-
Servers | Server Types | WebSphere application servers | ITSOBankServer1 | Communications | Ports
- Scroll down the window then note the port listed for WC_defaulthost.
For enhanced EAR files, we can define the virtual host at packaging time.
Web modules need to be bound to a specific virtual host. For our sample, we chose to bind the RAD8EJBWeb web module to a specific virtual host called itsobank_host. This virtual host has the following host aliases:
- www.itsobank.ibm.com:80
- www.itsobank.ibm.com:9080
Any request starting with...
-
itsobank_host_alias/RAD8EJBWeb
...such as...
-
http://www.itsobank.ibm.com:9080/RAD8EJBWeb
...is served by the RAD8EJBWeb application.
We can restrict the list of hosts used to access the web application by removing hosts from the virtual host definition. For example, to prevent users from accessing the ITSO Bank application directly from the WebSphere internal HTTP server when they invoke...
-
http://www.itsobank.ibm.com:9080/RAD8EJBWeb
...we can remove www.itsobank.ibm.com:9080 from the virtual host aliases list. Then, all requests go through the web server plug-in.
To create the itsobank_host virtual host:
- Click...
- Environment | Virtual Hosts | New | itsobank_host | Apply
- Select Host Aliases in the Additional Properties section and add the two aliases...

- Click OK and save the changes to the master configuration.
Create the virtual host for the IBM HTTP Server
Now definedd the itsobank_host virtual host, you need to configure the web server to serve the host aliases in the virtual host.
Configuring virtual hosting
We do not need to create a virtual host in httpd.conf. A virtual host in httpd.conf is required only to customize the configuration, for example, by separating the logs for each virtual host.
We create virtual hosts using the VirtualHost directive...
Configuring virtual hosts in httpd.conf
<VirtualHost www.itsobank.ibm.com:80>
    ServerAdmin webmaster@itsobank.ibm.com
    ServerName www.itsobank.ibm.com
    DocumentRoot "/opt/IBM/HTTPServer/htdocs/itsobank"
    ErrorLog logs/itsobank_error.log
    TransferLog logs/itsobank_access.log
</VirtualHost>
To have multiple virtual hosts for the same IP address, use the NameVirtualHost directive...
Using the NameVirtualHost and VirtualHost directives httpd.conf
NameVirtualHost 9.42.171.97:80

<VirtualHost itso_server:80>
    ServerAdmin webmaster@itso_server.com
    ServerName itso_server

    DocumentRoot "/opt/IBM/HTTPServer/htdocs/itso_server"
    ErrorLog logs/itso_server_error.log
    TransferLog logs/itso_server_access.log

</VirtualHost>

<VirtualHost www.itsobank.ibm.com:80>
ServerAdmin webmaster@itsobank.ibm.com
ServerName www.itsobank.ibm.com
DocumentRoot "/IBM/HTTPServer/htdocs/itsobank"
ErrorLog logs/itsobank_error.log
TransferLog logs/itsobank_access.log

</VirtualHost>
The www.itsobank.ibm.com and the itso_server hosts have the same IP address, 9.42.171.97. We set this address by inserting the following line in the machine hosts file, located in...
-
%windir%\system32\drivers\etc
...in Windows systems or in...
-
/etc
...on UNIX systems:
-
9.42.171.97 www.itsobank.ibm.com itso_server
In a production environment, name resolution is achieved by creating aliases at the DNS level. In any event, be able to ping the host definedd using a command, such as ping www.itsobank.ibm.com.
Each virtual host has a different document root. Verify the directory specified exists before starting the HTTP server. While testing the setup, we can place an index.html file at the document root stating which virtual host is being called, which lets you determine the virtual host being used.
Restart the IBM HTTP Server to apply these changes. If you are running a Windows system, try to start the server by running apache.exe from the command line rather than from the Services window. This method allows you to spot error messages that are thrown at server start. In Linux or UNIX servers, we can run apachectl with the -t flag to check for errors in httpd.conf.
If virtual hosts are correctly configured, invoking...
-
http://www.itsobank.ibm.com
...or...
-
http://itso_server
...returns different HTML pages.
Create a DB2 JDBC provider and data source
Enhanced EAR file users: If we are using an enhanced EAR file, we can define the JDBC provider, data source, and J2C authentication entry at packaging time.The ITSO Bank sample application uses a relational database with the Java Persistence API to store information. To access this database, you need to define a data source with a JNDI name that matches the data source configuration in the JPA module persistence.xml file.

The ITSO Bank sample application is configured for Derby by default, but we use a DB2 database with the application. In our example here, we create the DB2 JDBC provider, data source, and JAAS authentication alias required to run against DB2.
Create the data source for the ITSO Bank DB2 database with the following information:
- Data source name: ITSOBankDS
- JNDI name: jdbc/itsobank
- Driver type: 2
- Database name: MyCo
- Server name: The DB2 server IP address or host name
- Port number: 50000
- Clear the option Use this Data Source in container-managed persistence
- Container-managed authentication alias: Selecting the corresponding authentication alias.
Be sure to test the connection before you continue.
If you need further explanation about how to achieve these configurations, refer to WAS V8.5 provides the following ways to deploy a JEE application:
- Administrative console install wizard
- Monitored directory
- Application properties files
- wsadmin scripts
- Job manager runs wsadmin scripts
- Java application programming interfaces
- Rapid deployment tools
In this chapter, we cover three different options: deploying through the dmgr console, deploying using the monitored directory feature, and deploying through the job manager.
Deploy
To deploy the application using the dmgr console:
- Click...
-
Applications | New Application | New Enterprise Application | Local file system | Browse | RAD8EJBWebEAR.ear | Open
From the installation window, we can install files located either on the same system as the browser that you are using to access the dmgr console (the local file system option) or on any node in the cell (the remote file system option).
After you make your selection, click Next. The selected file is uploaded to the application server or to the deployment manager if this is a distributed server environment.
- The dmgr console allows you to take a shortcut when installing an application.
If you select the Fast Path -Prompt only when additional information is required option, only the configuration windows where you actually need to complete information during installation are shown.
For this example, however, we take the detailed path to explain the options. Select the Detailed - Show all installation options and parameters option.
If you select the option...
-
Generate Default Bindings
...WAS completes any incomplete bindings in the application with default values, but it does not alter any existing bindings. Selecting the option...
-
Override existing bindings
...allows you to specify a bindings file containing new bindings.
The contents of the application or module that you are installing determines which options are displayed on the bindings window.
We can generate default EJB JNDI names using a common prefix. EJB beans for which you did not specify a JNDI name get a default name, built by concatenating the prefix and the EJB name. If we specify a prefix of...
-
myApp/ejb
JNDI names default to...
-
myApp/ejb/EJBName
...such as...
-
myApp/ejb/Account
Virtual host bindings We can bind all web modules to a specific virtual host, such as itsobank_host.
Because our application uses Java EE 6 and EJB 3.1 and relies on the bindings and mappings generated automatically by the EJB container, we do not need to override bindings. Leave all options for bindings cleared.
The remainder of the wizard is divided into steps. The number of steps depends on the application. For example, if the application contains EJB modules or web modules, you are prompted for the information necessary to deploy them.
- Select installation options.
Step 1 gives you a chance to review the installation options. We can specify various deployment options, such as JSP precompiling and whether to generate EJB deployment code (not applicable for EJB 3 or later beans). In this step, we can set the following options:
- If you are deploying an enhanced EAR file, we specify here whether to use the resource configuration information packaged in the enhanced EAR file. The installation window pre-selects the Process embedded configuration option. If we do not want to use the resource configuration information packaged in the enhanced EAR file, clear this option. In this example, we configured the necessary resources using the dmgr console, so verify this option is not selected. If you did not configure the resources using the dmgr console and you are deploying the enhanced EAR created earlier, leave this option selected.
- Selecting the Precompile JavaServer Pages files option makes WebSphere compile all JSP pages in the EAR file during installation instead of during run time. Thus, the first user who accesses the application does not have to wait for the JSP pages to compile.
An alternative to precompiling JSP pages is to use the JspBatchCompiler script found in the bin directory of the profile that you are using to compile the JSP pages after the application is installed.
- We can specify file permissions for files in the application.
To use one of the predefined file permissions, select it. We can also specify our own file permissions using regular expressions.
- The dmgr console displays the Application Build ID of the application being installed. This string is specified in the MANIFEST.MF file in the EAR file's META-INF folder and can be set using the Rational Application Developer for WebSphere tool. For example:
-
Implementation-Version: v1.2.3
- The dispatching and servicing of remote resources are extensions to the web container that allows frameworks, servlets, and JSP pages to include content from outside of the current executing resource's JVM as part of the response sent to the client.
To enable these features, select the options to allow dispatching or servicing to or from remote resources.
- The Allow EJB reference targets to resolve automatically option is used for EJB 2.1 or earlier or Web 2.3 or earlier modules and allows WAS to provide a default value or to resolve EJB references automatically for any EJB reference that does not have a binding. Because the sample application is at EJB 3.1, this option does not apply.
In this example, we keep the default values. Click Next.
- Map modules to servers.
Here we can select the server or cluster on which you want each module deployed. For better performance, deploy all modules from one application in a single server. Specifically, do not separate the EJB clients, usually servlets in web modules, from the EJB beans themselves.
If you only have one server defined, the modules are mapped to this server by default.
Click the icon to select all modules in the ITSO Bank EAR file. In the Clusters and Servers field, select ITSOBankServer1. Click Apply to assign all modules to the ITSOBankServer1 application server. If you deploy to a cluster, select the cluster instead of the single application server.
Web servers: If we have a web server defined, select both the web server and ITSOBankServer1 in the server list. Press and hold the Ctrl key to select multiple servers. Mapping web modules to web servers ensures the web server plug-in is generated properly.
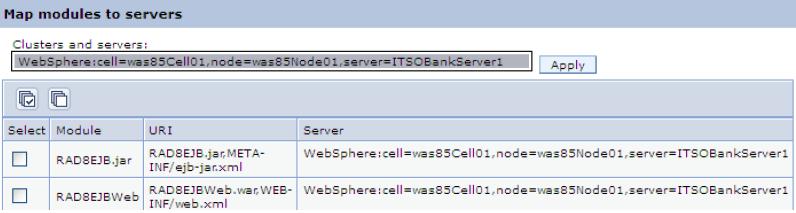
- Provide JSP reloading options for web modules.
Configure if and how often WebSphere checks for updates to JSP files and whether they are reloaded. In a production environment. You might want to disable this setting to improve performance. Click Next.
- Steps 4 and 5: Map shared libraries, and Map shared library relationships.
If the application depends on shared libraries, we can specify them here. Click Next.
- Initialize parameters for servlets.
For servlets that honor initialization parameters (specified by the init-param tag in the web module's web.xml deployment descriptor), we can configure the value of the parameters. Click Next.
- Provide JNDI names for beans.
Use this window to bind the enterprise beans in the application or module to a JNDI name. Because our application is at EJB 3.1, we can leave it blank to have WAS use the default names. Click Next.
- Bind EJB Business interfaces to JNDI names.
Specify a JNDI name for the business interfaces of your EJB beans. Because our application is at EJB 3.1, we can leave this setting blank to have WAS assign default JNDI name. Click Next.
- Map EJB References to beans.
Each EJB reference defined in the application must be mapped to an enterprise bean. We can leave it blank to have WAS use the default names.
If the reference was in an EJB 2 or earlier or Web 2.3 or earlier module, we can select the Allow EJB reference targets to resolve automatically option and then not need to specify a target JNDI name either. Click Next.
- Map virtual hosts for web modules.
Select the virtual host created for the application (itsobank_host).
Virtual host definitions: Only those virtual host definitions that are defined to the WebSphere environment are configurable at this step. To map the web modules to the virtual host defined in the enhanced EAR file, you need to configure that host after deploying the application.
Click Next.
- Map context roots for web modules.
Select the context root against to bind the module. Click Next.
- Map JASPI provider.
If the application has web modules, we can specify values to override the JASPI settings from the global or domain security configuration. Click Next.
- Metadata for modules.
Selecting the metadata-complete attribute tells WAS to ignore any deployment information specified in source code annotations. Leave both options cleared to use the information from the annotations. Click Next.
- Display module build Ids.
If the MANIFEST.MF file of a module in an enterprise application specifies a build identifier, this page shows the build identifier of the module. Click Next.
- Summary.
The Summary window gives an overview of the application deployment settings. If those settings are fine, click Finish to deploy the application.
- Save the configuration.
If you are working in a distributed server environment, synchronize the changes with the nodes so the application is propagated to the target application server or servers.
If you mapped the web modules to a web server, verify the web server plug-in is regenerated and propagated to the web server. For a quick refresh, restart the web server.
- Start the application:
- Click Applications | Application Types | WebSphere Enterprise Applications.
- Select the RAD8EJBWebEAR application and then click Start.
Deployment of the RAD8EJBWebEAR application is now complete. We can verify the application works by pointing your browser to the following website:
-
http://www.itsobank.ibm.com:9080/RAD8EJBWeb
If successful, the web page for the ITSO Bank application displays. Provide customer number 111-11-1111 to see an example of a customer�s accounts, and click Submit...

If we have any problems related to virtual hosts, restart the server and try again. WAS needs a restart to pick up virtual host changes.
Deploy using the monitored directory support feature
With WAS V8.5, we can deploy or update applications automatically by copying an application archive to a specified, monitored directory. Monitored directories support the following types of applications:
- Enterprise archive (EAR)
- Web archive (WAR)
- JAR
- Session Initiation Protocol (SIP) module (SAR)
The monitored directory feature is disabled by default.
IBM i: Using a monitored directory for application deployment is not supported on IBM i operating systems.
The default monitored directory for WAS V8.5 is...
-
PROFILE_HOME/monitoredDeployableApps/servers/server_name
...for stand-alone servers.
For distributed systems, the following directories are used:
Deployment managers use the following default monitored directories:
- For all servers named server_name.
-
dmgr_PROFILE_HOME/monitoredDeployableApps/servers/server_name
- For a specific server_name on a specific nodename
-
dmgr_PROFILE_HOME/monitoredDeployableApps/nodes/nodename/servers/server_name
- For the members of cluster_name
-
dmgr_PROFILE_HOME/monitoredDeployableApps/clusters/cluster_name
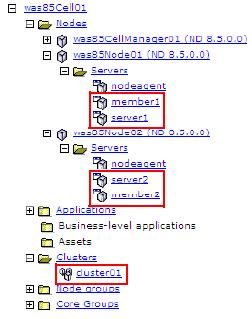
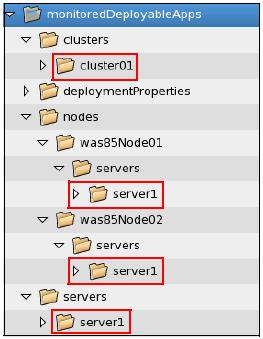
WAS will not create the whole directory structure. You have to manually create the directory structure for monitored directory.
Setting up a monitored directory
To enable and set up the monitored directory in WAS:
- In the dmgr console, click...
-
Applications | Global deployment settings | Monitor directory to automatically deploy applications
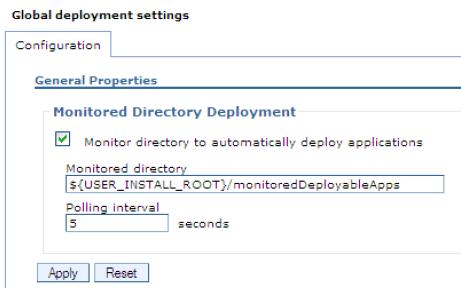
We can change the default location of the monitored directory in the Monitored directory field.
- To change the standard polling interval setting, specify a number of seconds in the Polling interval field.
Minimum value is 5 seconds. If we specify a lower or negative value, WAS uses 5 seconds automatically.
- Click Apply to save the configuration.
- Restart the stand-alone application server or the deployment manager.
Working with a monitored directory
When an application is copied into the monitored directory, WAS creates a temporary copy of that application in another directory and installs it on the server.
If you copy an application with a name already deployed on the server, it will be updated.
The monitored directory works only when the application server or cluster is running.
Binding values: Installing an EAR, JAR, WAR, or SAR file by adding it to a monitored directory does not change existing JNDI or other application bindings. If you need to set binding values during deployment, install the file using one of the following methods which set the bindings:
- The dmgr console application installation wizard
- A wsadmin script
- A properties file
The following examples demonstrate how to work with a monitored directory. We use the sample ITSO Bank application RAD8EJBWebEAR.ear as previously mentioned.
Deploy and remove an EAR file on a stand-alone application server
To deploy and remove an EAR file on a stand-alone application server:
- Start your appserver.
You might have to restart the application server after enabling monitored directory.
- Copy your files to the the monitored directory. For example, for a profile called AppSrv01, copy files to...
-
PROFILE_ROOT/AppSrv01/monitoredDeployableApps/servers/server1
- Copy the RAD8EJBWebEAR.ear application to the monitored directory.
- Verify the application was successfully deployed and started in the SystemOut.log file.
Installation application log when using a monitored directory
-
[6/22/12 13:23:22:308 EDT] 00000034 WatchService I CWLDD0007I: Event id 320986637-1. Start of processing. Event type: Added, File path: /opt/WAS/AppServer/profiles/AppSrv01/monitoredDeployableApps/servers/server1/RAD8EJBWebEAR.ear.
[6/22/12 13:23:22:336 EDT] 00000034 ModelMgr I WSVR0801I: Initializing all server configuration models ...
[6/22/12 13:23:32:490 EDT] 00000034 AppManagement I CWLDD0015I: Event id 320986637-1. Application RAD8EJBWebEAR is installed successfully.
[6/23/12 13:23:32:491 EDT] 00000034 AppManagement I CWLDD0020I: Event id 320986637-1. Starting application RAD8EJBWebEAR...
...
[6/22/12 13:23:38:195 EDT] 00000034 CompositionUn A WSVR0191I: Composition unit WebSphere:cuname=RAD8EJBWebEAR in BLA WebSphere:blaname=RAD8EJBWebEAR started.We can also verify the application is available in the dmgr console from...
-
Application | Application Types | WebSphere enterprise application
- Invoke the application using a URL in a browser. For the ITSO Bank application, use the following URL:
- http://www.itsobank.ibm.com:9080/index.jsp

After you deploy the application, note the application still exists in the monitored directory.
If you overwrite this file with a new file, the application is updated with your changes. However, the file must have the same name.
To uninstall the application from the server using the monitored directory, remove the RAD8EJBWebEAR.ear file from the monitored directory. This removal triggers the monitoring service, and the application is uninstalled. Inspect the SystemOut.log file for information about the application status.
Deploy an EAR file on a federated node
Install and remove an application on a federated node. Use the deployment manager monitored directory instead of the stand-alone server monitored directory.
After configuring the monitored directory in deployment manager, copy the file to one of the following directories:
- Deploy the application on all servers named server1
-
dmgr_PROFILE_HOME/monitoredDeployableApps/servers/server1
- Deploy the application only on server1 on node01.
-
dmgr_PROFILE_HOME/monitoredDeployableApps/nodes/node01/servers/server1
Deploy the application on all servers named server1
Deploy an EAR file on a cluster
To install an application on a cluster, use the cluster directory in the deployment manager monitored directory. For example, if your cluster name is cluster01, to deploy an application to this cluster, copy the application to the following directory:
-
dmgr_PROFILE_HOME/monitoredDeployableApps/clusters/cluster01
To update the application, overwrite it with a new EAR file with the same name. To remove the application from cluster, delete it from the monitored directory.
Note that if a server is a member of a cluster, we cannot deploy an application by copying it to its directory. If we do, you receive the following error:
A server named member1 was targeted by a monitored directory application deployment operation but was skipped because it is a member of cluster cluster01
Deploy applications by adding properties files to a monitored directory
Installing applications by copying them to a monitored directory does not change any bindings or JNDI configurations the applications might use. To configure application resources and deploy an application using a monitored directory, use the properties file.
The monitoring service scans both the server directory and the property directory. If it finds a valid property file, it runs the wsadmin applyConfigProperties command.
As an example, to install an application on a cluster using a property file:
- Create the property file that defines the deployment task to complete.
In this example, we install the ITSO Bank application on a cluster using the file shown in
Property file that installs ITSO Bank application
#Header
ResourceType=Application
ImplementingResourceType=Application

# Properties
Name=ITSOBank Application
EarFileLocation=/apps/RAD8EJBWebEAR.ear
TargetNode=was85node02
TargetCluster=cluster01

EnvironmentVariablesSection
#Environment Variables
cellName=was85Cell01
- Ensure the target server or cluster is running and the monitored service is enabled and configured.
- Copy the properties file to the deploymentProperties directory in the monitored directory.
WAS reads the property file and executes its tasks against its runtime environment. It then installs and configures the application.
Note that if you remove the property file from the monitored directory, the monitoring service notices this event but will not uninstall the application. Example 24-5 shows information logged when removing a property file from a monitored directory.
Monitor service processing logs
-
[6/22/12 13:52:52:957 EDT] 00000053 WatchService I CWLDD0007I: Event id 818406234-3. Start of processing. Event type: Deleted, File path: /opt/WAS/AppServer/profiles/Dmgr01/monitoredDeployableApps/deploymentPro perties/install_RAD8EJBWebEAR.txt.
[6/22/12 13:52:52:959 EDT] 00000053 WatchService I CWLDD0061I: Event id 818406234-3. The property file /opt/WAS/AppServer/profiles/Dmgr01/monitoredDeployableApps/deploymentPro perties/install_RAD8EJBWebEAR.txt is deleted from the folder. No action is performed.
[6/22/12 13:52:53:002 EDT] 00000053 WatchService I CWLDD0008I: Event id 818406234-3. End of processing.
To update an application, we can copy the property file and overwrite an existing property file (if not deleted). This action triggers the monitoring service to reinstall the application.
You have to uninstall an application manually or prepare a property file with uninstallation instructions. For the JSFSample application, we can use the file shown below
#Header
ResourceType=Application
ImplementingResourceType=Application
DELETE=true

# Properties
Name=ITSOBank Application
Deploy applications using the job manager
In a flexible management environment, we can submit the Install application job to deploy an enterprise application on managed application server targets of the job manager. This is useful if you want, for example, to deploy applications in servers located in different cells or different data centers.
When you use the job manager to install an application, the only options we can specify from the job manager console is the location to install. All the other options that you see in the dmgr console are the defaults.
The first step is to make the application available to the system where the installation job will run.
To transfer the application binaries from the job manager to the remote node using the distributeFile job:
- Copy the EAR file to the jmgr_PROFILE_HOME/config/temp/JobManager directory.
- In the Job manager console, click Jobs | Submit. This action launches the Job properties wizard.
- Select the Distribute file job type, and click Next.
- Select the deployment manager or administrative agent as the target node and enter the target credentials.
- Enter the EAR file location on the job manager and the location to store the EAR file on the remote node. The source file URL is relative to the job manager profile's config/temp/JobManager directory. The destination parameter gives the location relative to the default distribution provider's directory tree for downloaded content. The arguments are entered

Using these arguments, the script file is distributed to the following location:
-
dmgr_PROFILE_HOME/downloadedContent/RAD8EJBWebEAR.ear
- Use the defaults for the job schedule. The defaults execute the distribute file job one time.
- Review the summary, and click Finish. Monitor the status of the job and ensure it completes successfully.
To install the application from the job manager:
- Click Jobs | Submit.
- Select the Install application job type, and click Next.
- Select the target node where the job will run.
Enter the user ID and password with administrative authority on the target node.
- Specify the job parameters.
At a minimum...
- Specify the name of the new application.
- If the target is a deployment manager, enter the name of the node and server or cluster on which the application will be installed

- Use the defaults for the job schedule. The defaults execute the job one time. Click Next.
- Review the summary, and click Finish. Monitor the status of the job and ensure it completes successfully.
Deploying business-level applications
In contrast with an enterprise application (EAR), a business-level application (BLA) is only a logical WebSphere configuration artifact, similar to a server or cluster, stored in the configuration repository. We add Java EE application to business-level applications as assets.
Use BLA applications to group separate enterprise applications into one manageable unit that can be started, stopped, updated, and so on.
Business-level application can leverage non-Java EE components such as CORBA (C++) executables hosted in a generic server, or as files on the file system.
A business-level application does not represent or contain application binary files. Instead, it is a configuration that lists one or more composition units that represent the application binary files. A business-level application uses the binary files to run the application business logic. Administration of binary files is done using the normal methods for managing modules (for example, web or EJB modules) and is separate from administration of the application definition.
A business-level application does not introduce any new programming, run time, or packaging models and the following concerns are mitigated:
An asset represents one or more application binary files stored in an asset repository.
Typical assets include application business logic, such as EAR files, EJB modules, web modules, service component architecture (SCA) modules, shared library files, static content, and other resource files. The asset repository is managed by WAS and does not require any third-party software.
You must register files as assets before we can add them to one or more business-level applications. At the time of asset registration, we can import the physical application files into WebSphere's configuration repository, or we can specify an external location where the asset resides.
A composition unit represents a configured asset in a business-level application.
Configured in this context means installed, so a configured web module means a web module installed. WAS handles the following types of composition units:
- Asset composition units
Composition units created from assets by configuring each deployable unit of the asset to run on deployment targets.
- Shared library composition units
Composition units created from JAR-based assets by ignoring all the deployable objects from the asset and treating the asset JAR file as a library of classes.
- Business-level application composition units
Composition units created from business-level applications that are added to existing business-level applications.
If an asset depends on another asset, we can create a relationship between them to allow, for example, a web module asset to reference classes in a shared library.
In summary, a business-level application consists of composition units. When you add an asset to a business-level application, a composition unit is created for the asset. The composition unit is the configured (installed) asset.
Create a business-level application
In this example we use RAD8EJBWeb application, combining it with the DefaultApplication's web module.
An example from the DefaultApplication's web module that can be combined is the SnoopServlet, extracted from the DefaultApplication's EAR file. We create one asset for the RAD8EJBWeb application and another for the DefaultWebApplication. We then create a business-level application containing these two assets.
To create the two assets:
- Open the WebSphere dmgr console, and click...
-
Applications | Application Types | Assets | Import | Local file system | Browse | RAD8EJBWebEAR.ear | Open | Next
- Select the options for importing an asset.
Set the path in the Asset binaries destination URL field. If left blank, the file is imported to its default location...
-
PROFILE_HOME/installedAssets/asset_name/BASE/
- Click Next.
If specifying another name for the asset, make sure to keep the asset's file extension (such as .ear or .war). Otherwise, WebSphere cannot keep track of the asset type and fails to import the asset.
- On the Summary window, click Finish.
The asset is now imported into WebSphere's asset repository, but it is not yet configured (thus, it is still just an asset and not a composition unit).
- Repeat steps 1 to 4 and import the DefaultWebApplication.war file.
This file was extracted from the DefaultApplication EAR file and stored on the local operating system. We can find this EAR in...
-
${WAS_INSTALL_ROOT}/installableApps
Because the two assets do not depend on each other and do not require any shared library, we do not need to set up any relationships.
- Select Save to master configuration when finished.
After the assets are imported into the asset repository, we can create a business-level application.
- Click Applications | Application Types | Business-level applications. Click New.
- Enter a name, such as ITSOBank System, and click Apply.
- On the Business-level applications page, click Add under the Deployed assets section, and select the Add Asset option.
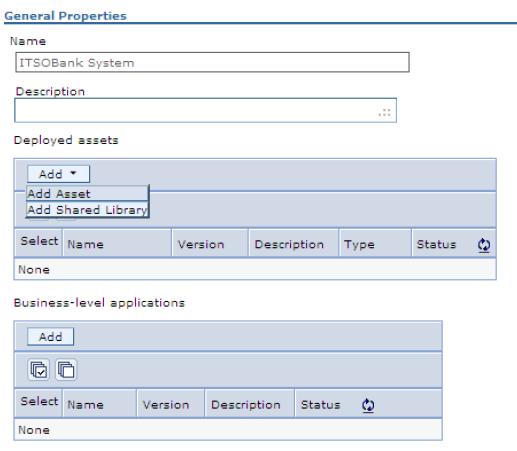
- On the next window, select the RAD8EJBWebEAR.ear asset, and click Continue.
- Configure (install) this asset with the necessary deployment options. The installation process follows the same steps for installing an application to WAS.
Proceed through the installation windows until the Summary window opens, and click Finish. WebSphere now installs the application, and it is a composition unit, , an asset that has been configured.
Installation note: WebSphere generates a unique application name, such as app1143018803114601914, for the application. You might want to change this name to a more descriptive name.
- Click Applications | Application Types | Business-level applications, and click the link for the ITSOBank System application.
- Repeat steps and add the DefaultWebApplication.war file to the ITSOBank System business-level application as well.
- Save to the master configuration when done.
- After completing the steps, we can stop the business-level application by clicking...
-
Applications | Application Types | Business-level applications
...and then clicking the corresponding links.
Deleting a business-level application: To delete a business-level application, first unmap (delete) the composition units (configured assets) that belong to the business-level application. Select the business-level application, and select the deployed assets. Click Delete. After you delete all assets from the business-level application, we can delete the business-level application itself. The assets, however, still remain in WebSphere's asset repository and can be used to configure other business-level applications.
We can manage the individual applications (composition units) that make up the business-level application individually. To do so, click...
-
Applications | Application Types | WebSphere enterprise applications
...and use the links to start, stop, update, and so on.
Deploying application clients
To run a Java-based client'server application, the client application executes in a client container of some kind. You might, for example, use a graphical swing application that calls EJB beans on an application server. WAS V8.5 supports several different application client environments. The following application client environments are available:
- Java EE client
This client uses services provided by the Java EE client container.
This client is a Java application program that accesses EJB beans, JDBC databases, and JMS queues. The Java EE application client depends on the application client run time to configure its execution environment, and it uses the JNDI name space to access resources, the same as we do in a server application (similar to a servlet).
The Java EE application client provides the following components:
- XML deployment descriptors
- Java EE naming (java:comp/env), including EJB references and resource references
The Java EE application client is launched using the launchClient script, which sets up the environment with the necessary class paths and other settings for you.
- Java thin client
This client does not use services provided by the Java EE client container.
The Java thin client runtime environment provides the support needed by full-function Java SE client applications but does not support a client c that provides easy access to these services. The Java thin client is designed to support those users who want a full-function Java SE client application programming environment using the supplied IBM JRE, without the impact of the Java EE platform on the client machine. The Java thin client does not perform initialization of any of the services the client application might require. For example, the client application is responsible for the initialization of the naming service, either through CosNaming or JNDI APIs. The Java thin client runtime environment does provide support for Java SE client applications to access remote enterprise beans, and provides the implementation for various enterprise bean services. Client applications can also use the Java thin client runtime environment to access CORBA objects and CORBA based services.
The thin client'supports JVMs from IBM, Sun and HP-UX. When launching the thin application client, set up the correct class paths yourself and verify the required libraries for the application and the WebSphere libraries are included.
- Applet client
In the Applet client model, a Java applet embedded in an HTML document executes in a web browser. With this type of client, the user accesses an enterprise bean in the application server through the Java applet in the HTML document.
- ActiveX to EJB Bridge application client
The ActiveX application client allows ActiveX programs to access enterprise beans through a set of ActiveX automation objects. The ActiveX application client uses JNI architecture to programmatically access the Java virtual machine (JVM) API. Therefore, the JVM code exists in the same process space as the ActiveX application (Visual Basic, VBScript, or Active Server Pages files) and remains attached to the process until that process terminates. The ActiveX to EJB Bridge is supported on Windows systems only.
Installing application client environments
We can install the application client environments using IBM Installation Manager and the WAS supplements package files. The installation packages contains the following installable components:
- IBM WebSphere SDK for Java Technology Edition 6.
- Standalone thin clients, resource adapters, and embeddable containers.
- Samples for both Java EE and non-Java EE client environments.
Preparing the sample application
The ITSO Bank application also has a stand-alone application client that we use to demonstrate the WAS application client container.
We need to import the project containing the stand-alone application client into IBM Rational Application Developer for WebSphere Software and export it as an EAR file.
To import the project and the stand-alone application:
- Import the j2eeclient\RAD8AppClient.zip Project Interchange file from the 7835codesolution folder. Select both projects when importing.
- Because the RAD8AppClient project has a specific binding configured for the EJBBankBean in the RAD8EJBEAR file, modify this binding to point to the same bean in the RAD8EJBWebEAR file, which is the application that you installed on your server.
To modify the binding complete the following steps:
- Expand the RAD8AppClient project, and double-click the RAD8AppClient deployment descriptor.
- Click the Open WebSphere Bindings Descriptor link from the right pane.
- Select EJB Reference (ejb/bank), and change the name from ejb/RAD8EJBEAR/RAD8EJB.jar/EJBBankBean#itso.bank.service.EJBBankRemote to itso.bank.service.EJBBankRemote.
By using the short name, we rely on the Autolink feature to search for and invoke a matching EJB interface. This method works in our environment where we only have one instance of the EJB installed and running.
- Press Ctrl+s to save the deployment descriptor.
- Export the RAD8AppClientEAR
Launching the J2EE client
A Java EE client application needs a container in which to run. In this example, we use the Java EE application client container. We can start this container using the launchClient program in...
-
INSTALL_ROOT/bin
By default the install root is...
-
/opt/WAS/AppClient
...in Linux systems. The launchClient program has the following syntax:
Usage: launchClient [-profileName pName | -JVMOptions options | -help | -?]
<userapp.ear> [-CC<name>=<value>] [app args]
The following list describes the elements that follow the launchClient command in the previous syntax: -profileName Defines the profile of the application server process in a multi-profile installation. The -profileName option is not required for running in a single profile environment or in an application client installation. The default is default_profile.
| -JVMOptions | Valid Java standard or nonstandard option string. Insert quotation marks around the option string. |
| -help, -? | Prints the usage information. <userapp.ear> Enter the path name and file name of the .ear file containing the client application. |
| -CC | These properties are for use by the application client run time. |
For full explanation of all parameters, run launchClient -help. app args The application arguments are for use by the client application and are ignored by WebSphere.
To start the ITSO Bank stand-alone application client using the launchClient command:
- Execute the command...
-
$ cd /opt/WAS/AppClient/bin
- The first time you execute this process, you will receive a message to accept the SSL certificate. Click y.
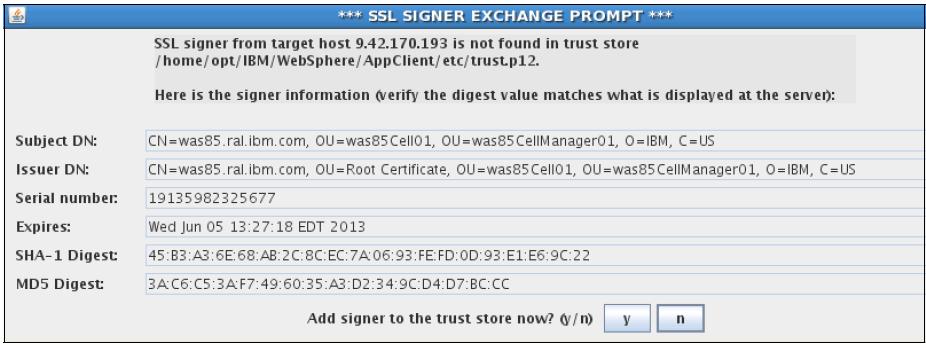
- If we have administrative security enabled, we have to provide the WAS credentials...

The application opens and displays a graphical window. Enter 111-11-1111 as the social security number.
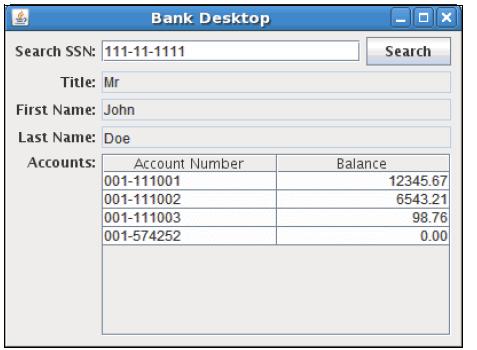
$ ./launchClient.sh /apps/RAD8AppClientEAR_withModifiedBinding.ear
IBM WAS, Release 8.5
Java EE Application Client Tool
Copyright IBM Corp., 1997-2011
WSCL0012I: Processing command line arguments.
WSCL0013I: Initializing the Java EE Application Client Environment.
[2012-06-22 17:24:05:421 CEST] 00000001 W UOW=null source=com.ibm.ws.ssl.config.SSLConfig org=IBM prod=WebSphere component=Application Server thread=[P=916627:O=0:CT]
CWPKI0041W: One or more key stores are using the default password.
WSCL0035I: Initialization of the Java EE Application Client Environment has completed.
WSCL0014I: Invoking the Application Client class itso.rad8.client.control.BankDesktopController - The first time you execute this process, you will receive a message to accept the SSL certificate. Click y.
Updating Java EE applications
WAS V8.5 has features that allow applications to be updated and restarted at a fine-grained level. It is possible to update only parts of an application or module and to restart only the necessary parts. It can also do interruption-free application upgrades using editions. With these features, we can perform the following tasks:- Replace an entire application (.ear file).
- Replace, add, or remove a single module (.war, EJB .jar, or connector .rar file).
- Replace, add, or remove a single file.
- Replace, add, and remove multiple files by uploading a compressed file that describes the actions to take.
- Do an interruption-free application upgrade.
Working with applications
If an application is running when it is updated, WAS stops the application or the affected components automatically, updates the application, and then restarts the application or components.
When updating an application, only the portion of the application code changed needs to be presented to the system. The application management logic calculates the minimum actions the system needs to execute to update the application. Under certain circumstances, the update can occur without stopping any portion of the running application.
WAS also has support for managing applications in a cluster for continuous availability. The Rollout Update action updates sequentially an application installed on multiple cluster members across a cluster. After you update an application's files or configuration, use the Rollout Update option to install the application's updated files or configuration on all cluster members of a cluster on which the application is installed.
The Rollout Update option completes the following actions for each cluster member in sequence:
- Saves the updated application configuration.
- Stops all cluster members on a given node.
- Updates the application on the node by synchronizing the configuration.
- Restarts the stopped cluster members on that node.
This action updates an application on multiple cluster members while providing continuous availability of the application.
With WAS V8.5, we can also use application editions to manage updates to the application, making it easier to rollout or rollback updates.
WAS V8.5 introduces a feature for validating an application edition before rolling it out. Setting and application edition to a validation state allows the application to be tested in a more realistic environment without impacting the users.
WAS V8.5 supports an additional OSGi application type that has a modular and dynamic design. WAS V8.5 features additional functionality designed to manage the OSGi application lifecycle.
Replacing an entire application EAR file
If you are not using application editions to manage application updates, follow these instructions to replace a full EAR file with a newer version:
- Click Applications | Application Types | WebSphere enterprise applications. Select the application to update and then click Update.
- In the Preparing for the application update window, select the Replace the entire application option (this is the default option).
- Select either the Local file system or Remote file system option. Click Browse to select the updated EAR file. Click Next.
- Proceed through the application installation windows, and make any necessary changes.
- To preview the files that are changed after the update installation, click the Review link.

After you review the files, save the configuration by clicking Save at the bottom of the window.
- If you are working in a distributed server environment, synchronize the changes with the nodes.
- If the application update changes the set of URLs that are handled by the application (, if servlet mappings are added, removed, or modified), verify the web server plug-in is regenerated and propagated to the web server.
It might take a few seconds for the WebSphere run time to pick up the changes and to restart the application as necessary. If your changes do not seem to have effect, wait and try again. We can also look at the SystemOut.log file for the application server to see when it restarts the application.
Replacing or adding an application module
To replace only a module, such as an EJB or web module of an application:
- Click Applications | Application Types | WebSphere enterprise applications. Select the application to update and then click Update.
- In the Preparing for the application update window, select the Replace or add a single module option.
- In the Path beginning with the installed application archive file to the module to be replaced or added field, enter the relative path to the module to replace. For example, if you were to replace the HelloWeb module, enter HelloWeb. If you enter a path or file that does not exist in the EAR file, the module will be added.
- Select either the Local file system or Remote file system option and then click Browse to select the updated module.
- Click Next.
- Proceed through the remaining windows, and make any necessary changes. In the Summary window, click Finish.
If you are adding a web module, select the detailed installation option. Allows you to select the correct target server for the module in the Map modules to servers step and to specify a context root for the module.
- To update the configuration in the master repository, select the Save link.
- If you are working in a distributed server environment, synchronize the changes with the nodes.
- If the application update changes the set of URLs that are handled by the application (, servlet mappings are added, removed, or modified), verify the web server plug-in is regenerated and propagated to the web server.
Modules can also be managed using the Manage Modules page. Click Applications | Application Types | WebSphere enterprise applications and then click the link for the application. Click the Manage Modules link in the Modules section. Select the module to modify and then click the Remove, Update, or Remove File buttons.
Replacing or adding single files in an application or module
To replace a single file, such as a GIF image or a properties file in an application or module, complete the following steps:
- Click Applications | Application Types | WebSphere enterprise applications. Select the application to update, and then click Update.
- In the Preparing for the application installation window, select the Replace or add a single file option.
- In the Relative path to file field, enter the relative path to the file to replace in the EAR file.
For example, to replace the logo.gif file in the images directory of the HelloWeb.war web module, enter HelloWeb.war/images/logo.gif. If you enter a path or file that does not exist in the EAR file, it is added.
- Select either the Local file system or Remote file system option and then click Browse to locate the updated file. Click Next.
- In the Updating Application window, click OK.
- To update the configuration in the master repository, select the Save link.
- If you are working in a distributed server environment, synchronize the changes with the nodes.
Removing application content
We can remove files either from an EAR file or from a module in an EAR file, as we describe in the sections that follow.
Removing files from an EAR file
To remove a file from an EAR file:
- Click Applications | Application Types | WebSphere enterprise applications. Select the application to remove the file from and then click Remove File.
- In the Select the file to be removed dialog box, select the file to be removed and then click OK.
- Save the configuration.
Removing files from a module
To remove a file from a module:
- Click Applications | Application Types | WebSphere enterprise applications, and click the link for the application to which the module belongs.
- Click the Manage Modules link under the Modules section.
- Select the module from which to remove the file, and click Remove File.
- In the Select the file to be removed dialog box, select the file to be removed and then click OK.
- Save the configuration.
Performing multiple updates to an application or module
Multiple updates to an application and its modules can be packaged in a compressed file, in .zip or .gzip format and uploaded to WAS. The uploaded file is analyzed, and the necessary actions to update the application are taken.
Depending on the contents of the compressed file, this method to update an application can replace files in, add new files to, and delete files from the installed application all in one single administrative action. Each entry in the compressed file is treated as a single file, and the path of the file from the root of the compressed file is treated as the relative path of the file in the installed application.
To perform these multiple updates, the following conditions must be true:
- To replace a file, the file in the compressed file must have the same relative path as the file to be updated in the installed application.
- To add a new file to the installed application, the file in the compressed file must have a different relative path than the files in the installed application.
- To remove a file from the installed application, specify metadata in the compressed file using a file named...
-
META-INF/ibm-partialapp-delete.props
...at any archive scope.
The ibm-partialapp-delete.props file must be an ASCII file that lists files to be deleted in that archive with one entry for each line. The entry can contain a string pattern, such as a regular expression that identifies multiple files. The file paths for the files to be deleted must be relative to the archive path that has the file...
-
META-INF/ibm-partialapp-delete.props
- To delete a file from the EAR file (not a module), include a ibm-partialapp-delete.props file in the root of the compressed file. In the .props file, list the files to be deleted. File paths are relative to the root of the EAR file.
For example, to delete a file named docs/readme.txt from the root of the HelloApp.ear file, include the line...
-
docs/readme.txt
...in ibm-partialapp-delete.props in the compressed file.
- To delete a file from a module in the EAR, include...
-
module_uri/META-INF/ibm-partialapp-delete.props
...in the compressed file. The module_uri part is the name of the module, such as HelloWeb.war. For example, to delete...
-
images/logo.gif
...from the HelloWeb.war module, include the images/logo.gif line in...
-
HelloWeb.war/META-INF/ibm-partialapp-delete.props
...in the compressed file.
- Multiple files can be deleted by specifying each file on its own line in the metadata .props file.
Regular expressions can also be used to target multiple files. For example, to delete all JavaServer Pages (.jsp files) from the HelloWeb.war file, include the line .*jsp in the HelloWeb.war/META-INF/ibm-partialapp-delete.props file. The line uses a regular expression, .*jsp, to identify all .jsp files in the HelloWeb.war module.
As an example, assume we prepared the compressed HelloApp_update.zip file shown in
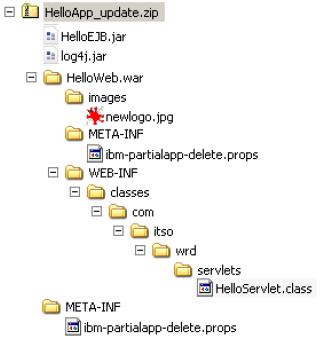
The META-INF/ibm-partialapp-delete.props file contains the following line: docs/readme.txt
The HelloWeb.war/META-INF/ibm-partialapp-delete.props contains the following line: images/logo.gif
When performing the partial application update using the compressed file, WebSphere performs the following actions:
- Adds the log4j.jar file to the root of the EAR.
- Updates the entire HelloEJB.jar module.
- Deletes the docs/readme.txt file (if it exists) from the EAR file but not from any modules.
- Adds the images/newlogo.jpg file to the HelloWeb.war module.
- Updates the HelloServlet.class file in the WEB-INF/classes/com/itso/wrd/servlets directory of the HelloWeb.war module.
- Deletes the images/logo.gif file from the HelloWeb.war module.
To perform the actions specified in the HelloWeb_updated.zip file:
- Click Applications | Application Types | WebSphere enterprise applications.
Select the application to update and then click Update.
- In the Preparing for the application installation window, select the Replace, add, or delete multiple files option.
- Select either the Local file system or Remote file system option, and click Browse to select the compressed file with the modifications created. Click Next.
- In the Updating Application window, click OK.
- To update the configuration in the master repository, select the Save link.
- If in a distributed server environment, make sure the Synchronize changes with Nodes option is selected so the application is distributed to all nodes. Click Save. The application is distributed to the nodes, is updated, and is restarted as necessary.
- If the application update changes the set of URLs that are handled by the application (, if servlet mappings are added, removed or modified), verify the web server plug-in is regenerated and propagated to the web server.
Rolling out application updates to a cluster
The Rollout Update feature allows you to roll out a new version of an application or part of an application to a cluster. Application updates can be done with a new version of an existing application or a new edition of an existing application edition.
Application version rollout is the traditional way for rolling out application updates, either by adding, removing, or replacing parts or the entire enterprise application. When an existing application is updated, the application is replaced with the new contents and the previously deployed code is lost. The only way to recover the previous version is by making another update using the previous version of the packaged file.
Application edition Management offers a way of managing multiple editions of the same application. This management process makes it possible to change from edition to edition with interruption-free updates, validate a new edition in a live environment before it goes to production, or even have multiple editions of the same application running in different targets.
Interruption-free edition upgrades and edition validation depends on the Intelligent Management features, such as the use of On Demand Router to allow for traffic to be correctly routed.
Application version rollout
The Rollout Update feature allows you to roll out a new version of an application or part of an application to a cluster. The Rollout Update feature stops the cluster members, distributes the new application, synchronizes the configuration, and restarts the cluster members. The operation is done sequentially over all cluster members to keep the application continuously available.
When stopping and starting the cluster members, the Rollout Update feature works at the node level. Thus, all cluster members on a node are stopped, updated and then restarted before the process continues to the next node.
Because the web server plug-in module cannot detect that an individual application on an application server is unavailable, the Rollout Update feature always restarts the application server hosting the application. Thus, if HTTP session data is critical to the application, either persist that data to a database or replicate it to other cluster members using the memory-to-memory replication feature.
The order in which the nodes are processed and the cluster members are restarted is the order in which they are read from the cell configuration repository. The Rollout Update feature cannot process the nodes and cluster members in any particular order.
Assume that we have an environment with two nodes, aix-target1Node01 and aix-target2Node01, and a cluster called cluster01, which has one cluster member on each node (member1 on aix-target1Node01 and member2 on aix-target2Node01). Assume also that we have an application named JSFSample deployed and running on the cluster.
To update this application using the Rollout Update feature:
- Click Applications | Application Types | WebSphere enterprise applications.
Select the application to update and then click Update.
- In the Preparing for the application installation window, select the appropriate action, depending on the type of update. In this example, we update the entire application EAR file to a new version. So, select the Replace the entire application option.
- Select either the Local file system or Remote file system option and then click Browse to select the updated EAR file. Click Next.
- Proceed through the remaining windows, and make any changes necessary. In the Summary window, click Finish.
- After the application is updated in the master repository, the status window appears
You then have the following options to start the rollout action:
- Click the Rollout Update link.
- Click the Manage Applications link. In the Enterprise Applications window, select the application, and click Rollout Update.
Saving directly to the master configuration: Do not click the Save directly to the master configuration link or otherwise save the configuration yourself. The Rollout Update feature does that task for you. If you save the configuration yourself, the Rollout Update action is canceled, and it is handled as a normal application update.
For each node, the cluster members are stopped, the application is distributed to the node, and the cluster members are restarted. When the rollout is complete (, when the The application rollout succeeded message displays), click Continue.
Although the rollout update feature makes it easy to roll out an application to a cluster and keep the application continuously available, verify the application can handle the rollout. For example, assume that we have v1.0 of an application running in a cluster.
The cluster consists of two application servers named server1 and server2, and HTTP session data is persisted to a database. When you roll out v2.0 of the application and server1 is stopped, the web server plug-in redirects users on server1 to server2. Then, when server1 is started again, starting v2.0 of the application, the plug-in distributes requests to server1 again. Now, if the application update incurred a change in the interface of any class stored in the HTTP session, when server1 tries to get these session objects from the database, it might run into a deserialization or class cast exception, preventing the application from working properly.
Another situation to consider is when the database structure changes between application versions, as when tables or column names change name or content. In that case, we might need to stop the entire application and migrate the database before we can deploy the new version. The Rollout Update feature is not suitable in this scenario.
So, it is important to understand the changes made to the application before rolling it out.
Application edition management and rollout
WAS V8.5 introduces the Edition control center, which enables management and operational control over application editions, including interruption-free application upgrades. An application edition is a version of an application composed of distinct versions of modules and bindings.
The terms version and edition distinguish between what occurs in your development and build environment from what occurs in your deployment and operational environment. A version is a successive generation of an interface, function, implementation, or entire application, and so forth. Version is a development and build concept. An edition is a successive deployment generation, for example, the deployment of a particular set of versioned artifacts. Edition is a deployment and operational concept.
The edition control center provides an application versioning model that supports multiple deployments of the same application in the Intelligent Management cell. Each deployment has a unique edition name. The edition control center allows you to select the edition to activate on an Intelligent Management cluster, so that we can perform a rollout of an application update or revert to a previous level.
Installing an application edition
Installing an application edition is similar to installing an application. When installing a new edition of an application, the Application edition and Edition description must be specified in the Select installation options window during the application installation wizard. This automatically creates an edition for the application being deployed
Activating an edition
Application editions can be in one of three states: Inactive, Validation, or Active. The installation of an edition does not make it automatically active. Activating an edition is different from starting an edition. An application edition must be in active state before it can be started. Similarly, the edition can only be deactivated when it is stopped.To activate an edition, select...
-
Applications | Edition control center | application_name | edition | Activate
Concurrent activation
Concurrent activation enables you to activate different editions of the same application on different servers or clusters. To use multiple editions concurrently, it is necessary to distinguish user requests from one another so the requests can be sent to the application servers that are hosting the appropriate edition. For example, if you introduce a new edition of an application, you might want a select group of users to test the edition and not want all users to have access to the edition. The on demand router policies define the destination of a client request. To have concurrent activation of an edition, create a routing policy.
Only one edition can be active in a single target simultaneously. To have multiple editions of the same application concurrently activated, use different deployment targets. You also create the routing policies to allow the on demand router to decide to what edition to send the requests.

Create routing policies for application editions
A routing policy allows you to create rules for the on demand router to decide to what edition to send a client request based on a set of criteria. This action is needed whenever we have multiple editions of the same application either in active/validate state or in active/active state.
Editions of an application usually have the same basic parameters used for routing requests, such as virtual host and context root. The routing policy needs extra information to be able to differentiate the client requests and route them to the correct edition. This information can be the IP address, the user ID or group, the time of the request, or many other parameters. For a listing of other parameters, visit the following information center website:
To create a routing policy for an edition:
WAS V8.5 offers a simplified way of doing this task. By setting an application edition to validation state, it creates a clone of the target used by the previous edition and deploys the edition under validation. The new target (a cluster or stand-alone server) is cloned to target_name-Validation and is displayed as a regular server/cluster.
To use application edition validation, you need to have a configured and working on demand router. The routing policy is used by this component to decide where to send client requests. You must also have an already active edition before starting the validation.
To validate an application edition:
To cancel a validation, go to...
When you perform a rollout on an edition, you replace an active edition with a new edition. If the new edition is compatible with earlier versions, we can perform a rollout to replace the active edition without impacting existing clients. An interruption-free replacement is ensured by quiescing current application requests and either rerouting new requests to other servers or temporarily queuing the requests until the new edition is ready for service.
To perform a rollout on a new edition, first install the application edition with the new edition information. You also need to have the previous edition of the application active and started.
Before starting an edition rollout, you need to understand a few concepts. These concepts are reviewed in the following paragraphs (rollout strategy, reset strategy, drainage interval, and performing the rollout).
The rollout strategy defines how the previous application edition will be replaced (in a group of servers or individually). The following list notes the available options:

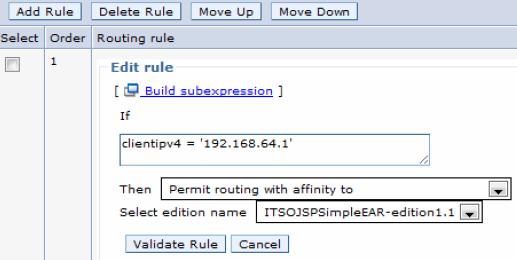
Validating an edition
Validating an application in a realistic way or in a production environment is usually a complicated process. It can demand creating and setting up a whole new environment just for the sake of validation and still incur the risk of not having this validation environment synchronized with the production environment.
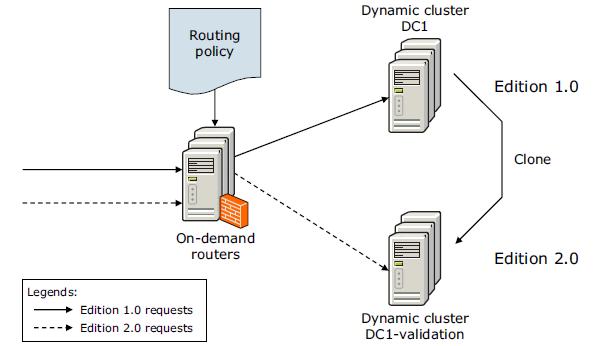
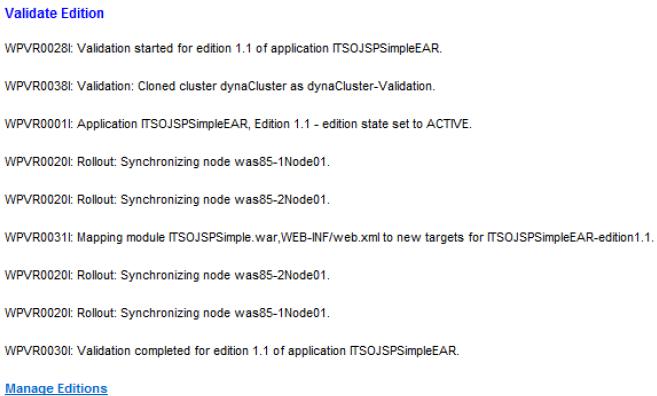
Application | Edition control center | application_name and then select the edition under validation. Click Cancel Validation
Rolling out an edition
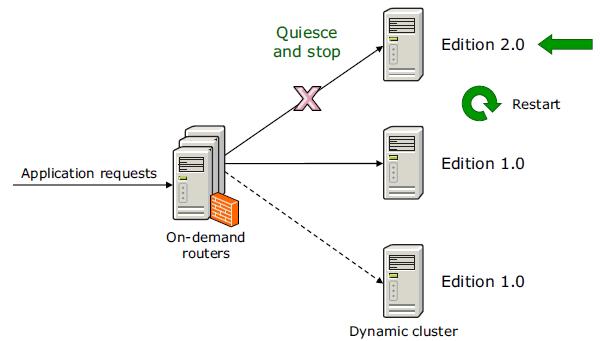
Rollout strategy
| Atomic | Replaces one edition with another in half of the cluster at a time. This rollout type serves all user requests with a consistent edition of the application. While the first half of the cluster is offline and updated, application requests are routed to the second half of the cluster. Verify that half the cluster can handle the entire load during the rollout period. |
| Grouped | Replaces one edition with another in a group of servers at a time. The size of this group is configurable so we can decide how many servers can be unavailable during the rollout. |
Reset strategy
The reset strategy instructs the application edition manager how each deployment target loads the new edition into the server run time. The following list notes the available options:
| Soft | Reset the application by stopping or restarting the application in each server of the cluster as the next edition replaces the old edition in that server. The server stays up during this process. |
| Hard | Recycle the entire application server as the next edition replaces the former edition, refreshing both process memory and any native libraries used by the application. |
Drainage interval
The drainage interval gives the HTTP sessions time to complete before the application or server is reset. The drainage interval specifies the amount of time the application edition manager waits before the reset strategy starts. The drainage interval allows requests with affinities and in-flight requests to complete. To prevent the loss of transient sessions, set the drainage interval to exceed the application session timeout interval. After the rollout starts, as each server updates, the server is marked as ineligible to begin any new sessions. If the drainage value is set to 0, the process does not wait for sessions to complete.
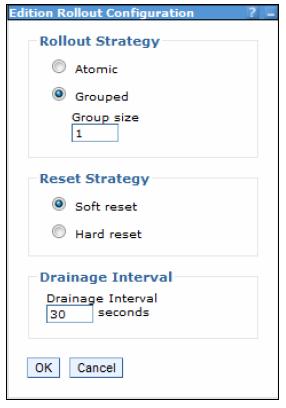
Tune the SOAP connector properties to set the request timeout value for the deployment manager. Set the value to be greater than the total time required to perform a rollout on the system, and restart the deployment manager. If this property is not set it can cause the rollout process to fail when the request timeout value expires. Estimating the value to set is derived from the following formula:
Request Timeout = RG * (DI + IQ + AR)

RG = number of groups to rollout
DI = drainage internal IQ = internal quiesce timeouts (approximately five minutes)
AR = application or server restart times (approximately 10 minutes)
If you are performing the rollout using the dmgr console, adjust the request timeout value by clicking...
-
System administration | Deployment manager | Administration services | JMX connectors | SOAPConnector | Custom properties | requestTimeout
Default is 600 seconds and needs to be increased adequately. A value of zero disables the timeout.
Also set the session expiration for the dmgr console to a value greater than the amount of time required for the entire rollout process to end.
Performing the rollout
To perform an interruption-free rollout for a compatible application edition:
- From the dmgr console, go to Applications | Edition control center.
- Select the application on which to perform the rollout.
- Check the edition to be rolled out, and click Rollout.
- Select the rollout strategy, reset strategy, and drainage interval based on the application requirements, and click OK
Rolling back an edition
If after the application rollout you find an error and decide to go back, we can do this by rolling back to the former edition. The rollback process works the same way as the rollout.
The only difference is that you select a previous working edition during the rollout procedure.
To rollback an edition:
- From the dmgr console, go to Applications | Edition control center.
- Select the application to rollback.
- Check the previously known working edition, and click Rollout.
Select the rollout strategy, reset strategy, and drainage interval, based on the application requirements, and click OK
The edition to go back to needs to be installed. If the edition was deleted, we can install it again and then perform the rollback.
Hot deployment and dynamic reloading
Hot deployment and dynamic reloading characterize how application updates are handled when updates to the applications are made by directly manipulating the files on the server. In either case, updates do not require a server restart, although they might require an application restart. These features provide the following capabilities:
- Hot deployment of new components
Hot deployment of new components is the process of adding new components, such as WAR files, EJB JAR files, servlets, and JSP files to a running application server without having to stop and then restart the application server.
However, in most cases, such changes require the application itself to be restarted so the application server run time reloads the application and its changes.
- Dynamic reloading of existing components
Dynamic reloading of existing components is the ability to change an existing component without the need to restart the application server for the change to take effect. Dynamic reloading can involve changes of the following types:
- Implementation of an application component, such as changing the implementation of a servlet
- Settings of the application, such as changing the deployment descriptor for a web module
To edit the application files manually, locate the binaries in use by the server (in most cases these binaries are in the application server installedApps directory). The application files can be edited manually on one or more of the nodes. These changes are overwritten the next time the node synchronizes its configuration with the deployment manager. Therefore, perform manual editing of an application's files only in the master repository, which is located on the deployment manager system.
If you are not familiar with updating applications by manipulating the server files directly, consider using the dmgr console update wizard.
The following settings can affect dynamic reload:
- Reload classes when application files are updated
For application files to be reloaded automatically after an update, the Override class reloading settings for Web and EJB modules setting must be enabled, and the Polling interval for updated files setting must be greater than 0.
Click...
-
Applications | Application Types | WebSphere enterprise applications
...and click the link for the application. In the Detail properties section, click the Class loading and update detection link.
- Application Server class loader policy
Set the application server's class loader policy to Multiple. If it is set to Single, restart the application server after an application update. Click...
-
Servers | Server Types | WebSphere application servers server name
The setting is found in the General Properties section, under Server-specific Application Settings.
- JSP Reload options for web modules
A web container reloads a web module only when this setting is enabled, which is a default setting. Click...
-
Applications | Application Types | WebSphere enterprise applications | application
In the Web Module Properties section, click JSP and JSF options and then select the JSP enable class reloading option. Enter a polling interval.