Using the LTPA token - DataPower as a gateway device
This article builds on the work done in Part 4 of this series. The configuration required for this scenario for the WebSphere-based client and provider installations is identical to the configuration described in that article. In effect, the insertion of the client and provider gateways into the flow should be transparent to both the client and provider.
The techniques shown in this article require a DataPower device with firmware version of at least 3.5.1.2.
In a commercial implementation of this scenario, the client would likely query a registry, like the WebSphere Service Registry and Repository, to dynamically bind the outgoing request to an endpoint. The registry would return the address of the client DataPower domain gateway in our scenario. There would also likely be some identity mapping involved between the client side and the service provider side. This mapping would likely happen in a federated identity product like Tivoli Federated Identity Manager, which could be invoked from the client WebSphere Web service stack, from the client domain DataPower gateway, from the provider domain DataPower gateway, or from the provider WebSphere Web service stack. For simplicity, however, we'll propagate the identity without mapping, which imposes the requirement that the user's Distinguished Name (DN) exists in the registries used by the WebSphere installations at both ends.
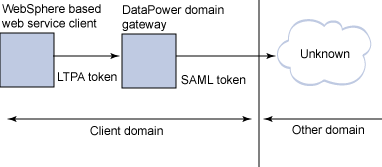
We'll look at two discreet scenarios in this article. The client-side perspective, shown in Figure 1, shows an organization that wants to outsource the provision of a service to a different organization. They make liberal use of LTPA tokens to propagate security identities within their local domain because they use WebSphere technologies internally, and want to gain the runtime efficiency and speed of development provided by the tools around that token type. They do not, however, want to tie themselves to the implementation of the outsourced service by requiring the service provider to understand LTPA tokens. They decide to interpose a Web service gateway to translate/transform the local LTPA token into a SAML token to propagate an identity to the service provider. In this article, we'll go through the steps to configure a DataPower device to perform that translation.
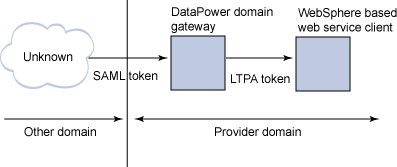
The second scenario, shown in Figure 2, looks at the same flow from the perspective of the service provider, who also happens to make liberal use of LTPA tokens within their infrastructure. The service provider wants to be able to provide their services without tying themselves to the service consumer. They want a gateway device that can translate security tokens from whatever format the client wants to use into an LTPA token for consumption within their own networks. We'll go through the steps to configure a DataPower device to do this.
In both cases we'll use the XML firewall functionality in the DataPower devices and the basic steps for each scenario will be as follows:
- Create and exchange keys for signing the SAML tokens.
- Create and exchange keys for each DataPower device.
- Create an XML firewall.
- Add a rule.
- Add and configure an Authentication, Authorization, Audit (AAA) action.
- Add a policy.
- Save the configuration.
Note: For the sake of simplicity, most of the screen captures in this article show only those fields and options that are relevant to the discussion.
Create and exchange cryptographic keys for SAML
Let's start with creating and exchanging the cryptographic keys for signing the SAML tokens passed from the client gateway to the provider gateway. In most cases, a trusted certificate authority either internal or external to your organization may provide Cert/Key pairs for you. If not, DataPower can provide test Cert/Key pairs for you as described in this section.
In order to accomplish the SAML steps, you first need to build a Certificate/Key pairing using the DataPower device.s onboard Crypto facilities. In our scenario, we'll be using this Cert/Key pair in the following manner:
- The client DataPower domain gateway receives a client request, authenticates the message with LTPA, injects a signed SAML assertion that identifies the sender to the message and sends it on to the provider gateway.
- The provider DataPower domain gateway receives a request from client gateway, verifies the signature of the SAML assertion and validates the sender as an authorized partner.
- Log in to the DataPower device. The URL to the device is typically https: //servername:9090/, but you may need to verify this with your DataPower administrator.
- Enter the User and Password and select the Domain (a domain is similar to a shared workspace or soft partition
within the device), then click Login, as shown in Figure 3:

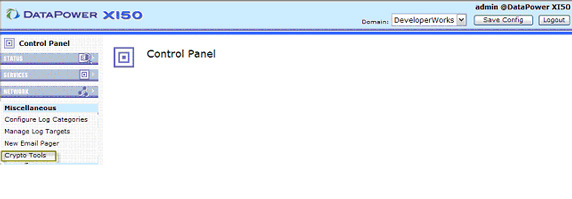
- In the Control Panel shown in Figure 4, click the Administrationtab in the left navigation.
This tab hosts most of your administrative capabilities on the device.

- At the bottom of the Administration tab, select Crypto Tools which allows you to build and store a Certificate/Key pair on the device as
shown in Figure 5:
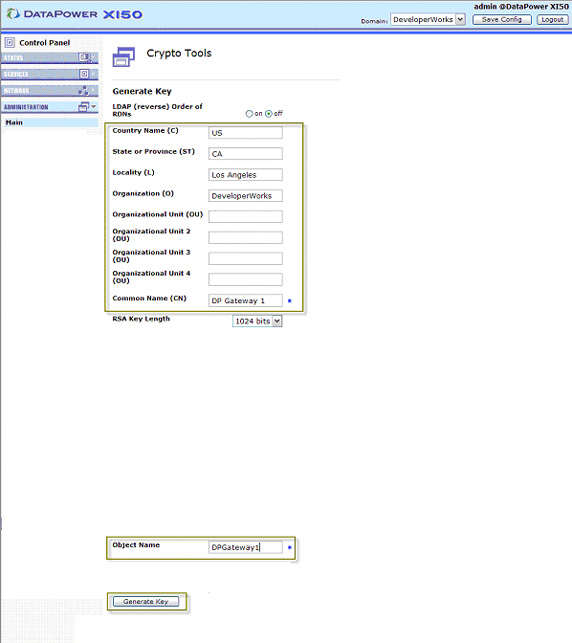
- In the Generate Key section, you can provide any information about the Certificate/Key pairing. Common Name is a required field
and is typically used as the most granular level of identity. The Object Name section determines
how the Certificate/Key pair will be referenced on the device. Click Generate Key, as shown in Figure 6:
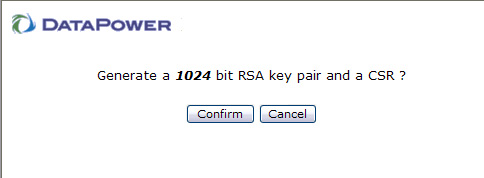
- Click Confirm as shown in Figure 7:
- You should receive a success message, as shown in Figure 8. Click Close and return to the Control Panel.

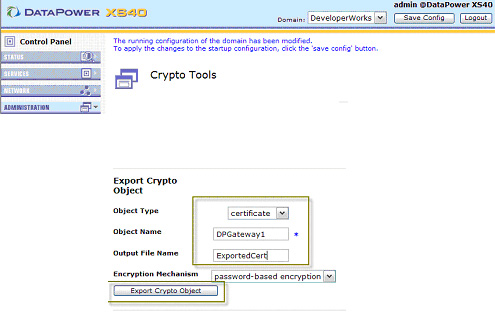
Because the client will be signing messages with the Cert/Key pair and the provider will be validating the signatures, you need to export the Public Key from the client DataPower domain gateway and import that Cert into the provider DataPower domain gateway.
- From the Control Panel, click the Administration tab, then click Crypto Tools.
- In the Export Crypto Object section, select certificate for the Object Type. Enter an
Object Name, or certificate alias, and enter a name for the exported key file in the Output File Name field.
Then click Export Crypto Object, as shown in Figure 10:
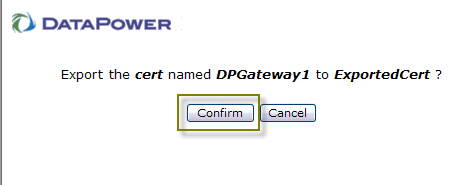
- Click Confirm in the dialog shown in Figure 11:
- In the success dialog, click Close.

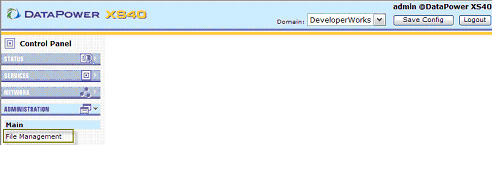
- On the left navigation, still in the Administration tab, click File Management as shown in Figure 13:
- In the Select Directory field, as shown in Figure 14, choose the temporary folder, which is where your
exported object is stored. Right-click your newly exported Cert (in this example, ExportedCert) and save it to your local file system.
You've now exported the public key and are ready to import it into the provider DataPower gateway.
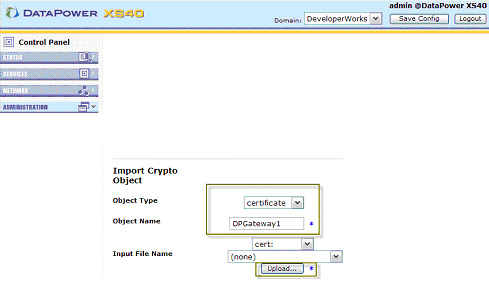
- Log in to the provider DataPower domain gateway. From the Control Panel, open the Administration tab and click Crypto Tools.
- In the Import Crypto Objects field, as shown in Figure 15, select certificate for the Object Type and
enter a name for the object in the Object Name field, then click Upload to import the key to the device.
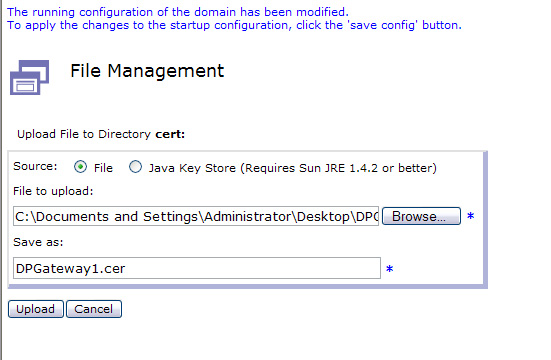
- Select Browse to get the key file from your file system as shown in Figure 16:

- In the browse dialog, select your public key file (in this example, DPGateway1.cer) and click Open.
Rename the key in Save as field, if you want, then click Upload as shown in Figure 17.
- Click Continue on the confirmation dialog.
The public key is now available for the provider gateway to use in signature verification. We'll use this later in this walk-through.
The client domain gateway expects a request message with an LTPA token in a Web services security (WS-Security) header as generated by the configuration described in Part 4 of this series. The gateway validates the inbound LTPA token and then injects a signed SAML token in the outbound payload for use in cross-domain identification, propagating it to the provider gateway in a WS-Security header along with the request.
We need to create an XML firewall, which allows us to mediate between service clients and providers or vice-versa. We'll start with building a mediating proxy on the client side DataPower domain gateway.
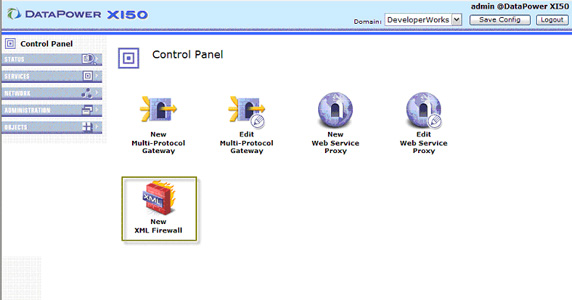
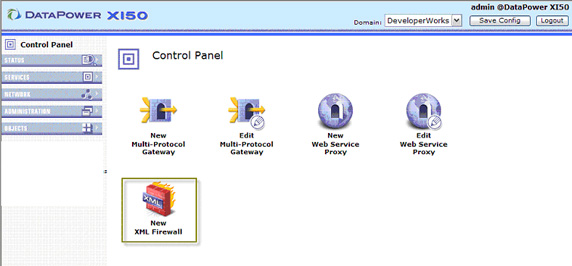
- Select New XML Firewall from the list of services in the Control Panel as shown in Figure 18. Note that there are
different service types for different purposes. Refer to the DataPower datasheets for more information on choosing a service type.
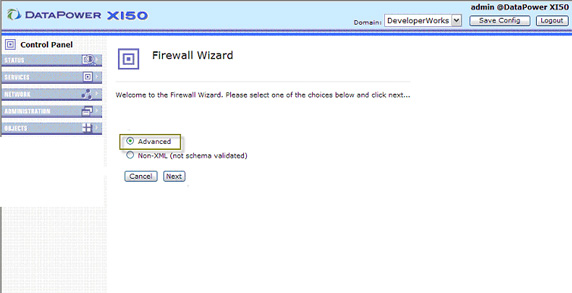
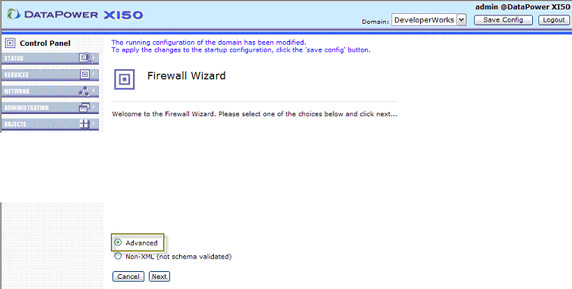
- Although you can build an XML firewall from a template or import one from other SOA products, for the purposes of this example,
we're going to skip this by selecting an Advanced firewall, as shown in Figure 19, and clicking Next:
- In the General Configuration dialog, shown in Figure 20, you need to fill out several required fields, including
Firewall Name, Back End Server Address and Port, and Front End Device Port, which is the
device listening port for inbound traffic. You don't need to specify a Device Address here because 0.0.0.0 instructs the
device to listen on all device addresses/NICs.
Leave the Firewall Type as is, which means the inbound traffic will be passed to the statically defined back end server address and port.
Next, create a firewall policy for this service by clicking + next to the Firewall Policy field. Leave the General Configuration screen open in the background as you'll return to it shortly.
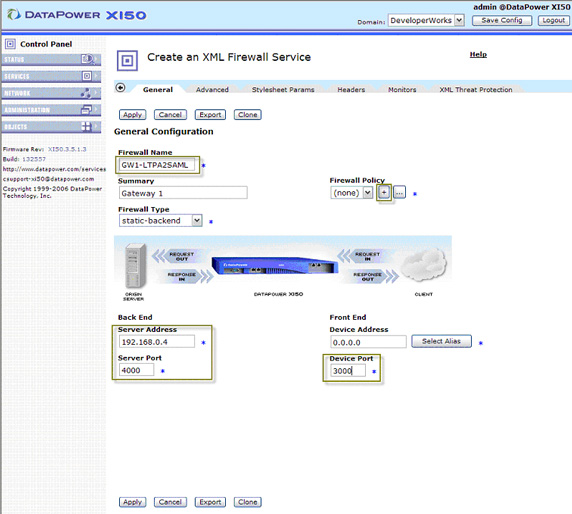
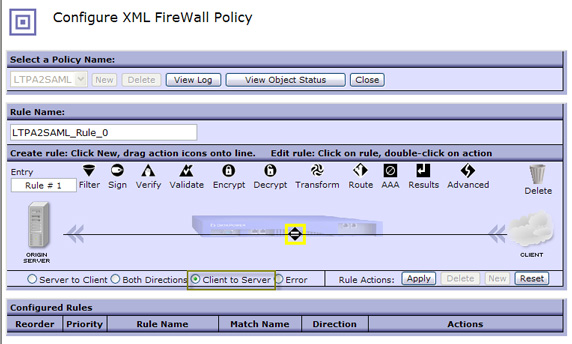
- You'll see a pop-up window asking for a policy name. We'll be creating a Request Rule that receives an inbound payload, checks for LTPA validity, then injects a SAML assertion for downstream use. Call the policy LTPA2SAML.
In the policy canvas, as shown in Figure 21, you can define message processing request, response, or error rules. As messages flow through the device, DataPower devices can accommodate a variety of XML and security functions at extremely high speeds (independent tests have demonstrated that the security processing is orders-of-magnitude faster than server software).
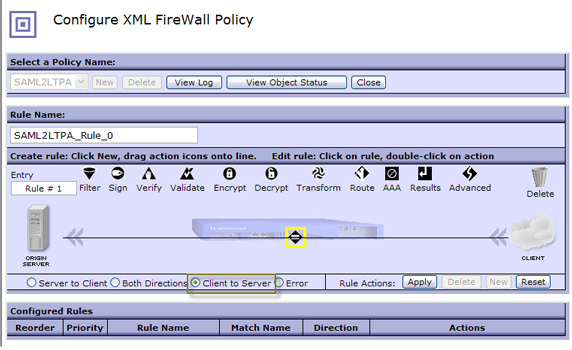
- Select Client to Server as the rule type, or, in other words, a request-rule.
- Every rule must start with a match action. Double-click the yellow highlighted diamond to create a match rule. If an inbound payload doesn't
match our criteria, it is rejected.
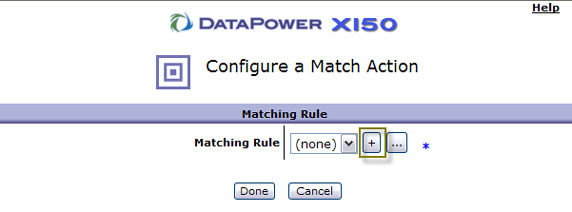
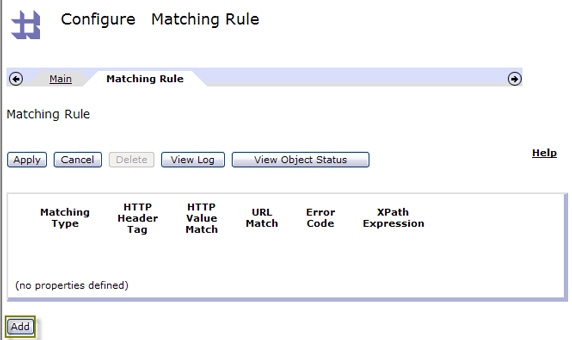
- Since we have no match rules yet, you have to create one. To do this, click the + next to the Matching Rule field, as shown in Figure 22:
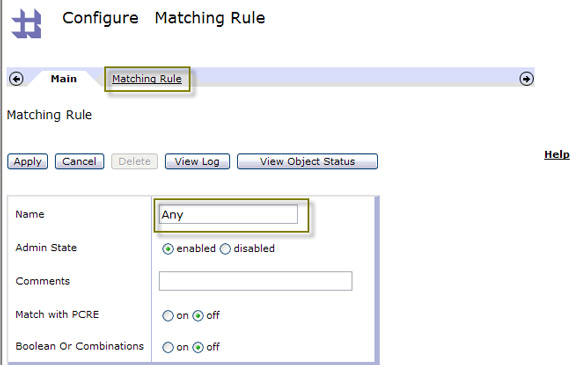
- Give the matching rule a name as shown in Figure 23. In our case, we'll be matching for any inbound URL on the server/port combination
defined for this XML firewall so Any or All would be appropriate. Select the Matching Rule tab to define the actual rule.
- You can match on several things like an HTTP header tag/value, URL, error code (typically used in error rules), or even XPath,
which allows you to do payload inspection. Click Add to create a URL match, as shown in Figure 24:
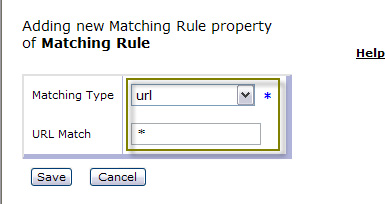
- In the Matching Type field, select url, and enter * in the URL Match field,
which means match any URL that comes in. Click Save, as shown in Figure 25. Note that you can use
literal matches or PCRE matches here.
- You have now defined a match rule. Click Apply to save your changes, as shown in Figure 26.
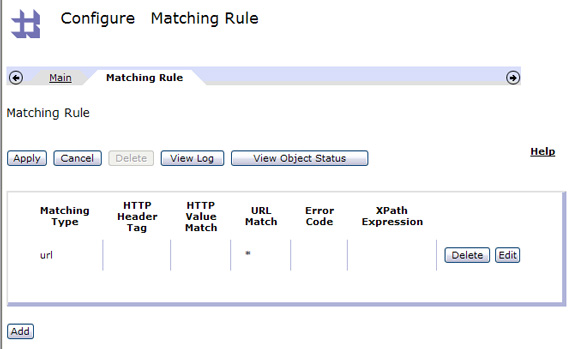
- The new match rule now appears in the drop-down, as shown in Figure 27. You'll be able to reuse this match rule object later in other
configurations. Keep in mind that almost everything configured on the DataPower device boils down to some type of reusable object or template.
Select the new rule, then click Done to return to the policy canvas.

Add Authentication, Authorization, and Audit (AAA) to consume LTPA and generate SAML
The AAA framework allows DataPower devices to use a broad variety of methods for extracting user passwords, security tokens and other identity information from incoming requests. This action allows a DataPower device to serve as a central enforcement point for securing Web services or traffic over the wire. DataPower integrates with leading identity management systems such as IBM Tivoli® Access Manager and Tivoli Federated Identity Manager, as well as many 3rd-party access control systems . And since the Audit & Accounting processing is fully extensible, the unique AAA framework has even enabled XS40 customers to integrated proprietary, in-house, single sign-on (SSO) systems with their Web services security architecture.
Notice in Figure 28 that our match action is no longer highlighted, which means that it's configured appropriately.
- Click and drag the AAA action onto the message processing flow, as shown in Figure 28:

- Notice the highlighted icon in Figure 29. You can drag and drop a variety of actions in any order to configure your message processing rule.
You can also configure and reconfigure your message processing policy to accommodate any number and order of actions you deem necessary. For now,
let's keep it simple and just configure the AAA action by double-clicking it.

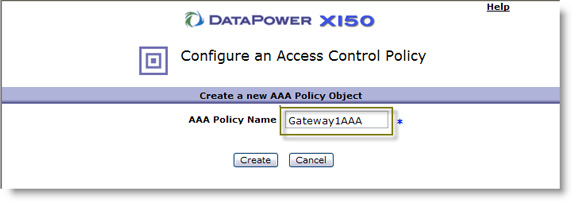
- Create a new AAA instance by clicking + next to AAA Policy, as shown in Figure 30:
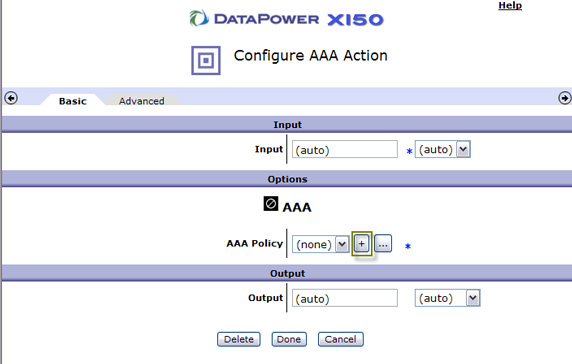
- Give the AAA policy a name and click Create, as shown in Figure 31:
- The first step in AAA is to extract the identity, which can be done several ways, as described earlier. For our example, select LTPA,
as shown in Figure 32, which means we expect some LTPA tokens including Domino-style LTPA v1 or v2. Select On for Use WS-Security
Token First, which means we expect the token in a WS-Security BinarySecurityToken. If left Off, it means the token is coming in the HTTP
header (and the DataPower device automatically determines which type of LTPA token the inbound connection is using based on cookie name and
content.) Click Next.

- The next step is to authenticate the extracted identity. In our case, that means making sure
that the LTPA token comes from a trusted source.
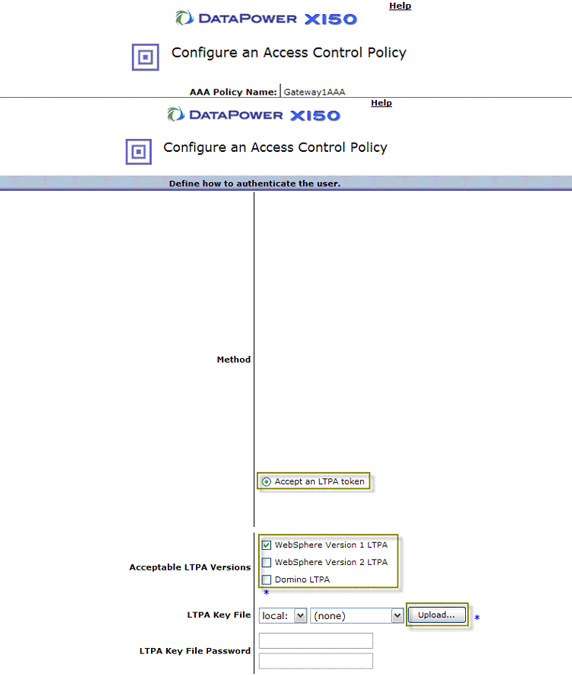
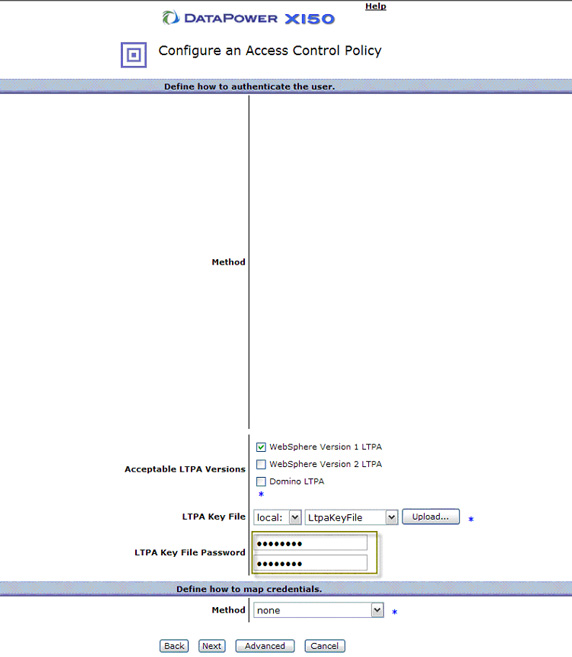
First select Accept an LTPA token as shown in Figure 33, then check the appropriate boxes for
Acceptable LTPA Versions (this won't appear until you do the first step).
The extent of the authentication being done here is to validate the LTPA token itself
(check that the key used to create it is the one we expected). In order to validate any LTPA, you need to
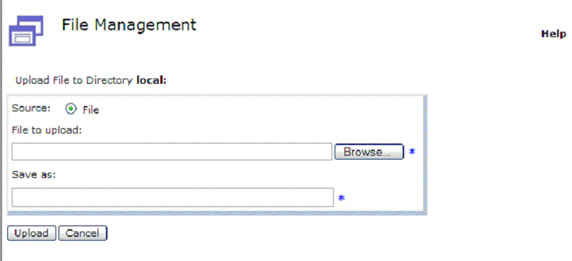
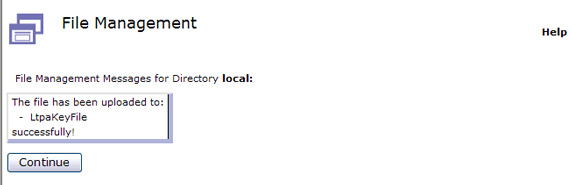
upload the LTPA key file. Select Upload to do that, as shown in Figure 33:
- Click Browse to locate the key file. This file is generated by LTPA-enabled products like
WebSphere Application Sever or Domino.
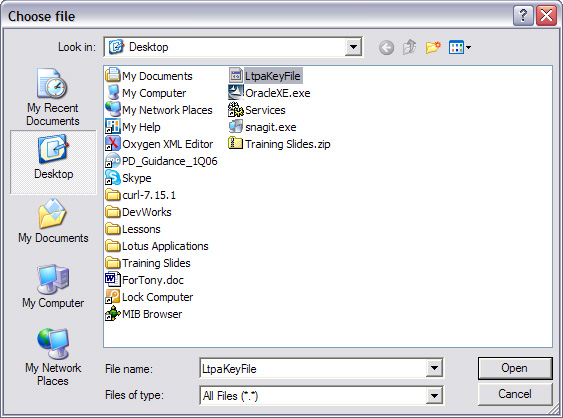
- Select the key file and click Open as shown in Figure 35:
- You can change the name of the key file in the Save as field, or leave the default, as shown in Figure 35.
Click Upload to save the key file to the DataPower device.

- Click Continue as shown in Figure 37:
- Enter the LTPA Key File Password associated with the key file and click Next, as shown in Figure 38:
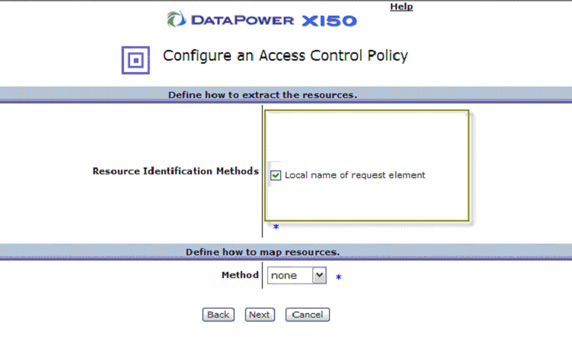
- The next two steps deal with authorization.
The only authorization we're going to do is to allow any authenticated clients.
However, this step is very similar to the authentication step, in that you first extract and then authorize.
For the purposes of our example, check Local name of request element, then click Next, as shown in Figure 39:
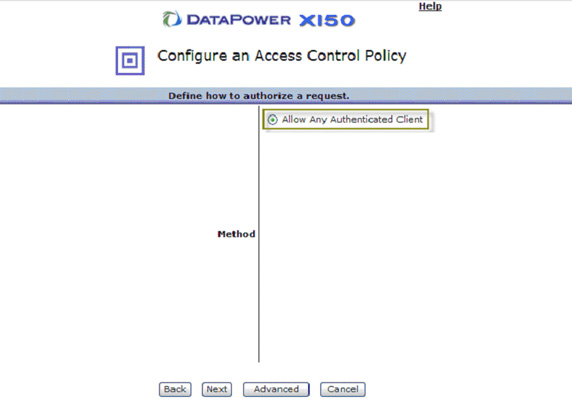
- In this step, you authorize permission to the extracted resource. Click select Allow Any Authenticated Client,
and then click Next, as shown in Figure 40:

- The last step in AAA is the Audit (and post-processing, which is used for token mediation).
Although the various Monitor and Logging options (not shown in Figure 41) are available;
we're going to do some post-processing by generating a SAML assertion within our outbound
payload. Select On for Generate a SAML Assertion.
Select the SAML Version you'd like to use.
Enter the DataPower Domain Gateway 1 for the Issuer Identity in SAML Assertion , or
something that fits your personal scenario.
For the Name Qualifier Attribute Value we're going to pull the LTPA identity or DN from the LTPA token and place it in this area. When the DataPower device consumed the inbound LTPA token, it created in memory a context that represents the information in that LTPA token. In our post- processing step here, we can reference some of that information in order to populate the outbound SAML token. We're going to propagate the identity provided in the inbound LTPA token to the provider gateway in a new SAML token. The way we address the user identity from the LTPA token is with the following built-in DataPower variable: var: //context/WSM/identity/credentials.
Finally, sign the SAML assertion with the keys we created earlier in this article. Select the appropriate key names for SAML Message Signing Key and SAML Message Signing Certificate .
Note that only the user identity from the LTPA token is passed in the SAML token. The realm which is present in the LTPA token is not passed.
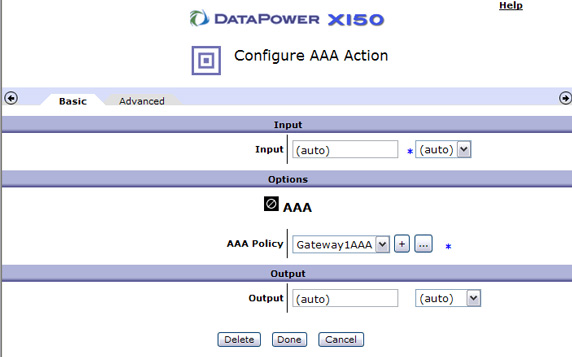
Click Commit to complete the AAA step, as shown in Figure 41:

- Click Done as shown in Figure 42:
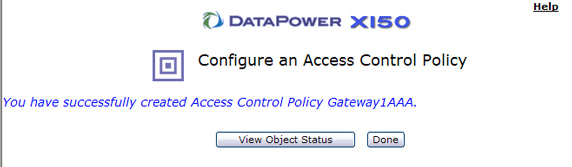
- You now have an AAA object available for your instance of AAA.
Make sure the AAA object you created is selected and click Done, as shown in Figure 43, to add it to the message processing policy:
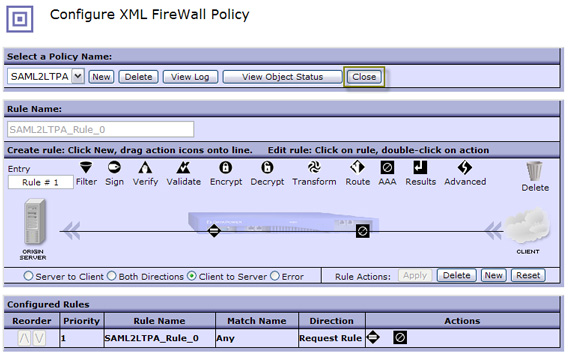
- You've now created a simple request rule with AAA LTPA consumption and SAML generation. Click Apply
to enable this policy as shown in Figure 44:

- Notice the new request rule at the bottom of the screen in Figure 45.
You can create several rules within a policy. Typically you'd have one or more request rules, response rules, and error rules
for a complete policy. In our case, we'll stick with the basics.
Click Close to add this policy to the XML firewall configuration, as shown in Figure 45:
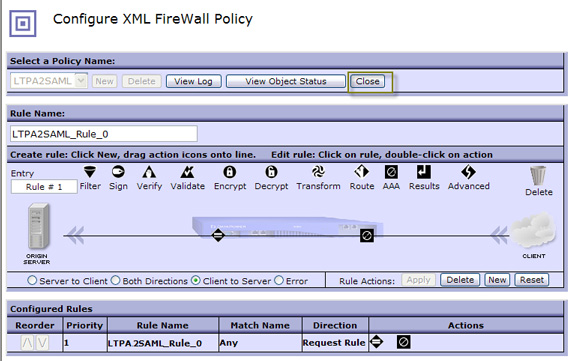
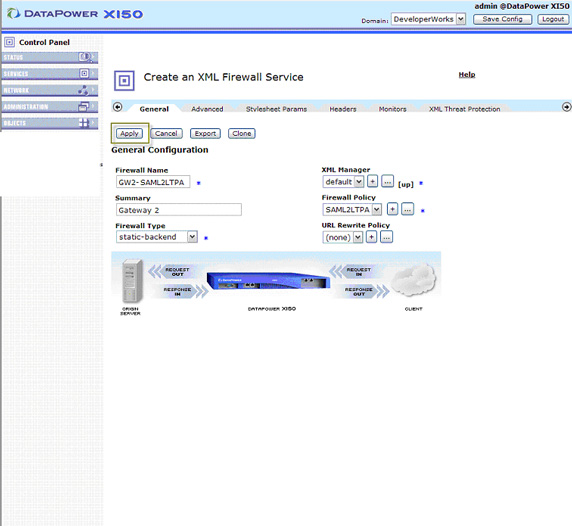
As you can se in Figure 46, the firewall policy is now set to LTPA2SAML. Again, the policy you've just created is now a reusable object for
that other services created on the device can use if necessary. To finish the configuration, click Apply, as shown in Figure 46:
The service is now live. You've just created your first XML firewall! Click the Control Panel image in the upper lefthand corner of the screen to continue.
The provider gateway expects a request message with a SAML token in a Web services security header. The SAML token will contain the Distinguished Name (DN) of the original invoker and will be signed by the client domain gateway. The provider gateway will take this DN and propagate it to the Web service provider in an LTPA token inside a WS-Security header. A Web service configured as described in Part 4 of this series will be able to consume the generated message and process it in the context of the initial invoker.
- From the control panel, as shown in Figure 48,
we're going to set up the provider DataPower domain gateway to receive the message from the client DataPower domain gateway.
Select New XML Firewall.
- We'll create this XML firewall very much like the one we created for the client gateway, so select Advanced for the XML Firewall
template as shown in Figure 49 and then click Next.
- Configure the Firewall Name, Back End Server Address and Port, and Front End Device Port as shown in Figure 50.
Notice that the Back End Port of the previous firewall is the Front End Device Port for this one.
Click + beside Firewall Policy to create another message processing policy.
- Select Client to Server as the message processing rule type again, then double-click the highlighted Match icon as shown in Figure
51:
- We're actually going to use the same match rule as we did on the client side,
so use the same steps you did for the first one, and then select it in the list as shown in Figure 52, and click Done:

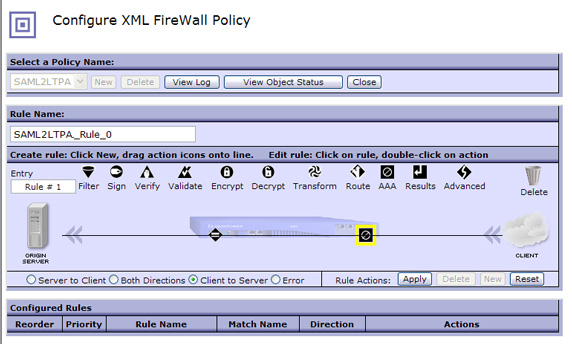
- Once the match action is place, click and drag the AAA step into the message processing policy as shown in Figure 53:

Add an AAA action to consume SAML and generate LTPA
- Double-click the highlighted AAA action to configure as shown in Figure 54.
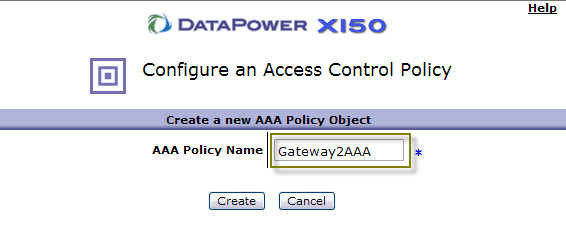
- Create a new AAA Policy by clicking + next to AAA Policy, as shown in Figure 55. Remember that this time we are
consuming SAML and generating LTPA.

- Enter a new name for this AAA policy and click Create, as shown in Figure 56:
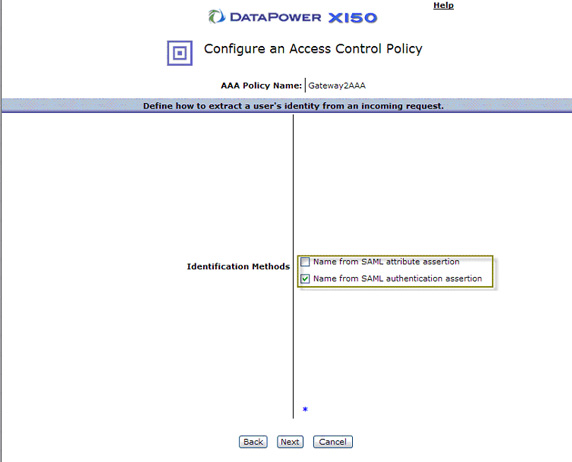
- For SAML, there are three different ways we can obtain or extract SAML, the two highlighted in Figure 57 deal with
SAML in the message payload. The third (which is not shown) deals with SAML in the Web browser. Select Name from SAML
authentication assertion, and click Next.
- For the authentication step, select Accept a SAML Assertion with a Valid Signature. Notice
that the option appears upon selecting SAML Signature Validation Credentials. Essentially, you can create a
list of possible credentials (or public keys) to match with the incoming payload here and reject any that don't match. In order to do this,
you need to create a new object representing the credential matches. Click + to create Crypto Validation Credentials.

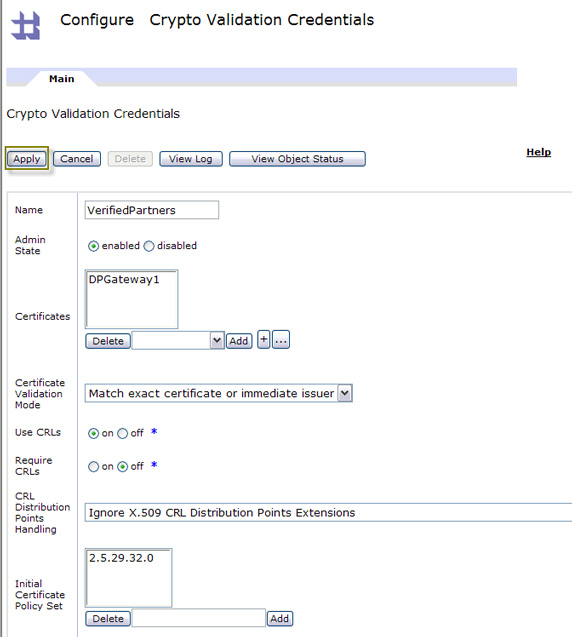
- Give this collection a name as shown above in Figure 59, then select the keys we imported previously, and click Add
to add the collectoon to the certificate list.
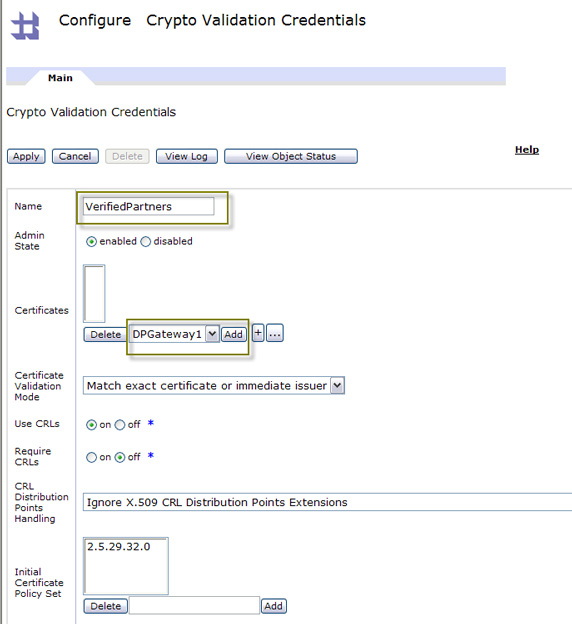
- Notice in Figure 60 that DPGateway1 has now been added to our list of VerifiedPartners. Click Apply to continue.
- As shown in Figure 61, VerifiedPartners now appears in the drop-down for SAML Signature Validation Credentials. Click Next.

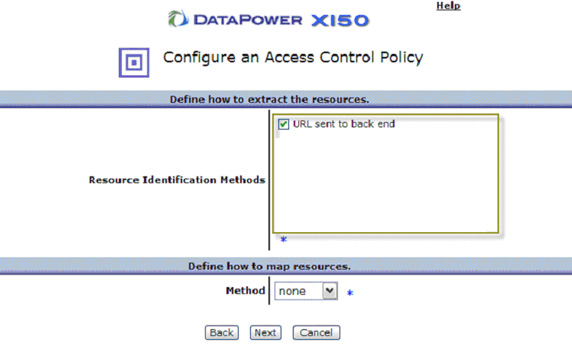
- Again, we're not really doing any authorization here, so select any resource identification method and then click Next.
- Select Allow Any Authenticated Client, as shown in Figure 63 and click Next.
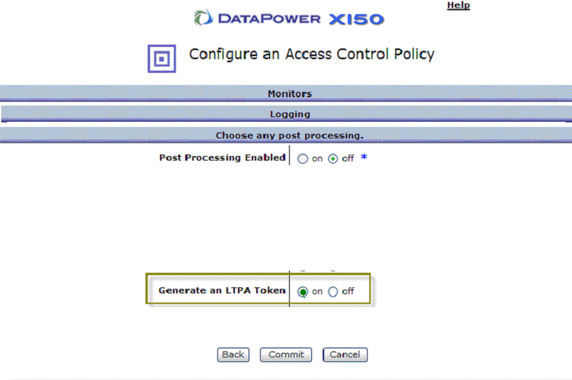
- Under Post Processing, select On for Generate an LTPA Token , as shown in Figure 64.
We're going to configure this very similarly to our LTPA set-up with some minor changes.
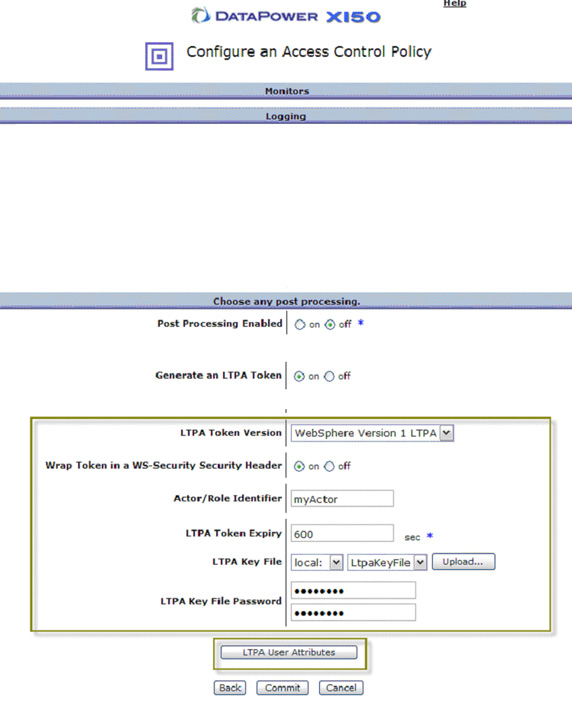
- The LTPA options should appear as shown in Figure 65. Select the LTPA Token Version
you want to generate. Select On for Wrap Token in a WS-Security Security Header.
The Actor/Role field really depends on how the WebSphere Application Server-based service provider is set up.
In Part 4,
we configured it to be myActor, so we'll use that here, too.
Import the key file here the same way you did in the client gateway configuration, then simply select it from
the drop-down list . Then specify the LTPA Key File Password.
- Click Commit upon returning to the AAA Post-Processing screen, then click Done in the dialog shown in Figure 66.
- You've now created a new AAA policy. Click Done as shown in Figure 67 to add it to the request rule.
- Click Apply to commit the changes and enable this message processing policy as shown in Figure 68:

Click Close on the policy canvas as shown in Figure 69.
Your new policy should be available in your XML firewall general configuration. Click Apply to enable this service as shown in Figure 70.
With the service enabled, everything's in place to send messages to these two gateways.
Click Control Panel in the upper lefthand corner as shown in Figure 71 to return to the control panel.
That's it. You have now completed configuration of the provider