Web Clients and Components
Browsers communicate with a J2EE apps using Web components such as servlets and JSP. Servlets are Java programming language classes that dynamically process requests and construct responses. JSP pages are text-based documents that execute as servlets but allow a more natural approach to creating static content.
Servlets are best suited to managing the control functions of an app, such as dispatching requests and handling nontextual data. JSP pages are more appropriate for generating text-based markup such as HTML, SVG, WML, and XML.
Web Client Life Cycle
The server-side portion of a Web client consists of Web components such as servlets and JSP pages, static resource files such as images, and helper classes and libraries.
Web components run within Web containers such as WebLogic and Websphere, which provide services such as request dispatching, security, concurrency, and life-cycle management. It also gives Web components access to the J2EE platform APIs such as naming, transactions, and e-mail.
Before it can be executed, a Web client must be packaged into a Web app archive (WAR), and deployed into a Web container.
Aspects of Web client behavior can be configured during deployment. Configuration information is maintained in XML format files called deployment descriptors. J2EE SDKs can automatically generate and update deployment descriptors. You can also manually create deployment descriptors using the Java Servlet specification.
Here is the process:
- Develop Web component code and deployment descriptor.
- Package Web components, static resources, and helper classes in WAR files.
- Deploy the app to a Web container.
- Pull up the URL that references the Web client.
The sections that follow detail how to create a simple Hello app, using either servlets or JSP.
The servlet version is called Hello1App and is implemented by two servlet classes, GreetingServlet.java and ResponseServlet.java. The JSP version is called Hello2App and consists of two JSP pages, greeting.jsp and response.jsp.
Web Application Archives
Web clients are packaged in Web app archives, *.war files. In addition to Web components, a Web app archive can contain:
- Server-side utility classes such as JavaBeans.
- Static Web content such as HTML, images, and sound files.
- Client-side classes such as applets and utility classes.
The top-level directory of a WAR is the document root of the app, and is where where JSP pages, client-side classes and archives, and static Web resources are stored.
The document root contains a subdirectory called WEB-INF, which contains the following files and directories:
| web.xml |
The Web app deployment descriptor
|
| Tag library descriptor files |
Set of related custom tags and contains the objects that implement the tags
|
| classes |
Directory that contains server-side classes: servlets, utility classes, and JavaBeans components
|
| lib |
Directory that contains JAR archives of libraries (tag libraries and any utility libraries called by server-side classes).
|
You can also create app-specific subdirectories (that is, package directories) in either the document root or the WEB-INF/classes directory.
Creating a WAR File
When you add the first Web component to a J2EE app, deploytool automatically creates a new WAR file to contain the component.
You can manually create a WAR in three ways:
- Using the packager tool distributed with the J2EE SDK.
- With the war task of the ant portable build tool
- With the JAR tool distributed with the J2SE. Arrange your app development directory in the structure required and exexecute:
jar cvf archiveName.war .
Note that to use any of these methods, also manually create a deployment descriptor in the correct format.
Adding a Web Component to a WAR File
The following procedure describes how to create and add the Web component in the Hello1App app to a WAR.
- Go to the examples and run:
ant hello1
The ant command will read the build.xml file to build the war file.
- Navigate to examples/src/web/hello1.
- Create the Hello1App WAR file, adding the GreetingServlet Web component and all of the Hello1App app content.
- Select GreetingServlet.class, ResponseServlet.class, and duke.waving.gif, and click Add. Click OK.
- Select GreetingServlet from the Servlet Class combo box.
packager -webArchive -classpath . -classFiles cart\ShoppingCart.class:cart\ShoppingCartItem.class: database\BookDB.class:util\Currency.class . -contentFiles banner.jsp:bookdetails.jsp:bookstore.jsp:cashier.jsp: catalog.jsp:DigitalClock.class:duke.books.gif: errorpage.jsp:initdestroy.jsp:receipt.jsp:showcart.jsp web.xml bookstore2.war
- Add the ResponseServlet Web component.
- Invoke the Web component wizard by selecting FileNew
 Web Component.
- In the combo box labeled Add To Existing WAR File, select Hello1WAR.
- Click Next.
- Select the Servlet radio button.
- Click Next.
- Select ResponseServlet from the Servlet Class combo box.
- Click Finish.
Note: You can add JSP pages to a WAR file without creating a new Web component for each page. You simply select the WAR file, click Edit to edit the contents of the WAR, and add the pages. The JSP version of the Hello, World app, described in Updating Web Clients, shows how to do this. If you choose this method, you will not be able to specify alias paths (described in Specifying an Alias Path) for the pages.
Configuring Web Clients
The following sections describe the Web client configuration parameters that you will usually want to specify. Configuration parameters are specified at three levels: app, WAR, and component. A number of security parameters can be applied at the WAR and component levels. For information on these security parameters, see Web-Tier Security.
Application-Level Configuration
Context Root
A context root is a name that gets mapped to the document root of a Web client. If your client's context root is catalog, then the request URL
http://<host>:8000/catalog/index.html
will retrieve the file index.html from the document root.
To specify the context root for Hello1App in deploytool,
- Select Hello1App.
- Select the Web Context tab
- Enter hello1 in the Context Root field.
WAR-Level Configuration
The following sections give generic procedures for specifying WAR-level configuration information. For some specific examples, see The Example Servlets.
Context Parameters
The Web components in a WAR share an object that represents their Web context (see Accessing the Web Context). To specify initialization parameters that are passed to the context,
- Select the WAR.
- Select the Context tab.
- Click Add.
References to Environment Entries, Enterprise Beans, Resource Environment Entries, or Resources
If your Web components reference environment entries, enterprise beans, resource environment entries, or resources such as databases, declare the references as follows:
- Select the WAR.
- Select the Environment, Enterprise Bean Refs, Resource Env. Refs or Resource Refs tab.
- Click Add in the pane to add a new reference.
Event Listeners
To add an event listener class...
- Select the WAR.
- Select the Event Listeners tab.
- Click Add.
- Select the listener class from the new field in the Event Listener Classes pane.
Error Mapping
You can specify a mapping between the status code returned in an HTTP response or a Java programming language exception returned by any Web component and a Web resource (see Handling Errors). To set up the mapping,
- Select the WAR.
- Select the File Refs tab.
- Click Add in the Error Mapping pane.
- Enter the HTTP status code (see HTTP Responses) or fully-qualified class name of an exception in the Error/Exception field.
- Enter the name of a resource to be invoked when the status code or exception is returned. The name should have a leading forward slash /.
Note: You can also define error pages for a JSP page contained in a WAR. If error pages are defined for both the WAR and a JSP page, the JSP page's error page takes precedence.
Filter Mapping
A Web container uses filter mapping declarations to decide which filters to apply to a request, and in what order (see Filtering Requests and Responses). The container matches the request Uniform Resource Identifier (URI) to a servlet as described in Specifying an Alias Path. To determine which filters to apply, it matches filter mapping declarations by servlet name or URL pattern. The order in which filters are invoked is the order in which filter mapping declarations that match a request URI for a servlet appear in the filter mapping list.
You specify a filter mapping in deploytool as follows:
- Select the WAR.
- Select the Filter Mapping tab.
- Add a filter.
- Click Edit Filter List.
- Click Add.
- Select the filter class.
- Enter a filter name.
- Add any filter initialization parameters.
- Click OK.
- Map the filter.
- Click Add.
- Select the filter name.
- Select the target type. A filter can be mapped to a specific servlet or to all servlets that match a given URL pattern.
- Specify the target. If the target is a servlet, select the servlet from the drop-down list. If the target is a URL pattern, enter the pattern.
Component-Level Configuration
Initialization Parameters
To specify parameters that are passed to the Web component when it is initialized,
- Select the Web component.
- Select the Init. Parameters tab.
- Click Add to add a new parameter and value.
Specifying an Alias Path
When a request is received by a Web container, it must determine which Web component should handle the request. It does so by mapping the URL path contained in the request to a Web component. A URL path contains the context root (described in the section Context Root) and an alias path:
http://<host>:8000/context root/alias path
Before a servlet can be accessed, the Web container must have at least one alias path for the component. The alias path must start with a / and end with a string or a wildcard expression with an extension (*.jsp, for example). Since Web containers automatically map an alias path that ends with *.jsp, you do not have to specify an alias path for a JSP page unless you wish to refer to the page by a name other than its file name. In the example discussed in the section Updating Web Clients, the page greeting.jsp has an alias, /greeting, but the page response.jsp is referenced by its file name within greeting.jsp.
You set up the mappings for the servlet version of the Hello app using the Web component inspector as follows:
- Select the GreetingServlet Web component.
- Select the Aliases tab.
- Click Add to add a new mapping.
- Type /greeting in the aliases list.
- Select the ResponseServlet Web component.
- Click Add.
- Type /response in the aliases list.
Running Web Clients
A Web client is executed when a Web browser references a URL that is mapped to a component contained in the client. Once you have deployed the Hello1App app, you can run the Web client by pointing a browser at
http://<host>:8000/hello1/greeting
Replace <host> with the name of the host running the J2EE server. If your browser is running on the same host as the J2EE server, you may replace <host> with localhost.
Updating Web Clients
During development, you will often need to make changes to Web clients. To update a servlet you modify the source file, recompile the servlet class, update the component in the WAR, and redeploy the app. Except for the compilation step, you update a JSP page in the same way.
To try this feature, first build, package, and deploy the JSP version of the Hello app:
- Go to j2eetutorial/examples/src and build the example by running ant hello2.
- Create a J2EE app called Hello2App.
- Select FileNewApplication.
- In the file chooser, navigate to j2eetutorial/examples/src/web/hello2.
- In the File Name field, enter Hello2App.
- Click New Application.
- Click OK.
- Create the WAR and add the greeting Web component and all of the Hello2App app content.
- Invoke the Web component wizard by selecting FileNewWeb Component.
- In the combo box labeled Create New WAR File in Application select Hello2App. Enter Hello2WAR in the field labeled WAR Display Name.
- Click Edit to add the content files.
- In the Edit Contents dialog box, navigate to examples/build/web/hello2. Select greeting.jsp, response.jsp, and duke.waving.gif, and click Add. Click OK.
- Click Next.
- Select the JSP radio button.
- Click Next.
- Select greeting.jsp from the JSP Filename combo box.
- Click Finish.
- Add the alias /greeting for the greeting Web component.
- Specify the context root hello2.
- Deploy Hello2App.
- Execute the app by pointing a Web browser at http://<host>:8000/hello2/greeting. Replace <host> with the name of the host running the J2EE server.
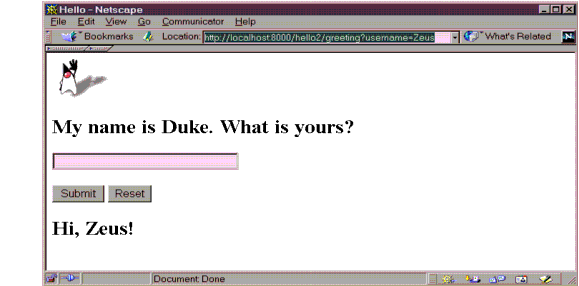
Now modify one of the JSP files. For example, you could replace the contents of response.jsp with the following:
<h2>Hi, <%=username%>!</h2>
To update the file in the WAR and redeploy the app:
- Edit response.jsp.
- Execute ant hello2 to copy the modified file to the build directory.
- Select Hello2App.
- In deploytool, select ToolsUpdate Files.
- A dialog box appears reporting the changed file.Verify that response.jsp has been changed and dismiss the dialog box.
- Select ToolsDeploy. Make sure the checkbox labeled Save Object Before Deploying is checked.
You can also perform steps 4 through 6 by selecting ToolsUpdate And Redeploy. The deploytool utility replaces the old JSP file in Hello2App.ear with the new one and then redeploys the app.
When you execute the app, the response should be changed (Figure 9-3)
Figure 9-3 New Response
Internationalizing Web Clients
Internationalization is the process of preparing an app to support various languages. Localization is the process of adapting an internationalized app to support a specific language or locale. Although all client user interfaces should be internationalized and localized, it is particularly important for Web clients because of the far-reaching nature of the Web. For a good overview of internationalization and localization, see
http://java.sun.com/docs/books/tutorial/i18n/index.html
In the simplest internationalized program, strings are read from a resource bundle that contains translations for the language in use. The resource bundle maps keys used by a program to the strings displayed to the user. Thus, instead of creating strings directly in your code, you create a resource bundle that contains translations and read the translations from that bundle using the corresponding key. A resource bundle can be backed by a text file (properties resource bundle) or a class (list resource bundle) containing the mappings.
In the following chapters on Web technology, the Duke's Bookstore example is internationalized and localized into English and Spanish. The key and value pairs are contained in list resource bundles named messages.BookMessage_*.class. To give you an idea of what the key and string pairs in a resource bundle look like, here are a few lines from the file messages.BookMessages.java.
{"TitleCashier", "Cashier"},
{"TitleBookDescription", "Book Description"},
{"Visitor", "You are visitor number "},
{"What", "What We"re Reading"},
{"Talk", " talks about how Web components can transform the way
you develop apps for the Web. This is a must read for
any self respecting Web developer!"},
{"Start", "Start Shopping"},
To get the correct strings for a given user, a Web component retrieves the locale (set by a browser language preference) from the request, opens the resource bundle for that locale, and then saves the bundle as a session attribute (see Associating Attributes with a Session):
ResourceBundle messages = (ResourceBundle)session.
   getAttribute("messages");
   if (messages == null) {
      Locale locale=request.getLocale();
      messages = ResourceBundle.getBundle("WebMessages",
         locale);
      session.setAttribute("messages", messages);
   }
A Web component retrieves the resource bundle from the session:
ResourceBundle messages =
   (ResourceBundle)session.getAttribute("messages");
and looks up the string associated with the key TitleCashier as follows:
messages.getString("TitleCashier");
In addition to Duke's Bookstore, both the Web client and the J2EE app client distributed with this tutorial's case study app, Duke's Bank, are internationalized; see the section Internationalization in Chapter 18.
This has been a very brief introduction to internationalizing Web clients. For more information on this subject, see the Java Blueprints:
http://java.sun.com/blueprints