IBM BPM, V8.0.1, All platforms > Authoring services in Integration Designer > Testing modules > Component testing > Test suite editor
Test Data Table view
At the bottom of the test suite editor, a Test Data Table view is provided that enables you to import Java extension classes or packages and specify, view, and edit values for operations.
The Test Data Table view is shown in the following figure:

As shown in the figure, there are two panes in the Test Data Table view. These panes are described in the following sections:
- 1 Imports
- 2 Defaults
Imports
The Imports pane is used to import Java extension classes or packages. It supports code assist in the test data table. The Imports page is shown in the following figure:
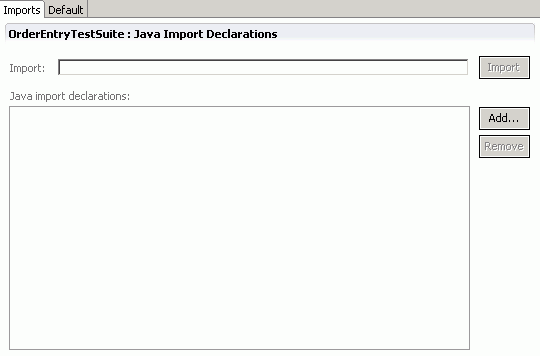
When you import a Java extension class or a package, you can specify use them in the Java expressions for the variables in the test data table.
Default pane
The Default pane contains the test data table used to specify, view, and edit values for operations. The values in the test data table can be repeated in variations. A variation contains a unique set of input values and expected results and it enables you to run a given test case against them. When a test case is run, it is run against all of the variations of the test data table.
The Default pane is shown in the following figure:
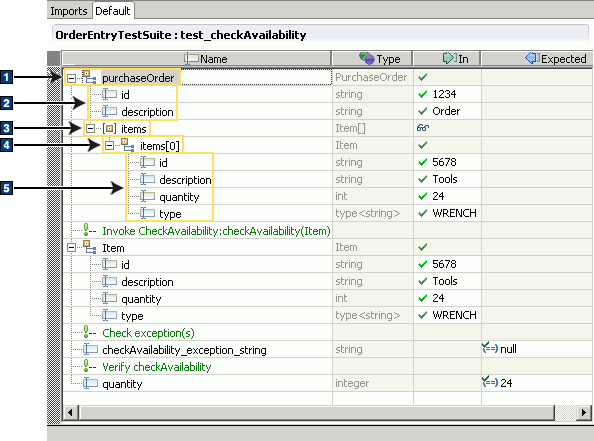
As shown in the figure, there are typically five objects that are displayed in the Name column of the test data table:
- 1 Parameters
- 2 Fields
- 3 Arrays
- 4 Elements
- 5 Fields
The Name column presents a hierarchical view of the data. Fields of a complex element are nested below the complex element. Similarly, elements of arrays are nested below the arrays, and fields are nested below the elements. To add an element to an array, you need to right-click the array and select Add Elements.
The Type column shows the data type of each object.
The In column accepts and displays the input values specified for an object. And
the Expected column accepts and displays the values expected as output for an object. If you specify an invalid
value in these columns, the row that contains the invalid value will be flagged with the validation error symbol 
. Validation errors do not indicate that you have errors in your workspace and they do not prevent you from continuing your testing. You can hover your cursor over the validation error symbol to obtain additional information about the validation error. Similarly, if you select the row that contains the validation error, the status area at the bottom of the test data table will provide additional information about the error.
If that at the top
of the test data table, you can use the Go to Previous
Error icon 
and the Go
to Next Error icon 
to move to the previous error or the next error.
When the test data table first opens, the following values are automatically assigned:
- Read-only fields are flagged with the read-only symbol

.
- All other fields are populated with default values.
If you are working with large business objects that have many fields and values, there are numerous features that can help you work with them more effectively in the test data table, such as:
- A Maximize Editor icon

that enables you to maximize the size of the test data table.
- Keyboard navigation that lets you navigate the test data table using common keys like Tab, Page Up/Down, and the arrow keys.
- Multiple field editing mechanisms.
Field editing mechanisms are discussed more fully in the topic "Specifying variable values."
The test data table is similar in many respects to the value editor in the integration test client. Information on using the value editor is found in the topic "Value and data pool editors."
Variable value states
Input values for variables can exist in one of the following two states:
- Set
- The variable is assigned a value when it is read. A set variable value is flagged with the Set symbol

.
- Unset
- The variable is not assigned a value when it is read. An unset
variable value is flagged with the Unset symbol

.
By comparison, output values for variables can also exist in one of the following two states:
- Set
- The variable is compared against the specified value when it is assigned a value. A set variable value is flagged with the Comparison
Operation symbol

.
- Do Not Care
- No checking of the variable value will be performed. The Do Not
Care symbol is identical to the Unset symbol
.
The states of a variable can be changed by right-clicking the variable and selecting one of the Set menu items.
Pop-up menu items
In the test data table, you can choose from numerous pop-up menu items to help you manage the values that you pass to variables. The pop-up menu items that are available differ depending on the kind of variable for which you are specifying a value. The following table lists some of the pop-up menu items that are available in the test data table.
| Pop-up menu item | How to invoke | Function |
|---|---|---|
| Copy Row(s) | In the Name column, select one or more objects and then right-click one of the selected objects and select Copy Row(s). | Copies the selected rows to the clipboard. |
| Paste Row(s) Before | In the Name column, right-click an object and select Paste Row(s) Before. | Pastes the copied rows from the clipboard to a position immediately before the row that contains the object that you right-clicked. |
| Paste Row(s) After | In the Name column, right-click an object and select Paste Row(s) After. | Pastes the copied rows from the clipboard to a position immediately after the row that contains the object that you right-clicked. |
| Select All | In the Name column, right-click any object and select Select All. | Selects all objects in the test data table. |
| Add comment | In the Name column, right-click a comment or parameter and select Add > Comment. | Opens the New Variation Comment window to enable you to add a new comment and specify its location in the test data table. (You can modify an existing comment by double-clicking it in the Name column.) |
| Add variable | In the Name column, right-click a comment or parameter and select Add > Variable. | Opens the New Data Table Variable window to enable you to add a new variable to the test data table. Information about adding a new variable is found in the topic "Adding variables." |
| Remove | In the Name column, select one or more comments or top-level parameters, then right-click a selected row and select Remove. | Removes the selected comments or top-level parameters in the test data table. |
| Copy Value | In the Name column, right-click a parameter, field, array, or element and select Copy Value. | Copies the selected parameter, field, array, or element to the clipboard. |
| Paste Value | In the Name column, select one or more objects and then right-click a selected row and select Paste Value. | Pastes the copied value of a field, array element, or business object from the clipboard. Values of one business object may be copied to a business object with a different data type if the attribute names match. For example, if a copied business object has attributes A, B, and C but the business object to which you are pasting has attributes B, A, and D, then attributes A and B will receive copied values but attribute D will not. If the data type of any copied fields do not match, such as when copying a boolean value to an integer field, then an error icon will display in the cell. |
| Copy Variable Name | In the Name column, select one or more objects and then right-click a selected row and select Copy Variable Name. | Copies the selected variables and any children of the variables. |
| Set Format > Literal | In the Name column, select one or more objects and then right-click a selected row and select Set Format > Literal. | Sets the format of the variable values to literals, which are essentially string values. The values are converted to the correct type for the variables with which they are associated. This is the default state of the variable values.
The exception to this rule is the value null. In this case, the variable will be set to the Java null expression. If you want to set the value to the string "null", then you can change the format to Java Expression and specify null. |
| Set Format > Java Expression | In the Name column, select one or more objects and then right-click a selected row and select Set Format > Java Expression. | Sets the format of the variable values to Java expressions. The type of the expressions must be compatible with the type of the variables. The Java context is the variables themselves and any imports defined in the Imports page of the Test Data Table view. Additional information about Java expressions is found in the topic Java expressions. |
| Set Format > XML | In the Name column, right-click the root (top level) of the object and select Set Format > XML. | Sets the format of the variable values to XML.
If you want to work with the XML editor, double-click the XML string in the Set or Expected column. The XML editor opens and displays the variable values in XML document format. In the test suite editor, the test data table is the editor that is open by default. If you switch to the XML format, a serialization of the value structure occurs for the purpose of populating the XML editor. When you switch to the XML format strictly for viewing the content and you do not perform any editing or import any file, you can switch back to the literal format if you so choose. However, if you perform any editing or import any file in the XML editor, then switching back to the literal format in the data table will invoke a message that warns you that data may be lost, such as XML comments. |
| Set To > Value | In the Name column, select one or more editable fields, then right-click a selected row and select Set To > Value. | Opens the Set Value window to enable you to specify a value for selected fields. Alternatively, you can also type a value directly into the Value column for an individual field. You can use this menu item in conjunction with the Select All menu item to open the Set Value
window and specify a value for all fields. Set values are flagged
with the Set symbol . |
| Set To > Unset | In the Name column, select one or more editable fields, then right-click one of the selections and select Set To > Unset. | Sets the value of the selected fields to the value Unset, as indicated by the Unset symbol . When a variable is unset, a value is not assigned to the variable when the variable is read. You can use this menu item in conjunction with the Select All menu item to set the value of all fields to the value Unset. |
| Set To > Default | In the Name column, select one or more editable fields, then right-click one of the selections and select Set To > Default. | Sets the value of the selected fields to the default value for their data types. A boolean data type is set to a value of false and an integer is set to a value of 0. A complex type is set to a value of null and a string is set to an empty string (" "). You can use this menu item in conjunction
with the Select All menu item to set the value of all fields to their default values. The default values are flagged with the Set symbol . |
| Set To > Null | In the Name column, select one or more editable fields, then right-click one of the selections and select Set To > Null. | Sets the value of the selected fields to the value Null. You can use this menu item in conjunction with the Select All menu item to set the value of all fields to the value Null. |
| Set To > Equals Value | In the Expected column, right-click an editable field and select Set To > Equals Value. | Opens the Set Value window to enable you to specify a new value for the selected field. The value is flagged with the Set symbol
|
| Set To > Do Not Care | In the Expected column, select one or more editable fields, then right-click one of the selections and select Set To > Do Not Care. | No checking of the variable values will be performed.
The values will be flagged with the Do Not Care symbol, which is identical to the Unset symbol . |
| Set To > Equals Default | In the Expected column, select one or more editable fields, then right-click one of the selections and select Set To > Equals Default. | Sets the value of the selected fields to the default value for the field types. A boolean data type is set to a value of false and an integer is set to a value of 0. A complex type is set to a value of null and a string is set to an empty string (" "). The variable values are flagged with the Comparison Operation symbol . |
| Set To > Equals Null | In the Expected column, select one or more fields that can be set to null, then right-click one of the selections and select Set To > Equals Null. | Sets the values to null for those types that can be specified as null. The variable values are flagged with the Comparison Operation symbol . |
| Set To > Not Equals Null | In the Expected column, select one or more fields that can be set to null, then right-click one of the selections and select Set To > Not Equals Default. | Sets the values to null for those types that can be specified as null. The variable values are flagged with the Not Equals Null symbol  . |
| Set Required to Default | In the Name column, select one or more editable fields, then right-click one of the selections and select Set Required to Default. | Sets the required fields to their default values. Sets any unrequired fields to unset. You can use this menu item in conjunction with the Select All menu item to set all required fields to their default values and set all unrequired fields to unset. |
| Import from XML File | In the Name column, select one or more objects and then right-click a selected row and select Import from XML. | Opens a file selection window that enables you to import the value of a field, array element, or business object from an XML file. Values of one business object may be copied to a business object with a different data type if the attribute names match. If a copied value is not correct for the data type of the field to which it is being imported, such as when importing a boolean value to an integer field, then an error icon will display in the cell. For additional information and an example of an XML file, see the section below entitled "Importing values from XML files." |
| Export to XML File | In the Name column, select one or more XSD elements or attributes and then right-click a selected row and select Export to XML File. | Opens a New XML File window that enables you to save the selected XSD element or attribute to your workspace as either an XML or XSD file. If the value element is representing an XSD schema, then you should export the XSD element as an XSD (.xsd) file. If that the XSD element or attribute that you chose to export will be exported as well as any nested objects, but the siblings of the object will not be exported. |
| Refactor > Rename | In the Name column, right-click the parameter that you want to rename and select Refactor > Rename. | Opens the Rename window to enable you to rename the selected parameter. Any references to the parameter in the test case tasks will be updated with the new name. |
| Add Children | In the Name column, right-click a variable with a complex type and select Add Children. | Adds children to the variable with the complex type. |
| Remove Children | In the Name column, right-click a variable with a complex type that has children and select Remove Children. | Removes children from the variable with the complex type. |
| Add Operator > AND | In the Expected column, right-click a value and select Add Operator > AND. | Adds an <AND> operator to the Name column in a new row of its own. The <AND> operator can be used to validate values. You can change an <AND> operator to an <OR> operator by clicking the <AND> operator in the Name column and selecting <OR> from the list. |
| Add Operator > OR | In the Expected column, right-click a value and select Add Operator > OR. | Adds an <OR> operator to the Name column in a new row of its own. The <OR> operator can be used to validate values. You can change an <OR> operator to an <AND> operator by clicking the <OR> operator in the Name column and selecting <AND> from the list. |
| Add Operator > Condition | In the Expected column, right-click a value and select Add Operator > Condition. | Adds a Condition operator to the Name column in a new row of its own. This enables you to specify a Boolean value that will be evaluated at run time. The condition is evaluated at the point where the associated value is compared. This allows complex expressions to be evaluated. The Condition operator can only be used to validate values that are defined in the same test variation. |
| Remove Operator | In the Expected column, select one or more operators, then right-click one of the selections and select Remove Operator. | Removes the selected operators from the test data table. |
| Refresh Type | In the Name column, locate a business object that you have changed in your workspace without refactoring. The business object will be flagged with an error icon. Right-click the business object and select Refresh Type. | Refreshes the business object in the test data table with the non-refactored changes made to the business object in your workspace. The error symbol will disappear. |
| Change Type | In the Name column, right-click a field, element, or attribute and select Change Type. | Opens the Change Type window to enable you to change the data type, type system, cardinality, or whether the field, element, or attribute is used as an input or output variable. If that your changes will be set in all test variations. This may cause errors if the variable type is no longer consistent with what is expected in the referencing tasks in the test case. |
| Use Derived Type | In the Name column, right-click a field, element, or attribute and select Use Derived Type. | Opens a Data Type Selection window that enables you to select a concrete type for an xsd:anyType field. You can also select a different type that is derived from the original type that was specified in the editor. If that the derived type is only retained in the test variation where it is set, but the current value will be retained wherever possible. |
| Set to Base Type | In the Name column, right-click a field, element, or attribute that uses a derived type and select Set to Base Type. | If that the base type is only retained in the current test variation where it is set, but the current value will be retained wherever possible. |
| Select Element | In the Name column, right-click an element and choose Select Element. | Opens a Select Element window that enables you to select a global XSD element (defined at the top level of the XSD schema) for an xsd:any element or select an XSD substitution group element for the selected element in the editor. |
| Change Comparator > Equal | In the Expected column, select one or more fields, then right-click one of the selections and select Change Comparator > Equals. | Sets the value of the selected fields to Equal
(==). This is the default value. The selected values are flagged with the comparison operation Equal symbol . |
| Change Comparator > Greater Than | In the Expected column, select one or more fields, then right-click one of the selections and select Change Comparator > Greater Than. | Sets the value of the selected fields to Greater
Than (>). The variable values are flagged with the comparison operation Greater Than symbol  . |
| Change Comparator > Greater Than or Equal | In the Expected column, select one or more fields, then right-click one of the selections and select Change Comparator > Greater Than or Equal. | Sets the value of the selected fields to Greater
Than or Equal (>=). The variable values are flagged with the comparison
operation Greater Than or Equal symbol . |
| Change Comparator > Less Than | In the Expected column, select one or more fields, then right-click one of the selections and select Change Comparator > Less Than. | Sets the value of the selected fields to Less
Than (<). The variable values are flagged with the comparison operation Less Than symbol  . |
| Change Comparator > Less Than or Equal | In the Expected column, select one or more fields, then right-click one of the selections and select Change Comparator > Less Than or Equal. | Sets the value of the selected fields to Less
Than or Equal (<=). The variable values are flagged with the comparison
operation Less Than or Equal symbol  . |
| Change Comparator > Not Equal | In the Expected column, select one or more fields, then right-click one of the selections and select Change Comparator > Not Equal. | Sets the value of the selected fields to Not
Equal. The variable values are flagged with the Not Equal symbol . |
| Add Elements | In the Name column, right-click an array or list and select Add Elements. | This menu item opens the Add Element window box to enable you to specify the number of elements that you want to add to the array or list. |
| Remove Elements | In the Name column, select one or more arrays or lists, then right-click a selected row and select Remove Elements. | Removes all elements from the selected arrays or lists. |
| Select Attribute | In the Name column, right-click an xsd:AnyAttribute attribute and choose Select Attribute. | Opens a Select Attribute window that enables you to select a global XSD attribute (defined at the top level of the XSD schema) for an xsd:anyAttribute attribute. |
Importing values from XML
In the test data table, you can select the Import from XML menu item. This opens a file selection window to enable you to select an XML file from the file system. You can import the value of a field, array element, or business object from an XML file or from the XML content in a SOAP message file. The XML does not necessarily need to be valid, but it must be well-formed if you want to successfully import values from it.Values of one business object in the XML can be imported into a business object with a different data type in the test data table if the attribute names match. (The one exception to this rule is that if the top-level root element name in the XML differs from the top-level parameter name in the test data table, the top-level root name in the XML will be ignored. And if the XML resides in a SOAP message file, the SOAP envelope and body elements are also ignored.)
Some other considerations for importing values from XML include:
- If a value that you want to import from the XML is not the correct data type for a corresponding field in the test data table, such as when importing a boolean value from the XML into an integer field in the test data table, then an error icon is displayed.
- If no matching attribute name is found in the XML for an attribute in the test data table, then the attribute field in the value editor is automatically set to unset.
To better illustrate how importing values from XML works, assume that the test data table is populated with the following elements:
| Name | Type | In |
|---|---|---|
| order | PurchaseOrder | |
| id | string | |
| items | Item[] |
<?xml version="1.0" encoding="UTF-8"?>
<bo:po xmlns:bo="http://OrderEntry/bos"
       xmlns:bo1="http://OrderEntry"
       xmlns:xsi="http://www.w3.org/2001/XMLSchema-instance"
       xsi:schemaLocation="http://OrderEntry/bos PurchaseOrder.xsd http:
              //OrderEntry xsd-includes/http.OrderEntry.xsd ">
       <id>id1</id>
       <items>
              <id>item1 id</id>
              <quan>5</quan>
       </items>
       <items>
              <id>item2 id</id>
              <desc>def</desc>
              <quan>6</quan>
       </items>
</bo:po>
If you import the XML into the value editor, the value editor will be populated with the following elements:
| Name | Type | In |
|---|---|---|
| order | PurchaseOrder | |
| id | string | id1 |
| items | Item[] | |
| items[0] | Item | |
| id | string | item1 id |
| desc | string | unset |
| quan | int | 5 |
| items[1] | Item | |
| id | string | item2 id |
| desc | string | def |
| quan | int | 6 |