Install WebSphere eXtreme Scale v8.6
- Overview
- Installation Manager overview
- Installation topologies
- Hardware and software requirements
- WXS product offering IDs
- Java SE considerations
- Java EE considerations
- Directory conventions
- Runtime files for WXS integrated with WAS
- Runtime files for WXS stand-alone installation
- Install Installation Manager and WXS product offerings
- Augment profiles
- Install WXS or WXS client with WAS
- Install fix packs using Installation Manager
- Uninstall fix packs using Installation Manager
- Uninstall WXS using Installation Manager
- Install the Eclipse Equinox OSGi framework
- Install the REST data service
- Install WXS in .NET environment
- Troubleshoot WXS installation
Overview
We can install WebSphere eXtreme Scale (WXS) in...
- Stand-alone environment
- WebSphere Application Server environment
To install WXS...
- Install the Installation Manager
- Obtain WXS product files
- Set up WXS product repositories within Installation Manager
- Choose install type
- Install a WXS
We can install WXS as an in-memory data grid for use with both .NET and Java applications using extreme transaction processing (XTP) capabilities.
WXS installation types
- WAS with WXS client and servers
Catalog and container servers in the same cell as the dmgr and other application servers.
- WAS with WXS client. WXS servers on stand-alone environment
WXS installed in an separate environment that does not have WAS. Manually configure and start the catalog server and container server processes.
- WAS with WXS client. WXS servers, catalog and container, on XC10 appliance
The WXS client for .NET is installed with a setup wizard that does not require the Installation Manager. The .NET client can access a data grid that is hosted by WAS.
Installation Manager overview
IM uses remote or local software flat-file repositories to...
- Show available packages, including products, fix packs, and interim fixes.
- Check prerequisites and interdependencies
- Install selected packages
- Uninstall selected packages
Use IM as a GUI, command-line interface, or silently with response files
Software products are referred to as packages. An installed package has a product level and an installation location. Package groups are collections of packages at a single location.
Installation Manager install modes...
| Mode | Description |
|---|---|
| admin | IM installed from an administrator or a root ID. Can be invoked by any administrator or root user. |
| nonAdmin | IM can be invoked only by the user that installed it. Also called user mode |
| group | IM can be invoked by any user ID connected to the default group of the user that installed it. Does not mean that two people can use the single instance of IM at the same time. UNIX only. |
IM consists of...
- Binaries copied from the installation kit
- Runtime data that describe WXSs installed by this particular IM
Software to be installed with IM is stored in flat-file repositories containing...
- Program objects and metadata for one or more packages.
- Product maintenance, such as fix packs and interim fixes
To get version and history information...
- versionInfo.sh
- historyInfo.sh
Use the Installation Manager command-line script, imcls, or use response files to...
- Install a new product level
- Roll back to a previous level
- Add or remove optional features or language packs
Optionally use the Packaging Utility, to create packages for installation repositories.
- Copy multiple packages into one repository
- Copy multiple disks for one product into a repository
For example, copy packages from Passport Advantage or PartnerWorld into a repository.
Before installing a product using local repositories, extract the compressed repository file. Extracted files take significantly less time to install than compressed files.
Windows gotcha
If a non-administrator installs WXS v8.5 on...
- Windows Vista, Windows 7
- Windows Server 2008
...into directories...
- Program Files
- Program Files (x86)
...with User Account Control (UAC) enabled, WXS will not function correctly.
UAC is an access-control mechanism that allows non-administrative users to install a software product into the Program Files or Program Files (x86) directory; but it then prohibits any write access to that directory after the installation has completed. WXS requires write access in the app_server_root directory to function correctly. Do not transfer the content of a repository in non-binary mode and do not convert any content on extraction.
To resolve this issue...
- Install WXS into a directory other than Program Files or Program Files (x86).
For example:
-
C:\IBM\WebSphere\AppServer
- Disable UAC.
Installation Manager console mode
IM console mode, included in Installation Manager v1.4.3 and later, does not work with WXS v8.5 offerings on systems other than z/OS.
WXS product offerings
After installing IM and configuring WXS product repositories, you should see...
- WXS in a stand-alone environment
- WXS client in a stand-alone environment
- WXS for WAS v7.0
- WXS for WAS v8.0
- WXS client for WAS v7.0
- WXS client for WAS v8.0
Topologies
- Development mode
Install WXS client and server installation once on a WAS node.

After installation, configure the development environment and begin writing the applications.
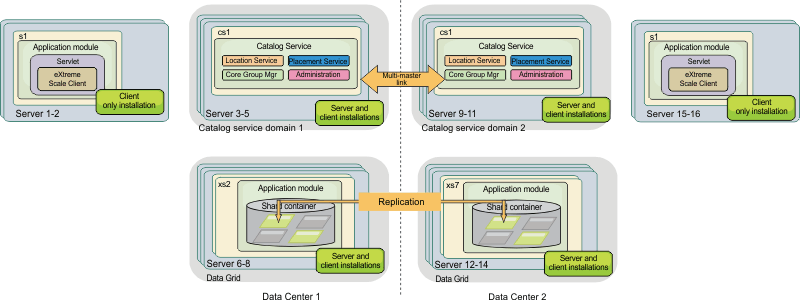
- Stand-alone topology
Install WXS on servers that are not running WAS. For example, in each of two data centers, install either WXS full (client and server) or WXS client-only.
The client-only installations are on the nodes running non-WAS web applications that will use the data grid. These nodes do not run any catalog or container servers, so the server installation is not required.
A multi-master link connects the two catalog service domains in the configuration. The multi-master link enables replication between the shards in the container servers in the different data centers.
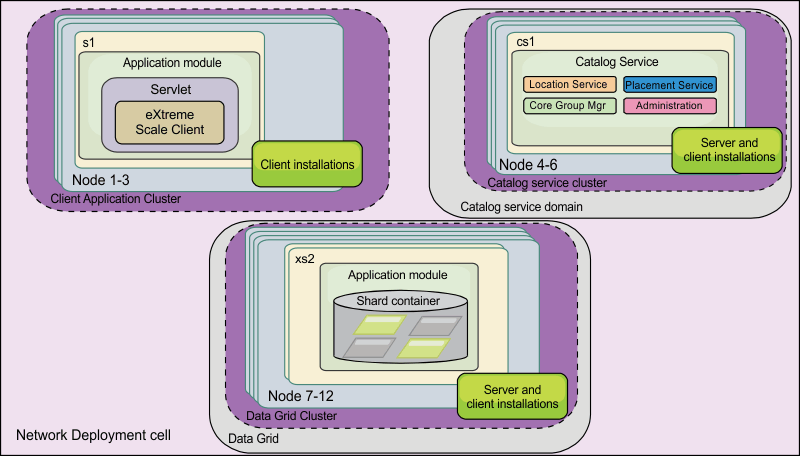
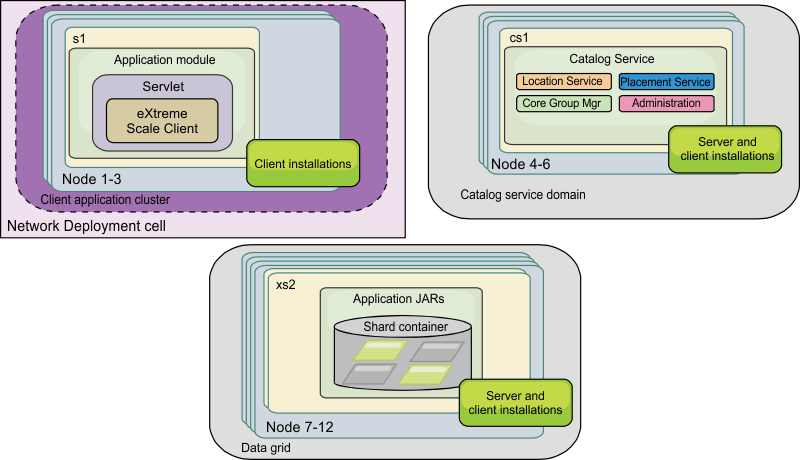
- WAS topology
WXS runs entirely in a WAS cell. Clients, catalog servers, and container servers each have an associated cluster. The nodes that run the application have the client-only installation. The other nodes have the client and server installation.
- Mixed topology
Contains both WAS and stand-alone servers.
For more information, see:
- Configure WebSphere Commerce to use WXS for dynamic cache to improve performance and scale
- WebSphere Business Process Management and Connectivity integration
Hardware and software requirements
Formally supported hardware and software options are available on the Systems Requirements page of WXS support site. We can install and deploy WXS in Java EE and Java SE environments. We can also bundle the client component with Java EE applications directly without integrating with WAS.
- Hardware requirements
WXS does not require a specific level of hardware. The hardware requirements are dependent on the supported hardware for the Java SE installation that you use to run WXS. If we are using eXtreme Scale with WAS or another JEE implementation, the hardware requirements of these platforms are sufficient for WXS.
- Operating system requirements
Each Java SE and Java EE implementation requires different operating system levels or fixes for problems that are discovered during the testing of the Java implementation. The levels required by these implementations are sufficient for eXtreme Scale.
- Installation Manager requirements
Before installing WXS, install Installation Manager. We can install IM using...
- WXS media
- File obtained from the Passport Advantage site
- Installation Manager download website
For WAS v7, use IBM Installation Manager for installing WebSphere Application Server Version 7.0
- Web browser requirements
- Mozilla Firefox, version 3.5.x and later
- Microsoft Internet Explorer, version 7 and later
- WAS requirements
- WAS v7.0.0.21 or later
- WAS v8.0.0.2 or later
- Java requirements
Other Java EE implementations can use the eXtreme Scale run time as a local instance or as a client to WXS servers. To implement Java SE, use v6 or later.
WXS product offering IDs
When installing WXS, or applying fixes, specify the offering ID, which can be found by running...
-
./imcl listAvailablePackages -repositories /path/to/wxs/repository
| Product name | Offering ID |
|---|---|
| WXS in a stand-alone environment | com.ibm.websphere.WXS.v86 |
| WXS client in a stand-alone environment | com.ibm.websphere.WXSCLIENT.v86 |
| WXS for WAS v7 | com.ibm.websphere.WXS.was7.v86 |
| WXS for WAS v8 | com.ibm.websphere.WXS.was8.v86 |
| WXS client for WAS v7 | com.ibm.websphere.WXSCLIENT.was7.v86 |
| WXS client for WAS v8 | com.ibm.websphere.WXSCLIENT.was8.v86 |
Java SE considerations
Supported versions
We can use WXS with Java SE v6 and v7.
To use SSL, you must use IBM Runtime Environment v6 or v7, installed as a part of the stand-alone WXS and WXS client installations, available for use by both clients and servers, in...
-
wxs_install_root/java
If we are installing WXS within WAS, we can use the JRE included in the WAS installation.
For the web console, use IBM Runtime Environment.
WXS features that are dependent on Java SE
| Feature | Supported in Java SE 5 | Supported in Java SE V6, V7 |
|---|---|---|
| EntityManager API annotations | X | X |
| JPA loader, JPA client loader, JPA time-based updater | X | X |
| Memory-based eviction (MemoryPoolMXBean) | X | X |
| Instrumentation agents:
| X | X |
| Web console for monitoring | X |
Upgrading the JDK in WXS
Common questions about the upgrade process for releases of WXS in both stand-alone and WAS environments follow:
- How do I upgrade the JDK that is included with WXS for WAS?
Use the JDK upgrade process made available by WAS.
- Which version of the JDK should I use when using WXS in a WAS environment?
Use any level of JDK supported by WAS, for the supported version of WAS.
See: Tune the IBM virtual machine for Java
Java EE considerations
Run eXtreme Scale applications in a Java EE environment
A Java EE application can connect to a remote eXtreme Scale application. Additionally, the WAS environment supports starting a WXS server as an application starts in the application server.
If you use an XML file to create an ObjectGrid instance, and the XML file is in the module of the EAR file, access the file by using method...
-
getClass().getClassLoader().getResource("META-INF/objGrid.xml")
...to obtain a URL object to use to create an ObjectGrid instance. Substitute the name of the XML file that we are using in the method call.
Use startup beans for an application to bootstrap an ObjectGrid instance when the application starts, and to destroy the instance when the application stops. A startup bean is a stateless session bean with remote location...
-
com.ibm.websphere.startupservice.AppStartUpHome
...and remote interface...
-
com.ibm.websphere.startupservice.AppStartUp
The remote interface has two methods:
- start method
- stop method
Use the start method to bootstrap the instance, and use the stop method to destroy the instance.
To maintain a reference to the instance. the application uses the method...
-
ObjectGridManager.getObjectGrid
Use class loaders
When application modules that use different class loaders share a single ObjectGrid instance in a Java EE application, verify the objects that are stored in eXtreme Scale and the plug-ins for WXS are in a common loader in the application.
Manage the life cycle of ObjectGrid instances in a servlet
To manage the life cycle of an ObjectGrid instance in a servlet, we can use the init method to create the instance and the destroy method to remove the instance. If the instance is cached, it is retrieved and manipulated in the servlet code.
 Tuning the IBM virtual machine for Java
Directory conventions
- wxs_install_root
- Root directory where WXS product files are installed
- Trial:
/opt/IBM/WebSphere/eXtremeScale
- Stand-alone directory:
/opt/IBM/eXtremeScale
C:\IBM\WebSphere\eXtremeScale - WXS integrated with WAS:
/opt/IBM/WebSphere/AppServer
- Trial:
- wxs_home
- Root directory of the WXS product libraries, samples, and components. Same as the wxs_install_root directory when trial is extracted. For stand-alone installations, the wxs_home directory is the ObjectGrid subdirectory under wxs_install_root For installations integrated with WAS, this directory is...
-
wxs_install_root/optionalLibraries/ObjectGrid
- Trial:
-
/opt/IBM/WebSphere/eXtremeScale
- Stand-alone directory:
/opt/IBM/eXtremeScale/ObjectGrid
>wxs_install_root\ObjectGrid
- WXS is integrated with WAS:
/opt/IBM/WebSphere/AppServer/optionalLibraries/ObjectGrid
- Trial:
- was_root
- Root directory of a WAS installation:
-
/opt/IBM/WebSphere/AppServer
- net_client_home
- Root directory of a .NET client installation.
-
C:\IBM\WebSphere\eXtreme Scale .NET Client
- restservice_home
- Directory in which the WXS REST data service libraries and samples are located. This directory is named restservice and is a subdirectory under the wxs_home directory.
- Stand-alone deployments:
-
/opt/IBM/WebSphere/eXtremeScale/ObjectGrid/restservice
wxs_home\restservice- WAS integrated deployments:
-
/opt/IBM/WebSphere/AppServer/optionalLibraries/ObjectGrid/restservice
- Stand-alone deployments:
- tomcat_root
- Root directory of the Apache Tomcat installation.
-
/opt/tomcat5.5
- wasce_root
- Root directory of the WAS Community Edition installation.
-
/opt/IBM/WebSphere/AppServerCE
- java_home
- Root directory of a JRE installation.
-
/opt/IBM/WebSphere/eXtremeScale/java
wxs_install_root\java - samples_home
- Extract sample files used for tutorials.
-
wxs_home/samples
wxs_home\samples - dvd_root
- Root directory of the DVD that contains WXS.
-
dvd_root/docs/
- equinox_root
- Root directory of the Eclipse Equinox OSGi framework installation.
-
/opt/equinox
- $HOME
- Location where user files are stored, such as security profiles.
-
c:\Documents and Settings\user_name
/home/user_name
Runtime files for WXS integrated with WAS
JAR files are included in the installation. We can see the JAR files that are included and the location to which they are installed.
| File name | Environment | Installation location | Description |
|---|---|---|---|
| wxsdynacache.jar | Client and server | lib | Classes to use with the dynamic cache provider. |
| wsobjectgrid.jar | Local and client | lib | WXS local, client, and server run times. |
| ogagent.jar | Local, client, server | lib | Runtime classes required to run Java instrumentation agent used with EntityManager API. |
| ogsip.jar | Server | lib | WXS SIP session management runtime compatible with WAS v7.0 and later. |
| sessionobjectgrid.jar | Client and server | lib | WXS HTTP session management runtime. |
| sessionobjectgridsip.jar | Server | lib | WXS SIP session management runtime compatible with WAS v7.0 and later. |
| wsogclient.jar | Local and client | lib | Installed when you use an environment that contains WAS v7.0 and later. Contains only local and client runtime environments. |
| wxssizeagent.jar | Local, client, server | lib | Provides more accurate cache entry sizing information when using JRE v1.6 or later. |
| oghibernate-cache.jar | Client and server | optionalLibraries/ObjectGrid | WXS level 2 cache plug-in for JBoss Hibernate. |
| ogspring.jar | Local, client, server | optionalLibraries/ObjectGrid | Classes for the SpringSource Spring framework integration. |
| xsadmin.jar | Utility | optionalLibraries/ObjectGrid | WXS administration sample utility. |
| ibmcfw.jar
ibmorb.jar ibmorbapi.jar | Client and server | optionalLibraries/ObjectGrid/endorsed | ORB runtime used for running applications in Java SE processes. |
| wxshyperic.jar | Utility | optionalLibraries/ObjectGrid/hyperic/lib | WXS server detection plug-in for the SpringSource Hyperic monitoring agent. |
| restservice.ear | Client | optionalLibraries/ObjectGrid/restservice/lib | WXS REST data service application enterprise archive for WAS environments. |
| restservice.war | Client | optionalLibraries/ObjectGrid/restservice/lib | WXS REST data service Web archive for application servers acquired from another vendor. |
| splicerlistener.jar | Utility | optionalLibraries/ObjectGrid/session/lib | Splicer utility for the WXS HTTP session manager filter. |
| splicer.jar | Utility | optionalLibraries/ObjectGrid/legacy/session/lib | v7.0 splicer utility for the WXS HTTP session manager filter. |
| wxsra.rar | Utility | optionalLibraries/ObjectGrid/wxsra.rar | WXS resource adapter to connect to the grid using a connection factory. |
Runtime files for WXS client.
| File name | Environment | Installation location | Description |
|---|---|---|---|
| wxsdynacache.jar | Client and server | lib | Dynamic cache provider classes |
| ogagent.jar | Local, client, server | lib | Classes required to run the Java instrumentation agent used with the EntityManager API. |
| ogsip.jar | Server | lib | WXS SIP session management runtime compatible with WAS v7.0 and later. |
| sessionobjectgrid.jar | Client and server | lib | WXS HTTP session management runtime. |
| sessionobjectgridsip.jar | Server | lib | WXS SIP session management runtime that is compatible with WAS v7.0 and later. |
| wsogclient.jar | Local and client | lib | Installed when you use an environment that contains WAS v7.0 and later. Contains only the local and client runtime environments. |
| wxssizeagent.jar | Local, client, server | lib | Provides more accurate cache entry sizing information when using JRE v1.6 or later |
| oghibernate-cache.jar | Client and server | optionalLibraries/ObjectGrid | WXS level 2 cache plug-in for JBoss Hibernate. |
| ogspring.jar | Local, client, server | optionalLibraries/ObjectGrid | Support classes for the SpringSource Spring framework integration. |
| xsadmin.jar | Utility | optionalLibraries/ObjectGrid | WXS administration sample utility. |
| ibmcfw.jar
ibmorb.jar ibmorbapi.jar | Client and server | optionalLibraries/ObjectGrid/endorsed | ORB runtime used for running applications in Java SE processes. |
| wxshyperic.jar | Utility | optionalLibraries/ObjectGrid/hyperic/lib | WXS server detection plug-in for the SpringSource Hyperic monitoring agent. |
| restservice.ear | Client | optionalLibraries/ObjectGrid/restservice/lib | WXS REST data service application enterprise archive for WAS environments. |
| restservice.war | Client | optionalLibraries/ObjectGrid/restservice/lib | WXS REST data service Web archive for application servers acquired from another vendor. |
| splicerlistener.jar | Utility | optionalLibraries/ObjectGrid/session/lib | splicer utility for the HTTP session manager filter. |
| splicer.jar | Utility | optionalLibraries/ObjectGrid/legacy/session/lib | v7.0 splicer utility for the WXS HTTP session manager filter. |
Runtime files for WXS stand-alone installation
JAR files are included in the installation. We can see the JAR files that are included and the location to which they are installed.
| File name | Environment | Installation location | Description |
|---|---|---|---|
| wxsdynacache.jar | Client and server | dynacache/lib | Cecessary classes to use with the dynamic cache provider. Automatically included in the server runtime environment when you use the supplied scripts. |
| wxshyperic.jar | Utility | hyperic/lib | The WXS server detection plug-in for the SpringSource Hyperic monitoring agent. |
| objectgrid.jar | Local, client, and server | lib | OSGi bundle used by the server runtime environment of Java SE 1.6 and later. The file is automatically included in the server runtime environment when you use the supplied scripts. |
| ogagent.jar | Local, client, server | lib | Runtime classes that are required to run the Java instrumentation agent used with the EntityManager API. |
| ogclient.jar | Local and client | lib | OSGi bundle that contains only the local and client runtime environments. Use this file with Java SE 1.6 and later. |
| ogspring.jar | Local, client, server | lib | Support classes for the SpringSource Spring framework integration. |
| wsogclient.jar | Local and client | lib | Installed when you use an environment that contains WAS and later. This file contains only the local and client runtime environments. |
| wxssizeagent.jar | Local, client, server | lib | Provides more accurate cache entry sizing information when using JRE v1.6 and later. |
| ibmcfw.jar
ibmorb.jar ibmorbapi.jar | Client and server | lib/endorsed | Includes the Object Request Broker (ORB) runtime used for running applications in Java SE processes. |
| restservice.ear | Client | restservice/lib | WXS REST data service application enterprise archive for WAS environments. |
| restservice.war | Client | restservice/lib | WXS REST data service Web archive for application servers acquired from another vendor. |
| xsadmin.jar | Utility | samples | WXS administration sample utility. |
| sessionobjectgrid.jar | Client and server | session/lib | WXS HTTP session management runtime. |
| splicerlistener.jar | Utility | session/lib | Splicer utility for the WXS v7.1 and later HTTP session listener. |
| xsgbean.jar | Server | wasce/lib | GBean for embedding WXS servers in WAS Community Edition application servers. |
| splicer.jar | Utility | legacy/session/lib | splicer utility for the WXS v7.0 HTTP session manager filter. |
| wxsra.rar | Client and server | session/lib | WXS resource adapter to connect to the grid using a connection factory. |
Runtime files for WXS client. WXS client relies on ObjectGrid processes and related APIs.
| File name | Environment | Installation location | Description |
|---|---|---|---|
| wxsdynacache.jar | Client and server | dynacache/lib | Classes to use with the dynamic cache provider. The file is automatically included in the server runtime environment when you use the supplied scripts. |
| wxshyperic.jar | Utility | hyperic/lib | The WXS server detection plug-in for the SpringSource Hyperic monitoring agent. |
| ogagent.jar | Local, client, and server | lib | Runtime classes that are required to run the Java instrumentation agent used with the EntityManager API. |
| ogclient.jar | Local and client | lib | OSGi bundle that contains only the local and client runtime environments. Use this file with Java SE 1.6 and later. |
| ogspring.jar | Local, client, and server | lib | Support classes for the SpringSource Spring framework integration. |
| wsogclient.jar | Local and client | lib | Installed when you use an environment that containsWAS and later. This file contains only the local and client runtime environments. |
| wxssizeagent.jar | Local, client, and server | lib | Provides more accurate cache entry sizing information when using JRE v1.6 and later. |
| ibmcfw.jar
ibmorb.jar ibmorbapi.jar | Client and server | lib/endorsed | Includes the Object Request Broker (ORB) runtime used for running applications in Java SE processes. |
| restservice.ear | Client | restservice/lib | WXS REST data service application enterprise archive for WAS environments. |
| restservice.war | Client | restservice/lib | WXS REST data service Web archive for application servers acquired from another vendor. |
| xsadmin.jar | Utility | samples | WXS administration sample utility. |
| sessionobjectgrid.jar | Client and server | session/lib | WXS HTTP session management runtime. |
| splicerlistener.jar | Utility | session/lib | splicer utility for the WXS v7.1 and later HTTP session listener. |
| splicer.jar | Utility | legacy/session/lib | splicer utility for the WXS v7.0 HTTP session manager filter. |
| wxsra.rar | Client and server | session/lib | WXS resource adapter to connect to the grid using a connection factory. |
Install Installation Manager
WXS product offerings are installed from Installation Manager product repositories. To access these repositories, first install Installation Manager using either....
For WAS v7, use IBM Installation Manager for installing WebSphere Application Server Version 7.0
IM is available in 32-bit or 64-bit versions. Either version can be used to install WXS.
Install Installation Manager - GUI
- To start Installation Manager GUI...
- Administrative installation...
-
cd IM_INSTALL
./install - Non-administrative installation...
-
cd IM_INSTALL
./userinst - Group-mode installation...
-
cd IM_INSTALL
groupinstWith group mode, multiple users can use a single instance of IM to manage software packages. If you do not install IM with group mode, we cannot use group mode to manage any of WXSs that you install later using this IM instance. Change the location for the current user from the default location to a location accessible by all users in the group.
- Administrative installation...
- Select the Installation Manager package
- Accept terms in the license agreements
- Review the summary information, and click Install
If the installation is successful, the program displays a message indicating that installation is successful.
If not successful, to troubleshoot the problem...
-
View Log File
- Add the path to WXS repository to your Installation Manager preferences. Go to...
-
File | Preferences | Repositories | Add Repository
...and set path to repository.config file. For example:
-
/var/repositories/product/local-repositories/repository.config
- Click OK.
- Clear any locations listed in the Repositories window that we are not using.
- Close IM...
-
Apply | OK | Exit
Install WXS - GUI
- Start Installation Manager.
-
/path/to/WXS_Client/install
On UNIX, to start in group mode...
-
/path/to/WXS_Client/IBMIM
- Click Install.
If we are prompted to authenticate, use the IBM ID and password that you registered with on the program website.
IM searches its defined repositories for available packages.
- Select one of the following product offerings...
- WXS in a stand-alone environment
- WXS client in a stand-alone environment
- WXS for WAS v7
- WXS for WAS v8
- WXS client for WAS v7
- WXS client for WAS v8
A message will indicate if if WXS is already installed. To create another installation of WXS in another location, click Continue.
If the option...
-
Search service repositories during installation and updates
...is selected on the Installation Manager Repository preference page, and we are connected to the Internet, we can click...
-
Check for Other Versions and Extensions
This allows us to search for updates in the default update repositories for the selected packages. In this case, you do not need to add the specific service-repository URL to the Installation Manager Repository preference page.
- Select the fixes to install.
Any recommended fixes are selected by default.
- If we are prompted, update to the latest level of Installation Manager.
- Accept the terms in the license agreements
- Specify the installation root directory for WXS.
The first time that you install a package using IM, specify the shared resources directory, which is where installation artifacts are located that can be used by one or more package groups. Use your largest drive for this installation. We cannot change the directory location until after you uninstall all packages.
Deleting the default target location and leaving an installation-directory field empty prevents you from continuing.
Do not use symbolic links as the destination directory.
Do not use a semicolon in the directory name.
The maximum path length on the Windows Server 2008, Windows Vista, and Windows 7 operating systems is 60 characters.
- Select the languages for which translated should content be installed.
- Click Next.
- Select the features to install.
Client Required for WXS stand-alone or WXS for WAS. Server Available for WXS stand-alone and WXS for WAS. Not required. Console Available for all WXS product offerings. Samples Available for all WXS product offerings. - Click Next.
- Review the summary information, and click Install.
- If the installation is successful, the program gives you a message to indicate that installation is successful.
If not successful, to troubleshoot the problem...
-
View Log File
- If the installation is successful, the program gives you a message to indicate that installation is successful.
- Select whether to start a profile creation tool when installation is finished.
The Profile augmentation panel lists existing profiles that we can select to augment with the features of eXtreme Scale. If you select existing profiles that are already in use, however, a warning panel is displayed. To continue with the installation, either stop the servers that are configured in the profiles, or click Back to remove the profiles from your selection.
Select None to not create a new profile.
- Exit Installation Manager
-
Finish | File | Exit
- If we are integrating with WAS v7, import WAS v7 into IM to complete the installation
Install Installation Manager - command line
- Run one of the following IM commands.
- Admin install...
cd IM_INSTALL/ ./installc -acceptLicense -log /path/to/installc.log - Non-administrative install...
./userinstc -acceptLicense
            -log /path/to/log/file
- Admin install...
- Group-mode installation...
./groupinstc -acceptLicense
             -dataLocation application_data_location
             -log /path/to/groupinstc.log
             -installationDirectory /path/to/IM/home
Install to file system location available to all users in the group
- Set up your groups, permissions, and environment variables
- If the repository requires a user name and password, create a keyring file.
If the keyring imutilsc command is unable to find the URL, append
-
/repository.config
...at the end of the repository URL location
Install WXS using command line
- Verify install WXS files for the Installation Manager and have access to necessary repositories.
- Log on to your system.
- cd IM_HOME/eclipse/tools
- Verify that WXS repository is available.
-
./icml listAvailablePackages -repositories source_repository
You should see one or more levels of the offering.
- Install WXS.
./icml install   com.ibm.websphere.offering_version,optional_feature_ID
       -repositories source_repository
       -installationDirectory installation_directory
       -sharedResourcesDirectory shared_directory
       -accessRights access_mode
       -preferences preference_key=value
       -properties property_key=value
       -keyring keyring_file
       -password password
       -acceptLicense
The offering_version, which optionally can be attached to the offering ID with an underscore, is a specific version of the offering to install (8.6.0.20110503_0200 for example).
- If offering_version is not specified, the latest version of the offering and all interim fixes for that version are installed.
- If offering_version is specified, the specified version of the offering and no interim fixes for that version are installed.
The offering version can be found attached to the end of the offering ID with an underscore when we run the following command against the repository:
- icml listAvailablePackages -repositories source_repository
We can also specify none, recommended or all with the -installFixes argument to indicate which interim fixes we want installed with the offering.
- If the offering version is not specified, the -installFixes option defaults to all.
- If the offering version is specified, the -installFixes option defaults to none.
We can add a list of features that are separated by commas. An example follows:
- icml -acceptLicense install com.ibm.websphere.WXS.v85,xs.console.feature,xs.samples.feature
icml -acceptLicense install com.ibm.websphere.WXS.v86,xs.console.feature,xs.samples.featurexs.client.standalone.feature Available as a required feature if you install WXS in a stand-alone environment or WXS for WAS product offerings. xs.server.standalone.feature Depending on which product offering we want to install, we can choose to install the server. The server is a selectable feature in the following product offerings: - WXS in a stand-alone environment
- WXS for WAS v7
- WXS for WAS v8
xs.console.feature Available for all product offerings. Monitoring console. With the web console, we can chart current and historical statistics. This console provides some preconfigured charts for high-level overviews, and has a custom reports page that we can use to build charts from the available statistics. Use the charting capabilities in the monitoring console of WXS to view the overall performance of the data grids in your environment xs.samples.feature Available for all product offerings. If you previously specified the mode in which to install IM, the -accessRights parameter is not required
If you experience issues later, IM can save earlier versions of a package to roll back to. When IM rolls back a package to a previous version, the current version of the files is uninstalled and the earlier versions are reinstalled. If you choose not to save the files for rollback, we can prevent the files from being saved by specifying...
-
-preference com.ibm.cic.common.core.preferences.preserveDownloadedArtifacts=False
Even if you choose not to save files for rollback, we can still access product files for rollback from the repository.
The program might write important post-installation instructions to standard output.
Install Installation Manager - response file
- Administrative installation:
-
cd IM_HOME
./installc -acceptLicense -log /path/to/installc.log - Non-administrative installation:
-
cd IM_HOME
./userinstc -acceptLicense -log /path/to/log/file - Group-mode installation (Unix):
 cd IM_HOME
./groupinstc -acceptLicense
             -dataLocation application_data_location
             -log /path/to/groupinstc.log
             -installationDirectory /path/to/IM/home
Group mode allows multiple users to use a single instance of Installation Manager to manage software packages. Group mode does not mean that two people can use the single instance of IBM IM at the same time. If you do not install IM using group mode, you will not be able to use group mode to manage any of WXSs that you install later using this IM. Change the default user home installation location to a location accessible by all users in the group.
After successfully installing IM and setting up the repository, we can continue to install any WXS stand-alone or WXS for WAS for product offering.
Install WXS - response file
- Install WXS files for the Installation Manager and have access to necessary repositories.
- From a command line, change to the Eclipse subdirectory in the directory where you installed IM.
- Start Installation Manager from the command line with the -record option.
Examples...
-
IBMIM.exe -skipInstall "C:\temp\imRegistry" -record C:\temp\wxssetup.response.txt
./IBMIM -skipInstall /var/temp/imRegistry -record /var/temp/iwxssetup.response.txtnstall_response_file.xml
./IBMIM -skipInstall $HOME/var/temp/imRegistry -record $HOME/var/temp/iwxssetup.response.txtnstall_response_file.xmlWhen we use the -skipInstall parameter no files are installed. Specify a temporary directory for response file location. The -skipInstall operation should not be used on the actual agent data location used by IM. This operation is unsupported. Use a clean writable location, and reuse that location for future recording sessions.
- Add repositories to your IM preferences.
- In the top menu, click...
-
File | Preferences | Repositories
- Perform the following actions for each repository:
- Click Add Repository.
- Enter the path to the repository.config file in the remote web-based repository or the local directory into which you unpacked the repository files.
For example:
- Remote repositories:
-
https://downloads.mycorp.com:8080/WXS_85_repository
- Local repositories:
- C:\repositories\wxs85\local-repositories
- /var/repositories/wxs85/local-repositories
- Remote repositories:
- Click...
-
OK | Apply | OK
- Click Install.
If we are prompted to authenticate, use the IBM ID and password that you registered with on the program website.
IM searches its defined repositories for available packages.
- In the top menu, click...
- Select one the following product offerings...
- WXS in a stand-alone environment
- WXS client in a stand-alone environment
- WXS for WAS v7
- WXS for WAS v8
- WXS client for WAS v7
- WXS client for WAS v8
If you already have WXS installed on your system, a message indicates that WXS is already installed. To create another installation of WXS in another location, click Continue.
If the option...
-
Search service repositories during installation and updates
...is selected on the Installation Manager Repository preference page and we are connected to the Internet, we can search for updates in the default update repositories for the selected packages by clicking...
-
Check for Other Versions and Extensions
In this case, we do not need to add the specific service-repository URL to the Installation Manager Repository preference page.
- Select the fixes to install.
Any recommended fixes are selected by default.
- Accept the terms in the license agreements
- Specify the installation root directory for WXS.
The first time that you install a package using IM, specify the shared resources directory, which is where installation artifacts are located that can be used by one or more package groups. Use your largest drive for this installation. We cannot change the directory location until after you uninstall all packages.
Deleting the default target location and leaving an installation-directory field empty prevents you from continuing.
Do not use symbolic links as the destination directory.
Maximum path length on the Windows Server 2008, Windows Vista, and Windows 7 operating systems is 60 characters.
- Click Next.
- Select the languages for which translated content should be installed.
- Click Next.
- Select the features to install.
- Client
Available as a required feature if you install either WXS in a stand-alone environment or WXS for WAS product offerings. The client must be installed for these product offerings.
- Server
Available if you to install either WXS in a stand-alone environment or WXS for WAS. We can choose not to install the server for these product offerings.
- Console
Available for all WXS product offerings. Monitoring console. With the web console, we can chart current and historical statistics. Use the charting capabilities in the monitoring console of WXS to view the overall performance of the data grids in your environment.
- Samples
Available for all WXS product offerings.
- Client
- Click Next.
- Review the summary information, and click Install.
- If the installation is successful, the program gives you a message to indicate that installation is successful. The program might also specify important post-installation instructions as well.
- If the installation is not successful, click View Log File to troubleshoot the problem.
- Click Finish.
- Click File > Exit to close IM.
- If we are integrating with WAS v7, import WAS v7 into IM to complete the installation
Create a keyring
After recording a response file to install WXS product offerings, we can choose to create a keyring file. If we are using a remote repository that requires authentication, then we can create a keyring for installation.
- Record a response file.
- From a command line, change to the Eclipse subdirectory in the directory where you installed IM.
- Start IM from the command line...
IBMIM.exe -skipInstall "C:\temp\imRegistry" -keyring C:\IM\im.keyring -record C:\temp\keyring_response_file.xml ./IBMIM -skipInstall /var/temp/imRegistry -keyring /var/IM/im.keyring -record /var/temp/keyring_response_file.xml ./IBMIM -skipInstall $HOME/var/temp/imRegistry -keyring $HOME/var/IM/im.keyring -record $HOME/var/temp/keyring_response_file.xml - When a window opens that requests your credentials for the authenticated remote repository, enter the correct credentials and save them.
- Click File > Exit to close IM.
Create and augment profiles for WXS
After installing WXS client create and/or augment DMGR and WAS profiles using the xs_augment template. Augmenting profiles for use with WXS is optional, but is required to...
- Automatically start a catalog service or container in a WAS process.
Without augmenting the server profiles, servers can only be started programmatically using the ServerFactory API, or as separate processes separate from WAS...
- startOgServer.sh
- stopXsServer.sh
- Use PMI to monitor WXS metrics.
- Display the version of WXS in the WAS admin console.
Create profiles
Create a dmgr profile
./manageprofiles.sh -create
                    -templatePath install_root/profileTemplates/xs_augment/dmgr
Create a custom profile
./manageprofiles.sh -create
                    -templatePath install_root/profileTemplates/xs_augment/managed
Create a stand-alone application server profile
./manageprofiles.sh -create
                    -templatePath install_root/profileTemplates/xs_augment/default
Create a cell profile
./manageprofiles.sh -create
                    -templatePath install_root/profileTemplates/xs_augment/cell/dmgr
                    -nodeProfilePath install_root/profiles/AppSrv01
                    -cellName cell01dmgr
                    -nodeName node01dmgr
                    -appServerNodeName node01

./manageprofiles.sh -create
                    -templatePath install_root/profileTemplates/xs_augment/cell/default
                    -dmgrProfilePath install_root/profiles/Dmgr01
                    -portsFile install_root/profiles/Dmgr01/properties/portdef.props
                    -nodePortsFile install_root/profiles/Dmgr01/properties/nodeportdef.props
                    -cellName cell01dmgr
                    -nodeName node01dmgr
                    -appServerNodeName node01
Augment profiles
Augment a dmgr profile
./manageprofiles.sh -augment
                    -profileName dmgr01
                    -templatePath install_root/profileTemplates/xs_augment/dmgr
Augment a custom profile
./manageprofiles.sh -augment -profileName profile01
                    -templatePath install_root/profileTemplates/xs_augment/managed
Augment a stand-alone application server profile
./manageprofiles.sh -augment
                    -profileName profile01
                    -templatePath install_root/profileTemplates/xs_augment/default
Augment a cell profile
./manageprofiles.sh -augment
                    -profileName dmgr01
                    -templatePath install_root/profileTemplates/xs_augment/cell/dmgr

./manageprofiles.sh -augment
                    -profileName profile01
                    -templatePath install_root/profileTemplates/xs_augment/cell/default
Unaugment a profile
./manageprofiles.sh -unaugment
                    -profileName profile01
                    -ignoreStack
                    -templatePath install_root/profileTemplates/xs_augment/profile_type
template_type...
- xs_augment
- pf_augment
profile_type...
| dmgr | dmgr profile |
| managed | custom profile |
| default | stand-alone application server profile |
| cell | cell profile |
Non-root profiles
Give a non-root user permissions for files and directories so that the non-root user can create a profile for WXS. The non-root user can also augment a profile that was created by a root user, a different non-root user, or the same non-root user.
In a WAS environment, non-root (non-administrator) users are limited in being able to create and use profiles in their environment. Within the Profile Management tool plug-in, unique names and port values are disabled for non-root users. The non-root user must change the default field values in the Profile Management tool for the profile name, node name, cell name, and port assignments. Consider assigning non-root users a range of values for each of the fields. We can assign responsibility to the non-root users for adhering to their proper value ranges and for maintaining the integrity of their own definitions.
The term installer refers to either a root or non-root user. As an installer, we can grant non-root users permissions to create profiles and establish their own product environments. For example, a non-root user might create a product environment to test application deployment with a profile that the user owns. Specific tasks that we can complete to allow non-root profile creation include the following items:
- Create a profile and assigning ownership of the profile directory to a non-root user so that the non-root user can start WAS for a specific profile.
- Grant write permission of the appropriate files and directories to a non-root user, which allows the non-root user to then create the profile. With this task, we can create a group for users who are authorized to create profiles, or give individual users the ability to create profiles.
- Install maintenance packages for WXS, which includes required services for existing profiles that are owned by a non- user. As the installer, we are the owner of any new files that the maintenance package creates.
For more information about creating profiles for non-root users, see Creating profiles for non-root users .
As an installer, we can also grant permissions for a non-root user to augment profiles. For example, a non-root user can augment a profile that is created by an installer, or augment a profile that they create. Follow the WAS Network Deployment non-root user augmentation process.
However, when a non-root user augments a profile that is created by the installer, the non-root user does not need to create the following files before augmentation. The following files were established during the profile creation process:
- was_root/logs/manageprofiles.xml
- was_root/properties/fsdb.xml
- was_root/properties/profileRegistry.xml
When a non-root user augments a profile that the user creates, the non-root user must modify the permissions for the documents that are located within the eXtreme Scale profile templates.
We can also use a non-root (non-administrator) profile for WXS in a stand-alone environment, one outside of WAS. Change the owner of the ObjectGrid directory to the non-root profile. Then we can log in with that non-root profile and operate WXS as you normally would for a root (administrator) profile.
Install WXS or WXS client with WAS
We can install WXS or WXS client in an environment in which WAS or WAS Network Deployment is installed. Use the existing features of WAS or WAS Network Deployment to enhance your WXS applications.
Verify that the target installation directory does not contain an existing installation of WXS or WXS client.
Stop all processes running in your WAS or WAS Network Deployment environment.
Verify that any running processes are stopped. If the running processes are not stopped, the installation proceeds, creating unpredictable results. On some platforms, the installation might be left in an undetermined state.
When you install WXS or WXS client, it should be in the same directory in which you installed WAS. For example, if you installed WAS in C:\was_root, then you should also choose C:was_root as the target directory for your WXS or WXS client installation.
Integrate WXS with WAS or WAS Network Deployment to apply the features of WXS to your JEE applications. Java EE applications host data grids and access the data grids using a client connection.
We can also run the grid as a client inside a Liberty profile that serves systems. To obtain the Liberty profile, install WAS .
- To install WXS or WXS client within a WAS v8 environment...
- Install IBM Instllation Manager.
- Use IM, install the appropriate WXS product offering:
- WXS for WAS v8
- WXS client for WAS v8
- Download the WAS v8 repositories from Passport Advantage
- Install WAS v8
- To install WXS or WXS client within a WAS v7 environment...
- Install IBM Installation Manager.
- Use IM, install the appropriate WXS product offering:
- WXS for WAS v7
- WXS client for WAS v7
- Install WAS v7 using InstallShield MultiPlatform (ISMP) installer.
- After importing WAS v7 into IM to complete the installation.
Importing WAS v7 into the Installation Manager allows us to manage and install fix packs for WXS from one location. Ensure you have the necessary repositories set up within IM for access to fix packs and updates.
Install the Liberty profile
We can use IBM Installation Manager to install WAS v8.5 or higher with WXS, or we can install the Liberty profile by running a provided JAR file. If you install the WAS Liberty profile using IM, then also install WXS v8.5 or higher using IM. Likewise, if you install the WAS Liberty profile by running a JAR file, then also install the WXS v8.5 or higher product image by running a JAR file.
Install the WAS Liberty profile using one of the following options:
- Installation Manager
- JAR file
Install the Liberty profile by running a JAR file
By running the JAR file that contains the distribution image, you install the Liberty profile, and we are ready to create a Liberty server.
We can install the Liberty profile by running a JAR file as described in this topic, or by - Installation Manager.
When we run the JAR file for WAS to install the Liberty profile, extract the JAR file first. Then, extract the Liberty profile JAR file for WXS. If you use IBM IM to install WAS v8.5 and obtain the Liberty profile, then use IM to also install WXS.
- Download the Liberty profile
- Extract the WAS Liberty profile distribution image.
-
java -jar wlp-edition-8.6.0.0.jar
To extract image by accepting the license terms and conditions silently...
-
java -jar wlp-edition-8.6.0.0.jar --acceptLicense
- To view all available options, run...
-
java -jar wlp-edition-8.6.0.0.jar -help
- Optional: Set the JAVA_HOME property for your environment.
The Liberty profile requires a JRE in which to run. It does not share the JDK or JRE that the WAS full profile uses. We can specify the JDK or JRE location - JAVA_HOME property in the server.env file,
On Linux or UNIX systems, we can...
- Set JAVA_HOME in $HOME/.bashrc file
- Append the JDK or JRE path to the PATH environment variable
On Windows systems, we can...
- Set JAVA_HOME as a system environment variable
- Append the JDK or JRE path to the PATH system variable
On Windows systems, to set JAVA_HOME, and add Java /bin directory to path:
-
set JAVA_HOME=C:\Progra~1\Java\JDK16
set PATH=%JAVA_HOME%\bin;%PATH%The Liberty profile runtime environment searches for the java command in this order:
- JAVA_HOME property
- JRE_HOME property
- PATH property
For more information about supported Java environments, and where to get them, see Minimum supported Java levels in the Liberty profile: Runtime environment known restrictions .
- Extract the WXS distribution image to the directory where you extracted profile-edition-8.6.0.0.jar file.
- java -jar wxs-wlp_8.6.0.0.jar
WXS is installed on top of the WAS distribution image when you extract both JAR files to the same directory.
Install fix packs using IBM Installation Manager
Use IBM IM to update WXS with the fix packs that are available for WXS product offerings. Fix packs can be installed using...
- IM GUI
- IM command line
- Response files
Install fix packs - GUI
Contact the IBM Software Support Center for information about upgrades forWXS stand-alone or WXS for WAS product offerings. The most current information is available from the IBM Software Support Center and Fix Central .
IBM IM is used to apply product maintenance to the following product offerings:
- WXS in a stand-alone environment
- WXS client in a stand-alone environment
- WXS for WAS v7
- WXS for WAS v8
- WXS client for WAS v7
- WXS client for WAS v8
Make sure that the web-based or local service repository location is listed and checked or that the Search service repositories during installation and updates option is selected on the Repositories panel in your IM preferences. For more information on using service repositories with IM, read the IBM IM v1.5 Information Center .
Restriction: We cannot use the Installation Manager to upgrade an installation and add or remove the full WAS profile feature or the Liberty profile feature.
- Stop all processes running in your environment.
- Log on to your system.
- Stop all servers and applications on the WAS installation that is being updated.
- Start IM.
- Click Update.
If we are prompted to authenticate, use the IBM ID and password that you use to access protected IBM software websites.
- Select the package group to update.
If you select Update all, IM will search all of the added and predefined repositories for updates to all of the package groups that it has installed. Use this feature only if you have full control over which fixes are contained in the targeted repositories. If you create and point to a set of custom repositories that include only the specific fixes to install, you should be able to use this feature confidently. If you enable searching service repositories or install fixes directly from other live web-based repositories, then you might not want to select this option so that we can select only the fixes to install for each offering on subsequent panels.
- Click Next.
- Select the version to which we want to update under:
- WXS in a stand-alone environment
- WXS client in a stand-alone environment
- WXS for WAS v7
- WXS for WAS v8
- WXS client for WAS v7
- WXS client for WAS v8
- Select any fixes to install.
Recommended fixes are selected by default.
- Accept the terms in the license agreements
- Select the optional features that we want in your updated installation.
- Review the summary information, and click Update.
- If the installation is successful, the program displays a message indicating that installation is successful.
- If the installation is not successful, click View Log File to troubleshoot the problem.
- Click Finish.
- Click File > Exit to close IM.
Install fix packs - command line
Use the IBM IM from the command line to update WXS with the fix packs that are available for WXS product offerings.
Contact the IBM Software Support Center for information about upgrades for WXS stand-alone or WXS for WAS product offerings. The most current information is available from the IBM Software Support Center and Fix Central .
IBM IM is used to apply product maintenance to the following product offerings:
- WXS in a stand-alone environment
- WXS client in a stand-alone environment
- WXS for WAS v7
- WXS for WAS v8
- WXS client for WAS v7
- WXS client for WAS v8
We cannot use the Installation Manager to upgrade an installation and add or remove the full WAS profile feature or the Liberty profile feature.
- For a list of interim fixes and fix packs that are available for WXS 8.5 and specific information about each fix...
- Go to Fix Central .
- Select WebSphere as WXS group.
- Select WebSphere eXtreme Scale
- Select 8.5 as the installed version.
- Select your operating system as the platform, and click Continue.
- Select Browse for fixes, and click Continue.
- Click More Information under each fix to view information about the fix.
- Make a note of the name of the fix pack that you would like to install.
- Download the file that contains the fix pack from Fix Central, and use local updating.
We can download a compressed file that contains the fix pack from Fix Central. Each compressed fix-pack file contains an IM repository for the fix pack and usually has a .zip extension. After downloading and extracting the fix-pack file, use IM to update WAS v8.x with the fix pack.
- Go to Fix Central.
- Select WebSphere as WXS group.
- Select WebSphere eXtreme Scale
- Select 8.5 as the installed version.
- Select your operating system as the platform, and click Continue.
- Select Browse for fixes, and click Continue.
- Select the fix pack to download, and click Continue.
- Select your download options, and click Continue.
- Click I agree to agree to the terms and conditions.
- Click Download now to download the fix pack.
- Transfer the compressed file in binary format to the system on which it will be installed.
- Extract the compressed repository files to a directory on your system.
- To install a fix pack from a downloaded file...
- Log on to your system.
- Stop all processes running in your environment. To stop all processes running in your WAS environment, see Command-line utilities .
- cd IM_ROOT/eclipse/tools
- Install the fix pack.
./icml install offering_ID_offering_version,optional_feature_ID
  -installationDirectory product_installation_location
  -repositories location_of_expanded_files
  -acceptLicense
The offering_ID is the offering ID that is listed in WXS product offering IDs.
The offering_version, which optionally can be attached to the offering ID with an underscore, is a specific version of the offering to install (8.5.0.20110503_0200 for example).
- If offering_version is not specified, the latest version of the offering and all interim fixes for that version are installed.
- If offering_version is specified, the specified version of the offering and no interim fixes for that version are installed.
The offering version can be found attached to the end of the offering ID with an underscore when we run the following command against the repository:
-
imcl listAvailablePackages -repositories source_repository
We can also specify none, recommended or all with the -installFixes argument to indicate which interim fixes we want installed with the offering.
- If the offering version is not specified, the -installFixes option defaults to all.
- If the offering version is specified, the -installFixes option defaults to none.
We can add a list of features that are separated by commas. If a list of features is not specified, the default features are installed.
- Optional: List all installed packages to verify the installation:
-
./imcl listInstalledPackages -long
imcl.exe listInstalledPackages -long
Install fix packs - response file
We can update this product to a later version using IBM IM with a response file.
As an alterative to the procedure that is described in this article, IM allows us to use the updateAll command in a response file or on the command line to search for and update all installed packages.
Use this command only if you have full control over which fixes are contained in the targeted repositories. If you create and point to a set of custom repositories that include only the specific fixes to install, you should be able to use this command confidently. If you enable searching service repositories or install fixes directly from other live web-based repositories, then you might not want to select this option so that we can select only the fixes to install - -installFixes option with the install command on the command line or the installFixes attribute in a response file.
- For a list of interim fixes and fix packs that are available for WXS and specific information about each fix...
- Go to Fix Central .
- Select WebSphere as WXS group.
- Select WXS as WXS.
- Select 8.x as the installed version.
- Select your operating system as the platform, and click Continue.
- Select Browse for fixes, and click Continue.
- Click More Information under each fix to view information about the fix.
- Recommendation: Make a note of the name of the fix pack that you would like to install.
- Download the file that contains the fix pack from Fix Central, and use local updating.
We can download a compressed file that contains the fix pack from Fix Central. Each compressed fix-pack file contains an IM repository for the fix pack and usually has a .zip extension. After downloading and extracting the fix-pack file, use IM to update WXS with the fix pack.
- Go to Fix Central .
- Select WebSphere as WXS group.
- Select WebSphere eXtreme Scale
- Select 8.6 as the installed version.
- Select your operating system as the platform, and click Continue.
- Select Browse for fixes, and click Continue.
- Select the fix pack to download, and click Continue.
- Select your download options, and click Continue.
- Click I agree to agree to the terms and conditions.
- Click Download now to download the fix pack.
- Transfer the compressed file in binary format to the system on which it will be installed.
- Extract the compressed repository files to a directory on your system.
- Perform the following actions:
- Log on to your system.
- If the repository requires a user name and password, create a keyring file to access this repository.
When creating a keyring file, append /repository.config at the end of the repository URL location if the imutilsc command is unable to find the URL specified.
- Stop all processes running in stand-alone WXS environment.
- cd IM_ROOT/eclipse/tools
- Install the fix pack using a response file.
imcl.exe -acceptLicense
         input C:\temp\update_response_file.xml
         -log C:\temp\update_log.xml
         -keyring C:\IM\im.keyring

./icml -acceptLicense
       input /var/temp/update_response_file.xml
       -log /var/temp/update_log.xml
       -keyring /var/IM/im.keyring

./icml -acceptLicense
       input $HOME/var/temp/update_response_file.xml
       -log $HOME/var/temp/update_log.xml
       -keyring $HOME/var/IM/im.keyring
Uninstall fix packs - GUI
We can roll back this product to an earlier version - IBM IM GUI.
During the rollback process, IM must access files from the earlier version of the package. By default, these files are stored on your computer when you install a package. If you change the default setting or delete the saved files, IM requires access to the repository that was used to install the earlier version.
Restriction: We cannot use the Installation Manager to roll back an installation and add or remove a feature.
- Stop all processes running in your environment.
- Start IM.
- Click Roll Back.
- Select the package group to roll back.
- Click Next.
- Select the version to which we want to roll back under.
- Click Next.
- Review the summary information, and click Roll Back.
- If the rollback is successful, the program displays a message indicating that the rollback is successful.
- If the rollback is not successful, click View Log File to troubleshoot the problem.
- Click Finish.
- Click File > Exit to close IM.
Uninstall fix packs - command line
We can roll back this product to an earlier version using IBM IM from the command line.
In order to use this procedure, have IM v1.5 or later installed on your system.
During the rollback process, IM must access files from the earlier version of the package. By default, these files are stored on your computer when you install a package. If you change the default setting or delete the saved files, IM requires access to the repository that was used to install the earlier version.
Restriction: We cannot use the Installation Manager to roll back an installation and add or remove the full WAS profile feature or the Liberty profile feature.
- Optional: If the repository requires a user name and password, create a keyring file to access this repository.
For more information on creating a keyring file for IM, read the IBM IM v1.5 Information Center .
When creating a keyring file, append /repository.config at the end of the repository URL location if the imutilsc command is unable to find the URL specified.
- Log on to your system.
- Stop all processes running in your environment.
- cd IM_HOME/eclipse/tools
- Roll back WXS.
./imcl rollback  offering_ID_offering_version
       -repositories source_repository
       -installationDirectory installation_directory
       -preferences preference_key=value
       -properties property_key=value
       -keyring keyring_file
       -password password
       -acceptLicense
The offering_version, which optionally can be attached to the offering ID with an underscore, is a specific version of the offering to which to roll back (8.5.0.20110503_0200 for example).
- If offering_version is not specified, the installation rolls back to the previously installed version of the offering and all interim fixes for that version are installed.
- If offering_version is specified, the installation rolls back to the specified earlier version of the offering and no interim fixes for that version are installed.
The offering version can be found attached to the end of the offering ID with an underscore in the Package section of the report that is generated when we run the historyInfo or genHistoryReport command from the app_server_root/bin directory.
For more information on using IM, read the IBM IM v1.5 Information Center .
Optional: List all installed packages to verify the roll back.
-
./imcl listInstalledPackages -long
Uninstall fix packs - response file
We can roll back this product to an earlier version using IBM IM with a response file.
During the rollback process, IM must access files from the earlier version of the package. By default, these files are stored on your computer when you install a package. If you change the default setting or delete the saved files, IM requires access to the repository that was used to install the earlier version.
You cannot use the Installation Manager to roll back an installation and add or remove the full WAS profile feature or the Liberty profile feature.
- Optional: If the repository requires a username and password, create a keyring file to access this repository.
When creating a keyring file, append /repository.config at the end of the repository URL location if the imutilsc command is unable to find the URL specified.
- Log on to your system.
- Stop all processes running in your environment.
- To stop all processes running in your stand-alone WXS environment, see Stopping stand-alone servers that use the ORB transport .
- To stop all processes running in your WAS environment, see Command-line utilities .
- Use a response file to roll back WXS.
cd IM_HOME/eclipse/tools
./icml input /var/temp/rollback_response_file.xml
       -log /var/temp/rollback_log.xml
       -keyring /var/IM/im.keyring
The program might write important post-installation instructions to standard output.
For more information on using IM, read the IBM IM v1.5 Information Center .
- Optional: List all installed packages to verify the roll back.
-
./imcl listInstalledPackages -long
Uninstall WXS using IBM IM
Uninstall WXS - GUI
- Remove the WXS augment from all WAS profiles before uninstalling WXS. You will be unable to perform the unaugment after uninstalling WXS. Use the manageprofiles command to unaugment existing profiles in a WXS environment. .
- Uninstall WXS.
- Stop all processes running in your environment.
- Start IM.
- Click Uninstall.
- In the Uninstall Packages window...
- Select one of the following...
- WXS in a stand-alone environment
- WXS client in a stand-alone environment
- WXS for WAS v6
- WXS for WAS v7
- WXS for WAS v8
- WXS client forWAS v6
- WXS client for WAS v7
- WXS client for WAS v8
- Click Next.
- Select one of the following...
- If the uninstallation wizard displays a list of augmented WAS profiles, then unaugment these profiles to proceed with the uninstallation.
- Review the summary information.
- Click Uninstall.
- If the uninstallation is successful, the program displays a message that indicates success.
- If the uninstallation is not successful, click View log to troubleshoot the problem.
- Click Finish.
- Click File > Exit to close IM.
- Optional: Uninstall IBM IM
Before we can uninstall IBM IM, uninstall all of the packages that were installed by IM.
Uninstall WXS - command line
Run manageprofiles unaugment the WXS augment from all WAS profiles before uninstalling WXS. You will be unable to perform the unaugment after uninstalling WXS. Use the manageprofiles command to unaugment existing profiles in a WXS environment.
- Log on to your system.
- Stop all processes running in your environment.
- cd IM_HOME/eclipse/tools
- Uninstall WXS.
imcl.exe uninstall com.ibm.websphere.v85,optional_feature_ID -installationDirectory installation_directory- We can remove a list of features that are separated by commas.the feature ID. For example,
-
imcl uninstall com.ibm.websphere.WXS.v85,xs.console.feature,xs.samples.feature
- client indicates the stand-alone client feature
- server indicates the stand-alone server feature
- console indicates the web based monitoring console
- samples indicates the samples
- If a list of features is not specified, the entire product is uninstalled.
Go to the IBM IM v1.5 Information Center for more information.
- We can remove a list of features that are separated by commas.the feature ID. For example,
- If the uninstallation process displays a list of augmented WAS profiles, then unaugment these profiles to proceed with the uninstallation.
- Optional: Uninstall IBM IM.
Before we can uninstall IBM IM, uninstall all of the packages that were installed by IM.
Uninstall WXS - response file
- Stop all processes running in your environment.
- Optional: Record a response file to uninstall WXS...
- From a command line, change to the eclipse subdirectory in the directory where you installed IM.
- Start IM from the command line - -record option.
-
./IBMIM -skipInstall /var/temp/imRegistry -record /var/temp/uninstall_response_file.xml
If you choose to use the -skipInstall parameter with a temporary installation registry created earlier.
IM uses the temporary installation registry while recording the response file. When the -skipInstall parameter is specified, no product packages are installed or uninstalled. All of the actions that you perform in IM simply update the installation data that is stored in the specified temporary registry. After the response file is generated, it can be used to uninstall WXS, removing WXS files and updating the standard installation registry.
The -skipInstall operation should not be used on the actual agent data location used by IM. This is unsupported. Use a clean writable location, and re-use that location for future recording sessions.
For more information, read the IBM IM v1.5 Information Center .
- Click Uninstall.
- In the Uninstall Packages window...
- Select one of the following...
- WXS in a stand-alone environment
- WXS client in a stand-alone environment
- WXS for WAS v6
- WXS for WAS v7
- WXS for WAS v8
- WXS client forWAS v6
- WXS client for WAS v7
- WXS client for WAS v8
- Click Next.
- Click Next.
- Select one of the following...
- Review the summary information.
- Click Uninstall.
- If the uninstallation is successful, the program displays a message that indicates success.
- If the uninstallation is not successful, click View log to troubleshoot the problem.
- Click Finish.
- Click File > Exit to close IM.
- Use the response file to uninstall WXS: From a command line on each of the systems from which we want to uninstall WXS, change to the eclipse/tools subdirectory in the directory where you installed IM and use the response file that you created to uninstall WXS.
-
./icml input /var/temp/uninstall_response_file.xml
-log /var/temp/uninstall_log.xml
Go to the IBM IM v1.5 Information Center for more information.
- Optional: List all installed packages to verify the uninstallation.
- ./icml listInstalledPackages
- If the uninstallation process displays a list of augmented WAS profiles, then unaugment these profiles to proceed with the uninstallation.
- Optional: a href="http://setgetweb.com/p/IM14/" >Uninstall all of the packages installed by IM, then uninstall IBM IM.
Unaugment all WAS profiles before uninstalling WXS.
Install the Eclipse Equinox OSGi framework
WXS supports two blueprint containers within the Eclipse Equinox core OSGi framework:- Eclipse Gemini
- Apache Aries
Use this procedure to set up the Eclipse Gemini container.
- Download Eclipse Equinox SDK v3.6.1 or later
- Create an equinox_root directory...
-
mkdir /opt/equinox
Extract the compressed file to equinox_root.
- Download the gemini-blueprint incubation 1.0.0 compressed file
- Extract the file contents into a temporary directory, and copy the following extracted files to equinox_root/plugins...
- dist/gemini-blueprint-core-1.0.0.jar
- dist/gemini-blueprint-extender-1.0.0.jar
- dist/gemini-blueprint-io-1.0.0.jar
Depending on the location where you download the compressed Blueprint file, the extracted files might have the extension, RELEASE.jar, much like the Spring framework JAR files in the next step. You must verify that the file names match the file references in the config.ini file.
- Download Spring Framework v3.0.5
- Extract it into a temporary directory, and copy the following extracted files to equinox_root/plugins
- org.springframework.aop-3.0.5.RELEASE.jar
- org.springframework.asm-3.0.5.RELEASE.jar
- org.springframework.beans-3.0.5.RELEASE.jar
- org.springframework.context-3.0.5.RELEASE.jar
- org.springframework.core-3.0.5.RELEASE.jar
- org.springframework.expression-3.0.5.RELEASE.jar
- Download the AOP Alliance JAR file from the SpringSource web page
- Copy com.springsource.org.aopalliance-1.0.0.jar to equinox_root/plugins
- Download the Apache commons logging 1.1.1 JAR file from the SpringSource web page
- Copy com.springsource.org.apache.commons.logging-1.1.1.jar file to equinox_root/plugins
- Download the Luminis OSGi Configuration Admin command-line client.
Use this JAR file bundle to manage OSGi administrative configurations.
- Copy net.luminis.cmc-0.2.5.jar to equinox_root/plugins
- Download the Apache Felix file installation v3.0.2 bundle
- Copy org.apache.felix.fileinstall-3.0.2.jar to equinox_root/plugins.
- Create a configuration directory under equinox_root/plugins...
-
mkdir equinox_root/plugins/configuration
- Create file...
-
equinox_root/plugins/configuration/config.ini
...and insert the following content...
osgi.noShutdown=true osgi.java.profile.bootdelegation=none org.osgi.framework.bootdelegation=none eclipse.ignoreApp=true osgi.bundles=\
org.eclipse.osgi.services_3.2.100.v20100503.jar@1:start, \
org.eclipse.osgi.util_3.2.100.v20100503.jar@1:start, \
org.eclipse.equinox.cm_1.0.200.v20100520.jar@1:start, \
com.springsource.org.apache.commons.logging-1.1.1.jar@1:start, \
com.springsource.org.aopalliance-1.0.0.jar@1:start, \
org.springframework.aop-3.0.5.RELEASE.jar@1:start, \
org.springframework.asm-3.0.5.RELEASE.jar@1:start, \
org.springframework.beans-3.0.5.RELEASE.jar@1:start, \
org.springframework.context-3.0.5.RELEASE.jar@1:start, \
org.springframework.core-3.0.5.RELEASE.jar@1:start, \
org.springframework.expression-3.0.5.RELEASE.jar@1:start, \
org.apache.felix.fileinstall-3.0.2.jar@1:start, \
net.luminis.cmc-0.2.5.jar@1:start, \
gemini-blueprint-core-1.0.0.jar@1:start, \
gemini-blueprint-extender-1.0.0.jar@1:start, \
gemini-blueprint-io-1.0.0.jar@1:start
Remove all trailing spaces after the backslash on each line. Include a blank line at the end of the file; for example:
- If you have already set up the environment, we can clean up the Equinox plug-in repository by removing:
-
equinox_root\plugins\configuration\org.eclipse.osgi
- Start equinox console.
-
java -jar plugins\org.eclipse.osgi_3.6.1.R36x_v20100806.jar -console
Install the REST data service into a Web server
The WXS REST data service is a Java Web application that can be deployed to any application server that supports Java servlet specification, v2.3 and a Java runtime environment, v5 or later.
The following software is required:
- Java Standard Edition 6 or later
- Web servlet container, v2.3 or later, which includes one of the following:
- WAS v7.0.0.5 or later
- WebSphere Community Edition v2.1.1.3 or later
- Apache Tomcat v5.5 or later
WXS, v7.1 or later, including the trial.
The WXS REST data service includes a single wxsrestservice.war file. The wxsrestservice.war file includes a single servlet that acts as a gateway between your WCF Data Services client applications or any other HTTP REST client and a data grid.
The REST data service includes a sample that allows us to quickly create a data grid and interact with it using a WXS client or the REST data service.
When WXS 7.1 is installed or the eXtreme Scale v7.1 trial is extracted, the following directories and files are included:
- restservice_home/lib
wxsrestservice.ear REST data service enterprise application archive for use with WAS and WAS CE. wxsrestservice.war REST data service web module for use with Apache Tomcat. wxsrestservice.ear includes wxsrestservice.war. Both tightly coupled with the WebSphere WXS runtime. If WXS is upgraded to a new version or a fix pack applied, the wxsrestservice.war file or wxsrestservice.ear file will need to be manually upgraded to the version installed in this directory.
- restservice_home/gettingstarted
The gettingstarted directory contains a simple sample that demonstrates how to use the WXS REST data service with a data grid.
Package and deploy the REST data service.
The REST data service is designed as a self-contained WAR module. To configure the REST data service, first package the REST data service configuration and optional WXS configuration files into a JAR file or directory. This application packaging is then referenced by the web container server runtime. The following diagram illustrates files used by the eXtreme Scale REST data service.
WXS REST Data Service Files
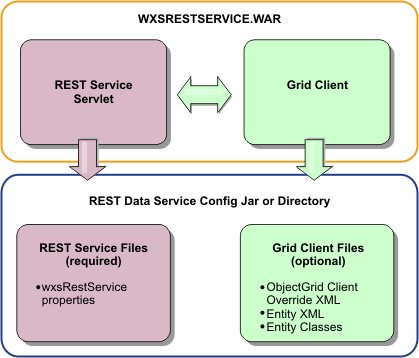
The REST service configuration JAR or directory must contain the following file:
wxsRestService.properties: The wxsRestService.properties file includes the configuration options for the REST data service. This includes the catalog service endpoints, ObjectGrid names to expose, trace options and more.
The following ObjectGrid client files are optional:
- META-INF/objectGridClient.xml
The ObjectGrid client override XML file is used to connect to the remote data grid. By default this file is not required. If this file is not present, the REST service uses the server configuration, disabling the near cache.
The name of the file can be overridden - objectGridClientXML REST data service configuration property. If provided, this XML file should include:
- Any ObjectGrids to expose to the REST data service.
- Any reference to the entity descriptor XML file associated with each ObjectGrid configuration.
- META-INF/entity descriptor XML files:
One or more entity descriptor XML files are required only if the client needs to override the entity definition of the client. The entity descriptor XML file must be used in conjunction with the ObjectGrid client override XML descriptor file.
- Entity classes Annotated entity classes or an entity descriptor XML file can be used to describe the entity metadata. The REST service only requires entity classes in the classpath if the eXtreme Scale servers are configured with entity metadata classes and a client override entity XML descriptor is not used.
An example with the minimum required configuration file, where the entities are defined in XML on the servers:
-
restserviceconfig.jar:
wxsRestService.propertiesThe property file contains:
-
catalogServiceEndPoints=localhost:2809
objectGridNames=NorthwindGridAn example with one entity, override XML files and entity classes:
-
restserviceconfig.jar:
wxsRestService.propertiesThe property file contains:
-
catalogServiceEndPoints=localhost:2809
objectGridNames=NorthwindGrid-
com/acme/entities/Customer.class META-INF/objectGridClient.xml
The client ObjectGrid descriptor XML file contains:
-
<objectGrid name="CustomerGrid" entityMetadataXMLFile="emd.xml"/>
META-INF/emd.xmlThe entity metadata descriptor XML file contains:
-
<entity class-name="com.acme.entities.Customer" name="Customer"/>
Install eXtreme Scale bundles
WXS includes bundles that can be installed into an Eclipse Equinox OSGi framework. These bundles used to start WXS servers or use WXS clients in OSGi. We can install the WXS bundles - Equinox console or - config.ini configuration file. This task assumes installed the following products:
- Eclipse Equinox OSGi framework
- WXS stand-alone client or server
WXS includes two bundles. Only one of the following bundles is required in an OSGi framework:
- objectgrid.jar
- The server bundle is the objectgrid.jar file and is installed with the WXS stand-alone server installation and is required for running WXS servers and can also be used for running WXS clients, or local, in-memory caches. The bundle ID for the objectgrid.jar file is com.ibm.websphere.xs.server_<version>, where the version is in the format: <Version>.<Release>.<Modification>. For example, the server bundle for this release is com.ibm.websphere.xs.server_8.5.0.
- ogclient.jar
- The ogclient.jar bundle is installed with the WXS stand-alone and client installations and is used to run WXS clients or local, in-memory caches. The bundle ID for ogclient.jar file is com.ibm.websphere.xs.client_<version>, where the version is in the format: <Version>_<Release>_<Modification. For example, the client bundle for this release is com.ibm.websphere.xs.server_8.5.0.
Install the WXS client or server bundle into the Eclipse Equinox OSGi framework - Equinox console
- Start the Eclipse Equinox framework with the console enabled; for example:
java_home /bin/java -jar equinox_root/plugins/org.eclipse.osgi_3.6.1.R36x_v20100806.jar -console
- Install the WXS client or server bundle in the Equinox console:
- osgi> install file:///<path to bundle>
- Equinox displays the bundle ID for the newly installed bundle:
- Bundle id is 25
- Start the bundle in the Equinox console, where <id> is the bundle ID assigned when the bundle was installed:
- osgi> start <id>
- Retrieve the service status in the Equinox console to verify that the bundle has started; for example:
- osgi> ss
When the bundle starts successfully, the bundle displays the ACTIVE state; for example:
- 25 ACTIVE com.ibm.websphere.xs.server_8.5.0
Install the WXS client or server bundle into the Eclipse Equinox OSGi framework - config.ini file
- Copy the WXS client or server (objectgrid.jar or ogclient.jar) bundle from...
-
<wxs_install_root>/ObjectGrid/lib
...to the Eclipse Equinox plug-ins directory...
-
equinox_root/plugins
- Edit the Eclipse Equinox config.ini configuration file, and add the bundle to the osgi.bundles property; for example:
-
osgi.bundles=\
org.eclipse.osgi.services_3.2.100.v20100503.jar@1:start, \
org.eclipse.osgi.util_3.2.100.v20100503.jar@1:start, \
org.eclipse.equinox.cm_1.0.200.v20100520.jar@1:start, \
objectgrid.jar@1:startVerify that a blank line exists after the last bundle name. Each bundle is separated by a comma.
- Start the Eclipse Equinox framework with the console enabled;
for example:
p> java_home /bin/java -jar equinox_root/plugins/org.eclipse.osgi_3.6.1.R36x_v20100806.jar -console
- Retrieve the service status in the Equinox console to verify that the bundle has started:
-
osgi> ss
When the bundle starts successfully, the bundle displays the ACTIVE state; for example:
25 ACTIVE com.ibm.websphere.xs.server_8.5.0

Install WXS in .NET environment overview
We can install WXS for .NET in either a runtime environment, or both a runtime and development environment. To build and test your own .NET applications, install WXS for .NET in your development environment. A development environment installation always includes the runtime environment installation; as such, the runtime assemblies are installed on disk and in the global assembly cache (GAC). The development environment installation additionally installs sample code, Visual Studio IntelliSense integration (for fly-over class and method descriptions), and API documentation. The sample WXS .NET source code and Visual Studio project are installed in the <installation_directory>\sampledirectory, and the API documentation is installed in the <installation_directory>\doc directory.
Install WXS client for .NET
- Run...
-
/ClientForDotNet/setup.exe
- To install WXS client into a runtime environment, click Runtime and do the following:
- Click Install to run the installer and click Finish.
The default installation directory is:
-
C:\Program Files (x86)\IBM\WebSphere\eXtreme Scale .NET Client
- Click Install to run the installer and click Finish.
- If you decided to install WXS client into both a runtime and a development environment, then choose Custom and do the following:
- Install WXS client into the default installation directory, or choose your own installation directory and click Next.
- By default, both runtime and development environment are selected as features. Verify you have enough disk space if we want to install both. Click Next.
- Choose a location for the log files and click Next.
- Click Install to run the installer and click Finish.
We can update or modify the SimpleClient to try the available WXS client for .NET APIs. Locate the SimpleClient in the <installation_directory>\sample\SimpleClient in the installation directory, and load this file into Visual Studio to view the sample application that uses simple create, retrieve, update, and delete operations. Use the SimpleClient as a guide for accessing the data grid. We can modify this application or write new applications that use the eXtreme Scale for .NET client supported API set.
Install WXS client for .NET with silent mode
WXS client for .NET can install in a runtime or in both a runtime and a development environment.
- Obtain WXS client from the DVD.
We can locate the setup.exe in the root directory...
-
/net_client_home/setup.exe
...or we can download it from the Support site .
- If you plan on installing WXS client for .NET in a development environment, you must be using a Windows system that meets the hardware and software requirements.
- Open a command prompt and run the following script: setup.exe /r /f1"/path/to/reponse/file\Setup.iss" The /path/to/reponse/file is the location where we want to create the response file.
- Follow the prompts in the wizard, and click Next to the Setup Type page.
- When creating the Setup.iss response file:
- Choose to install WXS client in a runtime environment, or choose a custom installation. A custom installation lets you install WXS in both environments.
- If you decided to install WXS client into a runtime environment, click Runtime and do the following:
- Click Install and click Finish.
<>ul>C:\IBM\WebSphere\eXtreme Scale .NET Client
- Click Install and click Finish.
- Install WXS client into the default installation directory, or choose your own installation directory. Click Next.
- Select both runtime and development environment. To install in both environments, verify you have enough disk space. Click Next
- Choose a location for the log files and click Next.
-
setup.exe /s /f1"/path/to/reponse/file\Setup.iss"
...where /path/to/reponse/file is the location where your response file resides.
We can update or modify the SimpleClient to try the available eXtreme Scale client for .NET APIs. Locate the SimpleClient in the <installation_directory>\sample\SimpleClient in the installation directory, and load this file into Visual Studio to view the sample application that uses simple create, retrieve, update, and delete operations. Use the SimpleClient as a guide for accessing the data grid. We can modify this application or write new applications that use the eXtreme Scale for .NET client supported API set.
Uninstall WXS client for .NET
To remove WXS client for .NET from your environment, we can uninstall it from your Windows Control Panel, or record a response file to uninstall in silent mode. Recording a response file is best when you have multiple installations of WXS client and we want to remove these installations quickly.
To uninstall WXS from a development environment, then make sure you shut down Visual Studio.
The uninstaller removes all binary files and all maintenance, such as fix packs and interim fixes, at the same time.
- Stop any .NET eXtreme Scale processes.
- We can uninstall WXS client for .NET using one of the following methods:
- Uninstall from the Windows Control Panel, click Add or Remove Programs and select IBM WXS client for .NET.
- To record a response file, then open a command prompt and run the following script:
-
setup.exe /uninst /r /f1"/path/to/reponse/file\Setup.iss"
- The uninstallation wizard opens and a confirmation window appears to verify to remove WXS client for .NET and all its features. Click OK.
- When the uninstallation process completes, click Finish.
- Optional: Uninstall WXS client for .NET in silent mode...
- setup.exe /uninst /s /f1"/path/to/reponse/file\Setup.iss"
Check your Windows Explorer to make sure all folders were removed from the installation directory. You should also check your Windows Control panel to make sure WXS is no longer listed. The installer does not delete folders with files that were generated after the installation, such as log files, custom configuration files, and any artifacts created by building the SimpleClient sample.
Troubleshoot WXS installation
To view the logs, open Installation Manager and go to...
-
File | View Log
Logs are located in...
-
C:\All Users\Application Data\IBM\IM
C:\user_name\Application Data\IBM\IM
/var/IBM/InstallationManager
$HOME/var/ibm/InstallationManager
The main log files are time-stamped XML files in the logs directory, and they can be viewed using any standard web browser.
The log.properties file in the logs directory specifies the level of logging or tracing that IM uses. To turn on tracing for the WXS plug-ins, for example, create a log.properties file with the following content:
-
com.ibm.ws=DEBUG
com.ibm.cic.agent.core.Engine=DEBUG
global=DEBUG
Restart IM as necessary, and IM outputs traces for the WXS plug-ins.
Disable Installation Manager checking mechanisms
- On some network file systems, disk space might not be reported correctly. To disable disk-space checking...
- Edit...
-
IM_HOME/eclipse/configuration/config.ini
...set...
-
cic.override.disk.space=sizeunit
Unit is blank for bytes, k for kilo, m for megabytes, or g for gigabytes. For example:
cic.override.disk.space=120 (120 bytes)
cic.override.disk.space=130k (130 kilobytes)
cic.override.disk.space=140m (140 megabytes)
cic.override.disk.space=150g (150 gigabytes)
cic.override.disk.space=true
- Restart IM.
IM will report a disk-space size of Long.MAX_VALUE. Instead of displaying a very large amount of available disk space, N/A is displayed.
- Edit...
- To bypass operating-system prerequisite checking
- Edit...
-
IM_HOME/eclipse/configuration/config.ini
- Restart Installation Manager.
...and set...
-
disableOSPrereqChecking=true
Release notes
Online Installation Manager release notes Windows Start | Programs | IBM Installation Manager | Release Notes. UNIX IM_HOME/documentation/readme.html If a fatal error occurs when you try to install WXS
- Make a backup copy of the current product installation directory.
- Uninstall everything. You might run into errors, but they can be safely ignored.
- Delete everything that remains in the WXS installation directory.
- Use IM to reinstall WXS to the same location or to a new one.
To get version and history information...
- versionInfo.sh
- historyInfo.sh
HP-UX gotcha
Some HP-UX systems are configured to not use DNS to resolve host names. This could result in IM not being able to connect to an external repository. We can ping the repository, but nslookup does not return anything. Work with the system administrator to configure the HP-UX machine to use DNS, or use the IP address of the repository.
- Edit...