Java API for XML Messaging (JAXM)
Overview
JAXM enables XML messaging over the Internet.
JAXM conforms to the SOAP 1.1 and SAAJ specifications, and is available in the following two packages:
- javax.xml.soap
Package defined in the SAAJ 1.1 specification that contains the API for creating and populating a SOAP message. Required for sending request-response messages.
- javax.xml.messaging
Package defined in the JAXM specification that contains the API needed for using a messaging provider and thus for being able to send one-way messages.
The javax.xml.messaging package depends on the java.xml.soap package. A client sending request-response messages can use just the javax.xml.soap API. A Web service or client that uses one-way messaging will need to use APIs from both javax.xml.soap and javax.xml.messaging.
Messages
JAXM messages follow SOAP standards, which prescribe the format for messages and also specify some things that are required, optional, or not allowed. With the JAXM API, you can create XML messages that conform to the SOAP specifications simply by making Java API calls.
The Structure of an XML Document
An XML document has a hierarchical structure with elements, subelements, subsubelements, and so on. You will notice that many of the SAAJ classes and interfaces represent XML elements in a SOAP message and have the word element or SOAP or both in their names.
An element is also referred to as a node. Accordingly, the SAAJ API has the interface Node, which is the base class for all the classes and interfaces that represent XML elements in a SOAP message. There are also methods such as SOAPElement.addTextNode, Node.detachNode, and Node.getValue, which you will see how to use in the tutorial section.
What Is in a Message?
The two main types of SOAP messages are those that have attachments and those that do not.
Messages with No Attachments
The following outline shows the very high level structure of a SOAP message with no attachments. Except for the SOAP header, all the parts listed are required.
I. SOAP message
A. SOAP part
1. SOAP envelope
a. SOAP header (optional)
b. SOAP body
The SAAJ API provides the SOAPMessage class to represent a SOAP message, SOAPPart to represent the SOAP part, SOAPEnvelope to represent the SOAP envelope, and so on.
When you create a new SOAPMessage object, it will automatically have the parts that are required to be in a SOAP message. In other words, a new SOAPMessage object has a SOAPPart object that contains a SOAPEnvelope object. The SOAPEnvelope object in turn automatically contains an empty SOAPHeader object followed by an empty SOAPBody object. If you do not need the SOAPHeader object, which is optional, you can delete it. The rationale for having it automatically included is that more often than not you will need it, so it is more convenient to have it provided.
The SOAPHeader object may contain one or more headers with information about the sending and receiving parties and about intermediate destinations for the message. Headers may also do things such as correlate a message to previous messages, specify a level of service, and contain routing and delivery information. The SOAPBody object, which always follows the SOAPHeader object if there is one, provides a simple way to send mandatory information intended for the ultimate recipient. If there is a SOAPFault object (see SOAP Faults), it must be in the SOAPBody object.
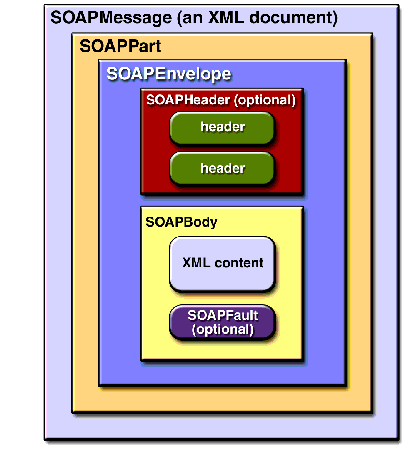
Figure 10-1 SOAPMessage Object with No Attachments
Messages with Attachments
A SOAP message may include one or more attachment parts in addition to the SOAP part. The SOAP part may contain only XML content; as a result, if any of the content of a message is not in XML format, it must occur in an attachment part. So, if for example, you want your message to contain an image file or plain text, your message must have an attachment part for it. Note than an attachment part can contain any kind of content, so it can contain data in XML format as well. Figure 10-2 shows the high-level structure of a SOAP message that has two attachments.

Figure 10-2 SOAPMessage Object with Two AttachmentPart Objects
The SAAJ API provides the AttachmentPart class to represent the attachment part of a SOAP message. A SOAPMessage object automatically has a SOAPPart object and its required subelements, but because AttachmentPart objects are optional, you have to create and add them yourself. The tutorial section will walk you through creating and populating messages with and without attachment parts.
A SOAPMessage object may have one or more attachments. Each AttachmentPart object has a MIME header to indicate the type of data it contains. It may also have additional MIME headers to identify it or to give its location, which can be useful when there are multiple attachments. When a SOAPMessage object has one or more AttachmentPart objects, its SOAPPart object may or may not contain message content. .
Another way to look at SOAP messaging is from the perspective of whether or not a messaging provider is used, which is discussed at the end of the section Messaging Providers.
Connections
All SOAP messages are sent and received over a connection. The connection can go directly to a particular destination or to a messaging provider. (A messaging provider is a service that handles the transmission and routing of messages and provides features not available when you use a connection that goes directly to its ultimate destination. Messaging providers are explained in more detail later.)
The JAXM API supplies the following class and interface to represent these two kinds of connections:
- javax.xml.soap.SOAPConnection -- a connection from the sender directly to the receiver (a point-to-point connection)
- javax.xml.messaging.ProviderConnection -- a connection to a messaging provider
SOAPConnection
A SOAPConnection object, which represents a point-to-point connection, is simple to create and use. One reason is that you do not have to do any configuration to use a SOAPConnection object because it does not need to run in a servlet container (like Tomcat) or in a J2EE container. It is the only kind of connection available to a client that does not use a messaging provider.
The following code fragment creates a SOAPConnection object and then, after creating and populating the message, uses the connection to send the message. The parameter request is the message being sent; endpoint represents where it is being sent.
SOAPConnectionFactory factory =
        SOAPConnectionFactory.newInstance();
SOAPConnection con = factory.createConnection();

. . .// create a request message and give it content

SOAPMessage response = con.call(request, endpoint);
When a SOAPConnection object is used, the only way to send a message is with the method call, which transmits its message and then blocks until it receives a reply. Because the method call requires that a response be returned to it, this type of messaging is referred to as request-response messaging.
A Web service implemented for request-response messaging must return a response to any message it receives. When the message is an update, the response is an acknowledgement that the update was received. Such an acknowledgement implies that the update was successful. Some messages may not require any response at all. The service that gets such a message is still required to send back a response because one is needed to unblock the call method. In this case, the response is not related to the content of the message; it is simply a message to unblock the call method.
Because the signature for the javax.xml.soap.SOAPConnection.call method changed in the SAAJ 1.1 specification, a JAXM implementation may elect not to implement the call method. To allow for this, there is a new exception on the SOAPConnectionFactory class stating that SOAPConnection is not implemented, which allows for a graceful failure.
Unlike a client with no messaging provider, which is limited to using only a SOAPConnection object, a client that uses a messaging provider is free to use a SOAPConnection object or a ProviderConnection object. It is expected that ProviderConnection objects will be used most of the time.
ProviderConnection
A ProviderConnection object represents a connection to a messaging provider. (The next section explains more about messaging providers.) When you send a message via a ProviderConnection object, the message goes to the messaging provider. The messaging provider forwards the message, following the message's routing instructions, until the message gets to the ultimate recipient's messaging provider, which in turn forwards the message to the ultimate recipient.
When an application is using a ProviderConnection object, it must use the method ProviderConnection.send to send a message. This method transmits the message one way and returns immediately, without having to block until it gets a response. The messaging provider that receives the message will forward it to the intended destination and return the response, if any, at a later time. The interval between sending a request and getting the response may be very short, or it may be measured in days. In this style of messaging, the original message is sent as a one-way message, and any response is sent subsequently as a one-way message. Not surprisingly, this style of messaging is referred to as one-way messaging.

Figure 10-3 Request-response and One-way Messaging
Messaging Providers
A messaging provider is a service that handles the transmission and routing of messages. It works behind the scenes to keep track of messages and see that they are sent to the proper destination or destinations.
Transparency
One of the great features of a messaging provider is that you are not even aware of it. You just write your JAXM application, and the right things happen. For example, when you are using a messaging provider and send a message by calling the ProviderConnection.send method, the messaging provider receives the message and works with other parts of the communications infrastructure to perform various tasks, depending on what the message's header contains and how the messaging provider itself has been implemented. The message arrives at its final destination without your even knowing about the details involved in accomplishing the delivery.
Profiles
JAXM offers the ability to plug in additional protocols that are built on top of SOAP. A JAXM provider implementation is not required to implement features beyond what the SOAP 1.1 and SOAP with Attachments specifications require, but it is free to incorporate other standard protocols, called profiles, that are implemented on top of SOAP. For example, the "ebXML Message Service Specification (available at http://www.oasis-open.org/committees/ebxml-msg/) defines levels of service that are not included in the two SOAP specifications. A messaging provider that is implemented to include ebXML capabilities on top of SOAP capabilities is said to support an ebXML profile. A messaging provider may support multiple profiles, but an application can use only one at a time and must have a prior agreement with each of the parties to whom it sends messages about what profile is being used.
Profiles affect a message's headers. For example, depending on the profile, a new SOAPMessage object will come with certain headers already set. Also a profile implementation may provide API that makes it easier to create a header and set its content. The JAXM reference implementation includes APIs for both the ebXML and SOAP-RP profiles. The Javadoc documentation for these profiles is at <$interface provides methods for setting and getting the values of these attributes.

Figure 10-4 One-way Message with Intermediate Destinations
When to Use a Messaging Provider
A JAXM client may or may not use a messaging provider. Generally speaking, if you just want to be a consumer of Web services, you do not need a messaging provider. The following list shows some of the advantages of not using a messaging provider:
- The application can be written using the J2SE platform
- The application is not required to be deployed in a servlet container or a J2EE container
- No configuration is required
The limitations of not using a messaging provider are the following:
- The client can send only request-response messages
- The client can act in the client role only
It follows that if you want to provide a Web service that is able to get and save requests that are sent to you at any time, use a messaging provider. You will also need to run in a container, which provides the messaging infrastructure used by the provider. A messaging provider gives you the flexibility to assume both the client and service roles, and it also lets you send one-way messages. In addition, if your messaging provider supports a protocol such as ebXML or SOAP-RP on top of SOAP, you can take advantage of the additional quality of service features that it provides.
Messaging with and without a Provider
JAXM clients can be categorized according to whether or not they use a messaging provider. Those that do not use a messaging provider can be further divided into those that run in a container and those that do not. A JAXM client that does not use a messaging provider and also does not run in a container is called a standalone client.
Running the Samples
The Java WSDP includes several JAXM sample applications. It also includes various implementations that make it possible for you to run the sample applications. These implementations, which constitute the JAXM reference implementation, are the following:
- an implementation of the JAXM API
- an implementation of a messaging provider
- basic implementations of ebXML and SOAP-RP profiles, which run on top of SOAP
All of the sample applications use the JAXM API, of course, and some use other implementations as well. For example, the sample application Remote uses the implementations of the messaging provider and the ebXML profile; the SOAP-RP sample uses the implementations for the messaging provider and the SOAP-RP profile. The next section, (The Sample Programs), gives more information about the sample applications and what they do.
Most of the samples run in a container, so before running them, you need to start Tomcat (see Starting Tomcat).
Once Tomcat is running, you can run the JAXM samples by following these steps:
- Open a browser window and set it to
http://localhost:8080/index.html - On the page that comes up, click on one of the sample programs listed. Then follow the instructions in the new window that comes up.
The Sample Programs
The sample programs illustrate various kinds of applications you can write with the JAXM API. Note that the Simple, Translator, and SAAJ Simple examples log messages sent and received to the directory in your Java WSDP installation where you started Tomcat. So if, for example, you start Tomcat from the $JWSDP_HOME/bin directory, that is where the messages will be logged. These messages are the XML that is sent over the wire, which you might find easier to understand after you have gone through the tutorial.
- Simple -- A simple example of sending and receiving a message using the local provider. Note that a local provider should not be confused with a messaging provider. The local provider is simply a mechanism for returning the reply to a message that was sent using the method SOAPConnection.call. Note that a message sent by this method will always be a request-response message. Running this example generates the files sent.msg and reply.msg, which you will find in the directory where you started Tomcat.
- SAAJ Simple -- An application similar to the Simple example except that it is written using only the SAAJ API. In SAAJ Simple, the call method takes a Java Object rather than a URLEndpoint object to designate the recipient, and thus uses only the javax.xml.soap package. Running this example generates the files sent.msg and reply.msg, which you will find in the directory where you started Tomcat.
- Translator -- An application that uses a simple translation service to translate a given word into different languages. If you have given the correct proxy host and proxy port, the word you supply will be translated into French, German, and Italian. Running this example generates the files request.msg and reply.msg in the directory where you started Tomcat. Check reply.msg after getting the reply in the SOAP body and again after getting the reply as an attachment to see the difference in what is sent as a reply.
- JAXM Tags -- An example that uses JavaServer Pages tags to generate and consume a SOAP message
- Remote -- An example of a round trip message that uses a JAXM messaging provider that supports the basic ebXML profile to send and receive a message
- SOAP-RP -- An example of a round trip message that uses a JAXM messaging provider that supports the basic SOAP-RP profile to send and receive a message
There are two other sample programs, jaxm-uddiping and jaxm-standalone, that do not run in Tomcat. To run them, go to the $JWSDP_HOME/samples/jaxm directory, where you will find the directories uddiping and standalone. Each directory contains a README file that explains what to do.
In the Examples section of the JAXM tutorial (UddiPing.java and MyUddiPing.java), you will find an application that modifies the code in UddiPing.java and also explains in detail how to run it. You might find it more convenient to wait until you have reached that section before trying to run the jaxm-uddiping and jaxm-standalone samples.
The preceding list presented the sample applications according to what they do. You can also look at the sample applications as examples of the three possible types of JAXM client:
- Those that do not use a messaging provider and also do not run in a containerThese are called standalone applications. The samples jaxm-standalone and jaxm-uddiping are examples of standalone clients.
- Those that do not use a messaging provider and run in a containerThe samples Simple, SAAJ Simple, Translator, and JAXM Tags are examples of this type.
- Those that use a messaging provider and run in a containerThe samples Remote and SOAP-RP are examples of this type.
Source Code for the Samples
Source code for the sample applications is in the directory
$JWSDP_HOME/docs/tutorial/examples/jaxm/samples/
You will find six directories, one for each of the samples that runs in Tomcat. The jaxmtags directory contain a number of .jsp files. The other directories all have two files, SendingServlet.java and ReceivingServlet.java. In addition to those two files, the translator directory contains the file TranslationService.java.
If you want to see all of the files that make up a Web web application, you can go to the directory $JWSDP_HOME/webapps and unpack the .war files. For example, for the Simple sample, you would do the following:
cd $JWSDP_HOME/webapps
jar -xvf jaxm-simple.war
In addition to the source files and class files for the Simple sample, you will find the files web.xml and build.xml. .
The web.xml file, referred to as a deployment descriptor, associates the endpoint passed to the method SOAPConnection.call or ProviderConnection.send with a particular servlet class. When the container encounters an endpoint, which is generally a URI, it uses the web.xml file to determine the appropriate servlet class and runs it. See the end of the section Sending the Request for an example and explanation.
The build.xml file is the Ant file to use to run the application.
Tutorial
This section will walk you through the basics of sending a SOAP message using the JAXM API. At the end of this chapter, you will know how to do the following:
- Get a connection
- Create a message
- Add content to a message
- Send a message
- Retrieve the content from a response message
- Create and retrieve a SOAP fault element
First, we'll walk through the steps in sending a request-response message for a client that does not use a messaging provider. Then we'll do a walkthrough of a client that uses a messaging provider sending a one-way message. Both types of client may add attachments to a message, so adding attachments is covered as a separate topic. Finally, we'll see what SOAP faults are and how they work.
The section Code Examples puts the code fragments you will produce into runnable applications, which you can test yourself. The JAXM part of the case study (JAXM Distributor Service) demonstrates how JAXM code can be used in a Web service, showing both the client and server code.
Client without a Messaging Provider
An application that does not use a messaging provider is limited to operating in a client role and can send only request-response messages. Though limited, it can make use of Web services that are implemented to do request-response messaging.
Getting a SOAPConnection Object
The first thing any JAXM client needs to do is get a connection, either a SOAPConnection object or a ProviderConnection object. The overview section (Connections) discusses these two types of connections and how they are used.
A client that does not use a messaging provider has only one choice for creating a connection, which is to create a SOAPConnection object. This kind of connection is a point-to-point connection, meaning that it goes directly from the sender to the destination (usually a URL) that the sender specifies.
The first step is to obtain a SOAPConnectionFactory object that you can use to create your connection. The SAAJ API makes this easy by providing the SOAPConnectionFactory class with a default implementation. You can get an instance of this implementation with the following line of code.
SOAPConnectionFactory scFactory =
                    SOAPConnectionFactory.newInstance();
Notice that because newInstance is a static method, you will always use the class name SOAPConnectionFactory when you invoke its newInstance method.
Now you can use scFactory to create a SOAPConnection object.
SOAPConnection con = scFactory.createConnection();
You will use con later to send the message that is created in the next part.
Creating a Message
The next step is to create a message, which you do using a MessageFactory object. If you are a standalone client, you can use the default implementation of the MessageFactory class that the SAAJ API provides. The following code fragment illustrates getting an instance of this default message factory and then using it to create a message.
MessageFactory factory = MessageFactory.newInstance();
SOAPMessage message = factory.createMessage();
As is true of the newInstance method for SOAPConnectionFactory, the newInstance method for MessageFactory is static, so you invoke it by calling MessageFactory.newInstance. Note that it is possible to write your own implementation of a message factory and plug it in via system properties, but the default message factory is the one that will generally be used.
The other way to get a MessageFactory object is to retrieve it from a naming service where it has been registered. This way is available only to applications that use a messaging provider, and it will be covered later (in Creating a Message).
Parts of a Message
A SOAPMessage object is required to have certain elements, and the SAAJ API simplifies things for you by returning a new SOAPMessage object that already contains these elements. So message, which was created in the preceding line of code, automatically has the following:
I. A SOAPPart object that contains
A. A SOAPEnvelope object that contains
1. An empty SOAPHeader object
2. An empty SOAPBody object
The SOAPHeader object, though optional, is included for convenience because most messages will use it. The SOAPBody object can hold the content of the message and can also contain fault messages that contain status information or details about a problem with the message. The section SOAP Faults walks you through how to use SOAPFault objects.
Accessing Elements of a Message
The next step in creating a message is to access its parts so that content can be added. The SOAPMessage object message, created in the previous code fragment, is where to start. It contains a SOAPPart object, so you use message to retrieve it.
SOAPPart soapPart = message.getSOAPPart();
Next you can use soapPart to retrieve the SOAPEnvelope object that it contains.
SOAPEnvelope envelope = soapPart.getEnvelope();
You can now use envelope to retrieve its empty SOAPHeader and SOAPBody objects.
SOAPHeader header = envelope.getHeader();
SOAPBody body = envelope.getBody();
Our example of a standalone client does not use a SOAP header, so you can delete it. Because all SOAPElement objects, including SOAPHeader objects, are derived from the Node interface, you use the method Node.detachNode to delete header.
header.detachNode();
Adding Content to the Body
To add content to the body, you need to create a SOAPBodyElement object to hold the content. When you create any new element, you also need to create an associated Name object to identify it. One way to create Name objects is by using SOAPEnvelope methods, so you can use envelope from the previous code fragment to create the Name object for your new element.
Note: The SAAJ API augments the javax.xml.soap package by adding the SOAPFactory class, which lets you create Name objects without using a SOAPEnvelope object. This capability is useful for creating XML elements when you are not creating an entire message. For example, JAX-RPC implementations find this ability useful. When you are not working with a SOAPMessage object, you do not have access to a SOAPEnvelope object and thus need an alternate means of creating Name objects. In addition to a method for creating Name objects, the SOAPFactory class provides methods for creating Detail objects and SOAP fragments. You will find an explanation of Detail objects in the SOAP Fault sections Overview and Creating and Populating a SOAPFault Object.
Name objects associated with SOAPBody and SOAPHeader objects must be fully qualified; that is, they must be created with a local name, a prefix for the namespace being used, and a URI for the namespace. Specifying a namespace for an element makes clear which one is meant if there is more than one element with the same local name.
The code fragment that follows retrieves the SOAPBody object body from envelope, creates a Name object for the element to be added, and adds a new SOAPBodyElement object to body.
SOAPBody body = envelope.getBody();
Name bodyName = envelope.createName(""GetLastTradePrice"",
          ""m"", ""http://wombat.ztrade.com"");
SOAPBodyElement gltp = body.addBodyElement(bodyName);
At this point, body contains a SOAPBodyElement object identified by the Name object bodyName, but there is still no content in gltp. Assuming that you want to get a quote for the stock of Sun Microsystems, Inc., you need to create a child element for the symbol using the method addChildElement. Then you need to give it the stock symbol using the method addTextNode. The Name object for the new SOAPElement object symbol is initialized with only a local name, which is allowed for child elements.
Name name = envelope.createName("symbol");
SOAPElement symbol = gltp.addChildElement(name);
symbol.addTextNode(""SUNW"");
You might recall that the headers and content in a SOAPPart object must be in XML format. The JAXM API takes care of this for you, building the appropriate XML constructs automatically when you call methods such as addBodyElement, addChildElement, and addTextNode. Note that you can call the method addTextNode only on an element such as bodyElement or any child elements that are added to it. You cannot call addTextNode on a SOAPHeader or SOAPBody object because they contain elements, not text.
The content that you have just added to your SOAPBody object will look like the following when it is sent over the wire:
<SOAP-ENV:Envelope
 xmlns:SOAP-ENV="http://schemas.xmlsoap.org/soap/envelope/"
  <SOAP-ENV:Body>
    <m:GetLastTradePrice xmlns:m=
              "http://wombat.ztrade.com">
      <symbol>SUNW</symbol>
    </m:GetLastTradePrice>
  </SOAP-ENV:Body>
</SOAP-ENV:Envelope>
Let's examine this XML excerpt line by line to see how it relates to your JAXM code. Note that an XML parser does not care about indentations, but they are generally used to indicate element levels and thereby make it easier for a human reader to understand.
JAXM code:
SOAPPart soapPart = message.getSOAPPart();
SOAPEnvelope envelope = soapPart.getEnvelope();
XML it produces:
<SOAP-ENV:Envelope
 xmlns:SOAP-ENV="http://schemas.xmlsoap.org/soap/envelope/"
  . . . . . . (intervening elements omitted)
</SOAP-ENV:Envelope>
The outermost element in this XML example is the SOAP envelope element, indicated by SOAP-ENV:Envelope. Envelope is the name of the element, and SOAP-ENV is the namespace prefix. The interface SOAPEnvelope represents a SOAP envelope.
The first line signals the beginning of the SOAP envelope element, and the last line signals the end of it; everything in between is part of the SOAP envelope. The second line has an attribute for the SOAP envelope element. xmlns stands for "XML namespace," and its value is the URI of the namespace associated with Envelope. This attribute is automatically included for you.
JAXM code:
SOAPBody body = envelope.getBody();
XML it produces:
  <SOAP-ENV:Body>
      . . . . . .
  </SOAP-ENV:Body>
These two lines mark the beginning and end of the SOAP body, represented in JAXM by a SOAPBody object.
JAXM code:
Name bodyName = envelope.createName("GetLastTradePrice",
          "m", "http://wombat.ztrade.com");
SOAPBodyElement gltp = body.addBodyElement(bodyName);
XML it produces:
  <m:GetLastTradePrice xmlns:m=
            "http://wombat.ztrade.com">

    . . . .
  </m:GetLastTradePrice>
These lines are what the SOAPBodyElement gltp in your code represents. "GetLastTradePrice" is its local name, "m" is its namespace prefix, and "http://wombat.ztrade.com" is its namespace URI.
JAXM code:
Name name = envelope.createName("symbol");
SOAPElement symbol = gltp.addChildElement(name);
symbol.addTextNode("SUNW");
XML it produces:
<symbol>SUNW</symbol>
The String "SUNW" is the message content that your recipient, the stock quote service, receives.
Sending a Message
A standalone client uses a SOAPConnection object and must therefore use the SOAPConnection method call to send a message. This method takes two arguments, the message being sent and the destination to which the message should go. This message is going to the stock quote service indicated by the URL object endpoint.
java.net.URL endpoint = new URL(
                  "http://wombat.ztrade.com/quotes";

SOAPMessage response = con.call(message, endpoint);
Your message sent the stock symbol SUNW; the SOAPMessage object response should contain the last stock price for Sun Microsystems, which you will retrieve in the next section.
A connection uses a fair amount of resources, so it is a good idea to close a connection as soon as you are through using it.
con.close();
Getting the Content of a Message
The initial steps for retrieving a message's content are the same as those for giving content to a message: You first access the SOAPBody object, using the message to get the envelope and the envelope to get the body. Then you access its SOAPBodyElement object because that is the element to which content was added in the example. (In a later section you will see how to add content directly to the SOAPBody object, in which case you would not need to access the SOAPBodyElement object for adding content or for retrieving it.) To get the content, which was added with the method SOAPElement.addTextNode, you call the method Node.getValue. Note that getValue returns the value of the immediate child of the element that calls the method. Therefore, in the following code fragment, the method getValue is called on bodyElement, the element on which the method addTextNode was called.
In order to access bodyElement, you need to call the method getChildElement on body. Passing bodyName to getChildElement returns a java.util.Iterator object that contains all of the child elements identified by the Name object bodyName. You already know that there is only one, so just calling the method next on it will return the SOAPBodyElement you want. Note that the method Iterator.next returns a Java Object, so it is necessary to cast the Object it returns to a SOAPBodyElement object before assigning it to the variable bodyElement.
SOAPPart sp = response.getSOAPPart();
SOAPEnvelope env = sp.getEnvelope();
SOAPBody sb = env.getBody();
java.util.Iterator it = sb.getChildElements(bodyName);
SOAPBodyElement bodyElement = (SOAPBodyElement)it.next();
String lastPrice = bodyElement.getValue();
System.out.print("The last price for SUNW is ");
System.out.println(lastPrice);
If there were more than one element with the name bodyName, you would have had to use a while loop using the method Iterator.hasNext to make sure that you got all of them.
while (it.hasNext()) {
  SOAPBodyElement bodyElement = (SOAPBodyElement)it.next();
  String lastPrice = bodyElement.getValue();
  System.out.print("The last price for SUNW is ");
  System.out.println(lastPrice);
}
At this point, you have seen how to send a request-response message as a standalone client. You have also seen how to get the content from the response. The next part shows you how to send a message using a messaging provider.
Client with a Messaging Provider
Using a messaging provider gives you more flexibility than a standalone client has because it can take advantage of the additional functionality that a messaging provider can offer.
Getting a ProviderConnection Object
Whereas a SOAPConnection object is a point-to-point connection directly to a particular URL, a ProviderConnection object is a connection to a messaging provider. With this kind of connection, all messages that you send or receive go through the messaging provider.
As with getting a SOAPConnection object, the first step is to get a connection factory, but in this case, it is a ProviderConnectionFactory object. You can obtain a ProviderConnectionFactory object by retrieving it from a naming service. This is possible when your application is using a messaging provider and is deployed in a servlet or J2EE container. With a ProviderConnectionFactory object, you can create a connection to a particular messaging provider and thus be able to use the capabilities of a profile that the messaging provider supports.
To get a ProviderConnectionFactory object, you first supply the logical name of your messaging provider to the container at deployment time. This is the name associated with your messaging provider that has been registered with a naming service based on the Java Naming and Directory Interface (JNDI). You can then do a lookup using this name to obtain a ProviderConnectionFactory object that will create connections to your messaging provider. For example, if the name registered for your messaging provider is "ProviderABC", you can do a lookup on "ProviderABC" to get a ProviderConnectionFactory object and use it to create a connection to your messaging provider. This is what is done in the following code fragment. The first two lines use methods from the JNDI API to retrieve the ProviderConnectionFactory object, and the last line uses a method from the JAXM API to create the connection to the messaging provider. Note that because the JNDI method lookup returns a Java Object, convert it to a ProviderConnectionFactory object before assigning it to the variable pcFactory.
Context ctx = new InitialContext();
ProviderConnectionFactory pcFactory =
    (ProviderConnectionFactory)ctx.lookup("ProviderABC");

ProviderConnection pcCon = pcFactory.createConnection();
You will use pcCon, which represents a connection to your messaging provider, to get information about your messaging provider and to send the message you will create in the next section.
Creating a Message
You create all JAXM messages by getting a MessageFactory object and using it to create the SOAPMessage object. For the standalone client example, you simply used the default MessageFactory object obtained via the method MessageFactory.newInstance. However, when you are using a messaging provider, you obtain the MessageFactory object in a different way.
Getting a MessageFactory
If you are using a messaging provider, you create a MessageFactory object by using the method ProviderConnection.createMessageFactory. In addition, you pass it a String indicating the profile you want to use. To find out which profiles your messaging provider supports, you need to get a ProviderMetaData object with information about your provider. This is done by calling the method getMetaData on the connection to your provider. Then you need to call the method getSupportedProfiles to get an array of the profiles your messaging provider supports. Supposing that you want to use the ebXML profile, you need to see if any of the profiles in the array matches "ebxml". If there is a match, that profile is assigned to the variable profile, which can then be passed to the method createMessageFactory.
ProviderMetaData metaData = pcCon.getMetaData();
String[] supportedProfiles = metaData.getSupportedProfiles();
String profile = null;

for (int i=0; i < supportedProfiles.length; i++) {
  if (supportedProfiles[i].equals("ebxml")) {
    profile = supportedProfiles[i];
    break;
  }
}

MessageFactory factory = pcCon.createMessageFactory(profile);
You can now use factory to create a SOAPMessage object that conforms to the ebXML profile. This example uses the minimal ebXML profile implementation included in the Java WSDP. Note that the following line of code uses the class EbXMLMessageImpl, which is defined in the ebXML profile implementation and is not part of the JAXM API.
EbXMLMessageImpl message = (EbXMLMessageImpl)factory.
                    createMessage();
For this profile, instead of using Endpoint objects, you indicate Party objects for the sender and the receiver. This information will appear in the message's header, and the messaging provider will use it to determine where to send the message. The following lines of code use the methods setSender and setReceiver, which are defined in the EbXMLMessageImpl implementation. These methods not only create a SOAPHeader object but also give it content. You can use these methods because your SOAPMessage object is an EbXMLMessageImpl object, giving you access to the methods defined in EbXMLMessageImpl.
message.setSender(new Party("http://grand.products.com"));
message.setReceiver(new Party("http://whiz.gizmos.com"));
You can view the Javadoc comments for the ebXML and SOAP-RP profile implementations provided in this Java WSDP at the following location:
$JWSDP_HOME/docs/jaxm/profile/com/sun/xml/messaging/
If you are not using a profile or you want to set content for a header not covered by your profile's implementation, you need to follow the steps shown in the next section.
Adding Content to the Header
To add content to the header, you need to create a SOAPHeaderElement object. As with all new elements, it must have an associated Name object, which you create using the message's SOAPEnvelope object.
The following code fragment retrieves the SOAPHeader object from envelope and adds a new SOAPHeaderElement object to it.
SOAPHeader header = envelope.getHeader();
Name headerName = envelope.createName("Purchase Order",
            "PO", "http://www.sonata.com/order");
SOAPHeaderElement headerElement =
            header.addHeaderElement(headerName);
At this point, header contains the SOAPHeaderElement object headerElement identified by the Name object headerName. Note that the addHeaderElement method both creates headerElement and adds it to header.
Now that you have identified headerElement with headerName and added it to header, the next step is to add content to headerElement, which the next line of code does with the method addTextNode.
headerElement.addTextNode("order");
Now you have the SOAPHeader object header that contains a SOAPHeaderElement object whose content is "order".
Adding Content to the SOAP Body
The process for adding content to the SOAPBody object is the same for clients using a messaging provider as it is for standalone clients. This is also the same as the process for adding content to the SOAPHeader object. You access the SOAPBody object, add a SOAPBodyElement object to it, and add text to the SOAPBodyElement object. It is possible to add additional SOAPBodyElement objects, and it is possible to add subelements to the SOAPBodyElement objects with the method addChildElement. For each element or child element, you add content with the method addTextNode.
The section on the standalone client demonstrated adding one SOAPBodyElement object, adding a child element, and giving it some text. The following example shows adding more than one SOAPBodyElement and adding text to each of them.
The code first creates the SOAPBodyElement object purchaseLineItems, which has a fully-qualified namespace associated with it. That is, the Name object for it has a local name, a namespace prefix, and a namespace URI. A SOAPBodyElement object is required to have a fully-qualified namespace, but child elements added to it may have Name objects with only the local name.
SOAPBody body = envelope.getBody();
Name bodyName = envelope.createName("PurchaseLineItems", "PO",
            "http://sonata.fruitsgalore.com");
SOAPBodyElement purchaseLineItems =
              body.addBodyElement(bodyName);

Name childName = envelope.createName("Order");
SOAPElement order =
      purchaseLineItems.addChildElement(childName);

childName = envelope.createName("Product");
SOAPElement product = order.addChildElement(childName);
product.addTextNode("Apple");

childName = envelope.createName("Price");
SOAPElement price = order.addChildElement(childName);
price.addTextNode("1.56");

childName = envelope.createName("Order");
SOAPElement order2 =
      purchaseLineItems.addChildElement(childName);

childName = envelope.createName("Product");
SOAPElement product2 = order2.addChildElement(childName);
product2.addTextNode("Peach");

childName = envelope.createName("Price");
SOAPElement price2 = order2.addChildElement(childName);
price2.addTextNode("1.48");
The JAXM code in the preceding example produces the following XML in the SOAP body:
<PO:PurchaseLineItems
 xmlns:PO="http://www.sonata.fruitsgalore/order">
  <Order>
    <Product>Apple</Product>
    <Price>1.56</Price>
  </Order>

  <Order>
    <Product>Peach</Product>
    <Price>1.48</Price>
  </Order>
</PO:PurchaseLineItems>
Adding Content to the SOAPPart Object
If the content you want to send is in a file, JAXM provides an easy way to add it directly to the SOAPPart object. This means that you do not access the SOAPBody object and build the XML content yourself, as you did in the previous section.
To add a file directly to the SOAPPart object, you use a javax.xml.transform.Source object from JAXP (the Java API for XML Processing). There are three types of Source objects: SAXSource, DOMSource, and StreamSource. A StreamSource object holds content as an XML document. SAXSource and DOMSource objects hold content along with the instructions for transforming the content into an XML document.
The following code fragment uses JAXP API to build a DOMSource object that is passed to the SOAPPart.setContent method. The first two lines of code get a DocumentBuilderFactory object and use it to create the DocumentBuilder object builder. Then builder parses the content file to produce a Document object, which is used to initialize a new DOMSource object.
DocumentBuilderFactory dbFactory = DocumentBuilderFactory.
                    newInstance();
DocumentBuilder builder = dbFactory.newDocumentBuilder();
Document doc = builder.parse("file:///music/order/soap.xml");
DOMSource domSource = new DOMSource(doc);
The following two lines of code access the SOAPPart object (using the SOAPMessage object message) and set the new DOMSource object as its content. The method SOAPPart.setContent not only sets content for the SOAPBody object but also sets the appropriate header for the SOAPHeader object.
SOAPPart soapPart = message.getSOAPPart();
soapPart.setContent(domSource);
You will see other ways to add content to a message in the section on AttachmentPart objects. One big difference to keep in mind is that a SOAPPart object must contain only XML data, whereas an AttachmentPart object may contain any type of content.
Sending the Message
When the connection is a ProviderConnection object, messages have to be sent using the method ProviderConnection.send. This method sends the message passed to it and returns immediately. Unlike the SOAPConnection method call, it does not have to block until it receives a response, which leaves the application free to do other things.
The send method takes only one argument, the message to be sent. It does not need to be given the destination because the messaging provider can use information in the header to figure out where the message needs to go.
pcCon.send(message);
pcCon.close();
Adding Attachments
Adding AttachmentPart objects to a message is the same for all clients, whether they use a messaging provider or not. As noted in earlier sections, you can put any type of content, including XML, in an AttachmentPart object. And because the SOAP part can contain only XML content, use an AttachmentPart object for any content that is not in XML format.
Creating an AttachmentPart Object and Adding Content
The SOAPMessage object creates an AttachmentPart object, and the message also has to add the attachment to itself after content has been added. The SOAPMessage class has three methods for creating an AttachmentPart object.
The first method creates an attachment with no content. In this case, an AttachmentPart method is used later to add content to the attachment.
AttachmentPart attachment = message.createAttachmentPart();
You add content to attachment with the AttachmentPart method setContent. This method takes two parameters, a Java Object for the content, and a String object that gives the content type. Content in the SOAPBody part of a message automatically has a Content-Type header with the value "text/xml" because the content has to be in XML. In contrast, the type of content in an AttachmentPart object has to be specified because it can be any type.
Each AttachmentPart object has one or more headers associated with it. When you specify a type to the method setContent, that type is used for the header Content-Type. Content-Type is the only header that is required. You may set other optional headers, such as Content-Id and Content-Location. For convenience, JAXM provides get and set methods for the headers Content-Type, Content-Id, and Content-Location. These headers can be helpful in accessing a particular attachment when a message has multiple attachments. For example, to access the attachments that have particular headers, you call the SOAPMessage method getAttachments and pass it the header or headers you are interested in.
The following code fragment shows one of the ways to use the method setContent. The Java Object being added is a String, which is plain text, so the second argument has to be "text/plain". The code also sets a content identifier, which can be used to identify this AttachmentPart object. After you have added content to attachment, you need to add attachment to the SOAPMessage object, which is done in the last line.
String stringContent = "Update address for Sunny Skies " +
  "Inc., to 10 Upbeat Street, Pleasant Grove, CA 95439";

attachment.setContent(stringContent, "text/plain");
attachment.setContentId("update_address");

message.addAttachmentPart(attachment);
The variable attachment now represents an AttachmentPart object that contains the String stringContent and has a header that contains the String "text/plain". It also has a Content-Id header with "update_address" as its value. And now attachment is part of message.
Let's say you also want to attach a jpeg image showing how beautiful the new location is. In this case, the second argument passed to setContent must be "image/jpeg" to match the content being added. The code for adding an image might look like the following. For the first attachment, the Object passed to the method setContent was a String. In this case, it is a stream.
AttachmentPart attachment2 = message.createAttachmentPart();

byte[] jpegData = . . .;
ByteArrayInputStream stream = new ByteArrayInputStream(
                jpegData);

attachment2.setContent(stream, "image/jpeg");

message.addAttachmentPart(attachment);
The other two SOAPMessage.createAttachment methods create an AttachmentPart object complete with content. One is very similar to the AttachmentPart.setContent method in that it takes the same parameters and does essentially the same thing. It takes a Java Object containing the content and a String giving the content type. As with AttachmentPart.setContent, the Object may be a String, a stream, a javax.xml.transform.Source object, or a javax.activation.DataHandler object. You have already seen an example of using a Source object as content. The next example will show how to use a DataHandler object for content.
The other method for creating an AttachmentPart object with content takes a DataHandler object, which is part of the JavaBeans Activation Framework (JAF). Using a DataHandler object is fairly straightforward. First you create a java.net.URL object for the file you want to add as content. Then you create a DataHandler object initialized with the URL object and pass it to the method createAttachmentPart.
URL url = new URL("http://greatproducts.com/gizmos/img.jpg");
DataHandler dh = new DataHandler(url);
AttachmentPart attachment = message.createAttachmentPart(dh);
attachment.setContentId("gyro_image");

message.addAttachmentPart(attachment);
You might note two things about the previous code fragment. First, it sets a header for Content-ID with the method setContentId. This method takes a String that can be whatever you like to identify the attachment. Second, unlike the other methods for setting content, this one does not take a String for Content-Type. This method takes care of setting the Content-Type header for you, which is possible because one of the things a DataHandler object does is determine the data type of the file it contains.
Accessing an AttachmentPart Object
If you receive a message with attachments or want to change an attachment to a message you are building, you will need to access the attachment. When it is given no argument, the method SOAPMessage.getAttachments returns a java.util.Iterator object over all the AttachmentPart objects in a message. The following code prints out the content of each AttachmentPart object in the SOAPMessage object message.
java.util.Iterator it = message.getAttachments();
while (it.hasNext()) {
  AttachmentPart attachment = (AttachmentPart)it.next();
  Object content = attachment.getContent();
  String id = attachment.getContentId();
  System.out.print("Attachment " + id + " contains: " +
                        content);
  System.out.println("");
}
Summary
In this section, you have been introduced to the basic JAXM API. You have seen how to create and send SOAP messages as a standalone client and as a client using a messaging provider. You have walked through adding content to a SOAP header and a SOAP body and also walked through creating attachments and giving them content. In addition, you have seen how to retrieve the content from the SOAP part and from attachments. In other words, you have walked through using the basic JAXM API.
SOAP Faults
This section expands on the basic JAXM API by showing you how to use the API for creating and accessing a SOAP Fault element in an XML message.
Overview
If you send a message that was not successful for some reason, you may get back a response containing a SOAP Fault element that gives you status information, error information, or both. There can be only one SOAP Fault element in a message, and it must be an entry in the SOAP Body. The SOAP 1.1 specification defines only one Body entry, which is the SOAP Fault element. Of course, the SOAP Body may contain other Body entries, but the SOAP Fault element is the only one that has been defined.
A SOAPFault object, the representation of a SOAP Fault element in the JAXM API, is similar to an Exception object in that it conveys information about a problem. However, a SOAPFault object is quite different in that it is an element in a message's SOAPBody object rather than part of the try/catch mechanism used for Exception objects. Also, as part of the SOAPBody object, which provides a simple means for sending mandatory information intended for the ultimate recipient, a SOAPFault object only reports status or error information. It does not halt the execution of an application the way an Exception object can.
Various parties may supply a SOAPFault object in a message. If you are a standalone client using the SAAJ API, and thus sending point-to-point messages, the recipient of your message may add a SOAPFault object to the response to alert you to a problem. For example, if you sent an order with an incomplete address for where to send the order, the service receiving the order might put a SOAPFault object in the return message telling you that part of the address was missing.
In another scenario, if you use the JAXM 1.1_01 API in order to use a messaging provider, the messaging provider may be the one to supply a SOAPFault object. For example, if the provider has not been able to deliver a message because a server is unavailable, the provider might send you a message with a SOAPFault object containing that information. In this case, there was nothing wrong with the message itself, so you can try sending it again later without any changes. In the previous example, however, you would need to add the missing information before sending the message again.
A SOAPFault object contains the following elements:
- a fault code -- always requiredThe SOAP 1.1 specification defines a set of fault code values in section 4.4.1, which a developer may extend to cover other problems. The default fault codes defined in the specification relate to the JAXM API as follows:
- VersionMismatch -- the namespace for a SOAPEnvelope object was invalid
- MustUnderstand -- an immediate child element of a SOAPHeader object had its mustUnderstand attribute set to "1", and the processing party did not understand the element or did not obey it
- Client -- the SOAPMessage object was not formed correctly or did not contain the information needed to succeed
- Server -- the SOAPMessage object could not be processed because of a processing error, not because of a problem with the message itself
- a fault string -- always requireda human readable explanation of the fault
- a fault actor -- required if the SOAPHeader object contains one or more actor attributes; optional if no actors are specified, meaning that the only actor is the ultimate destinationThe fault actor, which is specified as a URI, identifies who caused the fault. For an explanation of what an actor is, see the section Intermediate Destinations.
- a Detail object -- required if the fault is an error related to the SOAPBody object If, for example, the fault code is "Client", indicating that the message could not be processed because of a problem in the SOAPBody object, the SOAPFault object must contain a Detail object that gives details about the problem. If a SOAPFault object does not contain a Detail object, it can be assumed that the SOAPBody object was processed successfully.
Creating and Populating a SOAPFault Object
You have already seen how to add content to a SOAPBody object; this section will walk you through adding a SOAPFault object to a SOAPBody object and then adding its constituent parts.
As with adding content, the first step is to access the SOAPBody object.
SOAPEnvelope envelope =
            msg.getSOAPPart().getEnvelope();
SOAPBody body = envelope.getBody();
With the SOAPBody object body in hand, you can use it to create a SOAPFault object with the following line of code.
SOAPFault fault = body.addFault();
The following code uses convenience methods to add elements and their values to the SOAPFault object fault. For example, the method setFaultCode creates an element, adds it to fault, and adds a Text node with the value "Server".
fault.setFaultCode("Server");
fault.setFaultActor("http://gizmos.com/orders");
fault.setFaultString("Server not responding");
The SOAPFault object fault created in the previous lines of code indicates that the cause of the problem is an unavailable server and that the actor at "http://gizmos.com/orders" is having the problem. If the message were being routed only to its ultimate destination, there would have been no need for setting a fault actor. Also note that fault does not have a Detail object because it does not relate to the SOAPBody object.
The following code fragment creates a SOAPFault object that includes a Detail object. Note that a SOAPFault object may have only one Detail object, which is simply a container for DetailEntry objects, but the Detail object may have multiple DetailEntry objects. The Detail object in the following lines of code has two DetailEntry objects added to it.
SOAPFault fault = body.addFault();

fault.setFaultCode("Client");
fault.setFaultString("Message does not have necessary info");

Detail detail = fault.addDetail();

Name entryName = envelope.createName("order", "PO",
                "http://gizmos.com/orders/");
DetailEntry entry = detail.addDetailEntry(entryName);
entry.addTextNode("quantity element does not have a value");

Name entryName2 = envelope.createName("confirmation", "PO",
                  "http://gizmos.com/confirm");
DetailEntry entry2 = detail.addDetailEntry(entryName2);
entry2.addTextNode("Incomplete address: no zip code");
Retrieving Fault Information
Just as the SOAPFault interface provides convenience methods for adding information, it also provides convenience methods for retrieving that information. The following code fragment shows what you might write to retrieve fault information from a message you received. In the code fragment, newmsg is the SOAPMessage object that has been sent to you. Because a SOAPFault object must be part of the SOAPBody object, the first step is to access the SOAPBody object. Then the code tests to see if the SOAPBody object contains a SOAPFault object. If so, the code retrieves the SOAPFault object and uses it to retrieve its contents. The convenience methods getFaultCode, getFaultString, and getFaultActor make retrieving the values very easy.
  SOAPBody body =
          newmsg.getSOAPPart().getEnvelope().getBody();
  if ( body.hasFault() ) {
    SOAPFault newFault = body.getFault();
    String code = newFault.getFaultCode();
    String string = newFault.getFaultString();
    String actor = newFault.getFaultActor();
Next the code prints out the values it just retrieved. Not all messages are required to have a fault actor, so the code tests to see if there is one. Testing whether the variable actor is null works because the method getFaultActor returns null if a fault actor has not been set.
    System.out.println("SOAP fault contains: ");
    System.out.println("    fault code = " + code);
    System.out.println("    fault string = " + string);

    if ( actor != null ) {
      System.out.println("    fault actor = " + actor);
    }
  }
The final task is to retrieve the Detail object and get its DetailEntry objects. The code uses the SOAPFault object newFault to retrieve the Detail object newDetail, and then it uses newDetail to call the method getDetailEntries. This method returns the java.util.Iterator object it, which contains all of the DetailEntry objects in newDetail. Not all SOAPFault objects are required to have a Detail object, so the code tests to see whether newDetail is null. If it is not, the code prints out the values of the DetailEntry object(s) as long as there are any.
  Detail newDetail = newFault.getDetail();
  if ( newDetail != null) {
    Iterator it = newDetail.getDetailEntries();
    while ( it.hasNext() ) {
      DetailEntry entry = (DetailEntry)it.next();
      String value = entry.getValue();
      System.out.println("    Detail entry = " + value);
    }
  }
In summary, you have seen how to add a SOAPFault object and its contents to a message as well as how to retrieve the information in a SOAPFault object. A SOAPFault object, which is optional, is added to the SOAPBody object to convey status or error information. It must always have a fault code and a String explanation of the fault. A SOAPFault object must indicate the actor that is the source of the fault only when there are multiple actors; otherwise, it is optional. Similarly, the SOAPFault object must contain a Detail object with one or more DetailEntry objects only when the contents of the SOAPBody object could not be processed successfully.
Code Examples
The first part of this tutorial used code fragments to walk you through the fundamentals of using the JAXM API. In this section, you will use some of those code fragments to create applications. First, you will see the program Request.java. Then you will see how to create and run the application MyUddiPing.java. Finally, you will see how to create and run SOAPFaultTest.java.
Note: $JWSDP_HOME is the directory where you unpacked the Java Web Services Developer Pack.
Request.java
The class Request.java puts together the code fragments used in the section Client without a Messaging Provider and adds what is needed to make it a complete example of a client sending a request-response message. In addition to putting all the code together, it adds import statements, a main method, and a try/catch block with exception handling. The file Request.java, shown here in its entirety, is a standalone client application that uses the SAAJ API (the javax.xml.soap package). It does not need to use the javax.xml.messaging package because it does not use a messaging provider.
import javax.xml.soap.*;
import java.util.*;
import java.net.URL;

public class Request {
  public static void main(String[] args)  {
    try {
      SOAPConnectionFactory scFactory =
          SOAPConnectionFactory.newInstance();
      SOAPConnection con = scFactory.createConnection();

      MessageFactory factory =
          MessageFactory.newInstance();
      SOAPMessage message = factory.createMessage();

      SOAPPart soapPart = message.getSOAPPart();
      SOAPEnvelope envelope = soapPart.getEnvelope();
      SOAPHeader header = envelope.getHeader();
      SOAPBody body = envelope.getBody();
      header.detachNode();

      Name bodyName = envelope.createName(
              "GetLastTradePrice", "m",
              "http://wombats.ztrade.com");
      SOAPBodyElement gltp =
              body.addBodyElement(bodyName);

      Name name = envelope.createName("symbol");
      SOAPElement symbol = gltp.addChildElement(name);
      symbol.addTextNode("SUNW");

      URL endpoint = new URL
                ("http://wombat.ztrade.com/quotes";
      SOAPMessage response = con.call(message, endpoint);

      con.close();

      SOAPPart sp = response.getSOAPPart();
      SOAPEnvelope se = sp.getEnvelope();
      SOAPBody sb = se.getBody();

      Iterator it = sb.getChildElements(bodyName);
      SOAPBodyElement bodyElement =
              (SOAPBodyElement)it.next();
      String lastPrice = bodyElement.getValue();

      System.out.print("The last price for SUNW is ");
      System.out.println(lastPrice);

    } catch  Exception(ex) {
      ex.printStackTrace();
    }
  }
}
In order for Request.java to be runnable, the second argument supplied to the method call has to be a valid existing URI, which is not true in this case. See the JAXM code in the case study for similar code that you can run (JAXM Client). Also, the application in the next section is one that you can run.
UddiPing.java and MyUddiPing.java
The sample program UddiPing.java is another example of a standalone application. A Universal Description, Discovery and Integration (UDDI) service is a business registry and repository from which you can get information about businesses that have registered themselves with the registry service. For this example, the UddiPing application is not actually accessing a UDDI service registry but rather a test (demo) version. Because of this, the number of businesses you can get information about is limited. Nevertheless, UddiPing demonstrates a request being sent and a response being received. The application prints out the complete message that is returned, that is, the complete XML document as it looks when it comes over the wire. Later in this section you will see how to rewrite UddiPing.java so that in addition to printing out the entire XML document, it also prints out just the text content of the response, making it much easier to see the information you want.
In order to get a better idea of how to run the UddiPing example, take a look at the directory $JWSDP_HOME/samples/jaxm/uddiping. This directory contains the subdirectory src and the files run.sh (or run.bat), uddi.properties, UddiPing.class, and README. The README file tells you what you need to do to run the application, which is explained more fully here.
The README file directs you to modify the file uddi.properties, which contains the URL of the destination (the UDDI test registry) and the proxy host and proxy port of the sender. If you are in the uddiping directory when you call the run.sh (or run.bat) script, the information in uddi.properties should be correct already. If you are outside Sun Microsystem's firewall, however, you need to supply your proxy host and proxy port. If you are not sure what the values for these are, you need to consult your system administrator or other person with that information.
The main job of the run script is to execute UddiPing. Once the file uddi.properties has the correct proxy host and proxy port, you can call the appropriate run script as shown here. Note that supply two arguments, uddi.properties and the name of the business you want to look up.
Unix:
cd $JWSDP_HOME/samples/jaxm/uddiping
run.sh uddi.properties Microsoft
Windows:
cd $JWSDP_HOME\samples\jaxm\uddiping
run.bat uddi.properties Microsoft
What appears on your screen will look something like this:
Received replyfrom:
version="1.0" encoding="UTF-8" ?><Envelope
xmlns="http://schemas.xmlsoap.org/soap/envelope/"><Body><busin
essList generic="1.0" xmlns="urn:uddi-org:api"
operator="www.ibm.com/services/uddi"
truncated="false"><businessInfos><businessInfo
businessKey="D7475060-BF58-11D5-A432-
0004AC49CC1E"><name>Microsoft Corporation</name><description
xml:lang="en">Computer Software and Hardware
Manufacturer</description><serviceInfos></serviceInfos></busin
essInfo></businessInfos></businessList></Body></Envelope>
If the business name you specified is in the test registry, the output is an XML document with the name and description of that business. However, these are embedded in the XML document, which makes them difficult to see. The next section adds code to UddiPing.java that extracts the content so that it is readily visible.
Creating MyUddiPing.java
To make the response to UddiPing.java easier to read, you will create a new file called MyUddiPing.java, which extracts the content and prints it out. You will see how to write the new file later in this section after setting up a new directory with the necessary subdirectories and files.
Setting Up
Because the name of the new file is MyUddiPing.java, create the directory myuddiping under the <JWSDP_HOME>/samples/jaxm directory.
cd $JWSDP_HOME/samples/jaxm
mkdir myuddiping
This new myuddiping directory will be the base directory for all future commands relating to MyUddiPing.java.
In place of the run.sh or run.bat script used for running UddiPing, you will be using an Ant file, build.xml, for setting up directories and files and for running MyUddiPing. The advantage of using an Ant file is that it is cross-platform and can thus be used for both Unix and Windows platforms. Accordingly, you need to copy the build.xml file in the examples/jaxm directory of the tutorial to your new myuddiping directory. (The command for copying should be all on one line. Note that there is no space between "myuddiping/" "and "build", and there is a "." at the end of the command line.)
Unix:
cd myuddiping
cp $JWSDP_HOME/docs/tutorial/examples/jaxm/myuddiping/
                                      build.xml .
Windows:
cd myuddiping
copy $JWSDP_HOME\docs\tutorial\examples\jaxm\myuddiping\
                                      build.xml .
Once you have the file build.xml in your myuddiping directory, you can call it to do the rest of the setup and also to run MyUddiPing. An Ant build file is an XML file that is sectioned into targets, with each target being an element that contains attributes and one or more tasks. For example, the target element whose name attribute is prepare creates the directories build and src and copies the file MyUddiPing.java from the $JWSDP_HOME/docs/tutorial/examples/jaxm/myuddiping/src directory to the new src directory. Then it copies the file uddi.properties from the uddiping directory to the myuddiping directory that you created.
To accomplish these tasks, you type the following at the command line:
ant prepare
The target named build compiles the source file MyUddiPing.java and puts the resulting .class file in the build directory. So to do these tasks, you type the following at the command line:
ant build
Now that you are set up for running MyUddiPing, let's take a closer look at the code.
Examining MyUddiPing
We will go through the file MyUddiPing.java a few lines at a time. Note that most of the class MyUddiPing.java is based on UddiPing.java. We will be adding a section at the end of MyUddiPing.java that accesses only the content you want from the response that is returned by the method call.
The first four lines of code import the packages used in the application.
import javax.xml.soap.*;
import javax.xml.messaging.*;
import java.util.*;
import java.io.*;
The next few lines begin the definition of the class MyUddiPing, which starts with the definition of its main method. The first thing it does is check to see if two arguments were supplied. If not, it prints a usage message and exits.
public class MyUddiPing {
  public static void main(String[] args) {
    try {
      if (args.length != 2) {
        System.err.println("Usage: MyUddiPing " +
          "properties-file business-name");
        System.exit(1);
      }
The following lines create a java.util.Properties file that contains the system properties and the properties from the file uddi.properties that is in the myuddiping directory.
      Properties myprops = new Properties();
      myprops.load(new FileInputStream(args[0]));
      Properties props = System.getProperties();
      Enumeration it = myprops.propertyNames();
      while (it.hasMoreElements()) {
        String s = (String) it.nextElement();
        props.put(s, myprops.getProperty(s));
      }
The next four lines create a SOAPMessage object. First, the code gets an instance of SOAPConnectionFactory and uses it to create a connection. Then it gets an instance of MessageFactory and uses it to create a message.
      SOAPConnectionFactory scf =
          SOAPConnectionFactory.newInstance();
      SOAPConnection connection =
          scf.createConnection();
      MessageFactory msgFactory =
          MessageFactory.newInstance();
      SOAPMessage msg = msgFactory.createMessage();
The new SOAPMessage object msg automatically contains a SOAPPart object that contains a SOAPEnvelope object. The SOAPEnvelope object contains a SOAPBody object, which is the element you want to access in order to add content to it. The next lines of code get the SOAPPart object, the SOAPEnvelope object, and the SOAPBody object.
      SOAPEnvelope envelope =
            msg.getSOAPPart().getEnvelope();
      SOAPBody body = envelope.getBody();
The following lines of code add an element with a fully-qualified name and then add two attributes to the new element. The first attribute has the name "generic" and the value "1.0". The second attribute has the name "maxRows" and the value "100". Then the code adds a child element with the name name and adds some text to it with the method addTextNode. The text added is the business name you will supply when you run the application.
      SOAPBodyElement findBusiness =
          body.addBodyElement(
          envelope.createName("find_business",
          "", "urn:uddi-org:api"));
      findBusiness.addAttribute(
          envelope.createName("generic", "1.0");
      findBusiness.addAttribute(
          envelope.createName("maxRows", "100");
      SOAPElement businessName =
          findBusiness.addChildElement(
          envelope.createName("name"));
      businessName.addTextNode(args[1]);
The next line of code creates the Java Object that represents the destination for this message. It gets the value of the property named "URL" from the system property file.
      Object endpoint =
        System.getProperties().getProperty("URL");
The following line of code saves the changes that have been made to the message. This method will be called automatically when the message is sent, but it does not hurt to call it explicitly.
msg.saveChanges();
Next the message msg is sent to the destination that endpoint represents, which is the test UDDI registry. The method call will block until it gets a SOAPMessage object back, at which point it returns the reply.
SOAPMessage reply = connection.call(msg, endpoint);
In the next two lines, the first prints out a line giving the URL of the sender (the test registry), and the second prints out the returned message as an XML document.
      System.out.println("Received reply from: " +  endpoint);
      reply.writeTo(System.out);
The code thus far has been based on UddiPing.java. The next section adds code to create MyUddiPing.java.
Adding New Code
The code we are going to add to UddiPing will make the reply more user-friendly. It will get the content from certain elements rather than printing out the whole XML document as it was sent over the wire. Because the content is in the SOAPBody object, the first thing you need to do is access it, as shown in the following line of code. You can access each element in separate method calls, as was done in earlier examples, or you can access the SOAPBody object using this shorthand version.
SOAPBody replyBody =
    reply.getSOAPPart().getEnvelope().getBody();
Next you might print out two blank lines to separate your results from the raw XML message and a third line that describes the text that follows.
      System.out.println("");
      System.out.println("");
      System.out.print(
       "Content extracted from the reply message: ");
Now you can begin the process of getting all of the child elements from an element, getting the child elements from each of those, and so on, until you arrive at a text element that you can print out. Unfortunately, the registry used for this example code, being just a test registry, is not always consistent. The number of subelements sometimes varies, making it difficult to know how many levels down the code needs to go. And in some cases, there are multiple entries for the same company name. Note that by contrast, the entries in a standard valid registry will be consistent.
The code you will be adding drills down through the subelements within the SOAP body and retrieves the name and description of the business. The method you use to retrieve child elements is the SOAPElement method getChildElements. When you give this method no arguments, it retrieves all of the child elements of the element on which it is called. If you know the Name object used to name an element, you can supply that to getChildElements and retrieve only the children with that name. In this example, however, you need to retrieve all elements and keep drilling down until you get to the elements that contain text content.
Here is the basic pattern that is repeated for drilling down:
      Iterator iter1 = replyBody.getChildElements();
      while (iter1.hasNext()) {
        SOAPBodyElement bodyElement =
            (SOAPBodyElement)iter1.next();
        Iterator iter2 =
            bodyElement.getChildElements();
        while (iter2.hasNext()) {
The method getChildElements returns the elements in the form of a java.util.Iterator object. You access the child elements by calling the method next on the Iterator object. The method Iterator.hasNext can be used in a while loop because it returns true as long as the next call to the method next will return a child element. The loop ends when there are no more child elements to retrieve.
An immediate child of a SOAPBody object is a SOAPBodyElement object, which is why calling iter1.next returns a SOAPBodyElement object. Children of SOAPBodyElement objects and all child elements from there down are SOAPElement objects. For example, the call iter2.next returns the SOAPElement object child2. Note that the method Iterator.next returns an Object, which has to be narrowed (cast) to the specific kind of object you are retrieving. Thus, the result of calling iter1.next is cast to a SOAPBodyElement object, whereas the results of calling iter2.next, iter3.next, and so on, are all cast to a SOAPElement object.
Here is the code you add to access and print out the business name and description:
      Iterator iter1 = replyBody.getChildElements();
      while (iter1.hasNext()) {
        SOAPBodyElement bodyElement =
            (SOAPBodyElement)iter1.next();
        Iterator iter2 =
            bodyElement.getChildElements();
        while (iter2.hasNext()) {
          SOAPElement child2 =
            (SOAPElement)iter2.next();
          Iterator iter3 =
            child2.getChildElements();
          String content = child2.getValue();
          System.out.println(content);
          while (iter3.hasNext()) {
            SOAPElement child3 =
              (SOAPElement)iter3.next();
            Iterator iter4 =
                child3.getChildElements();
            content = child3.getValue();
            System.out.println(content);
            while (iter4.hasNext()) {
              SOAPElement child4 =
                (SOAPElement)iter4.next();
              content = child4.getValue();
              System.out.println(content);
            }
          }
        }
      }
      connection.close();
    } catch  Exception(ex) {
      ex.printStackTrace();
    }
  }
}
You have already compiled MyUddiPing.java by calling the following at the command line:
ant build
With the code compiled, you are ready to run MyUddiPing. The following command will call java on the .class file for MyUddiPing, which takes two arguments. The first argument is the file uddi.properties, which is supplied by a property set in build.xml. The second argument is the name of the business for which you want to get a description, and you need to supply this argument on the command line. Note that any property set on the command line overrides the value set for that property in the build.xml file. The last argument supplied to Ant is always the target, which in this case is run.
cd $JWSDP_HOME/samples/jaxm/myuddiping
ant -Dbusiness-name="Oracle" run
Here is the output that will appear after the full XML message. It is produced by the code added in MyUddiPing.java.
Content extracted from the reply message:

Oracle
oracle powers the internet

Oracle Corporation
Oracle Corporation provides the software and services for e-
business.
Running Ant with Microsoft as the business-name property instead of Oracle produces the following output:
Received reply from: http://www-
3.ibm.com/services/uddi/testregistry/inquiryapi
<?xml version="1.0" encoding="UTF-8" ?><Envelope
xmlns="http://schemas.xmlsoap.org/soap/envelope/"><Body><busin
essList generic="1.0" xmlns="urn:uddi-org:api"
operator="www.ibm.com/services/uddi"
truncated="false"><businessInfos><businessInfo
businessKey="D7475060-BF58-11D5-A432-
0004AC49CC1E"><name>Microsoft Corporation</name><description
xml:lang="en">Computer Software and Hardware
Manufacturer</description><serviceInfos></serviceInfos></busin
essInfo></businessInfos></businessList></Body></Envelope>

Content extracted from the reply message:

Microsoft Corporation
Computer Software and Hardware Manufacturer
SOAPFaultTest.java
The code SOAPFaultTest.java, based on the code fragments in a preceding section (SOAP Faults) creates a message with a SOAPFault object. It then retrieves the contents of the SOAPFault object and prints them out. You will find the code for SOAPFaultTest in the following directory:
$JWSDP_HOME/docs/tutorial/examples/jaxm/fault/src
Here is the file SOAPFaultTest.java.
import javax.xml.soap.*;
import java.util.*;

public class SOAPFaultTest {

  public static void main(String[] args) {
    try {
       MessageFactory msgFactory =
                        MessageFactory.newInstance();
      SOAPMessage msg = msgFactory.createMessage();
      SOAPEnvelope envelope =
                      msg.getSOAPPart().getEnvelope();
      SOAPBody body = envelope.getBody();
      SOAPFault fault = body.addFault();

      fault.setFaultCode("Client");
      fault.setFaultString(
              "Message does not have necessary info");
      fault.setFaultActor("http://gizmos.com/order");

      Detail detail = fault.addDetail();

      Name entryName = envelope.createName("order", "PO",
                     "http://gizmos.com/orders/");
      DetailEntry entry = detail.addDetailEntry(entryName);
      entry.addTextNode(
          "quantity element does not have a value");

      Name entryName2 = envelope.createName("confirmation",
                "PO",   "http://gizmos.com/confirm");
      DetailEntry entry2 = detail.addDetailEntry(entryName2);
      entry2.addTextNode("Incomplete address: no zip code");

      msg.saveChanges();

      // Now retrieve the SOAPFault object and its contents
      //after checking to see that there is one

      if ( body.hasFault() ) {
        fault = body.getFault();
        String code = fault.getFaultCode();
        String string = fault.getFaultString();
        String actor = fault.getFaultActor();

        System.out.println("SOAP fault contains: ");
        System.out.println("    fault code = " + code);
        System.out.println("    fault string = " + string);
        if ( actor != null) {
          System.out.println("    fault actor = " + actor);
        }

      detail = fault.getDetail();
      if ( detail != null) {
        Iterator it = detail.getDetailEntries();
        while ( it.hasNext() ) {
          entry = (DetailEntry)it.next();
          String value = entry.getValue();
          System.out.println("    Detail entry = " + value);
        }
      }
    } catch  Exception(ex) {
      ex.printStackTrace();
    }
  }
}
Running SOAPFaultTest
To run SOAPFaultTest, you use the Ant file build.xml that is in the directory $JWSDP_HOME/docs/tutorial/examples/jaxm/fault.
This Ant file does many things for you, including creating a build directory where class files will go, creating the classpath needed to run SOAPFaultTest, compiling SOAPFaulTest.java, putting the resulting .class file in the build directory, and running SOAPFaultTest.
To run SOAPFaultTest, do the following:
- Go to the directory where the appropriate build.xml file is located.
cd $JWSDP_HOME/docs/tutorial/examples/jaxm/fault
- At the command line, type the following:
ant prepare
- This will create the build directory, the directory where class files will be put.
- At the command line, type
ant build
- This will run javac on SOAPFaultTest.java using the classpath that has been set up in the build.xml file. The resulting .class file will be put in the build directory created by the prepare target.
- At the command line, type
ant run
- This will execute the command java SOAPFaultTest.
Note that as a shortcut, you can simply type ant run. The necessary targets will be executed in the proper order because if a target indicates that it depends on one or more other targets, those will be executed before the specified target is executed. In this case, the run target depends on the build target, which in turn depends on the prepare target, so the prepare, build, and run targets will be executed in that order. As an even faster shortcut, you can type just ant. The default target for this build.xml file is run, so it has the same effect as typing ant run.
If you want to run SOAPFaultTest again, it is a good idea to start over by deleting the build directory and the .class file it contains. You can do this by typing the following at the command line:
ant clean
After running SOAPFaultTest, you will see something like this:
Here is what the XML message looks like:

<?xml version="1.0" encoding="UTF-8"?>
<soap-env:Envelope xmlns:soap-env="http://schemas.xmlsoap.org/
soap/envelope/"><soap-env:Header/><soap-env:Body><soap-env:
Fault><soap-env:faultcode>Client</soap-env:faultcode><soap-
env:faultstring>Message does not have necessary info</soap-
env:faultstring><soap-env:faultactor>http://gizmos.com/order
</soap-env:faultactor><soap-env:Detail><PO:order xmlns:PO=
"http://gizmos.com/orders/">quantity element does not have a
value</PO:order><PO:confirmation xmlns:PO="http://gizmos.com/
confirm">Incomplete address: no zip code</PO:confirmation>
</soap-env:Detail></soap-env:Fault></soap-env:Body></soap-env:
Envelope>

Here is what the SOAP fault contains:
  fault code = Client
  fault string = Message does not have necessary info
  fault actor = http://gizmos.com/order
  Detail entry = quantity element does not have a value
  Detail entry = Incomplete address: no zip code
Conclusion
JAXM provides a Java API that simplifies writing and sending XML messages. You have seen how to use this API to write client code for JAXM request-response messages and one-way messages. You have also seen how to get the content from a reply message. This knowledge was applied in writing and running the MyUddiPing and SOAPFaultTest examples. In addition, the case study (The Coffee Break Application) provides detailed examples of JAXM code for both the client and server.
You now have first-hand experience of how JAXM makes it easier to do XML messaging.
Further Information
You can find additional information about JAXM from the following:
- Documents bundled with the JAXM Reference Implementation at $JWSDP_HOME/docs/jaxm/
- SAAJ 1.1 specification, available fromhttp://java.sun.com/xml/downloads/saaj.html
- JAXM 1.1 specification, available fromhttp://java.sun.com/xml/downloads/jaxm.html
- JAXM website at http://java.sun.com/xml/jaxm/
- JAXM sample applications (see Running the Samples)