Create and run performance tests
IBM Rational Performance Tester v7.x
- Install Rational Performance Tester
- Install Rational Agent Controller
- Create and run a performance test
- Create a test project to store the performance tests
- Create a new test to record the test scenario
- Record the test scenario against DayTrader
- Create a data pool to replace the user ID and password value in the test
- Reference DayTraderTest to use the data pool value
- Associate the user ID (uid) and password values with the data pool column
- Create performance schedules
- Configure the response time breakdown in the schedule for data collection
- Add DayTraderTest to DayTraderSchedule
- Run the DayTrader test and review the reports
- Optional: Deploy the DayTrader sample application
Install Rational Performance Tester
These steps will guide you through the installation:
- Extract these files into a temporary directory...
- RPT_V7.0_Part_1.zip
- RPT_V7.0_Part_2.zip
- RPT_V7.0_Part_3.zip
When you are finished, we will find three extracted folders:
- disk1
- disk2
- disk3
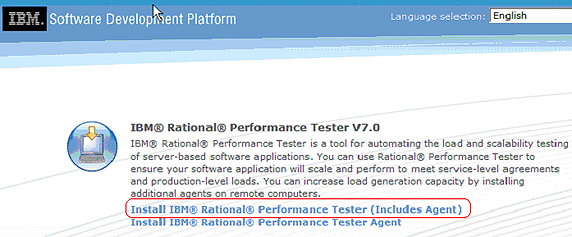
- In the disk1 folder, click the launchpad.exe file to start the installation.
- Select Install IBM Rational Performance Tester (Includes Agent)
- Accept the agreement when you are prompted, and click Next. The IBM Installation Manager will be installed first. Accept the default location for it, and click Next.
- Click Install to install the IBM Installation Manager, and click Finish when the installation is complete.
- The next screen will display the Rational Performance Tester packages to be installed. Make sure that IBM Rational Performance Tester Version 7.0.0
is selected and then click Next again.

- Accept the license agreement again to install Rational Performance Tester, and click Next.
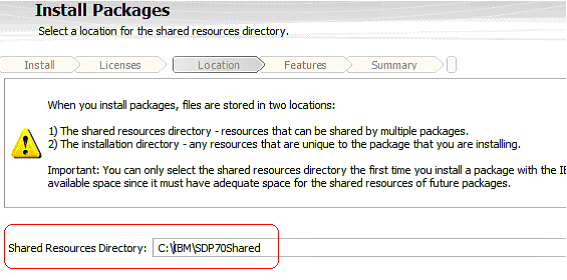
- On the screen that says Select a location for the shared resource directory, either enter a new location or accept the default location, and
then click Next
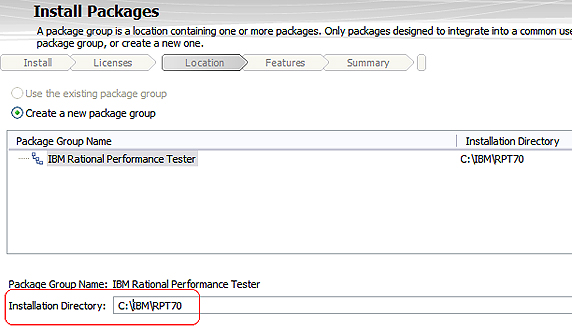
- On the next screen, ensure that Check a new package group is selected, and either enter a new location for the installation or accept the default
location to install Rational Performance Tester. Click Next.
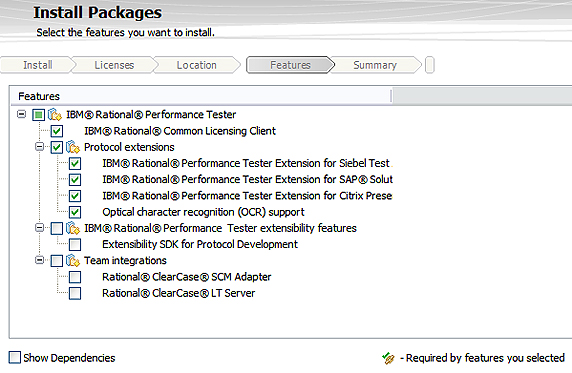
- Click Next twice until you see the screen that says Select the Features you want to install. Accept the default, and click Next.
Install Rational Agent Controller
- Keep clicking Next until you see the screen titled Configure the IBM Rational Agent Controller installation (IBM® Rational® Agent Controller is installed with Rational Performance Tester).
- Select Typical installation and click Next.
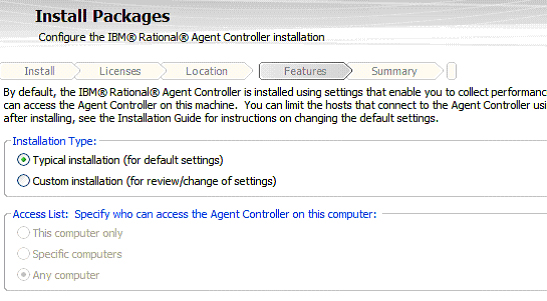
- On the Summary Information screen, click Install

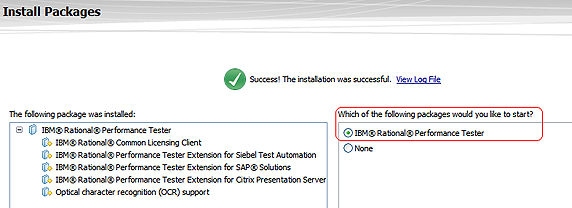
- When the installation completes successfully, we will see the screen below. Select IBM Rational Performance Tester and click Finish. This will start Rational Performance Tester.
Create and run a performance test
To create a performance test to run a against an application, we use Rational Performance Tester to record a sequence of interactions with the Web-based application. This sequence is called a test scenario. We need to plan the test scenarios before you start recording. In this article, The test scenario example in this article requires the user to log into the DayTrader application, buy and sell stock, and then log out of the application.
Before recording a performance test, we also need to create the performance test project that contains the tests. Rational Performance Tester then opens a browser for us to record the test scenarios and generates the test. We can edit the generated test to add...
- verification points
- data pools
- custom code
- other variables
In this example, we will add a data pool that stores multiple data for the same value. After the data pool is associated with the test, it will replace the value in the test with the data from the data pool when executing, thus simulating different user request to the server.
To run the completed test, we need to create a schedule and a user group for the test. A schedule contains one or many user groups. Recorded tests are added to the user groups. Using schedules and user groups enables control over how the tests run. For example, a test can run...
- Run sequentially, randomly, weighted order, at a set interval
- Repeatedly for a set number of times
- Run remotely
- Emulate workload
This example uses the response time breakdown option, which is selected under the schedule, to collect statistics on a captured page element when the test runs. Response time breakdown shows how much time was spent on each page that was captured in the test. To collect the breakdown of response times, DCI monitoring must to be running.
The steps that follow will guide us from creating to running the test and generating the reports for analysis. To get started:
- First, start IBM WebSphere Application Server Community Edition, which will start the DayTrader application:
-
Start | All Programs | IBM WebSphere | Application Server Community Edition | Start the server
- Start Rational Performance Tester, and click OK in the default workspace location to store the test projects.

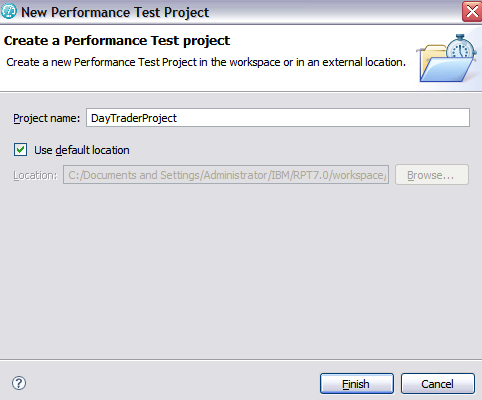
Create a test project to store the performance tests
- In the Test Navigator, right-click to display the menu.
- Select New | Performance Test Project. The New Performance Test Project window will open.

- Enter the Project Name as DayTraderProject, and check Use default location
- Click Finish to create the project.
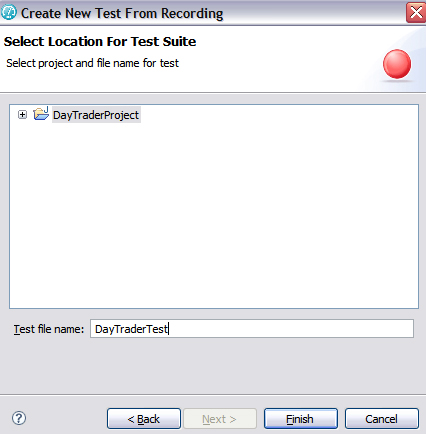
Create a new test to record the test scenario
- After the project is created, the Create New Test from Recording window will open

- Check Create Test from New Recording and select HTTP Recording. Click Next.
- For Select Location for Test Suite, select the DayTraderProject. In the Test file name field, enter DayTraderTest
- Click Finish to start initializing the recorder.
Record the test scenario against DayTrader
- The Rational Performance Tester recorder will open a new browser after it is initialized.
- In the browser, enter this DayTrader URL to bring up the application
-
http://IIC02:8080/daytrader/app
- Record the following test scenario:
- Click the Trading & Portfolios tab.
- Log in, using the default user name and password

- Click the Trading & Portfolios tab.
- When the DayTrader home page is displayed, click the Quotes/Trade link at the top to open the Quotes page

- Click the Buy button in the first row of the Quote table to purchase 100 shares. The confirmation screen will confirm
your purchase.

- Click the Portfolio link at the top to open up the user Portfolio page.
- Verify that the purchase is reflected in the Portfolio. On the same page, notice the number of holdings listed.
- Next, click the Sell link in the first row of the Portfolio table to sell the shares. The confirmation screen will be displayed
to confirm the selling.

- Click the Portfolio link again to see that the number of holdings reflects the sale.
- Click Logoff and then close the browser.
The control will return to Rational Performance Tester to process the recording and display the test content.
Create a data pool to replace the user ID and password value in the test
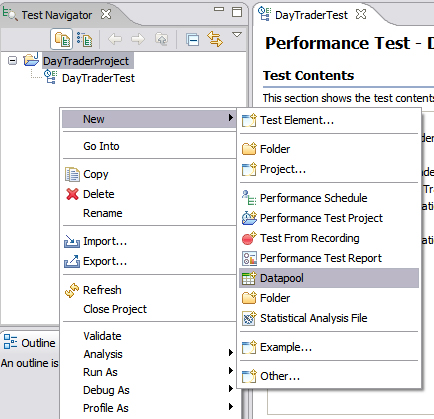
- In the Test Navigator, right-click to display the menu.
- Select...
-
New | Datapool
The New Datapool window will open.
- In the Enter or select the parent folder field, enter DayTraderProject. In the Name field, enter DayTraderDatapool.
- Click Next.

- For Description, enter Datapool for the login ID, and for Initial Table Dimension, enter 2 column.
- Click Finish.
- Next, click the Variable1 column, and the Edit Variable window will open.
- Name the column LoginID and, for Type, enter String. Then click OK.
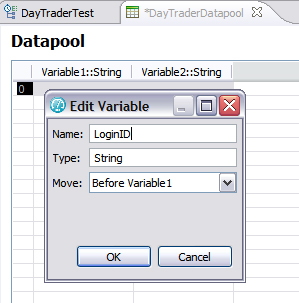
- Perform the same step as above for Variable2. Name the column Password and specify the Type as String.

The data pool will contain five different user login IDs, numbered uid:0 through uid:4, as Table 1 shows.
User ID Password uid:0 xxx uid:1 xxx uid:2 xxx uid:3 xxx uid:4 xxx To add a line for the next record, press Enter or right-click on the last record and select Add Record.
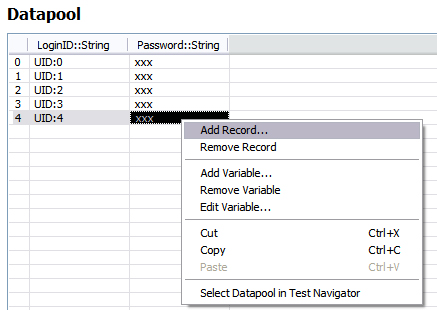
Use CRTL-S to save the data pool.
Reference DayTraderTest to use the data pool value
- In the Test Navigator, click DayTraderTest to open the property page.
- Right-click DayTraderTest and select Add > Datapool.
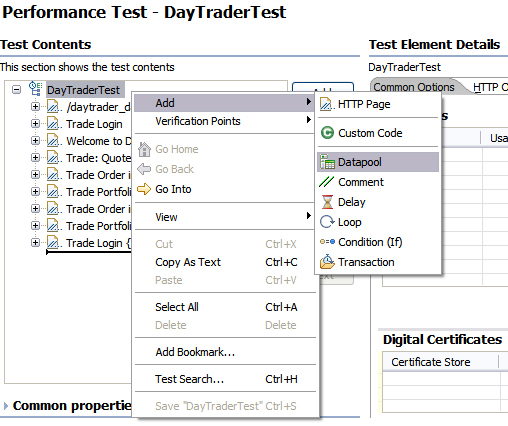
- When the Import Datapool window opens, select the following:
- Matching resources: DayTraderDatapool.datapool.
- Open mode: Shared (per machine)
- Wrap when the last row is reached: checked

- Click Select to accept the DayTraderDatapool.data pool for the DayTraderTest. The Test Element Details will be updated with the data pool information.

Figure 25 - To save the changes, use CTRL+S.
Associate the user ID (uid) and password values with the data pool column
- In the Test Navigator, click DayTraderTest to open the property page.
- Expand the Welcome to DayTrader page, and then select iic02:8080/daytrader/app.
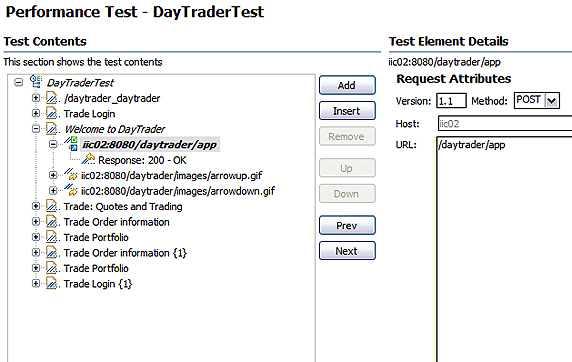
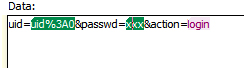
- Scroll down the Test Element Details screen until you see uid and passwd in the Data section
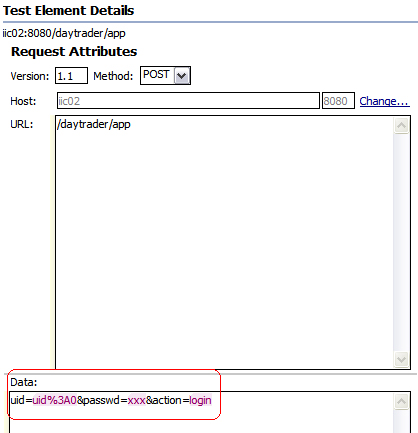
- Click the uid value, so the menu will display, and select Substitute From > Datapool Variable.

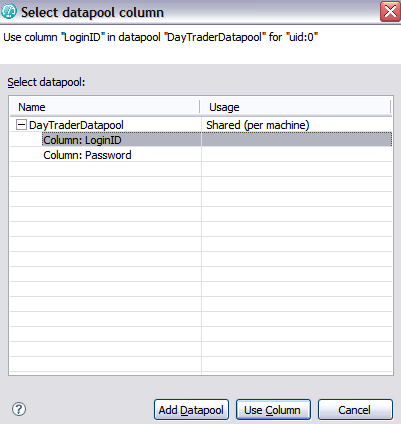
- The Select datapool column window will open. Select Column:LoginID, and then click the Use Column button at the bottom
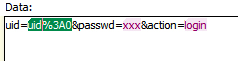
The uid value will be highlighted in green to indicate the association
- Repeating the steps before and after Figure 25 to associate the password value with the password column from the data pool. The
password will be highlighted in green after the association, as below
shows.
- After completing the association, click the Welcome to DayTrader page again. Note that the Test Data table now contains the association
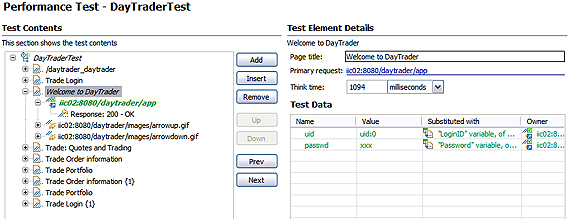
- To save the changes, use CTRL+S.
Create performance schedules
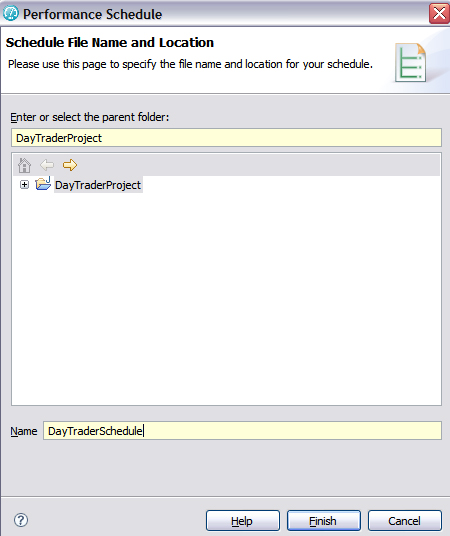
- In the Test Navigator, right-click DayTraderProject to display the menu, and then select New > Performance Schedule

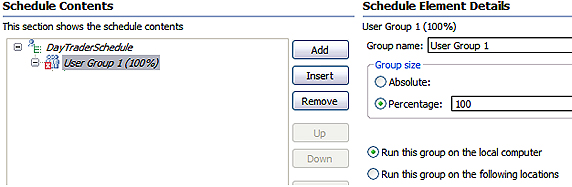
- The Performance Schedule window will open. Enter DayTraderSchedule as the name for the schedule.
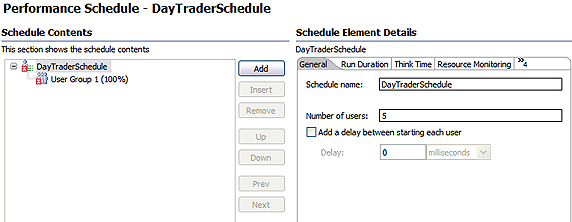
In the Performance Schedule property window, under Schedule Contents, notice the DayTraderSchedule with one user group. In the Schedule Element Details, the General tab displays the Number of users as 5 by default. This is the maximum number of virtual users that you can run on the Rational Performance Tester evaluation copy.
Configure the response time breakdown in the schedule for data collection
- In Schedule Element Details, click on the >> (double greater-than signs) to show more tabs.
- Click the Response Time Breakdown tab.
- Select Enable collection of response time data.
- Select DayTraderTest to perform the collection.
- Under Options, select High as the Detail level.
- The select Only sample information from a subset of users.
- Select Fixed number of users, and enter 2 for per User Group.

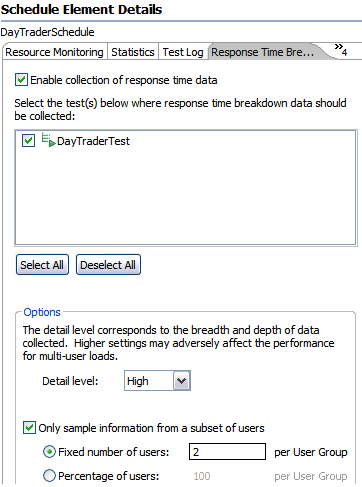
- Be sure to save the changes (CTRL+S).
The default, User Group 1, will be used to add the test. The default user group size is 100% running on the local computer. In the second section of this article (Part 3), there will be steps to add more user groups as the user load test increases.
Add DayTraderTest to DayTraderSchedule
- In the Performance Schedule property window, right-click on User Group 1, and select Add > Test
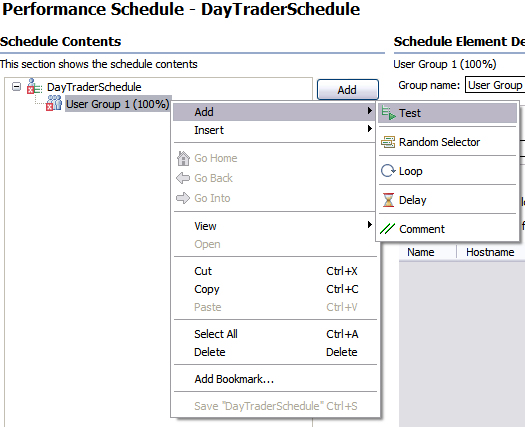
- In the Select Performance Tests window, expand the DayTraderProject and select DayTraderTest
- Click OK.

The test is added to the schedule under User Group 1

- Use CTRL+S again to save the changes.
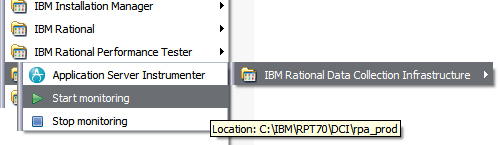
Run the DayTrader test and review the reports
- First, start DCI (data-conversion interface) monitoring. In Windows: IBM Software Delivery Platform > IBM Rational Data
Collection Infrastructure > Start Monitoring.
- In the Test Navigator, right-click DayTraderSchedule to display the menu.
- Select Run As > Performance Schedule

Rational Performance Tester will launch the schedule, collect the data, and display the results in reports when the collection is finished.
- Scroll through the different tabs to view the reports.

When you have the completed performance report, you can export a copy in HTML, XML, or CVS formats for further analysis, printing, display in the browser, or simply to share the report by e-mailing it to someone. Follow these steps to export the report to HTML:
- In the Performance Test Runs view, right-click the report that you want to export.
- Select Export To HTML from the menu
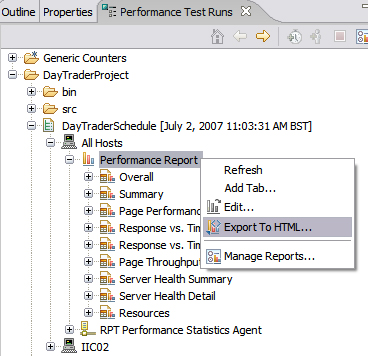
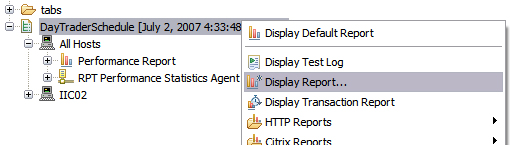
If you cannot see the report, right-click DayTraderSchedule and select Display Report from the menu
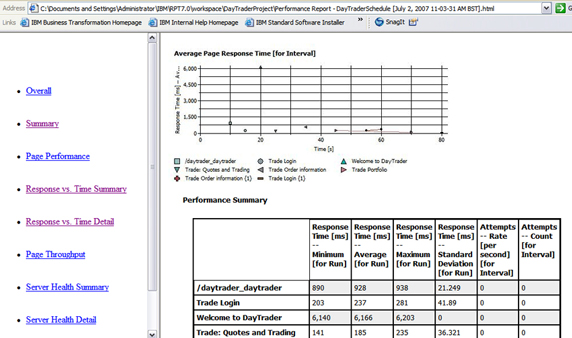
- Provide the location and file name for the report, and then click Finish

- Open the exported report and review it on your Web browser
Optional: Deploy the DayTrader sample application
- Download IBM WebSphere Application Server Community Edition V1.1.0.2, and install it on the same machine where Rational Performance Tester is installed.
- Download IBM DB2 Express-C 9 (see Resources), and install it on the same machine where Rational Performance Tester is installed.
- Download the DayTrader.zip file from the Downloads section, and unzip it to your C:\ directory.
- Next, set up the database:
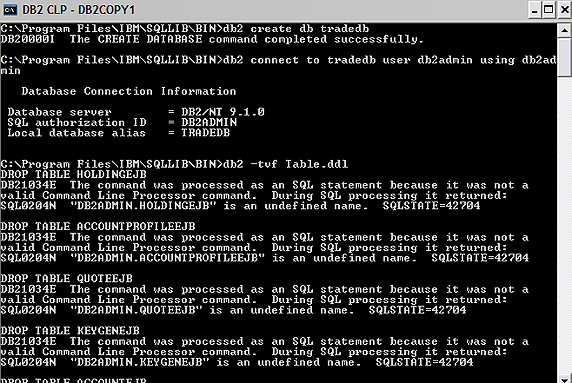
- In a DB2 command window, create a database called tradedb:
- db2 create db tradedb
- Issue a connect to tradedb using db2admin:
- db2 connect to tradedb user <db2admin> using <password>
- Load the database schema for tradedb:
- db2 â8;“tvf C:\daytrader\modules\db2\sql\Table.ddl
Deploy the DayTrader application into WebSphere Application Server by following these steps:
- In a DB2 command window, create a database called tradedb:
- Edit the C:\daytrader\plans\dayTrader-db2-9.1-XA-plan.xml file:
- Modify the User, Password, DatabaseName and ServerName properties for TradeDataSource.
- Look for these values in (shown in {brackets] in Listing 1), and change
then to the correct information:
- {db2admin}
- {db2admin_passwd}
- {iic02.iicmy.ibm.com}
- {tradedb}
Listing 1. Code in the XML file<name>jdbc/TradeDataSource</name> <config-property-setting name="User">{db2admin}</config-property-setting> <config-property-setting name="Password">{db2admin_passwd}</config-property-setting> <config-property-setting name="PortNumber">50000</config-property-setting> <config-property-setting name="ServerName">{iic02.iicmy.ibm.com}</config-property-setting> <config-property-setting name="DatabaseName">{tradedb}</config-property-setting> <config-property-setting name="DriverType">4</config-property-setting> - Save the changes to the dayTrader-db2-9.1-XA-plan.xml file.
- Start WebSphere Application Server Community Edition by clicking...
-
Start | IBM WebSphere|; Application Server community Edition|; Start the server
- Open the Windows command line, and change the directory to %WASCE_HOME%\bin.
- Use this command to deploy the daytrader.ear file:
deploy.bat deploy C:\daytrader\modules\ear\target\daytrader-ear-1.1.1.ear c:\daytrader\plans\ dayTrader-db2-9.1-XA-plan.xml - When prompted for the user name and password during deployment, enter system for username and manager as the password.

- When deployment completes, restart WebSphere:
-
Start | IBM WebSphere | Application Server community Edition | Stop the server
Start | IBM WebSphere | Application Server community Edition | Start the server
- Configure DayTrader before starting to use it:
- In a Web browser, open this URL: http://iic02:8080/daytrader/
- Click the Configuration tab, and then click (Re)-populate
DayTraderDatabase.

- A new browser will open to perform the population action. Wait until it completes before closing the browser.
- Notice the user IDs populated. You will use this to log in to the DayTrader application. The password for all user IDs password is xxx
