Advanced options for debugging Java beans
During normal development you should not need to be concerned with the VM that is used by each visual editor instance. Advanced users, however, can configure the workbench so that any messages sent to System.out or System.err of the VM are written to the .log file in the .metadata directory in your workspace.
The virtual machine (VM) that is used to execute the Java beans is not the same VM that the workbench is running within. A separate VM is created for each instance of the visual editor. The class path of this VM is set to be the entries in the Java build path for the project. If while the visual editor is open the Java build path is changed any open editors must be closed and re-opened to reflect the updated build path.
When the workbench is started it can be given a -DEBUG option that points to a text file:
-DEBUG file:/c:/temp/options.txt
The debug file contains entries that are read by the visual editor. If the file contains the following line then any messages sent to System.out or System.err are shown in the console:
org.eclipse.jem.proxy/debug/vmtraceout=true
In addition to having console output shown from the VM used by the visual editor you can start it in debug mode and perform remote debugging. This scenario is not optimized and may change in future versions of the visual editor. However, it is documented in case you need to perform debugging of your Java beans at design time. To perform remote debugging you will need two workbenchs running: one with the Java beans that you want to debug, and one that can perform socket based remote debugging. The second workbench could be running on the same machine or a different machine. To enable debugging of the visual editor's VM, the -DEBUG file should contain the line:
org.eclipse.jem.proxy/debug/debugvm=true
Each time the visual editor starts a VM it will ask you whether you want it to be started in debug mode or not. This message is either written to a dialog, or if the -DEBUG file contains the entry org.eclipse.jem.proxy/debug/ioconsole=true it will be written System.out.
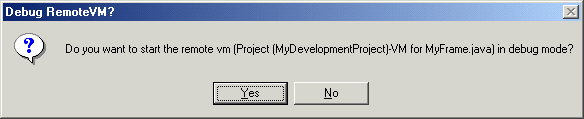
If the message is written to System.out then it will ask you for input of Y or N and wait on System.in:
Do you want to start the remote vm (Project (Test)-VM for HelloFrame.java) in debug mode? (Enter Y or N):
The previous dialog is for when the class HelloFrame.java in the project Test is opened with the visual editor . If you select Yes, or enter Y and press Enter in the console, then the VM is started in suspend mode with the -Xdebug using a socket connector. A free port is allocated. Then, you are told its number.

If the message is written to System.out then it will wait for input on System.in.
You must now attach the debugger to port number 7078. Enter 'y' when the debugger is attached. The program will not continue properly without the debugger being attached. Press 'n' if you could not connect the debugger. This will still cause an error, but it will clean up better. Enter 'y' or 'n':
The next step is to attach a remote debugger to port number 7078. The instance of the workbench that is running the visual editor is suspended while the remote debugger attaches, so use a debugger from another application. If the other application is another instance of the workbench, you can begin remote debugging by using the menu option Debug > Debug and creating a new Remote Java Application configuration.
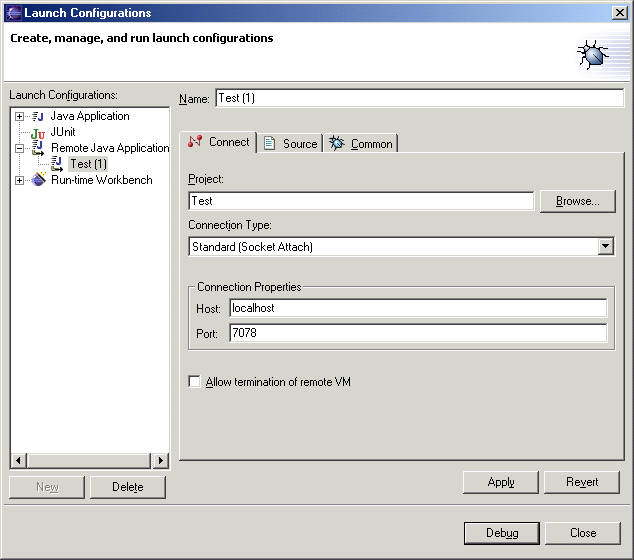
Enter the port number that was previously written to stdout, in this case 7078. If the debugger is on a different machine, in the Host field you should enter the IP address of the machine running the workbench that is being debugged. To begin the remote debugger, click Debug and then enter y in the stdin console of the workbench being debugged.
In addition to being prompted to debug the VM used by each instance of the visual editor , you will see messages that prompt you to debug the project itself:
Do you want to start the remote vm (Project (Test)-Beaninfo) in debug mode? (Enter Y or N):
This is for the VM that is used for introspection and the java.beans.Introspector is run in, and can be distinguished from the VM for the visual editor because it does not specify a particular Java source file name. This VM is started the first time any bean info is required for a Java bean within a project, and remains active as long as the project remains open. By debugging this project you can step through and analyze any code in your BeanInfo classes as your Java beans are being introspected. Introspection occurs once for each Java bean class for each project it is used in. The result is held in a cache to help performance. If at any time you need to clear the cache of BeanInfo information held for a project you can close and open the project from its pop-up menu.