Scenario 1: Basic authentication and identity assertion
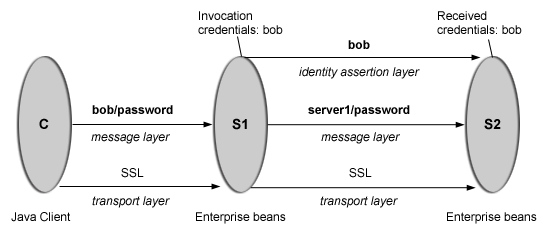
This is an example of a pure Java client, C, accessing a secure enterprise bean on a server, S1, through user bob. The enterprise bean code on S1 accesses another enterprise bean on server, S2. This configuration uses identity assertion to propagate the identity of bob to the downstream server, S2. S2 trusts that bob already is authenticated by S1 because it trusts S1. To gain this trust, the identity of S1 also flows to S2 simultaneously and S2 validates the identity by checking the trustedPrincipalList to verify it is a valid server principal. S2 also authenticates S1. The following steps take you through the configuration of C, S1, and S2.
Step 1: Configure client, C
Client C requires message layer authentication with a Secure Sockets Layer (SSL) transport. To accomplish this task, perform these steps:
-
Identify the sas.client.props file to the client by specifying the property com.ibm.CORBA.ConfigURL=file:/QIBM/UserData/WebAS5/product/instance/properties/sas.client.props where product is Base or ND and instance is the name of your instance. All further configuration involves setting properties within this file.
-
Enable SSL. In this case, SSL is supported but not required:
com.ibm.CSI.performTransportAssocSSLTLSSupported=true
com.ibm.CSI.performTransportAssocSSLTLSRequired=false -
Enable client authentication at the message layer. In this case, client authentication is supported but not required:
com.ibm.CSI.performClientAuthenticationRequired=false
com.ibm.CSI.performClientAuthenticationSupported=true -
Use all of the remaining defaults in the sas.client.props file.
Step 2: Configure server, S1
In the administrative console, server S1 is configured for incoming requests to support message layer client authentication and incoming connections to support SSL without client certificate authentication. S1 is configured for outgoing requests to support identity assertion.
- Configure S1 for incoming connections:
- Disable identity assertion.
- Enable user ID and password authentication.
- Enable SSL.
- Disable SSL client certificate authentication.
- Configure S1 for outgoing connections:
- Enable identity assertion.
- Disable user ID and password authentication.
- Enable SSL.
- Disable SSL client certificate authentication.
Step 3: Configure server, S2
In the administrative console, server S2 is configured for incoming requests to support identity assertion and to accept SSL connections. Complete the following steps to configure incoming connections. Configuration for outgoing requests and connections are not relevant for this scenario.
- Enable identity assertion.
- Disable user ID and password authentication.
- Enable SSL.
- Disable SSL client authentication.