Tutorials > Program model > Create new business logic
Prepare the workspace
In this step, we will import sample code into the WebSphere Commerce workspace. This sample code is the starting point for the tutorial.
You should configure the development environment to use the same database type as the target machine, if the target machine that you are deploying the code to is using a different type of database. See Changing the development database for more information.
Procedure
- Open WebSphere Commerce Developer.
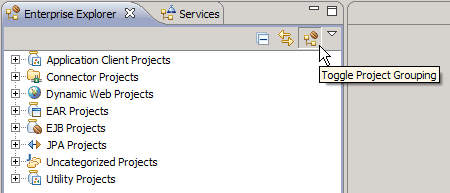
- In the Enterprise Explorer view, ensure the Toggle Project Grouping button is selected...

By selecting the Toggle Project Grouping button, you ensure that the view in WebSphere Commerce Developer matches the screen captures and instructions in this tutorial.
- Publish the consumer direct sample store.
- Refresh the Stores project after the publishing completes successfully:
- Open WebSphere Commerce Developer.
- Open the Enterprise Explorer view.
- Right-click Stores > Refresh.
- Open WebSphere Commerce Developer.
- Unzip the sample code for this tutorial:
- Locate the WCSample.zip file
that you downloaded to the file system.
- Unzip the files under...
notcompletedsourcecode\newbusinesslogic
...into a temporary directory on the file system, for example, C:\temp.
- Locate the WCSample.zip file
that you downloaded to the file system.
- Import the sample Java code into the workspace:
- Navigate to WebSphereCommerceServerExtensionsLogic.
- Right-click the src folder and
select Import. The Import wizard opens.
- From the Select an import source list, select General > File
System and click Next.
- Click Browse (beside the From
directory field) and navigate to the...
notcompletedsourcecode\newbusinesslogic\Javafiles
...directory in the temporary directory, for example...
C:\temp\notcompletedsourcecode\newbusinesslogic\Javafiles
- Click Select All to select all the files under the Javafiles directory.
- In the Folder field, the folder...
WebSphereCommerceServerExtensionsLogic/src
...is already specified. Keep this value and all other default values.
- Click Finish.
- You will see two errors in the Problems view in the class BonusDataBean. You can ignore these errors for now, as they will be fixed as you progress through the tutorial.
- Navigate to WebSphereCommerceServerExtensionsLogic.
- Import the JSP page for this tutorial:
- In the Enterprise Explorer view, expand the Stores > WebContent
> > ConsumerDirect_name where ConsumerDirect_name is the
name of the store.
- Right-click the ConsumerDirect_name directory
and select Import.
- From the Select an import source list, select File System and click Next.
- Click Browse (beside the From
directory field) and navigate to the storeassets directory
code in the temporary directory, for example...
C:\temp\notcompletedsourcecode\newbusinesslogic\storeassets
- Click Deselect All, then select
the MyNewJSPTemplate_All.jsp file.
- In the Folder field, the Stores/Web
Content/ConsumerDirect_name folder is
already specified. Keep this value.
- Click Finish.
- In the Enterprise Explorer view, expand the Stores > WebContent
> > ConsumerDirect_name where ConsumerDirect_name is the
name of the store.
- Import the properties file for the tutorial into the appropriate
directory:
- In the Enterprise Explorer view, expand the following directories: Stores > Java Resources: Java Source > ConsumerDirect_name
- Right-click the ConsumerDirect_name directory
and select Import.
- From the Select an import source list, select File System and click Next.
- Click Browse (beside the From
directory field) and navigate to the storeassets directory
in the temporary directory, for example C:\temp\notcompletedsourcecode\newbusinesslogic\storeassets.
- Click Deselect All, then select
the Tutorial_All_en_US.properties file.
- In the Folder field, the Stores/src/ConsumerDirect_name folder
is already specified. Keep this value.
- Click Finish.
- In the Enterprise Explorer view, expand the following directories: Stores > Java Resources: Java Source > ConsumerDirect_name
- Copy the following four files from drive:yourTempDir\notcompletesourcefiles\newbusinesslogic\ACpolicies to
WCDE_INSTALL/\xml\policies\xml:
- MyNewControllerCmdACPolicy.xml
- MyNewViewACPolicy.xml
- SampleACPolicy_template.xml
- SampleACPolicy_template_en_US.xml
- MyNewControllerCmdACPolicy.xml
Test the environment to ensure you are ready to start the tutorials, by doing the following:
- In WebSphere Commerce Developer, switch to the Server view.
- Right-click WebSphere Commerce Test Server and
select Start if the server is stopped or Restart if
the server is running.
- Both the console view and the WCDE_INSTALL/wasprofiles/logs/server1/trace.log
file should display the server's status as it starts. Watch the console
or examine the log to see when the WebSphere Commerce Test Server
server has finished its startup process. You will see information
similar to the following when the server has started:
A WSVR0001I: Server server1 open for e-business
- In the Enterprise Explorer view, expand the Stores > WebContent > ConsumerDirect_name.
- Right-click the index.jsp file and select Run As > Run on Server. If the Server Selection window displays, select Choose
an existing server and click Finish.
- Select a product and ensure you can purchase it successfully.
You are now ready to proceed with the tutorials.