Tutorials > Dynamic caching > Improve WebSphere Commerce performance with dynamic caching
Install the cache monitor
The dynamic cache monitor is an installable Web application that displays simple cache statistics, cache entries, and cache policy information.
Procedure
- Use the WebSphere Application Server Administrative console to install CacheMonitor.ear
- Start the WebSphere Application Server administration server.
- Launch the WebSphere administrative console.
- Start the WebSphere Application Server administration server.
- Click Applications > New Application.
- For the New Application screen, click New Enterprise Application.
- Click Browse and locate the CacheMonitor.ear in the WAS_HOME/installableApps directory.
Click Next.

- Select Detailed- Show all installation options and parameters, and click Next on the Preparing for the application installation screen. You will receive an application security warning. Select continue.
- For the Select installation options screen, accept the default values and click Next.
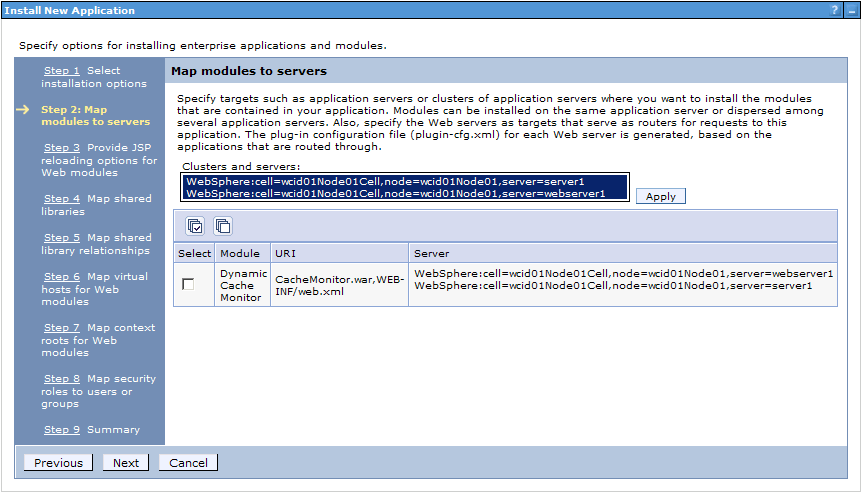
- For the Map modules to servers screen, select the application server to be monitored. Select both server names for the servers that will be monitored from the list of available servers you can map to. Then, check the box beside the Dynamic Cache Monitor module, and click Apply. As part of the entry in the server column of the table, you should now see an additional server listed.
-

- Click Next.
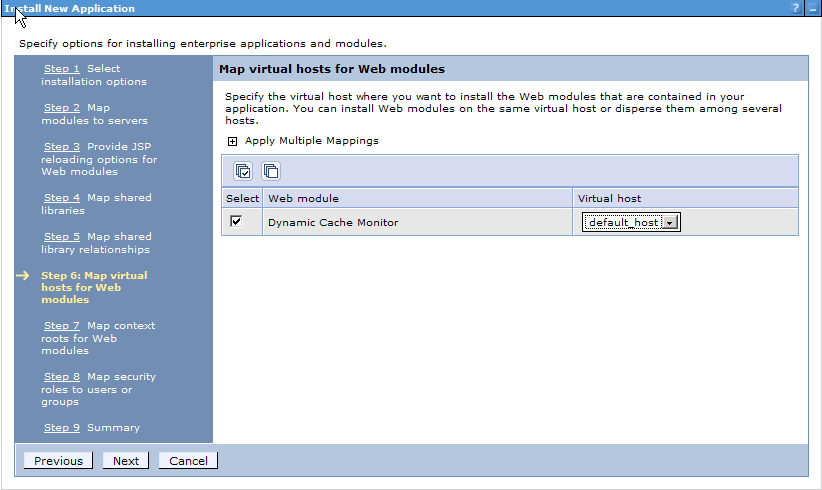
- For the Map virtual hosts for Web modules screen, check the box beside the Dynamic Cache Monitor Web module and select one of the following:
- VH_(instance)_Admin
- VH_(instance)_Tools

- VH_(instance)_Admin
- For the Map security roles to users or groups screen, accept the default values and click Next.
- For the Summary screen, accept the default values and click Finish.
- Save the changes.
- Update the plugin-cfg.xml configuration file.
- In the plugin-cfg.xml file located at WAS_HOME\profiles\profile_name\config\cells\cell_name\nodes\webserver1_node\servers\webserver1, ensure that the /cachemonitor/* alias has been automatically added. If the /cachemonitor/* alias has not been added to the configuration file, in the WebSphere Application Server Administrative console:
- Click Servers > Server Types > Web Servers.
- Select webserver1 and click Generate Plug-in. Doing this will regenerate the configuration file.
- Click Servers > Server Types > Web Servers.
- In the plugin-cfg.xml file located at WAS_HOME\profiles\profile_name\config\cells\cell_name\nodes\webserver1_node\servers\webserver1, ensure that the /cachemonitor/* alias has been automatically added. If the /cachemonitor/* alias has not been added to the configuration file, in the WebSphere Application Server Administrative console:
- Use the WebSphere Application Server Administrative console to start the cache monitor.
- Click Applications > Application Types > WebSphere enterprise applications.
- Check the box next to Dynamic Cache Monitor, and click Start.
- Click Applications > Application Types > WebSphere enterprise applications.
- Access the Web Application at http:// hostname: virtual_host_port/cachemonitor.
You will need to restart the application server and Web server to use the cache monitor. Wait until the next step to do so.