- Overview
- Enable security integration
- Use available authentication data for unprotected URIs
- Restrict cookies to HTTPS sessions
- Set X-Frame-Options to SAMEORIGIN
- Configure portal to run as a non-privileged account
- Block public internet access to administrative pages
- Block HTTP TRACE requests to the server
- Redirect IIS home to portal
- Secure LtpaToken2 cookie
- IBMJCE setup
- Custom error pages
- Portal "internal" SSL approach
Overview
The following are notes created during a security hardening session for WebSphere Application Server with an IIS web server. This particular example leverages WebSphere Portal, but general principles apply to a variety of applicaions
Enable security integration
To enable session security integration, in the WebSphere Integrated Solutions Console, click...
-
Servers | Server Types | WebSphere Application Servers | WebSphere Portal | Web Container Settings | Web Container | Session Management | Security Integration

By default, the Java Cryptography Extension (JCE) is shipped with restricted or limited strength ciphers. To use 192-bit and 256-bit Advanced Encryption Standard (AES) encryption algorithms, we must apply unlimited jurisdiction policy files.
Use available authentication data for unprotected URIs
Enable WAS to create a security context on requests to unprotected URIs if valid credentials such as an LtpaToken or LtpaToken2 cookie are available on the request:
-
Security | Global Security | Web and SIP security | General Settings | Use available authentication data when an unprotected URI is accessed

Restrict cookies to HTTPS sessions
Go to...
-
Servers | Server types | WebSphere application servers | server_name | Session management | Enable cookies
...and enable "Restrict cookies to HTTPS sessions"

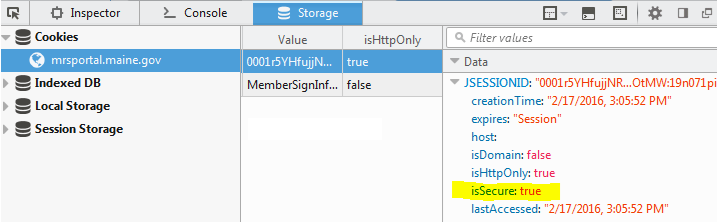
After setting this, connect to portal using HTTPS protocol. Using an HTTP connection will throw permission exceptions when using portlets such as the WCM authoring portlet and the Manage Pages portlet.
Firebug will show whether this is enabled via the isSecure data in the cookie.
Set X-Frame-Options to SAMEORIGIN
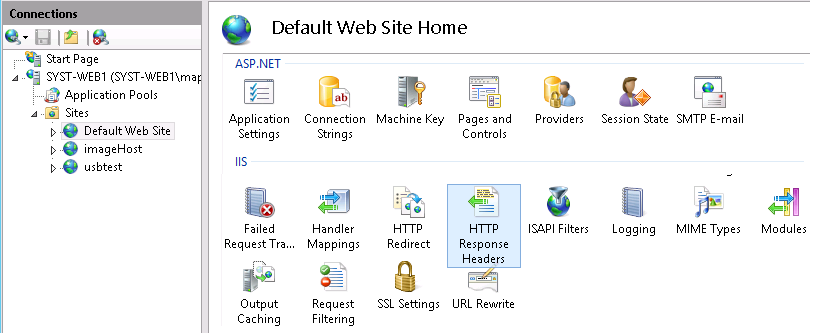
- On each IIS web server host, go to...
-
Control Panel\System and Security\Administrative Tools\Internet Information Services Manager

From IIS Manager, select...
-
Sites | Default Web Site | HTTP Response Headers | Add
Make sure to plug it into Default Web Site. Setting higher up the tree seems to be problematic.
- Set...
Name X-Frame-Options Value SAMEORIGIN 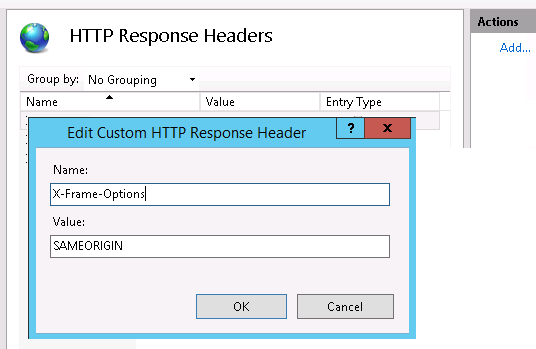
Do this for all IIS web servers.
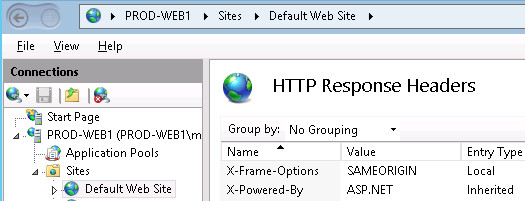

- Once saved, changes are written to web.config...
<system.webServer> ... <httpProtocol> <customHeaders> <add name="X-Frame-Options" value="SAMEORIGIN" /> </customHeaders> </httpProtocol> ... </system.webServer> - Restart IIS to load change.
Open a 'cmd" prompt as an administrative user
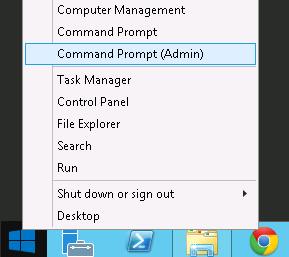
...and run...
-
iisreset
- Use Firebug to verify setting.
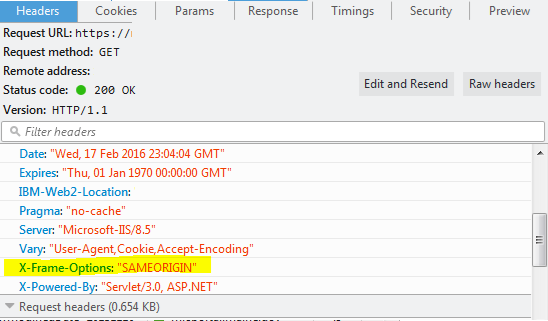
See also: Mitigating framesniffing with the X-Frame-Options header
Configure portal to run as a non-privileged account
- Create service account, for example, SERVICE-PORTAL, on local machine or domain.
- Grant folder access service account...
Directory Access NOTES C:\IBM Full Control Inherit to all child files and directories C:\MyApp Read & Execute, List, Read Inherit to all child files and directories C:\MyApp\App_Logs Full Control Inherit to all child files and directories C:\MyApp\Return Full Control Inherit to all child files and directories C:\scratch Full Control Inherit to all child files and directories - Right-click on directory, and select properties from context menu.
- Select Security Tab
- Select Edit button
- Select Add, enter account name, and accept
- On return to the security tab, select account, then select the Access match the table above, and select okay.
This should inherit the permissions to all the child files and directories. Verify, as sometimes this not happen consistently.

- Update Portal Windows services with service account and password
- Stop all IBM WAS services
For standalone services this will be the singled IBM Portal Windows service, for a cluster this will be the DMGR, search, node agent and the IBM Portal Windows Services
- DMGR Node Services

- Portal Node(s)

- DMGR Node Services
- In Service applet select the IBM service properties, the select "Log On" tab, and provide service account name and password. For the first service you will be prompted for allowing the account to run as a service, select okay.
- Provide service credentials
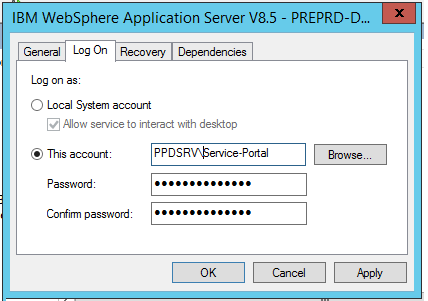
- Accept "Grant Log On As A Service" right

- Restart Services
- Stop all IBM WAS services
Block public internet access to administrative pages
- Log on to the Web server computer as an administrator.
- Install URLRewriteModule feature
To install Microsoft URL Rewrite Module 2.0 for IIS 7:
-
msiexec /I rewrite_amd64
To uninstall, right-click on rewrite_amd64, then choose uninstall
- Correct the load order of IIS modules
- Make a copy of applicationHost.config
- Edit applicationHost.config
-
notepad C:\Windows\System32\inetsrv\config\applicationHost.config
- Search for RewriteModule in the <GlobalModules> section, and move the line to be above above the IsapiFilterModule module.
- Save the file.
- Restart IIS
Restart using Internet Information Services Manager. If that does not work, restart from command-line.
- Open Internet Services Manager
-
Start | Settings | Control Panel | Administrative Tools | Internet Services Manager
- Go to the Server view

- Click...
-
URL Rewrite icon | Actions | Add Rules | Inbound rules | Request blocking
- Block access to...
-
*/04_Sj9CPykssy0xPLMnMz0vMAfGjzOKd3R09TMx9DAwMLIzMDTzNff1DPXwCDN39zfQLsh0VAd7eW54!/*
*MyApp-Administration*
*MyAppThemeStatic/WEB-INF*The first, obfuscated URL context, goes to an administrative page. This URL context is the same across all portal environments.
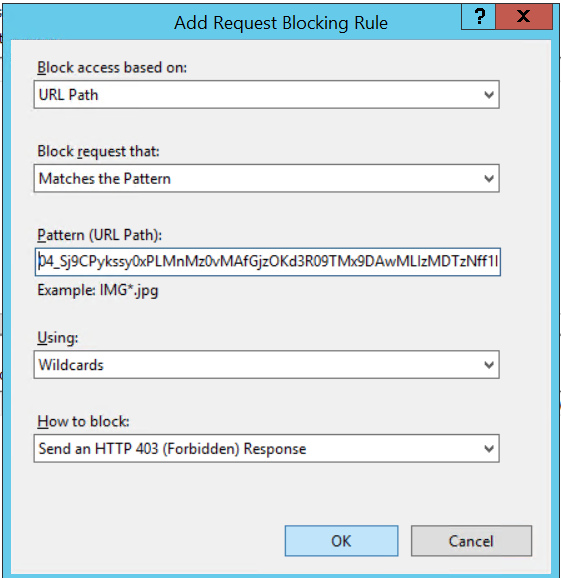
No IIS restart is required.
- Verify page is blocked. For example.
-
https://172.10.11.14:7443/MyApp-Administration
https://172.11.1.14:7443/myapp/portal/MyApp-Administration

Block HTTP TRACE requests to the server
Perform the following to update request filtering to deny the verbs for TRACE...
- Open Internet Information Services Manager...
-
Control Panel | System and Security | Administrative Tools
- Go to Default Web Site, then click Request Filtering.
- On the Request Filtering pane, click the HTTP verbs tab, and then click "Deny Verb..." in the Actions pane.
- On the Deny Verb dialog box, enter the HTTP verb to block, and then click OK.
To block HTTP TRACE requests to the server, enter "TRACE" in the dialog box.
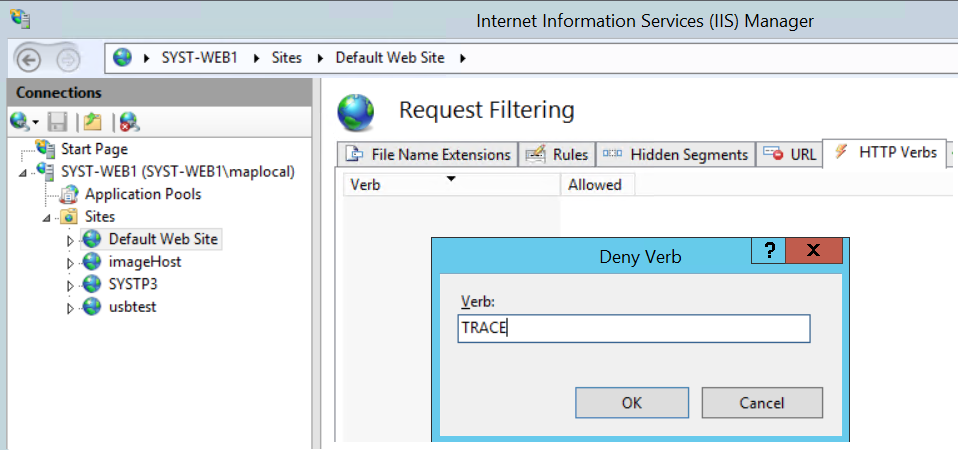
Note: Do NOT block DELETE requests. This will break delete attachments functionality.
Redirect IIS home requests to portal
Edit...
-
C:\inetpub\wwwroot\iisstart.htm
..and add the following after the <head> tag.
Prod...
<!-- Pleace this snippet right after opening the head tag to make it work properly -->

<!-- This code is licensed under GNU GPL v3 -->
<!-- You are allowed to freely copy, distribute and use this code, but removing author credit is strictly prohibited -->
<!-- Generated by http://insider.zone/tools/client-side-url-redirect-generator/ -->

<!-- REDIRECTING STARTS -->
<link rel="canonical" href="https://myportal.myco.com/myapp/portal"/>
<noscript>
        <meta http-equiv="refresh" content="0;URL=https://myportal.myco.com/myapp/portal">
</noscript>
<!--[if lt IE 9]><script type="text/javascript">var IE_fix=true;</script><![endif]-->
<script type="text/javascript">
        var url = "https://myportal.myco.com/myapp/portal";
        if(typeof IE_fix != "undefined") // IE8 and lower fix to pass the http referer
        {
                document.write("redirecting..."); // Don't remove this line or appendChild() will fail because it is called before document.onload to make the redirect as fast as possible. Nobody will see this text, it is only a tech fix.
                var referLink = document.createElement("a");
                referLink.href = url;
                document.body.appendChild(referLink);
                referLink.click();
        }
        else { window.location.replace(url); } // All other browsers
</script>
<!-- Credit goes to http://insider.zone/ -->
<!-- REDIRECTING ENDS -->
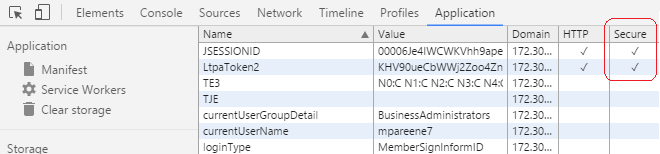
Secure LtpaToken2 cookie
Set secure flag for LtpaToken2 cookie...
- Enable...
- Security | Global Security | Web and Sip Security | Single Sign-On | Requires SSL

- Save changes. Sync nodes.
- Restart the DMGR, nodeagent(s) and Portal server(s).
- Chrome Devtools now shows LtpaToken2 as Secure...
IBMJCE setup
For each node, enable IBMJCE Random number generation algorithm...Edit...
-
C:\IBM\WebSphere\AppServer\java\jre\lib\security\java.security
Go to below section in the file...
-
security.provider.1=com.ibm.crypto.pkcs11impl.provider.IBMPKCS11Impl
security.provider.2=com.ibm.crypto.provider.IBMJCE
security.provider.3=com.ibm.jsse.IBMJSSEProvider
security.provider.4=com.ibm.jsse2.IBMJSSEProvider2
security.provider.5=com.ibm.security.jgss.IBMJGSSProvider
security.provider.6=com.ibm.security.cert.IBMCertPath
security.provider.7=com.ibm.security.cmskeystore.CMSProvider
security.provider.8=com.ibm.security.jgss.mech.spnego.IBMSPNEGO
security.provider.9=com.ibm.security.sasl.IBMSASL
security.provider.10=com.ibm.xml.crypto.IBMXMLCryptoProvider
security.provider.11=com.ibm.xml.enc.IBMXMLEncProvider
security.provider.12=org.apache.harmony.security.provider.PolicyProvider
...and add the second line, and change the line numbers starting from third line. After changes done this section should look like below.
-
security.provider.1=com.ibm.crypto.pkcs11impl.provider.IBMPKCS11Impl
security.provider.2=com.ibm.securerandom.provider.IBMSecureRandom
security.provider.3=com.ibm.crypto.provider.IBMJCE
security.provider.4=com.ibm.jsse.IBMJSSEProvider
security.provider.5=com.ibm.jsse2.IBMJSSEProvider2
security.provider.6=com.ibm.security.jgss.IBMJGSSProvider
security.provider.7=com.ibm.security.cert.IBMCertPath
security.provider.8=com.ibm.security.cmskeystore.CMSProvider
security.provider.9=com.ibm.security.jgss.mech.spnego.IBMSPNEGO
security.provider.10=com.ibm.security.sasl.IBMSASL
security.provider.11=com.ibm.xml.crypto.IBMXMLCryptoProvider
security.provider.12=com.ibm.xml.enc.IBMXMLEncProvider
security.provider.13=org.apache.harmony.security.provider.PolicyProvider
Restart the WebSphere Portal Server
Portal and IIS custom error pages
Overview
This document describes adding custom error handling for the MyApp application. We are configuring HTTP error code handling on both the portal and web server levels. URIs with an /myapp portal root context, such as...
- https://myhost:10029/myapp/business/foo
- https://myhost:10029/myapp/test
...will be served a custom error page via from WAS. However, URIs that do not include portal root context, for example...
-
https://myhost:10029/test
...will be processed on the web server
Set up error handling in Portal
- Extract and backup wps.ear...
-
cd c:\scratch
C:\IBM\WebSphere\wp_profile\bin\wsadmin.bat -user portaladmin -password mypassword -c "$AdminApp export wps wps.ear"
copy wps.ear wps.ear.origAlternatively, you can export wps.ear from the WAS console.
- Expand the wps.ear...
-
C:\IBM\WebSphere\wp_profile\bin\EARExpander.bat -ear wps.ear -operationDir c:/scratch/wps -operation expand -expansionFlags all
...and navigate to
-
c:/scratch/wps/wps.war/WEB-INF/
- Edit both web.xml and web_merged.xml, and in each set...
<mime-mapping>
    <extension>png</extension>
<mime-type>image/png</mime-type>
</mime-mapping>
<error-page>
    <error-code>404</error-code>
    <location>/html/error404.html</location>
</error-page>
<error-page>
    <error-code>400</error-code>
    <location>/html/error400.html</location>
</error-page>
<error-page>
    <error-code>401</error-code>
    <location>/html/error401.html</location>
</error-page>
<error-page>
    <error-code>403</error-code>
    <location>/html/error403.html</location>
</error-page>
<error-page>
    <error-code>406</error-code>
    <location>/html/error406.html</location>
</error-page>
<error-page>
    <error-code>429</error-code>
    <location>/html/error429.html</location>
</error-page>
<error-page>
    <error-code>500</error-code>
    <location>/html/error500.html</location>
</error-page>
<error-page>
    <error-code>501</error-code>
    <location>/html/error501.html</location>
</error-page>
<error-page>
    <error-code>502</error-code>
    <location>/html/error502.html</location>
</error-page>
<error-page>
    <error-code>503</error-code>
    <location>/html/error503.html</location>
</error-page>
<error-page>
    <error-code>504</error-code>
    <location>/html/error504.html</location>
</error-page>
<error-page>
    <error-code>505</error-code>
    <location>/html/error505.html</location>
</error-page>
Portal 8 uses Servlet 2.5 specification, so we have to specify individual mapping for each required error code.
See also:
- Error Code Summary for a list of possible error codes.
- Specify mapping for each code mentioned in above table
- Create directory...
-
c:/scratch/wps/wps.war/html
...then navigate to that directory.
- For each HTTP error code, create and save files...
For example, error404.html contains...
<html>
    <script>
        window.location.href = "/myapp/portal/error/error404";
    </script>
</html>
The java script code in each file redirects error page we will create in the portal hierarchy.
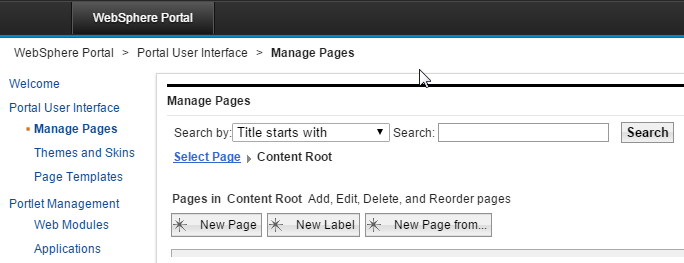
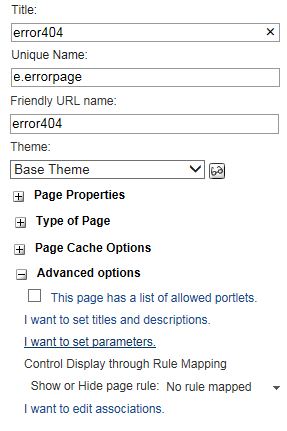
- From Portal Administration, create pages for each http error code...
First create a new label called "Error"...
Portal Administration | Manage Pages | Content Root | New Label
Then create WCM pages for each error code...
Portal Administration | Manage Pages | Content Root | Error | New Page
...and set...
Title error404 Unique Name my.error404 Friendly URL name error404 (should match redirection URL in error404.html) Theme MyApp Base Theme Type of Page Static Content URI of Layout Template of HTML war:MyAppThemeStatic/themes/Portal8.0/layout-templates/MyApp1Column/ 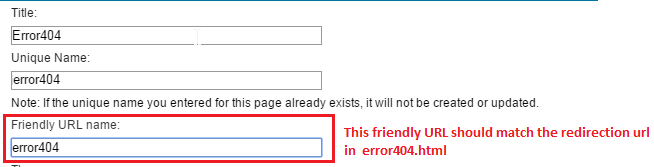
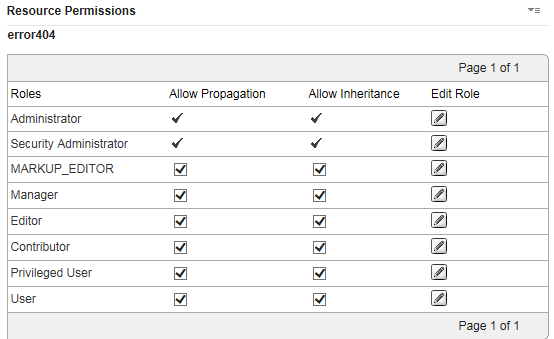
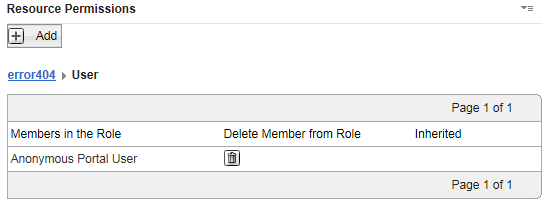
- For each page, for User role, assign anonymous user permissions.
- For each error page, select...
-
Page Properties | Advanced Options | I want to set parameters
...and set...
Parameter Value Description topNav hide Hide page from direct navigation ibm.portal.sharing.scope.page resourceaggregation.profile profiles/profile_myapp_full.json
- Create WCM content.
Go to...
-
Libraries | MyApp_Content_en | Content | Error Pages | New
...and create content for httpd codes
- Error 404
- Error 400
- Error 401
- Error 403
- Error 405
- Error 429
- Error 500
- Error 501
- Error 502
- Error 503
- Error 504
- Error 505
Example content properties...
Name: Error404 Display title: Error404 Description: 404 Error Page Text Type: Content Location: MyApp_Content_en / Error Pages / Error404 Content Template: MyApp_Design / AT_Rich_Text Mapped Presentation Templates: Workflow MyApp_Design / Direct Workflow Verify anonymous user access to page...
Administrator Defined Workflow Defined Inheritance User None CN=WCMContentApprovers,OU=Roles,DC=MyApp,DC=COM, [all users], cn=wcmcontentauthors,ou=roles,dc=myapp,dc=com [all authenticated portal users], [anonymous portal user] Contributor None None WCMContentAuthors, WCMContentApprovers, WCMAdmins, WCMDesigners Editor None None None Manager None wpsadmin wpsadmin Approver None CN=WCMContentApprovers,OU=Roles,DC=MyApp,DC=COM None - Configure pages
- From Portal Administration, go to...
-
Manage Pages | Content | Error
...and for each error page, select...
-
Edit Page Layout
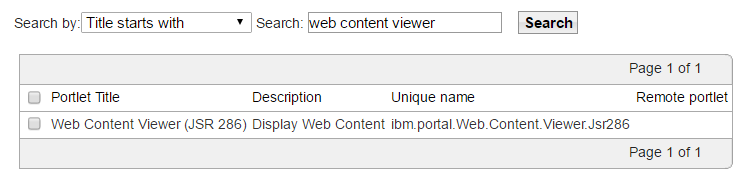
- Click the "Add portlets" button, then add a "Web Content Viewer" portlet...
- After adding, click on the context menu for the portlet, then select "Edit shared settings"
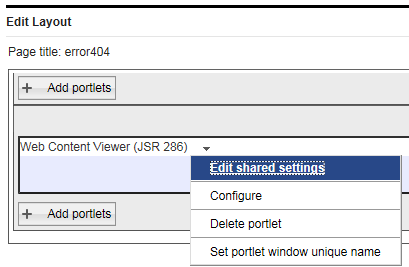
- Configure shared settings to point to WCM error content...
Content Type Content Item Content Behavior Select content and path Content MyApp_Content_en / Error Pages / Error404 Alternate Presentation Template MyApp_Design / PT_RichText - Pull up error page in browser. For example...
-
http://172.10.11.29:10039/myapp/portal/error/error404
...and select...
-
Edit Mode
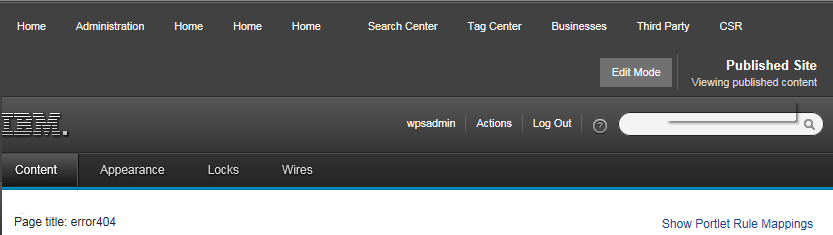
- Hover on the page name area, you will see 'Edit'. Click on edit. This will open page properties.
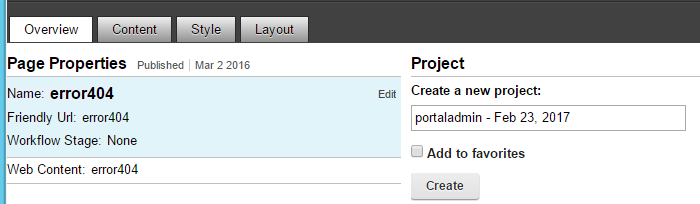
Important: Make sure we are editing the right page. The value for "Name" should equal your page.
- Click on the Advanced tab
- In the Page Layout template location, enter one of the below layout locations
- MyApp Single Column Layout:
-
war:MyAppThemeStatic/themes/Portal8.0/layout-templates/MyApp1Column/
- MyApp 2 Column Layout:
-
war:MyAppThemeStatic/themes/Portal8.0/layout-templates/MyApp2ColumnRight/
war:MyAppThemeStatic/themes/Portal8.0/layout-templates/MyApp2ColumnLeft/
war:MyAppThemeStatic/themes/Portal8.0/layout-templates/MyApp2Rows2ColumnLeft/ - MyApp 3 Column Layout:
-
war:MyAppThemeStatic/themes/Portal8.0/layout-templates/MyApp3Column/
- MyApp Single Column Layout:
- Click on...
-
"Update Layout from Template"
Select MyApp Base Theme and Full profiles.
- From Portal Administration, go to...
- Deploy new wps.ear and test
- Collapse the changes made back into a new wps.ear file.
-
cd C:\scratch
C:\IBM\WebSphere\wp_profile\bin\EARExpander.bat -ear /scratch/wps.ear -operationDir /scratch/wps -operation collapse - Optional: Make a backup of configuration on dmgr and nodes
-
cd c:\IBM\WebSphere\wp_profile\bin
backupConfig WebSphereConfig_20151202.zip
startServer.bat WebSphere_PortalOn portal cluster node, run startNode.bat
- Deploy the updated wps.ear back to portal
-
cd C:\IBM\WebSphere\wp_profile\bin
wsadmin.bat -user portaladmin -password mypassword -c "$AdminApp install C:/scratch/wps.ear {-update -appname wps -deployejb -deployejb.classpath C:/IBM/WebSphere/PortalServer/base/wp.base/shared/app/wp.base.jar}" - Restart portal
- Collapse the changes made back into a new wps.ear file.
Set up error handling in IIS
Copy custom error files to target IIS servers, into...
-
C:\inetpub\custerr\en-US
For example...
-
cd C:\inetpub\custerr\en-US
copy 404.htm 404_orig.htm
copy C:\Scratch\Error_Pages\error404page.html 404.htm
copy 401.htm 401_orig.htm
copy C:\Scratch\Error_Pages\error401page.html 401.htm
copy 403.htm 403_orig.htm
copy C:\Scratch\Error_Pages\error403page.html 403.htm
copy 405.htm 405_orig.htm
copy C:\Scratch\Error_Pages\error405page.html 405.htm
copy 500.htm 500_orig.htm
copy C:\Scratch\Error_Pages\error500page.html 500.htm
copy 501.htm 501_orig.htm
copy C:\Scratch\Error_Pages\error501page.html 501.htm
copy 502.htm 502_orig.htm
copy C:\Scratch\Error_Pages\error502page.html 502.htm
To test...
-
https://myportal.myco.com/foo
https://myportal.myco.com/myapp/foo
https://myportal.myco.com/myapp/portal
https://myportal.myco.com/myapp/portal/foo
https://myportal.myco.com/myapp/portal/Business/foo
Error pages are set in Internet Information Services (IIS) Manager, select...
-
Sites | Default Web Site | Error Pages
Do NOT edit any settings on this page.
If something goes wrong, review...
-
C:\inetpub\wwwroot\web.config
More info...
- Custom error pages for HTTP 4xx and HTTP 5xxx codes
- IIS 7.x - Configuring the WAS Web server plug-in to serve custom error pages
Error Code Summary
We need to support major codes which are relevant and may come in MyApp Portal. Note there are numerous other codes but they are not meaningful in context of our System.
Table below summarizes codes and possible methods to test implementation.
| Code | Description | HTML Page | To test |
|---|---|---|---|
| 404 | Page Not Found | error404.html | https://myhost:10029/myapp/business/foo
https://myhost:10029/myapp/test https://myhost:10029/test |
| 400 | Bad Request | error400.html | UrlSegmentMaxLength registry setting on web server |
| 401 | Unauthorized | error401.html | Change file perm on static resource to non-readable? |
| 403 | Forbidden | error403.html | |
| 405 | Method not allowed | error405.html | |
| 429 | Too Many Requests | error429.html | |
| 500 | Internal Server Error | error500.html | |
| 501 | Not Implemented | error501.html | |
| 502 | Bad Gateway | error502.html | |
| 503 | Service Unavailable | error503.html | |
| 504 | Gateway Timeout | error504.html | |
| 505 | Http Version Not Supported | error505.html | |
Portal "internal" SSL approach
We do NOT want to enable TLS v1.2 on any systems on which it not currently not supported. For example, Active Directory currently only supports TLS 1.0. WebSphere Application Server supports TLS v1.2 only after upgrading from Java 6 to Java 7.
IIS web server: Protocol and cipher suites restrictions
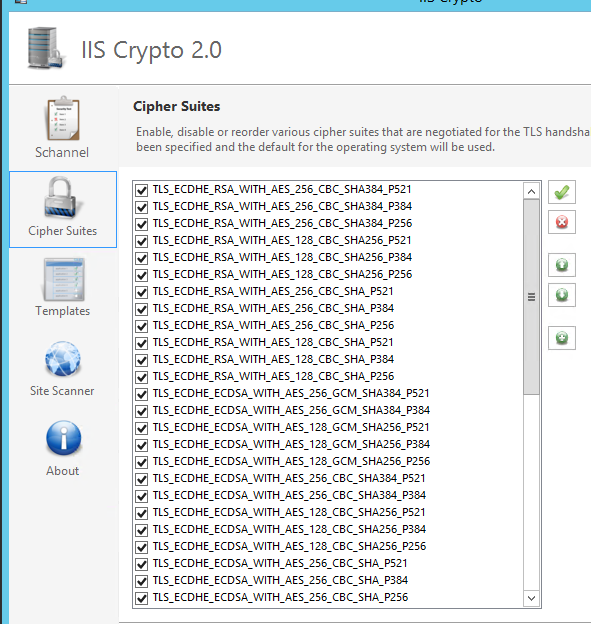
This configuration is made to turn off deprecated encryption methods and cipher suites for Portal Webserver SChannel. Microsoft IIS uses SChannel for it's SSL encyption support.
Use IISCrypto to set SChannel settings. As a starting point select Best Practices and only enable the following settings.
Enabled protocols
-
TLS 1.2
Ciphers
-
AES 128
AES 256
Hashes
-
SHA
SHA 256
SHA 384
SHA 512

Select Cipher Suite tab page and deselect the following...
-
TLS_DHE_RSA_WITH_AES_256_CBC_SHA
TLS_DHE_RSA_WITH_AES_128_CBC_SHA
TLS_DHE_DSS_WITH_3DES_EDE_CBC_SHA
TLS_RSA_WITH_RC4_128_SHA
TLS_RSA_WITH_RC4_128_MD5
TLS_RSA_WITH_NULL_SHA256
TLS_RSA_WITH_NULL_SHA
SSL_CK_RC4_128_WITH_MD5
SSL_CK_DES_192_EDE3_CBC_WITH_MD5

WebSphere Application Server: Protocol and cipher suites restrictions
Currently, the Quality of Protection setting for our portal environments is SSL_TLS, which supports all handshake protocols except for SSLv2 on the server side. We want the only supporred protocol to be TLS v1.2.

- Use backupconfig.sh to make a backup of WAS.
-
cd c:\IBM\WebSphere\wp_profile\bin
backupConfig.bat c:\scratch\backupConfig_20161213.zip
startServer.bat Websphere_Portal - Install Java 7
- Log on to the console and go to...
-
Security | SSL certificate and key management | Related Items | SSL configurations | NodedefaultSSLsetting | Quality of protection (QoP)
The above setting will apply to both inbound and outbound SSL Communication.
- On the Quality of protection (QoP) settings panel, select TLSv1.2 from the pull-down list in the box named Protocol.
- Click Apply and Save.
- Update ssl.client.props.
On each portal node, edit...
-
C:\IBM\WebSphere\wp_profile\properties\ssl.client.props
...and set...
-
com.ibm.ssl.protocol=TLSv1.2

Do the same on the dmgr for...
-
c:\IBM\WebSphere\AppServer\profiles\Dmgr01\properties\ssl.client.props
On Syst, update...
-
C:\IBM\WebSphere\AppServer\profiles\cw_profile\properties\ssl.client.props
C:\IBM\WebSphere\wp_profile\properties\ssl.client.props - On each web server node, update plugin-cfg.xml and set...
-
StrictSecurity="true"
If this is not done, we may receive GSK_ERROR_SOCKET_CLOSED (gsk rc = 420) errors.
- Restart the dmgr using stopManager/startManager
Stop nodes...
-
c:\IBM\WebSphere\wp_profile\bin\stopNode.bat -username -password
- Use stopServer to stop all application servers running on the nodes
- Synchronize nodes...
-
c:\IBM\WebSphere\wp_profile\bin\syncNode.bat dmgr_host soap_port
soap port is found from dmgr console under...
-
System Administration | Deployment manager | Ports | SOAP_CONNECTOR_ADDRESS
You must run syncNode.bat from the command-line on each federated node, otherwise the nodes will not synchronize in the administrative console.
- Start the node agent on each federated node...
-
c:\IBM\Websphere\wp_profile\bin\startNode.bat
- Check the Sync status of node from console, and then start the application server from console.
- Log back on to the QoP settings panel and set cipher suites to SHA384 and SHA256.
- Test using browsers
- Test using OpenSSL
- Test with sslscan.
Test TLS v1.2 using browsers
- Firefox version 24 and later...
- Open Firefox browser and enter about:config in the address bar.
- When prompted, click I'll be careful, I promise! and accept the warning.
- Search for security.tls.version.max.
- Double-click security.tls.version.max and change the value to 3.
A value of 1 supports TLS1.0. A value of 2 supports TLS1.0 and TLS1.1. A value of 3 supports TLS1.0, TLS1.1, and TLS1.2.
Internet Explorer v8 and later, select...
-
Tools | Internet Options | Advanced tab | Security | Use TLS 1.2 check box | OK
Test using OpenSSL
You can use openssl s_client connnect to WAS using SSL port like console SSL port or Application server ssl port
-
openssl s_client -connect webspherehostname:consolesslport -tls1_2
For Example...
-
openssl s_client -connect myportalsupport.myco.com:9443 -tls1_2
Once connected to the WAS system, the certificate chain is displayed in the command prompt and the handshake details.
See also
Author: Michael Pareene
Email: michael.pareene@gmail.com
Web: setgetweb.com