Example: Using scripts with the job manager
Introduction
The scenario that we describe here uses a simple WebSphere environment to illustrate how to automate tasks. We can use these techniques in more complex environments. This scenario contains the following steps:
- Write a customized script to automate the tasks.
- Configure the job manager.
- Verify the results.
Applications in this environment are installed frequently, and the administrator needs a quick way to install these applications...
- A wsadmin script is prepared to install an application. The script makes use of the script libraries.
- A job is scheduled to run the script at regular intervals.
- The script checks a text file that lists the new applications to be installed. The new application information stored in a text file includes the application name, application location, node name, and server name

- If the job runs and finds the application is not installed, the application is then installed. If the application is already installed, it is uninstalled and then re-installed.
- The text file is renamed filename.txt.old when the job is executed.
- If the job executes and no text file exists, no actions are taken. It is only when you distribute a new text file and application the job performs the install.
To test, we used the following applications:
- hello1.ear
- hello2.ear
Create the customized script
The AdminApplication script in the script libraries includes procedures that accomplish the installation and update of applications. In this scenario, we used the following procedures from the script libraries:
- AdminApplication.uninstallApplication
This procedure is used to uninstall an application. The arguments specify the application name.
- AdminApplication.installAppWithNodeAndServerOptions
This procedure is used to install an application. This procedure is selected because there is only a single server in this environment. In an environment with clustered application servers, use the installAppWithClusterOption procedure instead.
The script file is written in Python and is called appInstall.py.
#Check the list and install/update the applications.
#

import sys
import java import os
import re
import time from java.lang import *


dir = "C:/WAS/Appserver/profiles/dmgr40/downloadedContent/inputfile"
# sep = System.getProperty("line.separator")

for fname in os.listdir(dir):
print fname
path = os.path.join(dir, fname)
if (os.path.isfile(path)) and (not re.match(".*old$",path) and (not re.match("appInstall.py",fname))):
    print "procesing %s" % (path)
    inp = open(path, 'r')
    for line in inp.readlines():
        itemList = line[:-1].split(',')
        appName = itemList[0]
        earFile = itemList[1]
        nodeName= itemList[2]
        serverName = itemList[3]
        # application existence check         print "application existence check"
        existAppList = AdminApp.list().split(sep)
        isExist = 0
        for existApp in existAppList:
        if(appName == existApp):
            isExist = 1
            break
        # acquire application manager         print "acquire application manager"
        appMgrID = AdminControl.queryNames("type=ApplicationManager,node="+nodeName+",process="+serverName+",*" )
# if exists, uninstall application print "app exists - uninstall"
if( isExist == 1 ):

appId = ""

try:
_excp_ = 0
appID = AdminControl.completeObjectName("type=Application,node="+nodeName+",Server="+serverName+",name=" +appName+",*" )

except:
_type_, _value_, _tbck_ = sys.exc_info()
_excp_ = 1

#endTry

# if running, stop application print "appID is %s" % (appID)
if(len(appID) > 0):

print "stopping %s" % (appName)
stopped = AdminControl.invoke(appMgrID, "stopApplication", appName)
sleep(1)

# uninstall application print "Uninstalling %s" % (appName)
AdminApplication.uninstallApplication(appName)

# install application print "Installing %s" % (appName)
AdminApplication.installAppWithNodeAndServerOptions(appName, earFile, nodeName, serverName)
print "Starting %s" % (appName)
started = AdminControl.invoke(appMgrID, "startApplication", appName)
sleep(1)

inp.close()
os.rename(fname, fname + ".old")
#endIf
#endFor
The hello.txt input file
-
hello,/webspherev8.5/appserver/profiles/dmgr40/downloadedContent/appl/hello1.ear,node40a,server40 a1
The sample script is first tested using wsadmin running in script mode.
Testing the sample script
-
wsadmin -lang jython -f c:\webspher ev8.5\appserver\profiles\dmgr40\downloadedContent\appinstall.py -username admin -p assword admin
WASX7209I: Connected to process "dmgr" on node dmgr40node using SOAP connector;
The type of process is: DeploymentManager
hello.txt
procesing C:\WebSphereV8.5\AppServer\profiles\dmgr40\downloadedContent\inputfile\hello.txt
application existence check
acquire application manager
app exists - uninstall
Installing hello
AdminApplication: Install application with -node and -server options
Application name: hello
Ear file to deploy: /webspherev8.5/appserver/profiles/dmgr40/downloadedContent/appl/hello1.ear
Node name: node40a
Server name: server40a1
Usage: AdminApplication.installAppWithNodeAndServerOptions("hello", "/webspherev8.5/appserver/profiles/dmgr40/downloadedContent/appl/hello1.ear", "node40a", "server40a1")
ADMA5016I: Installation of hello started.
ADMA5058I: Application and module versions are validated with versions of deploy ment targets.
ADMA5005I: The application hello is configured in the WebSphere Application Serv er repository.
ADMA5053I: The library references for the installed optional package are created
ADMA5005I: The application hello is configured in the WAS repository.
ADMA5001I: The application binaries are saved in C:\WebSphereV8.5\AppServer\profiles\dmgr40\wstemp\Script120f8e64a06\workspace\cells\Cell40\applications\hello.ear \hello.ear
ADMA5005I: The application hello is configured in the WebSphere Application Serv er repository.
SECJ0400I: Successfully updated the application hello with the appContextIDForSe curity information.
ADMA5005I: The application hello is configured in the WebSphere Application Serv er repository.
CWSAD0040I: The application hello is configured in the Application Server repository.
ADMA5113I: Activation plan created successfully.
ADMA5011I: The cleanup of the temp directory for application hello is complete.
ADMA5013I: Application hello installed successfully. OK: installAppWithNodeAndServerOptions('hello', '/webspherev8.5/appserver/profiles /dmgr40/downloadedContent/appl/hello1.ear', 'node40a', 'server40a1', 'false'):
Submitting the job
To use the job manager to execute the script:
- Before running the appInstall.py script, transfer it along with the hello.txt file and the hello1.ear file from the job manager to the deployment manager using the distributeFile job.
In Rational Application Developer, export the appInstall.py script file and application EAR file to the jmgr_PROFILE_HOME/config/temp/JobManager directory.
Manually copy the hello.txt file to the same directory.
- In the Job manager console, click Job | Submit to launch the Job properties wizard.
- Use the Distribute file job to transfer each file. In each case, select the admin agent as the target node. The source location refers to the file in the jmgr_PROFILE_HOME/config/temp/JobManager directory. The format of the file is: file:/file_name
- Distribute the files as follows:
- Distribute the hello.txt file to the following directory: dmgr_PROFILE_HOME/downloadedContent/inputfile
- Distribute the appInstall.py file to the following directory: dmgr_PROFILE_HOME/downloadedContent
- Distribute the appInstall.py file to the following directory: dmgr_PROFILE_HOME/downloadedContent/appl
- Submit the wsadmin script for execution. Click Job | Submit to launch the Job properties wizard and then complete the following steps:
- Click Run wsadmin script as the job type and then enter a description. Click Next
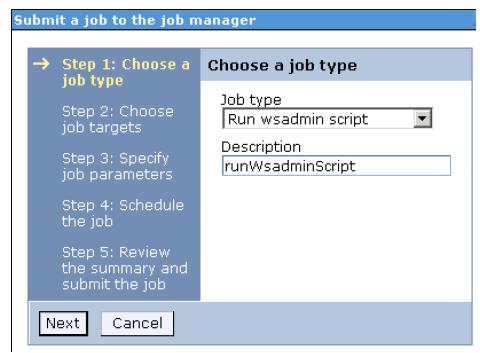
- Select the job target. In this case, the deployment manager node is selected.
Enter the user ID and password required for administration tasks on the deployment manager. Click Next.
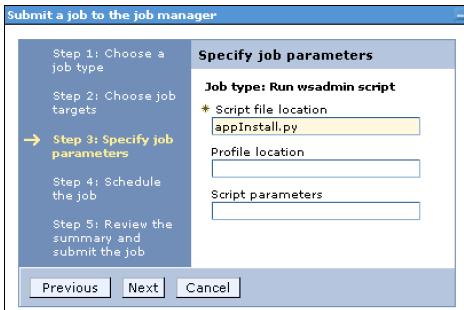
- Specify the script location. This location is the same location that you used when you distributed the file. The current directory is the dmgr_PROFILE_HOME/downloadedContent directory. Click Next
- Next, we can schedule the job to run once or to run multiple times at regular intervals.
We can also define when the job is available for execution and when it expires.
In this example, the execution of the script from the job manager is tested first using the "Run once" option in the Availability interval field. After the job is tested, we can repeat the job submit process and set an interval so the job runs automatically.
Click Next.
- Review the summary and then click Finish.
- Monitor the job status to ensure that it completes successfully. If the job does not complete successfully, click the Job ID to see the messages produced.
- Click Run wsadmin script as the job type and then enter a description. Click Next
Verifying the results
We can verify the results by displaying the new application in the dmgr console, starting the application and then accessing the application from a web browser. Use the following steps:
- Access the deployment manager console, expand Applications from the navigation tree, and click...
-
Application Types | WebSphere enterprise application
- Verify the new application is in the list.