Work with application servers
- Create an application server
- View the status of an application server
- Starting an application server
- Viewing runtime attributes of an application server
- Customizing application servers
- Repository checkpoints service
Overview
Application server types:
| Stand-alone | Created with an application server profile. Not federated to a cell or registered with an administrative agent. Hosts its own administrative services and operates independently from other WebSphere processes. Available on all WAS packages. Only option in the Base and Express environments. |
| Unfederated | Resides on a node managed from an administrative agent. Cannot be used in a cluster. Multiple servers can exist on one node. Available on all WAS packages. |
| Managed | Resides on a node managed from a deployment manager. Can be server created using an application server profile and subsequently federated to the cell, or created directly from the dmgr console. Can be clustered for high-availability and workload balancing. Available only with the Network Deployment package. |
Create an application server
The process to create an application server depends on your WAS package.
Stand-alone application servers
Stand-alone application servers are created by creating an application server profile. This action results in a profile that defines one stand-alone application server. This application server hosts the sample applications and the dmgr console application.In previous versions, a stand-alone server was always named server1. Starting with WAS V7, we have the opportunity to give the server a different name during profile creation.
Unfederated application server
An administrative agent can monitor and control multiple unfederated application servers on one or more nodes.Ways to create an unfederated application server include...
- The first server on a node to be managed by an administrative agent must be created with a stand-alone profile and then registered with the administrative agent.
The registration process disables the dmgr console on the server and makes a console for the application server node available on the administrative agent process.
- Additional unfederated application servers on that node are created from the administrative agent.
- When you use the administrative agent console to register the application server node to a job manager, additional application servers can be created on the node by submitting a job from the job manager console. What about wsadmin?
The administrative service remains active in unfederated application servers that are registered to an administrative agent. We can connect to either the application server or the administrative agent to run wsadmin commands, but all admin operations performed by connecting to the application server are forwarded to the agent. Connecting to the agent avoids that extra step.
Managed application servers
In a distributed server environment, you create an application server from the deployment manager dmgr console.
If we are creating an application server with the intention of adding it to a cluster, click
-
Servers | Clusters | clustername
Application server options
You need to consider certain options as you create an application server. The method by which you select these options varies depending on how you are creating the server, but the values are the same.
Templates
An application server is created based on a template that defines the configuration settings. Four template options are provided:| default Standard production server | You get this option if we do not specify a template for a server on a distributed system. |
| default z/OS | Available only on z/OS platforms and is the only option until you create new templates. |
| DeveloperServer | The DeveloperServer template is used when setting up a server for development use. This template configures a JVM for a quick start by disabling bytecode verification and performing JIT compilations with a lower optimization level. Do not use this option on a production server where long run throughput is more important than early server startup. |
| Custom template | We can create templates based on existing application servers |
Ports
Each server process uses a set of ports that must be unique on the system. When you create an application server, we have the following options:- Use the default ports
Use if you will only have one application server on the system or if this is the first application server created, and port selection is not an issue.
- Have a set of ports selected that are unique to the WebSphere system installation
Ensures that no two WebSphere processes in the installation have the same port assigned. It does not guarantee that ports are selected that are not in use by non-WebSphere processes or by WebSphere processes installed as a separate installation.
- Specify the ports
Best if we have a convention for port assignment on the system that ensures unique ports are used by all processes, both WebSphere and non-WebSphere.
Only available when you create a new profile using the Advanced option or the manageprofiles command.
Create an application server from the dmgr console
To create an application server from the dmgr console:
- Open the deployment manager dmgr console.
- Click...
-
Servers | Server Types | WebSphere application server
- Click New.
- Select the node for the new server, and enter a name for the new server.
- Select a template to use by clicking the appropriate radio button.
On z/OS systems, there is one system-defined template called default ZOS.
- The options you see on the next window vary depending on the platform. For distributed platforms, you see the window. Select the box...
-
Generate Unique Ports
...to have unique ports generated for this server. Clearing this option generates the default set of ports.
If we have multiple core groups defined, we have the option to select the core group.
For z/OS systems
The server-specific short name specifies the short name for the server. This item is also used as the job name (for example, BBOS002). The generic short name is the short name converted to a cluster short name if the server is later used in a cluster.
- A summary window is presented with the options you chose. Click Finish to create the server.
- In the messages box, click Save to save the changes to the master repository.
- Review and update the virtual host settings
- Regenerate the web server plug-in and propagate it to the web server
If we are creating an application server on a Windows operating system, this process does not give you the option of registering the new server as a Windows service. We can do this task later using the WASService command
Creating an application server from the job manager
To create an application server from the job manager...
- Start the job manager and targets. Access the job manager console.
- Click Jobs | Submit.
- Click the Create application server job type. Click Next.
- Select the job target:
- If we are creating an application server on an unfederated node, select the application server node.
- If we are creating a new managed server, select the deployment manager node.
Add a target name by entering the name and then clicking Add. We can also search for a target name by clicking Find.
Enter the user name and password with administrative authority on the target node...
- Specify the job parameters. At minimum:
- Specify a unique name of the new application server. Use the Find button to get a list of existing server names on the target.
- If the target is a deployment manager, enter the name of the node on which the server will be created.
We can expand the Additional job parameters section where the optional settings allow you to add platform specific settings, specify a different template, and specify the setting that determines if ports unique to the installation are generated.
- The template name field defaults to the default server template for the operating system on which the application server will run. You only need to specify this setting to use a custom template or the DeveloperServer template.
- The Generate unique ports option is selected by default to generate unique ports for the installation.
- Platform-specific information is where we can provide a short name, generic name, or bit mode for creating a server on the target. If we do not provide this information, the product generates unique names and uses the default bit mode.
- Schedule the job. Take the defaults for the job schedule. The defaults execute the job once. Click Next.
- Review the settings, and click Finish.
- Wait until the job status is Succeeded.
- Verify the server was created. Click Jobs | Target resources to see the new server
in the list of resources.
Updating the virtual host settings
When you install applications, associate a virtual host with each web module.
When creating a new application server, the default_host virtual host is set as the default virtual host for web modules installed on the server. We can change this default in the web container settings for the application server or simply select a new virtual host when you install the applications.
If the application will only be accessed through a web server, and the virtual host that you will use is set up with the web server port in the list of host aliases, no action is necessary; however, if application clients will access the web container directly, or if you will be installing SIP applications on this server, ensure the relevant ports generated for this application server are added to the host alias list.
Creating an application server template (optional)
WAS provides the ability to create a customized server template based on an existing server configuration. Next, we can use that server template to create new servers. If we need more than one application server, for example, for a cluster, and if the characteristics of the server are different from the default server template, it is more efficient to create a custom template and use that template to create your server.To create an application server template based on an existing server:
- Servers | Server Types | WebSphere application servers | Templates | New
- Select a server from the list to build the template from, and click OK.
- Enter a name and description for the template, and click OK.
- Save your configuration.
View the status of an application server
Check the status of an application server:
- Use the serverStatus command on the system where the application server is running.
- In a distributed environment, we can view the status from the dmgr console. The node for the application server must be active for the deployment manager to know the status of a server on that node.
- From the job manager console.
- If the server is registered as a Windows service, we can check the status of the service.
Using the dmgr console
To check the status of a managed server using the deployment manager's dmgr console, the node agent must be started.
- Click...
-
Servers | Server Types | WebSphere application servers
The servers are listed. The last column on the right side contains an icon to indicate the status of each server.
If the server status is Unknown, the node agent on the node in which the application server is installed is not active. The server cannot be managed from the dmgr console unless its node agent is active.
Using the serverStatus command
The syntax of the serverStatus command is:
serverStatus.bat(sh) [options]
The options are shown Example 8-5.
serverStatus options

Usage: serverStatus <server name | -all>
[-logfile <filename>]
[-replacelog]
[-trace]
[-username <username>]
[-password <password>]
[-profileName <profile>]
[-help]
The first argument is mandatory. The argument is either the name of the server for which status is desired or the -all keyword, which requests status for all servers defined on the node.
If we have administrative security enabled, enter the user ID and password of an administrator ID. If we do not include it in the command, you are prompted for it for example, to view the status of a server...
-
cd PROFILE_HOME/bin
serverStatus.sh server_name -username adminID -password adminpw
To check the status of all servers on the node...
-
cd PROFILE_HOME/bin
serverStatus.sh -all -username adminID -password adminpw
serverStatus example - AIX operating system
-
PROFILE_HOME/bin/serverStatus.sh -all -username wsadmin -password foo
ADMU0116I: Tool information is being logged in file PROFILE_HOME/logs/serverStatus.log
ADMU0128I: Starting tool with the MyServer01 profile
ADMU0503I: Retrieving server status for all servers
ADMU0505I: Servers found in configuration:
ADMU0506I: Server name: nodeagent
ADMU0506I: Server name: MyServer01
ADMU0506I: Server name: MY_ODR_1
ADMU0506I: Server name: MyServer02
ADMU0506I: Server name: k
ADMU0506I: Server name: MyServer03
ADMU0508I: The Node Agent "nodeagent" is STARTED
ADMU0509I: The Application Server "MyServer01" cannot be reached. It appears to be stopped.
ADMU0509I: The Application Server "MY_ODR_1" cannot be reached. It appears to be stopped.
ADMU0509I: The Application Server "MyServer02" cannot be reached. It appears to be stopped.
ADMU0509I: The Server "k" cannot be reached. It appears to be stopped.
ADMU0509I: The Application Server "MyServer03" cannot be reached. It appears to be stopped.
From the job manager console
To display the servers and their status from the job manager console:
- Click Jobs | Targets.
- Select the box to the left of the node name. In the Display resources drop-down menu, click Server.
- This action displays the list of servers in the node. Click the name of the server.
The status of the server is displayed.
Starting an application server
Using the dmgr console to start a managed server
Before managing a server in a distributed server environment using the dmgr console, the node agent for the server's node must be running. To check the status of the node, click System administration | Node Agents. The status of the node agent is in the far right column. If it is not started, start it manually
From the dmgr console:
- Click...
-
Servers | Server Types | WebSphere application servers
- Select the box to the left of each server to start.
- Click Start.
- Verify the results in the Server status feedback window.
If there are any errors, check the log files for the application server process. The default location for the logs is:
- PROFILE_HOME/logs/server_name/SystemOut.log
- PROFILE_HOME/logs/server_name/startServer.log
On z/OS, check the output in the application server job log.
By default, all the applications on a server start when the application server starts.
Using the startServer command
startServer options
./startServer.sh servername  \
                 -nowait \
                 -quiet \
                 -logfile /path/to/file.log \
                 -replacelog \
                 -trace \
                 -script [<script filename>] [-background] \
                 -timeout <seconds> \
                 -statusport <portnumber> \
                 -profileName <profile> \
                 -recovery \
                 -help \
For example...
-
PROFILE_HOME/bin/startServer.sh MyServer03
ADMU0116I: Tool information is being logged in file PROFILE_HOME/logs/MyServer03/startServer .log
ADMU0128I: Starting tool with the MyServer01 profile
ADMU3100I: Reading configuration for server: MyServer03
ADMU3200I: Server launched. Waiting for initialization status.
ADMU3000I: Server MyServer03 open for e-business; process id is 749660
Start a server from the job manager
To start an application server from the job manager:
- Access the job manager console.
- Click Jobs | Submit.
- Select the Start server job type. Click Next.
- Select the job target:
- If we are starting an application server on an unfederated node, select the application server node.
- If we are starting a new managed server, select the deployment manager node. Add a target name by entering the name and clicking Add. We can also search for a target name by clicking Find.
Enter the user ID and password with administrative authority on the target node.
- Specify the job parameters:
- Specify the name of the application server.
Use Find button to get a list of existing server names on the target.
- If the target is a deployment manager, enter the name of the node on which the server will be created.
- Specify the name of the application server.
- Schedule the job.
Take the defaults for the job schedule. The defaults execute the job once. Click Next.
- Review the summary, and click Finish.
- Monitor the status of the job and ensure it completes successfully.
Using the dmgr console to stop a managed server
These directions assume the node agent for the application server is running.
From the dmgr console, we have the following options to stop an application server:
| Stop | Quiesces the application server and stops it. In-flight requests are allowed to complete. |
| Restart | Stops and then starts the server. |
| Immediate Stop | Stops the server, but bypasses the normal server quiesce process, which enables in-flight requests to complete before shutting down the entire server process. This shutdown mode is faster than the normal server stop processing, but some application clients can receive exceptions. |
| Terminate | Deletes the application server process. Use this if immediate stop fails to stop the server. |
From the dmgr console to stop an application server:
- Click...
-
Servers | Server Types | WebSphere application servers
- Select the box to the left of each server to stop.
- Click the appropriate stop option.
If there are any errors, check the log files for the application server process:
- PROFILE_HOME/logs/server_name/SystemOut.log
- PROFILE_HOME/logs/server_name/stopServer.log
On z/OS, check the output in the application server job log.
Restarting all servers on a node
To stop and then restart all the application servers on a node from the dmgr console:
- Click...
-
System administration | Node agents
- Select the box to the left of the node agent.
- Click Restart all Servers on Node.
Stopping all servers in a cluster
To stop all the servers in a cluster from the dmgr console:
- Click...
-
Servers | Clusters | WebSphere application server clusters
- Select the box to the left of the cluster.
- Click Stop or Immediate Stop.
Restarting all servers in a cluster
To stop and then restart all the servers in a cluster from the dmgr console:
- Click...
-
Servers | Clusters | WebSphere application server clusters
- Select the box to the left of the cluster.
- Click Ripplestart.
Using the stopServer command
The syntax of the stopServer command is:
-
stopServer.bat(sh) [options]
Usage:
 stopServer <server> [options]
           -nowait
          -quiet
          -logfile <filename>
          -replacelog
          -trace
          -timeout <seconds>
          -statusport <portnumber>
          -conntype <connector type>
          -port <portnumber>
          -username <username>
          -password <password>
          -profileName <profile>
          -help
For reference, <server> is the name of the server to be started. The first argument is mandatory and is case sensitive. If administrative security is enabled, a user name and password is also required.
stopServer command example
PROFILE_HOME/bin/stopServer.sh
MyServer03 -username wsadmin -password foo

ADMU0116I: Tool information is being logged in file PROFILE_HOME/logs/MyServer03/stopServer.
log
ADMU0128I: Starting tool with the MyServer01 profile ADMU3100I: Reading configuration for server: MyServer03
ADMU3201I: Server stop request issued. Waiting for stop status.
ADMU4000I: Server MyServer03 stop completed.
If we attempt to stop a server and for some reason it does not stop, we can use the operating system commands to stop the Java process for the server.
Viewing runtime attributes of an application server
To view runtime attributes using the dmgr console:
- Click...
-
Servers | Server Types | WebSphere application servers
- Click the server name to access the detail page.
- If the server is running, four tabs are displayed: Configuration, Reports, Operation and Runtime. If the server is not running, the Runtime tab is not displayed. Click the Runtime tab.
The Runtime tab is composed of the following items:
- General information about the server process, including the process ID, cell name, node name, state, and the current and maximum heap size.
- Access to a list of messaging engines that run on this application server. There will be one messaging engine for each bus of which the server is a member. We can start and stop the messaging engine from this window.
- Access to the Diagnostic Provider service. This allows you to query current configuration data, state, and initiate diagnostic tests.
- Access to the Transaction Service properties settings. We can change the timeout settings while the server is running but not the transaction log directory setting.
Changes made in this window are active until the server is stopped.
To make these settings permanent and to configure additional Transaction Service settings, click the Configuration tab while we have this page open. This action takes you directly to the Transaction Service settings.
We can also view or act on transactions in the following states by clicking Review, located to the right of the state. This action is not normally necessary, but in an exceptional situation, it might be useful.
- Manual transactions:
These transactions await administrative completion. For each transaction, the local or global ID is displayed. We can display each transaction resource and its associated resource manager. Choose also to commit or rollback transactions in this state.
- Retry transactions:
These are transactions with some resources being retried. For each transaction, the local or global ID is displayed, and whether the transaction is committing or rolling back. We can display each transaction resource and its associated resource manager. Choose also to finish, or abandon retrying, transactions in this state.
- Heuristic transactions:
These are transactions that completed heuristically. For each transaction, the local or global ID and the heuristic outcome is displayed. We can display each transaction resource and its associated resource manager. We can also choose to clear the transaction from the list.
- Imported prepared transactions:
Transactions that were imported and prepared but not yet committed. For each transaction, the local or global ID is displayed. We can display each transaction resource and its associated resource manager. We can also choose to commit or roll back transactions in this state.
Performance Monitoring Service settings allow you to change the instrumentation levels while the server is running or make permanent changes to the configuration for that server.
Product Information gives you access to extensive information about the product installation and Fix Pack information.
Customizing application servers
When creating a new application server, it inherits most of its configuration settings from the specified template server. To view or modify these settings, click...
-
Servers | Server Types | WebSphere application servers
A list of application servers defined in the cell appears in the workspace. Click the name of the application server to make a modification.
General properties
The general properties consist of a few items that we can see immediately:
| Server name and node name | You also have short name and unique ID for servers on z/OS. |
| Run in development mode | Enable this option to streamline the startup time of an application server. Do not enable this setting on production servers. |
| Parallel start | Start the server components, services, and applications on multiple threads. This action might shorten the startup time. The order in which the applications start depends on the weights you assigned to each of them. Applications that have the same weight are started in parallel.
To set the weight of an application...
|
| Start components as needed | Start the application server components as needed. Might shorten appserver start time. |
| Access to internal server classes | Whether the applications can access many of the server implementation classes. |
| Application classloader policy and class loading mode | Define an application server-specific classloader policy and class loading mode. |
You also have the run in 64-bit JVM mode setting on z/OS, which provides additional virtual storage for user applications in 64-bit mode. Removing the check from this selection enables your server to start in 31-bit mode.
There is no interdependence between the modes in which we are running different servers. We can run some of your servers in 64-bit mode and some of your servers in 31-bit mode. However, eventually convert all of your servers to run in 64-bit mode because support for running servers in 31-bit mode is deprecated.
Container settings
Each application server has containers that run specific application components.
Modifying container settings is not something you normally do on a daily basis. Information about the most commonly used settings in these sections is provided throughout this book with the appropriate topics. Each container has settings that allow you to modify its configuration.
Session management
Manage HTTP session support. Session tracking mechanism, maximum in-memory session count, session timeout.
SIP container settings
Run SIP applications written to the JSR 116 specification. SIP is used to establish, modify, and terminate multimedia IP sessions, including IP telephony, presence, and instant messaging. If we have SIP applications, review these settings.Web container settings
Serve application requests for servlets and JSPs. Specify the default virtual host, enable servlet caching, disable servlet request and response caching, set the number of timeout thread and the default timeout, configure settings for using thread pools or a work manager to start runnable objects, specify session manager settings (such as persistence and tuning parameters), and HTTP transport properties.
The Asynchronous Request Dispatcher (ARD) enables servlets and JSPs to make standard include calls concurrently on separate threads. Selecting this link allows you to enable ARD and configure related settings.
Portlet container services
Runtime environment for portlets using the JSR 168 Portlet Specification. Portlets based on this JSR 168 Portlet Specification are referred to as standard portlets. We can use these settings to enable portlet fragment caching to save the output of portlets to the dynamic cache.
EJB container properties
Set passivation directory path, pool cleanup interval, default data source JNDI name. Enable stateful session bean failover using memory-to-memory replication. Configure EJB cache, EJB timer service settings and EJB asynchronous method invocation settings.
Container services
The following settings are available under the container services section:
- Application profiling service
WebSphere extension used with access intents to dynamically control concurrency, pre-fetch, and read-ahead. Allows you to enable this service and to set the compatibility mode for J2EE 1.3 applications.
- Transaction service
Manage active transaction locks. Set directory location to store log files for recovery. Set total transaction lifetime timeout, and client inactivity timeout.
When the application server is running, a Runtime tab is available in the Transaction Service properties workspace. From here, we can manage running transactions and modify timeout settings at run time.
- Dynamic cache service
Specify settings for the dynamic cache service of this server.
- Compensation service
Server-level configuration for compensation enablement and logging. This service is not started automatically. If we plan to run applications that require this service, enable it here.
- Internationalization service
Configure and manage an internationalization context for an application for which components are distributed across the enterprise. This section of the configuration window allows you to enable this service. It is not enabled by default.
- Default Java Persistence API settings
Manage persistence and object-relational mapping and functions for the EJB 3.0 specifications. Configure default settings for JPA. JPA settings in an application override these settings.
- Object pool service
Disable. (Enabled by default).
- ORB service
Request timeout, thread settings, and connection cache minimum and maximum.
- Startup beans service
Session beans that run business logic through the invocation of start and stop methods when applications start and stop. Enable this service (it is disabled by default).
- Business process services
The business process settings allow you to manage the following features:
- Activity session service
- Work area partition service
- Work area service
Applications
Use the Installed Applications link to view the applications installed on this server. This link will display the collection of applications as links to the configuration page for each application.
Server messaging
The server messaging settings provide configuration settings and information for the messaging services.
Server infrastructure
The server infrastructure settings include settings for Java and process management and administration services:
- Java and Process Management:
Class loader Create and configure class loader instances. Process definition Runtime properties, such as the program to run, arguments to run the program, and the working directory. Within the process definitions, are the JVM definitions, such as the initial and maximum heap sizes, debug options, the process class path, or different runtime options, such as profiler support and heap size. Process execution Process priority or the user and group to be used to run the process. Not applicable on the Windows platform. Monitoring policy How long the node agent monitors the application server. It includes ping intervals, timeouts, and an initial state setting. These settings can be used to ensure the server is started when the node starts and is restarted in the event of a failure. Custom properties Additional custom properties for this component. Administration services Administrative communication protocol settings and timeouts. Server components Creates additional runtime components that are configurable. Custom services Creates custom service classes that run within this server and their configuration properties. - Java SDKs:
View and chose the required version of SDKs for the application server process. WAS V8.5 lets you select between Java SDK versions 1.6 and 1.7, both of them available for 32 and 64-bits systems. The default version selected when installing is Java SDK 1.6. If both versions are installed on the system, we can chose one of them and set it as default by clicking the Make Default button. Save your changes and restart the application server process to use the newly selected JAVA SDK version.
Ports
Basic port definitions...
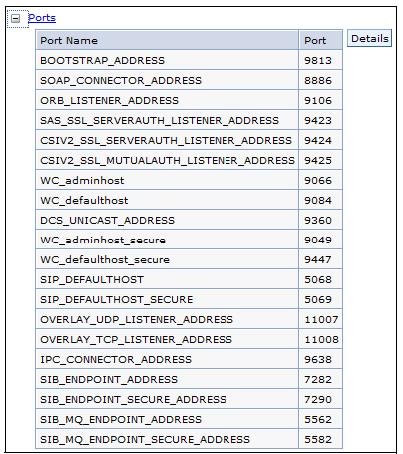
Viewing application server ports
The WAS V8.5 provides two new ports for the application server:
- OVERLAY_UDP_LISTENER_ADDRESS
Used for peer-to-peer (P2P) communication. The On Demand Configuration and asynchronous PMI components use P2P as their transport. This port is required by every WebSphere Extended Deployment process.
The Default Value (incremented for multiple processes) is 11001.
- OVERLAY_TCP_LISTENER_ADDRESS
Used for P2P communication. The On Demand Configuration and asynchronous PMI components use P2P as their transport. Required by every WebSphere Extended Deployment process.The Default Value (incremented for multiple processes) is 11002.
You might not ever need to manually change these ports. It is likely, however, that you will want to view them. For example, if you use the dumpNameSpace command, we can specify the bootstrap port of the process from which to dump the name space.
When you federate a node, know the SOAP connector port of the node or deployment manager. The inbound communications ports are essential for accessing applications and the dmgr console.
Click Details to go to a page that has links for the configurable port settings.
Some port settings are defined to use the channel framework. These settings have an associated transport chain that represents the network protocol stack. A transport chain consists of one or more types of channels, each of which supports a different type of I/O protocol, such as TCP or HTTP. Network ports can be shared among all of the channels within a chain. The Channel Framework function automatically distributes a request arriving on that port to the correct I/O protocol channel for processing.
Message listener service
The message listener service provides the message-driven bean (MDB) listening process, in which message-driven beans are deployed against listener ports that define the JMS destination to listen upon. These listener ports are defined within this service along with settings for its thread pool.
Communications Enabled Applications (CEA)
The Communication Enabled Applications setting provides the ability to add dynamic web communications to any application or business process. We can enable this setting and then configure the Representational State Transfer (REST) interface and the computer-telephony interaction (CTI) gateway.
Performance
Specify settings for the Performance Monitoring Infrastructure (PMI) and the Performance and Diagnostic Advisor Configuration framework.
Security
Security settings for the application server allow you to set specific settings at the server level. Security settings are covered in WAS V8 Security Guide, SG24-7971.Troubleshooting
These settings include the ones for logging and tracing. For information about troubleshooting and using these settings, see WAS V6: Diagnostic Data, REDP-4085.
Additional properties
The following settings are defined under the additional properties section:
| Class loader viewer service | Enable or disable the service that keeps track of classes that are loaded. |
| Core group service | High availability. |
| Endpoint listeners | Eeceives requests from service requester applications within a specific application server or cluster. |
| Debugging service | Settings for the debugging service to be used in conjunction with a workspace debugging client application, for example, the Application Server Toolkit. |
| Thread pools | Maximum number of concurrently running threads in the web container. Because one thread is needed for every client request, this setting directly relates to the number of active clients that can possibly access the web container on this application server at any given time. A timeout value can be specified for the application server to remove threads from the pool based on a timed period of inactivity.
Finally, an option for creating threads beyond the maximum pool size is available. Be careful when using this option. It can have the unexpected effect of allowing the web container to create more threads than the JVM might be able to process, creating a resource shortage and bringing the application server to a halt.
|
| Reliable messaging state | Manage the WS-ReliableMessaging runtime state. |
| Web server plug-in properties | Change the HTTP plug-in configuration without having to stop the server and start it again. |

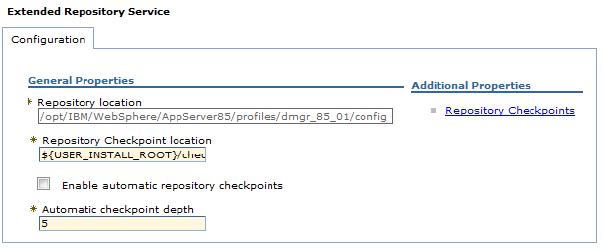
Repository checkpoints service
The extended repository service enables advanced management of the configuration repository. The configuration repository contains the configuration for the cell. This information is essential to the operation of the applications. We can create repository checkpoints to help save snapshots of your configuration as you make changes so that we can undo those changes if necessary. We can configure your repository to create automatic delta checkpoints each time you make a configuration change. A delta checkpoint saves a copy of the configuration documents prior to saving your changes. We can specify the number of automatic checkpoints to save. After this limit is reached, the next checkpoint replaces the oldest.
To configure the repository checkpoints service:
- Log into the dmgr console, and click...
-
System administration | Extended Repository Service
- To enable automatic checkpoints, select...
-
Enable automatic repository checkpoints
To create a single checkpoint, select...
-
Additional Properties | Repository Checkpoints | New
Next, enter a name for the checkpoint, and click OK. A full repository checkpoint is created.
- Click...
-
System administration | Extended Repository Service | Repository Checkpoints
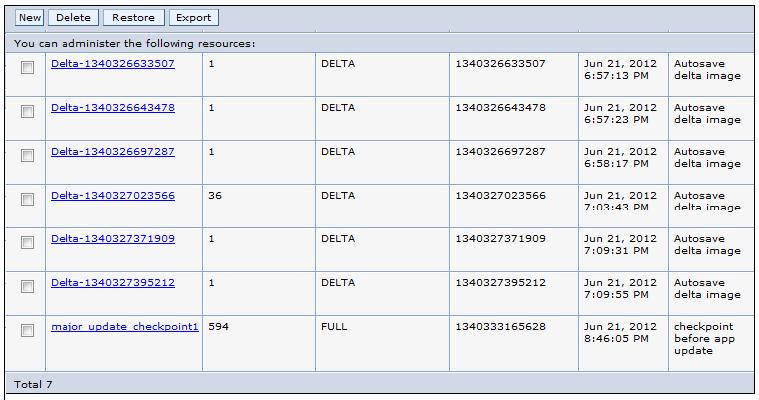
Repository checkpoints
Other checkpoint options available are adding, deleting, exporting as compressed files (only for delta checkpoints), and viewing the contents by clicking the name of the checkpoint.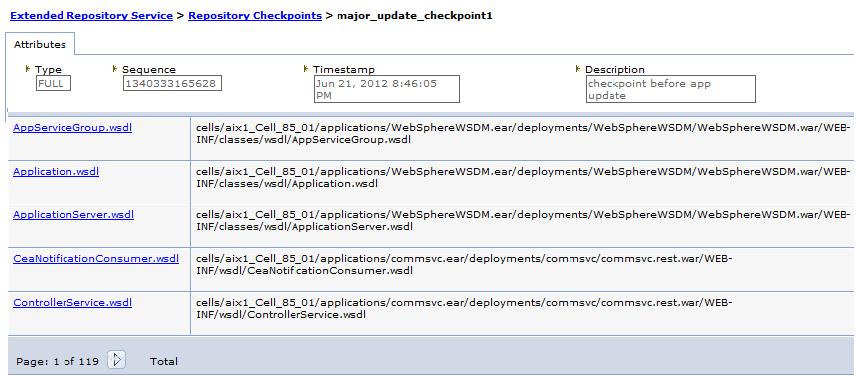
Repository checkpoint contents
More information: Repository checkpoints service, refer to the IBM WAS V8.5 Concepts, Planning, and Design Guide, SG24-8022-00.