URL Mapping
URL Mapping allows portal administrators to create constant user friendly URLs and map them to portal pages. As administrators create the URLs, they can define human readable names for them. These can be remembered and are therefore more user friendly. The self defined URLs can be published externally and thereby made available to portal users. For example, a computer store that uses the portal could create a user defined URL...
products/hardware/laptops...for the page on which their laptop product line is advertised. This URL can be appended to a portal prefix that was defined by the store, for example...
http://www.fancycomputers.com/wps/portal/products/hardware/laptopsClicking on such a mapped URL from outside of the portal takes the user to the desired portal page. Users can also combine several mapped contexts into the representation of a full valid URL, type that full mapped URL into the address field of the browser and thereby get to the portal page.
Clicking on a mapped URL from outside the portal takes the user straight to the desired page in the case of pages which are accessible without login to the portal. In the case of pages which require login the user is prompted for user ID and password. After successful login the portal takes the user directly to the desired page. However, this works only if portal security is enabled. Otherwise the portal redirects the user to the portal Welcome page.
See the following sections for more information about URL Mapping:
- The administrative model of URL Mapping
- Working with the URL Mapping feature
- Reference: Unreserved URL characters
- Setting the language for a URL Mapping
The administrative model of URL Mapping
The mapped URLs are arranged in hierarchical trees of contexts. A tree starts with a root context at the top level, and each context can have several child contexts. The full URL of a context is created by concatenating the labels of all contexts that lie on the path from the root to the given child context. The example...
products/hardware/laptops...given above is the URL concatenated from the three contexts.
The following context attributes can be configured for the URL contexts:
- The label or labels of the context:
Examples of labels are products or hardware. A context must have at least one label; it can have more than one label.
- The portal page:
The portal page which the context references; in other words, the page to which the context is mapped.
- Child contexts of a context.
The following restrictions apply to the names that we can give to contexts:
- Users can map contexts to all portal pages for which they have the User role.
- As the labels are later used to create the URL, the label can only contain characters that are in the set of unreserved URL characters.
- A label of a context must be unique in the scope of its parent context. This means that no two sibling contexts can have the same label.
- The label of a root context must not share its partial or full name string with a portal URL identifier. For example, if the identifier is name, then a root context must not be na or vice versa.
- The maximum length of a label is restricted to 255 characters.
- A label must not have the same name as URL codecs that are used in the portal. Here is a lists of codec names currently in use
- cxml
- cxml_1
- cxml_2
- kcxml
- cxmld
- wml
- vp
- base64xml
- delta
- c0
- c0_1
- c0_2
- c1
- c2
- c3
- d0
- dl2
Mapped URLs and their hierarchy
The complete user defined URLs are concatenated from the context hierarchy as described above. They are mapped to portal pages as shown in the following example:
Context hierarchy URL name Referenced page Products Products Product page Hardware Products/Hardware Hardware page Laptops Products/Hardware/Laptops Laptop page Software Products/Software Software page The context Laptops references the Laptop page, therefore this page can be accessed via the URL Products/Hardware/Laptops.
If a context has more than one label, this results in the equivalent number of possible URLs combined from context names. In the following example, the Laptop page can be accessed by both the URLs Products/Hardware/Laptops and Products/Hardware/ThinkPads:
Context hierarchy URL name Referenced page Products Products Product page Hardware Products/Hardware Hardware page Laptops Products/Hardware/Laptops Laptop page ThinkPads Products/Hardware/ThinkPads Laptop page Software Products/Software Software page
Portal content tree and URL Mapping context tree
The hierarchical tree of the contexts is independent from that of the portal pages and navigation as shown in the following example:
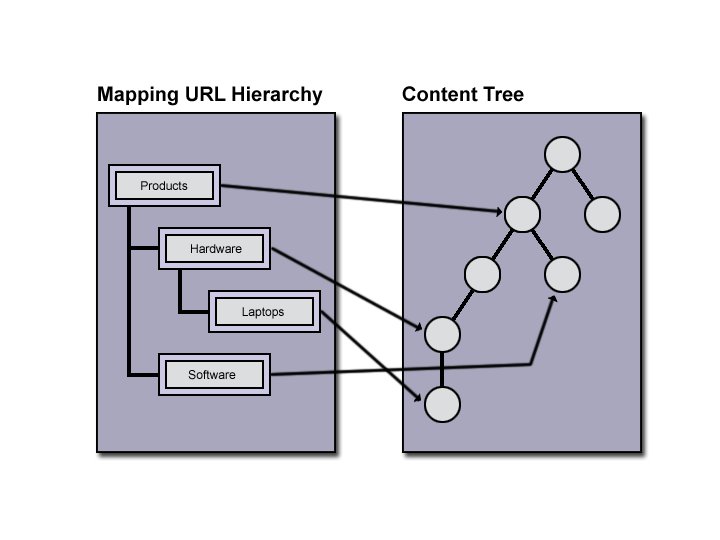
This has the following advantages:
- Users can map contexts and URLs for which they have the Editor role to all portal pages for which they have the User role.
- Administrators can give users access roles to individual contexts. These roles determine the access rights assigned to the users to perform their tasks. For example, if you give a user the Editor role to contexts, that user can then map those contexts to pages.
- If you change the name or label of a context, the portal applies that change to all user defined URLs which depend on that context. Example: an update from...
products/hardware/.....to...
products/computer-hardware/......changes all URLs under the updated context accordingly.
Access control administration
Administrators give users access roles to perform their tasks with contexts. The roles determine the access rights assigned to the users to perform their tasks. The roles given to a user for a single context are inherited by all its children by default.
The following example can explain this: Administrator A assigns subadministrator S the Editor access role for the Hardware context. By default, user S then has the same role on all children of context Hardware. In the example above, this would be Laptops and ThinkPads. Therefore, user S can add subcontexts at any location in this subtree. However, user S has no permission to add subcontexts to the software context or to its child contexts. In the following table, the part of the context tree for which user S has the Editor role is shown in bold.
Context hierarchy URL name Products Products Hardware Products/Hardware Laptops Products/Hardware/Laptops Subnotebooks (Context added by user) Products/Hardware/Laptops/Subnotebooks ThinkPads Products/Hardware/ThinkPads Software Products/Software Notes:
- Users can traverse contexts for which they have no access role assigned, in order to get to a child context for which they have an access role assigned. In the example above, if user S has no access role for the Products context, user S cannot edit or map that context. User S can only view and click that context in the URL Mapping portlet, in order to get to the Hardware context for which the user has the Editor access role.
- Use of explicit blocks overrules the default inheritance behavior. If in the example above the administrator puts a block on the Laptops context for user S, then user S cannot map that context to a portal page or create a child context under it, such as Subnotebooks in the example above.
The access control roles required for the URL Mapping tasks are listed in the following table:
Mapping URL task Required role Creating a context Editor role for the parent context Delete a context Manager role for the context Adding, removing, or changing a label Editor role for the context Mapping tasks:
- Mapping a portal page to a context
- Change a mapping
- Remove a mapping
Both of the following:
- Editor role for the context
- User role on the portal page.
Recommendation: Although an administrator can allow end users to define contexts and map them to their pages, it is not recommended to do this. The number of potential URL Mappings can then grow significantly; this may have performance implications.
For more information about how to administer user roles and access rights refer to Enabling security and Security Concepts.
Work with the URL Mapping feature
Administrators perform the following tasks related to URL Mapping:
- Administering the Mapping URL hierarchy
- Administering access control roles for the context tree
- Configuring URL Mapping.
These tasks are described in the following sections.
Administer the Mapping URL hierarchy
We can perform the following tasks with the Mapping URL administration portlet:
- Create a context
- Delete a context
- Add a label to a context
- Remove a label from a context
- Change the label of a context
- Map portal pages to contexts, that is assign mappings for portal pages to URL Mapping contexts
- Reassign a mapping, that is change the portal page that is mapped to a context
- Unassign a mapping, that is remove the mapping of portal page to a context.
For details about how to perform these tasks refer to the help of the URL Mapping portlet.
To get to the URL Mapping portlet, click Administration, then Portal Settings, then URL Mapping.
Administer access roles for the context tree
Administrators perform the following tasks with regard to access control roles for URL Mapping:
- Assign access roles to users for a context
- Remove access roles.
Use the Access control portlets to assign access roles to users for contexts. See the help of the Access control portlets for detail on how to perform these tasks.
Configure URL Mapping
Administrators perform the tasks described in the following to configure URL Mapping:
Adapting to changes of the portal servlet mappings:
The filter mappings for URL Mappings must be identical to the servlet mappings of the portal. If those are changed, the filter mappings must be updated accordingly. To do this, edit the following lines in the file web.xml:
     <filter-mapping>
        <filter-name>URL Analyzer</filter-name>
        <url-pattern>/portal/*</url-pattern>
     </filter-mapping>

     <filter-mapping>
        <filter-name>URL Analyzer</filter-name>
        <url-pattern>/myportal/*</url-pattern>
     </filter-mapping>
Notes:
- The update is required for both versions of the file web.xml. To ensure this, redeploy the file after the update, or apply the update to both files.
- If you use the modify-servlet-path configuration task, the portal performs this update, and you do not have to do it manually. Refer to Change the WebSphere Portal and WSRP Producer URI for more information on this task.
Enabling and disabling URL Mapping:
URL Mapping is enabled by default. It can be disabled. To disable URL Mapping, modify the property wps.mappingurl.enabled in Configuration Service, as described in Setting configuration properties. Set the value to true to enable URL Mapping or set the value to false to disable URL Mapping. Setting this property is sufficient if you switch between the two states regularly.
If you install the portal with the Mapping URL functionality disabled, it is strongly recommended to still define the Portal URL identifier, if a change to enabled Mapping URL functionality may become possible in the future. This is recommended, as all browser bookmarks to dynamically created Portal URLs will break when you change the identifier.
If you decide not to use URL Mapping at all, you should additionally edit the portal file web.xml in order to obtain maximum performance. Comment out the following lines:
     <filter>
        <filter-name>URL Analyzer</filter-name>
        <filter-class>com.ibm.wps.mappingurl.impl.URLAnalyzer</filter-class>
     </filter>

     <filter-mapping>
        <filter-name>URL Analyzer</filter-name>
        <url-pattern>/portal/*</url-pattern>
     </filter-mapping>

     <filter-mapping>
        <filter-name>URL Analyzer</filter-name>
        <url-pattern>/myportal/*</url-pattern>
     </filter-mapping>
Define the identifier for portal URLs
Portal URLs are the URLs that are automatically created by the portal itself. In order to be able to distinguish between a URL created by URL Mapping and a portal URL, portal URLs have an identifier included.
We can configure this identifier according to your preference. However, the following restrictions apply:
- The portal URL identifier must not share its partial or full name string with the label of a root context. Example: If the identifier is name, then a root context must not be na or vice versa.
- The identifier may only contain characters that are in the set of unreserved URL characters.
- The identifier must not start with one of the special characters that are in the set of unreserved URL characters.
For more information about the set of unreserved URL characters see Reference: Unreserved URL characters.
To change the identifier of a portal URL, modify the parameter wps.mappingurl.portal_url_identifier in Configuration Service, as described in Setting configuration properties. The format of the identifier must be as follows:
/identifier_name/identifier_valueNotes:
- The identifier name is mandatory; the identifier value is optional.
- On a running production system, this should only be performed if it is really required, as it will break existing browser bookmarks to the portal.
Reference: Unreserved URL characters
Context names and identifiers must only consist of characters that are contained in the set of unreserved URL characters. They are listed in the following. Alphanumeric characters:
a b c d e f g h i j k l m n o p q r s t u v w x y zA B C D E F G H I J K L M N O P Q R S T U V W X Y Z0 1 2 3 4 5 6 7 8 9Special characters:
Description Character Hyphen - Underscore _ Period . Exclamation mark ! Tilde ~ Asterisk * Single quote ' Parentheses open and closed ( )
Set the language for a URL Mapping
You might want to create a link to the portal in a specific language for portal users. In this case use a URL Mapping and set it to the required language. The portal will display the addressed page and all subsequently selected pages in the locale that is defined in the URL Mapping until a different language is explicitly requested. To set the language for a URL Mapping, use the XML configuration interface. Proceed by the following steps:
- Create the URL Mapping as required by using the URL Mapping portlet.
- Export the URL Mapping by using the XML configuration interface.
- To change the locale for the URL Mapping, edit the resulting XML file and update the value for the locale attribute in the <portal-url> element as required.
- Import the URL Mapping with the changed locale by running the updated XML script.
Using the XML configuration interface is the only method for changing the locale of a URL Mapping.
Related information
Parent topic:
Portal configuration