Back
WebSphere Portal V6 Database Domains
- Database Domains
- Terminology
- How is portal data organized?
- Advantages of Database Domains
- Examples of moving and sharing Database Domains
- Properties files associated with Database Domains
- Example 1, Moving Database Domains
- Example 2, Moving Domains between database types
- Example 3 - Sharing Domains between Portal Nodes
- A quick recap of Example 2
- A summary of Example 3
- Example 4 - Sharing Domains between separate clusters
- A quick recap of Example 3
- Using Database Domains in a production environment
Database Domains
WebSphere Portal v6 allows us to..
- Split portal data between different database instances and database types
- Share portal data between portal servers and clusters.
A database domain is the schema that defines a particular type of portal data.
The term...
database domains...is often referred to as...
configuration split...or...
database split
Terminology
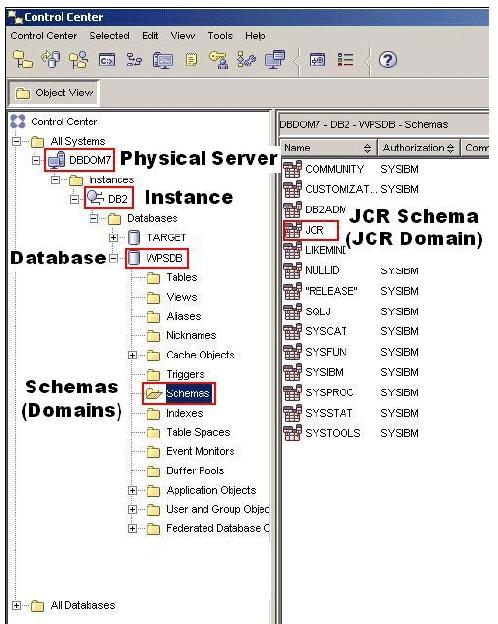
Physical Server Hardware on which the database software is install. Instance Actual physical installation of the database software. Databases Structures that store portal data. Associated with a particular database instance. Schemas Collection of related database elements (tables, indices etc.) that define the data and provide it with structure. Schemas and domains are interchangeable terms. The figure below is a screenshot taken from the DB2 Control Center showing a typical DB2 schema architecture after an initial database-transfer has been executed to move Portal data from Cloudscape to DB2.
Note that the database-transfer process will create WMM objects in the schema defined by the wmm.DbUser value, which in this case is DB2ADMIN.
Portal data
Configuration data Includes:
- Database connections
- Object factories
- Deployment descriptors
Generally constant over the uptime of a portal server node.
Typically kept in property files on the portal server's hard disk and protected by file system security.
With WebSphere Portal V6 much of the configuration data is now managed by WAS ND, and cannot be split or shared.
Release data Includes:
- Resource definitions
- Rules
- Rights
- Page hierarchy
- Available portlets
- Themes
- Templates
- Credential slots
Generally created in dev environments and then brought into the portal using tools like XMLAccess
These resources are typically not modified during production and require administrative rights.
Release data is protected by portal access control and contains only data, not code.
One copy of the release data must exist per cluster.
Release data cannot be split or shared.
Administrators must verify that content of the release databases is consistent across the different lines,
Customization Applied to a single user only. Customization data can be shared between portal server nodes using PortletData. In an environment that consists of multiple lines of production, customization data is kept in a database that is shared across the lines of production, meaning the data is automatically in sync across the lines of production and no matter which line of the production the user logs in to, their customizations will still be available to them.
Community Includes...
- Shared documents
- Application resources
Also known as Java Community Resources (JCR).
JCR data is comprised of shared content using storage mechanisms such as those created with...
We can manipulate JCR data using JCR Explorer
Protected by portal access control.
Which portal data can be shared
Database Schema/Domain Shareable Storage method Configuration No Filesystem Release No ** Database Customization Yes Database Community Yes Database JCR Yes Database Feedback Yes Database Likeminds Yes Database WMM Yes Database ** Release data can be shared between portal servers in the same cluster.
There are two additional databases called "Designer" and "Sync" which are included for use with a number of the "tech preview" features in WebSphere Portal v6. These databases are beyond the scope of this book.
Advantages of database domains
Now that you have defined what you mean by "database domains" and discussed how portal data is organized, we can now begin to discuss in more detail the advantages of splitting and sharing the portal data.
As discussed in the previous section, separation of portal data allows us to store each type of data in its own database domain and these domains can then be transferred to different database servers and database instances and shared between multiple portal nodes
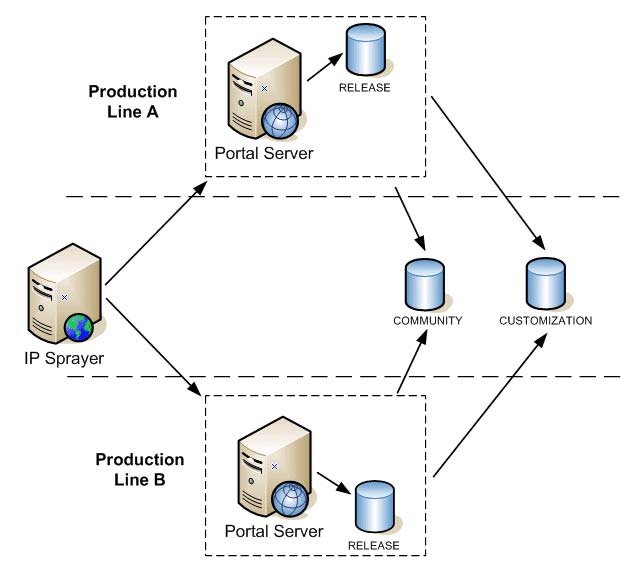
Sharing data between Portal servers
Here is a typical database domains scenario.
In this scenario you have multiple lines of production however the community and customization data is shared between them.
Each production line has a copy of the same Release data (because the Release data cannot be shared)
The advantages of splitting and sharing database domains in this way are
- As the community and customization data are shared between both lines of production, it is synchronized by default thus eliminating the need to conduct any database replication between the production lines
- A user can be routed to either line of production and will still have access to their user specific customizations.
- Upgrades and maintenance can now be carried out in parallel to normal operations and are much simpler because the release data is logically separated now form the community and customization data. Therefore updates to the release data will not affect the other shared database domains. This allows some clusters or server to remain in production during any upgrade or maintenance process.
Updating Portal
As previously mentioned, now that you have the ability to share data between portal nodes, the process of updating our, portal environment is much simpler (and much less risky).
You could conduct an upgrade as follows
- Production line B is taken out of service temporarily to test new release data.
- Users are routed to line A
- Testers or Administrators can access production line B with the new Release data but still using the same user data as production line A.
- If the test fails, it is possible to revert to the previous release data.
- If the test is successful, production line B is put back into service and then users must be re-routed from line A to line B and then production line A is taken out service to have its Release data updated.
Multiple lines of production can exist on different continents. In this example, the customization and jcr data is shared between the production line clusters and replicated securely (using database replication features), between Europe and Asia via a secure link. Each geographical location shares common data between its own lines of production.
This topology allows for users in any geography to log in anywhere and see the same jcr and customization data.
An entire geography and be brought down for maintenance, and the system will still provide 24x7 operations, by redirecting users to the geography that is up and running.
Backing up of user data
One of the challenges of operating a 24x7 environment, is the ability to backup portal data without disrupting end users. In Figure 5-4 you have a two clusters that are sharing the same Customization data. In this scenario the backup is carried out while the user data stays live. During the backup, only the database entries for individual users are locked.
Examples of moving and sharing database domains
In order to best demonstrate how to split and share database domains, you will now look at four examples from your own testing.
These examples help to demonstrate how database domains are a powerful new feature that has been added to the Portal 6 database architecture. These examples show how to move or share a Database Domain and each example leads in to the next one, successively introducing greater and greater high availability than its predecessor.
The particular database domains used in the following examples such as jcr, release, customization etc. are used for illustrative purposes only. They have not been selected in the examples for any specific reason, but where a Database Domain has been moved or shared for a specific reason, an appropriate explanation is provided.
Properties files associated with database domains
There are four properties files that need to be modified when moving or sharing database domains.
In each of the various examples discussed in this chapter, you will see that you edited the following files in this order
wpconfig.properties Ensure that this file contains the correct WAS and Portal administrator user id's and passwords prior to any Database Domain activity. wpconfig_dbtype.properties Edit to include all the relevant database connection information (such as database drivers) that will be needed by portal before you attempt to move or share any database domains. wpconfig_sourceDB.properties Edit to define where the database domains currently reside. This file is not updated as part of any Database Transfer or Database Connect task, so manually edit it to tell portal where any database domains that you may wish to move or share currently are. wpconfig_dbdomain.properties This file needs to be edited to define were you wish to move or connect the database domains to. Keep these properties files and the order in which they will be used in mind when carrying out any Database Domain activities.
Make a copy of any properties file before you edit them.
Table 5-2 Properties files used for database domains
Property file Modified when... wpconfig.properties Transferring or moving to another database wpconfig_dbtype.properties Connecting portal to an additional database server that is different from the one you are currently using (e.g. you are using Cloudscape or DB2 and are now moving some or all Domains to Oracle) wpconfig_sourceDB.properties Transferring to a new database server wpconfig_dbdomain.properties Connecting or transferring to a new database server Throughout this chapter you make extensive use of the Config Wizard. When configuring WebSphere Portal, there are typically multiple different methods that can be employed.
In the following examples, you make extensive use of editing the appropriate properties files and then executing the required configuration task via the Config Wizard.
Although this method may differ from how you configure Portal (for example, you may edit the properties files and use the command line to configure Portal), you chose this method specifically so that in the event the configuration task failed for some reason, you would not have to manually re-enter values in the config wizard panels (and therefore you would also minimize the risks of introducing typos or incorrect information).
Using the Config Wizard in these examples also allows us to walk the reader through the configuration process step by step and helps to further re-iterate just what properties and values are being used.
For every example however, you have provided the command line alternative should you not wish to make use of the Config Wizard.
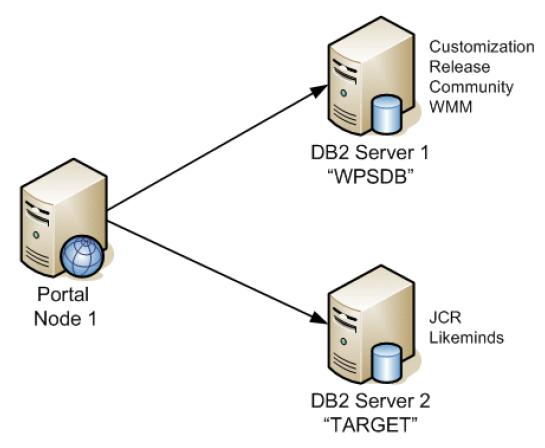
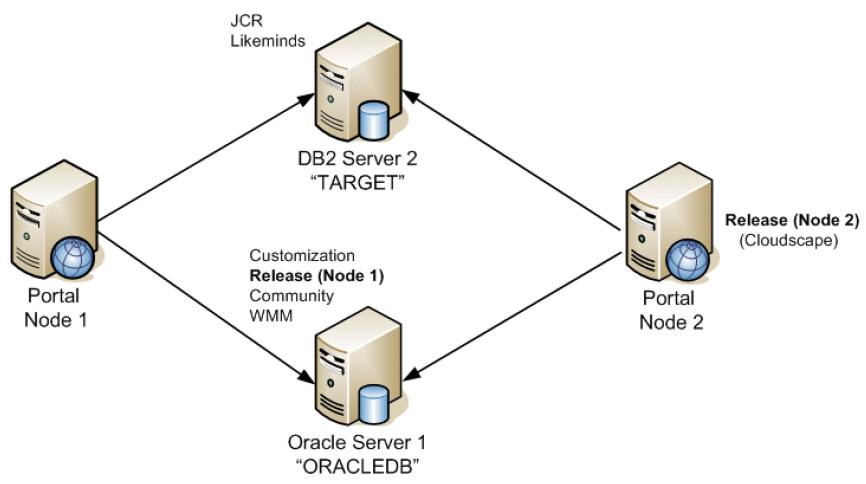
Example 1, Moving database domains
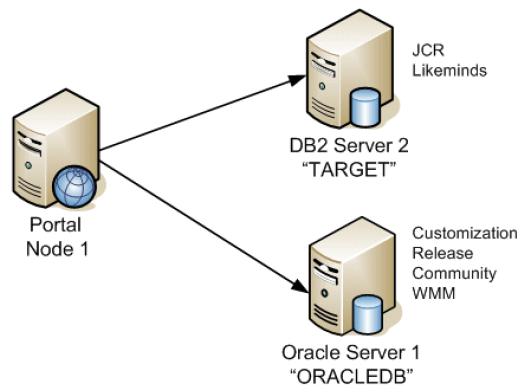
For this example you began with a single portal node using a remote DB2 server and instance. Portal server installation has occurred (with Cloudscape), and the subsequent database transfer from Cloudscape to DB2 has taken place.
On the remote DB2 instance you created a database called WPSDB that contained all the database domains/schemas...
- Customization
- Release
- Community
- WMM*
- JCR
- Likeminds
* The WMM domain is named after the administrative user for the database. In the case, db2admin.
For simplicity, you opted not to use the Feedback , Designer, and Sync domains.
Our aim was to split the portal data by moving the JCR and Likeminds domains to a second DB2 server and instance and storing them in a database you created there earlier called TARGET.
Steps for moving database domains between the same database type
- Build a new DB2 database server (Server 2) and create a new database on it called TARGET.
- Catalogue the databases on DB Server 2 on the Portal server node and ensured you could connect to the new TARGET database on DB2 Server 2.
- In an existing clustered environment you would need to carry out step 2. on the primary node and all other portal nodes in the cluster.
- Edit wpconfig_dbtype.properties.
You edit this properties file in order to provide the configwizard (or database-transfer task) with the location of the drivers that will allow it to connect to the destination DB2 database server/database. In the case you only needed to specify the details for DB2
Regardless of which operating system the portal server is using, make sure any file system paths use the forward slash /.
### DB2 Properties ### Name of class SqlProcessor will use to import SQL files db2.DbDriver=COM.ibm.db2.jdbc.app.DB2Driver ### Directory and name of the zip/jar file containing JDBC driver class ### Use the system specific file separator names, e.g. for windows semicolon and for unix colon. db2.DbLibrary=C:/IBM/SQLLIB/java/db2java.zip ### Name of jdbc provider to be used db2.JdbcProviderName=wpdbJDBC_db2- Edit the wpconfig_sourceDB.properties file.
When you first install portal, all database domains are stored in Cloudscape. Once the portal was installed you then transferred all the database domains to a DB2 server (DB2 Server 1)
The wpconfig_sourceDB.properties file however is not updated as part of the database transfer process and therefore still lists all the database domains as being in the original Cloudscape database.
Therefore, in order to move any database domains (e.g. in the case JCR and Likeminds), update wpconfig_sourceDB.properties to reflect the fact that these database domains are now in DB2.
When you subsequently then run either the Configwizard or the WPConfig database-transfer task to move the database domains, the updated values in the wpconfig_sourceDB.properties file will be read and the wizard or task will then know where the database domains you wish to move currently are.
source.jcr.DbType Type of database where the Domain is stored. In the case DB2 source.jcr.DbName Name of the database where the Domain is stored. In the case WPSDB source.jcr.DbSchema Name of the database schema/ domain. In the case jcr. source.jcr.DbUrl Where database is and how you connect to it source.jcr.DbUser User name to use when connecting to the database where the Database Domain is stored. source.jcr.DbPassword Password to use for the previously specified user name. ### JCR Database Properties ### The type of database to be used for WebSphere Portal JCR domain rce.jcr.DbType=db2 ### The name of the WebSphere Portal JCR domain database ### This value should also appear as the database element in DbUrl ### Non-Windows platforms when using DB2 only. This value is the TCPIP Alias ### for the database. source.jcr.DbName=wpsdb ### The WebSphere Portal JCR domain database schema name ### Follow the documentation of the target database management system ### in order to define a valid schema name as restrictions apply for ### some database management systems. source.jcr.DbSchema=jcr ### The wp JCR domain database URL source.jcr.DbUrl=jdbc:db2:wpsdb ### The database administrator user ID source.jcr.DbUser=db2admin ### The database administrator password source.jcr.DbPassword=password- Repeat the above steps for any other database domains you wish to move. In the case you repeated them for the Likeminds Domain.
- Edit wpconfig_dbdomain.properties.
Now that you have specified the current location of the database domains, we need to specify where you wish to move them to. In the case, you wished to move them to a different DB2 server and in to a database called TARGET. The values you changed in the wpconfig_dbdomain.properties. are as follows...
jcr.DbType Specifies the type of database where the Domain will be stored. In the case DB2 jcr.DbName Specifies the name of the database where the Domain is to be moved to. In the case TARGET jcr.DbSchema Specifies the name of the schema/domain. jcr.DbUrl Specifies how to connect to the new database where you wish to move the database domains to jcr.DbUser Specifies the user name to use when connecting to the database where you wish to move the Database Domain to jcr.DbPassword Specifies the password to use for the previously specified user name. You will need to repeat step 6 for each of the database domains you wish to move.
Example 5-4 Editing wpconfig_dbdomain.properties for JCR and Likeminds
### JCR Database Properties

### The type of database to be used for WebSphere Portal JCR domain
jcr.DbType=db2

### The name of the WebSphere Portal JCR domain database
### This value should also appear as the database element in DbUrl
### Non-Windows platforms when using DB2 only. This value is the TCPIP Alias
### for the database.
jcr.DbName=target

### The LikeMinds database schema name
jcr.DbSchema=jcr

### The wp JCR domain database URL
jcr.DbUrl=jdbc:db2:target

### The database administrator user ID
jcr.DbUser=db2admin

### The database administrator password
jcr.DbPassword=password

### Properties
### DbType: The type of database to be used for LikeMinds
likeminds.DbType=db2

### The name of the WebSphere Portal likeminds domain database
###  This value should also appear as the database element in DbUrl
###  Non-Windows platforms when using DB2 only. This value is the TCPIP Alias
### for the database.
likeminds.DbName=target

### The LikeMinds database schema name
likeminds.DbSchema=likeminds

### The LikeMinds database URL
likeminds.DbUrl=jdbc:db2:target
### The database administrator user ID
### **Required for DB2, DB2 for z/OS and OS/390 **likeminds.DbUser=db2admin
### The database administrator
passwordlikeminds.DbPassword=password
Repeat these steps for any other database domains you may wish to move.

- Run the Configwizard or WPConfig database-transfer task.
The Config Wizard can be found in...
portal_server_root/config/wizardRun configwizard.bat to start the wizard.
Alternatively we can run the following command from the directory...
portal_server_root/config/...substituting domain1, domain2 etc. with he names of the database domains...
./WPSconfig database-transfer -DTransferDomainList=domain1,domain2,etcThe domain names that can be specified when the using the command line are...
release customization community jcr wmm feedback likemindsFor example
./WPSconfig database-transfer -DTransferDomainList=jcr,likeminds
When moving database domains and using DB2, if possible try to ensure that the new (destination) database server does not contain any databases with the same name as the original (source) server. You state this because if you have the same database name on 2 different DB2 servers, then the DB2 client on the Portal server will have to be cataloged using aliases because we can't catalog the same database name twice on the DB2 client to point to 2 different DB2 servers. You should be able to work around duplicate database names by using database aliases on the DB2 client, however a discussion on database aliases is beyond the scope of this Redpaper.
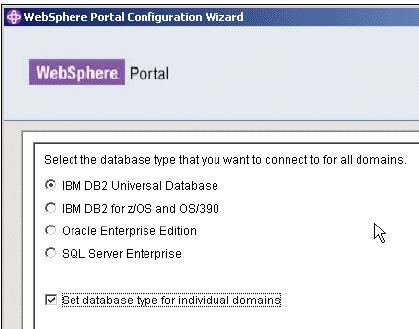
- Select the option to "Transfer data to another database" and then specify the WebSphere Application Server Administrator user name and password
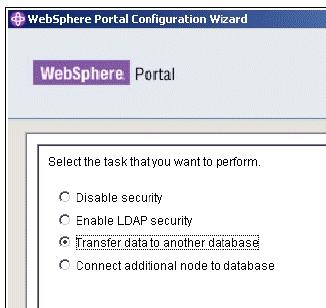

- Ensure that "Set database type for individual domains" is selected. This option will allow us to specify which individual database domains you want to transfer to another database server.
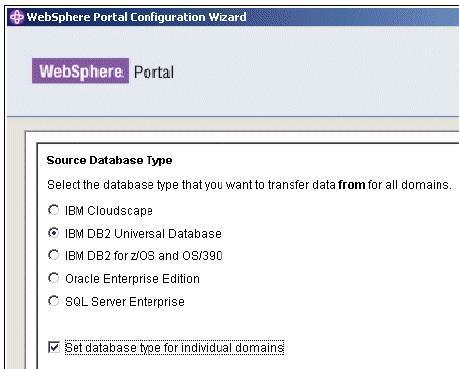
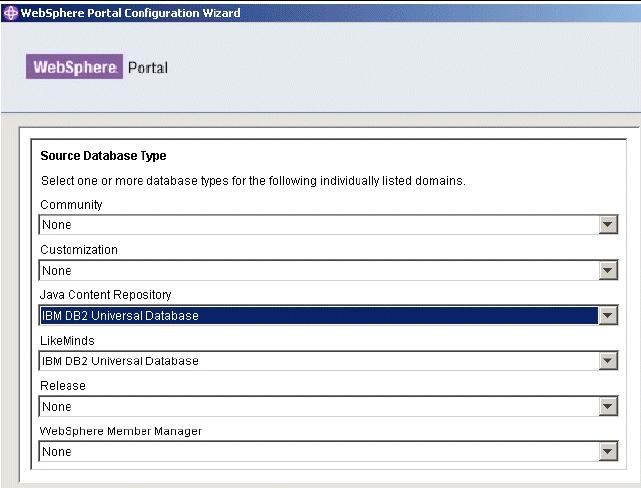
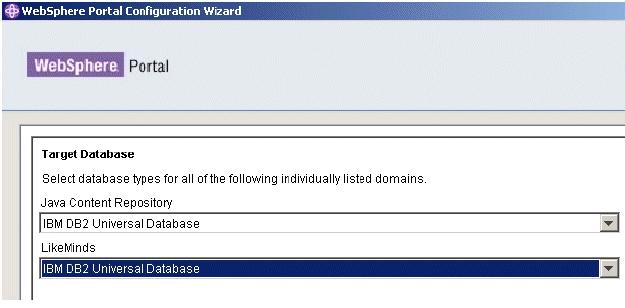
- Select the database domains you want to move. In the case you only specified JCR and Likeminds as the source database domains to be moved. Leave any database domains that you do not wish to move set to "None".
- Specify which databases type will store the database domains you want to move. In the case both database domains will be moved to a DB2 database server.

- Set the DB2 properties that you specified in the wpconfig_dbtype.properties file in step 3. These values define how portal server if going to connect to DB2 database servers.
- Set the details for the first Database Domain you wish to move (in the case JCR).

You will need to provide a valid user name and password to connect to the target database / database server otherwise the database transfer process will fail. In the case this was the user db2admin and the password was password.
Once the Configwizard has run, for security reasons, any password values you may have specified in the properties files it reads from will be replaced with the generic text string of "ReplaceWithYourDbAdminPwd".
- Set the details for the next Database Domain you wish to move (in the case Likeminds). Provide a valid user name and password to connect to the target database / database server otherwise the database transfer process will not be successful.

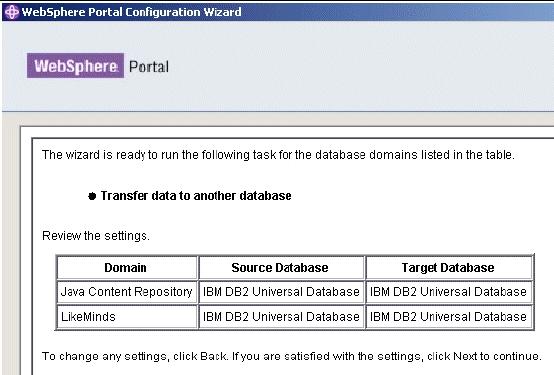
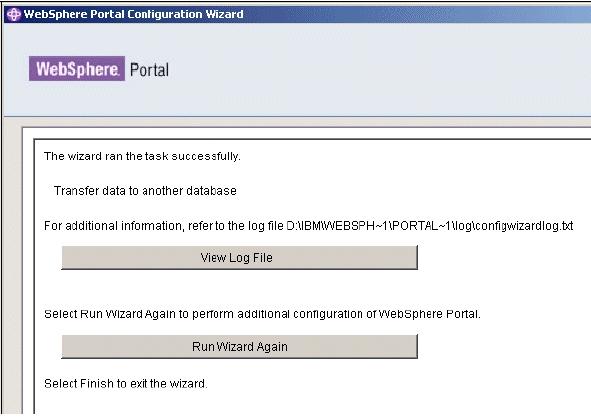
Figure 5-18 shows a summary of the database domains that will be transferred to the new databsase server. It lists where they currently are and where the will be moved to. Click Next to begin the transfer process.
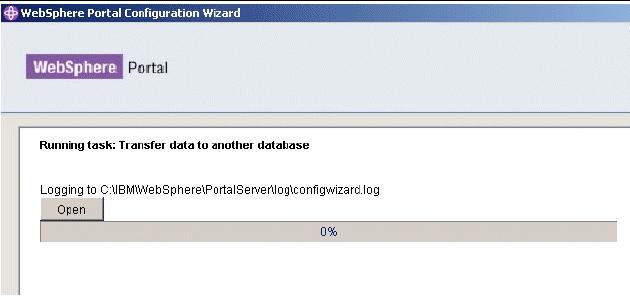
- Clicking the Open button will show you the content of the configwizard.txt file thus allowing you to check the status of the transfer process.
- Once the transfer process has successfully completed, we can verify that the database domains have moved to the new server by using the tools provided by the database software.

In the case, you repeated step 7, and used the Control Center tool that comes with DB2 to verify that the database called "TARGET" now contains the schemas (i.e. database domains) for both JCR and Likeminds
Compare Figure 5-21 with the contents of the "TARGET" database in Figure 5-8.
You will see that in Figure 5-8 there were no database domains listed under schemas, however in Figure 5-21 we can now see the JCR and Likeminds schemas.
This proves that the database domains have now been successfully moved to the new DB2 database server.

Example 2, Moving Domains between database types
Example 2 is similar to example 1, however instead of moving database domains to another database server of the same type, this time you will be moving database domains from DB2 to Oracle.
Although the steps involved in moving database domains to Oracle (or any other supported database server) are very similar to the steps outlined in example 1, it is important to understand some of the configuration differences, as well as to understand under what circumstances you might wish to move database domains to database servers of different types.
Some of the reasons you might wish to move database domains to database servers of different types are
- You may wish to make use of an existing database environment other than the one you currently use with WebSphere Portal. This could help us to realize some cost savings by reusing existing skills and infrastructure
- You may merge with or take over another organization that does not use the same database software you currently use and it would not be cost effective to migrate them to the database software
- You may wish to migrate WebSphere Portal from one type of database software to another for commercial or technical reasons.
The steps listed in this section can not only be used to move individual database domains from one database server to another, they can in effect be used to migrate the entire Portal from one type of database server to another.
A quick recap of Example 1
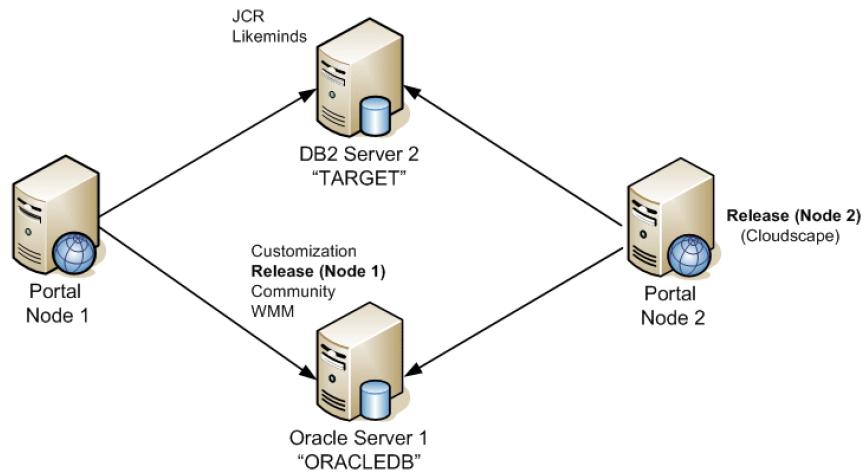
At the end of example 1, the portal environment comprised one portal server connected to two DB2 database servers.
The JCR and Likeminds database domains were moved to the second DB2 database server (in to the "TARGET" database) and the remaining database domains stayed on their original database server (in the WPSDB database).
.

A summary of Example 2
In example 2, you now wish to move all the remaining database domains from their original DB2 server and database called WPSDB to an Oracle database server with a database called "ORACLEDB".
This new environment is described in Figure 5-23.
The remaining database domains that you now wish to move to Oracle are
- Customization
- Release
- Community
- WMM (the domain is actually named after the administrative user for the database. In the case it was called "db2admin")
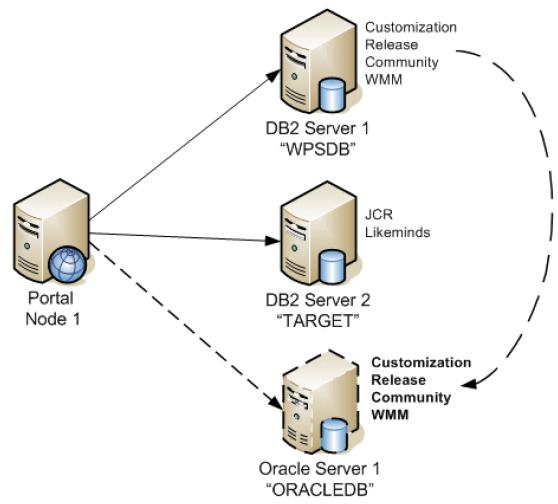
Once you have moved the remaining database domains from the original DB2 Database Server and WPSDB database, you will effectively no longer require the original DB2 server for the portal environment
Steps for moving database domains between database types
See the Infocenter document entitled "Installing Oracle" for more details on how to install and configure Oracle for user with WebSphere Portal.
Also, the WebSphere Portal v6 Cluster Guide also contains the steps for configuring Oracle for use with WebSphere Portal. This is a particularly useful document and can be found here
- Install and configure a remote Oracle database server and create a database called "ORACLEDB".
- Prepare the portal server for Oracle by copying the relevant Oracle database driver on to the portal server and checking connectivity between portal and the Oracle database server.
See the Infocenter document entitled "Planning for Oracle" for more details on how to
install and configure WebSphere Portal for use with Oracle.
- Edit wpconfig_dbtype.properties. You needed to edit this properties file in order to provide the Configwizard (or database-transfer task) with the location of the drivers that will allow it to connect to the destination Oracle database server / database.
From example 1, the wpconfig_dbtype.properties already contained details for DB2, as well as for Cloudscape, so you now needed to specify the details for how to connect to Oracle
Regardless of which operating system the portal server is using, make sure any file system paths use the forward slash /.
Example 5-5 Editing wpconfig_dbtype.properties for Oracle
### Oracle Properties ### The name of class SqlProcessor will use to import SQL files oracle.DbDriver=oracle.jdbc.driver.OracleDriver ### The directory and name of the zip/jar file containing JDBC driver class ### Use the system specific file separator names, e.g. for windows semicolon and for unix colon. oracle.DbLibrary=C:/IBM/WebSphere/OracleDriver/ojdbc14.jar ### The name of jdbc provider to be used oracle.JdbcProviderName=wpdbJDBC_oracle- Edit the wpconfig_sourceDB.properties file. In example 1, you edited the values for the JCR and Likeminds database domains to point them from Cloudscape to DB2.
As previously mentioned, the wpconfig_sourceDB.properties file is not updated as part of any database transfer process and therefore still lists the remaining database domains (Customization, Release, Community and WMM) as being in the original Cloudscape database even though they are actually in DB2.
Therefore, in order to move any of the remaining database domains, you will first need to update wpconfig_sourceDB.properties to reflect the fact that these database domains are in fact currently in DB2.
When you then subsequently run either the Configwizard or the WPConfig database-transfer task to move the database domains, the updated values in the wpconfig_sourceDB.properties file will be read and the wizard or task will then know where the database domains you wish to move to Oracle currently are.
Example 5-6 shows the properties in the wpconfig_sourceDB.properties file associated with the Release Database Domain. The values you changed are as follows...
source.release.DbType type of database where the Domain is currently stored. In the case DB2 source.release.DbName name of the database where the Domain is currently stored. In the case WPSDB source.release.DbSchema name of the source schema/domain. source.release.DbUrl the database currently is and how you connect to it source.release.DbUser user name to use when connecting to the database where the Database Domain is currently stored. source.release.DbPassword password to use for the previously specified user name. You will need to repeat step 4 for each of the database domains you wish to move.
Example 5-6 Editing wpconfig_sourceDB.properties for DB2
### Release Database Properties ### The type of database to be used for WebSphere Portal Release domain source.release.DbType=db2 ### The name of the WebSphere Portal Release database ### This value should also appear as the database element in DbUrl ### Non-Windows platforms when using DB2 only. This value is the TCPIP ### Alias for the database. source.release.DbName=wpsdb ### The WebSphere Portal Release domain database schema name ### Follow the documentation of the target database management system ### in order to define a valid schema name as restrictions apply for ### some database management systems. source.release.DbSchema=release ### The wps release domain database URL source.release.DbUrl=jdbc:db2:wpsdb ### The database administrator user ID source.release.DbUser=db2admin ### The database administrator password source.release.DbPassword=password- Repeat these steps for any other database domains you wish to move. In the case you repeated them for the Customization, Community and WWM Domains.
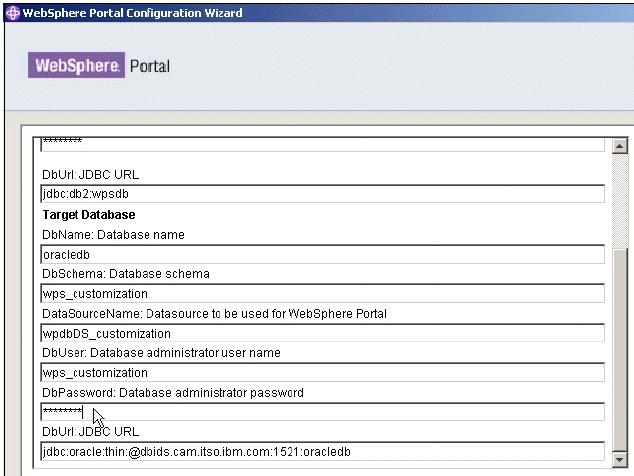
- Edit wpconfig_dbdomain.properties. Now that you have specified the current location of the database domains, we need to specify where you wish to move them to.
In the case, you wished to move the remaining four database domains to an Oracle server and in to a database called "ORACLEDB".
Example 5-7 shows the values you changed for the Customization Database Domain (in bold).
- customization.DbType. Specifies the type of database where the Domain will be stored once it is moved. In the case Oracle.
- customization.DbName. Specifies the name of the database where the Domain is to be moved to. In the case "ORACLEDB"
- customization.DbSchema. Specifies a unique name for the schema for this particular Database Domain
- customization.DataSourceName. Specifies a unique name for the datasource for this particular Database Domain
- customization.DbUrl. Specifies how to connect to the new database where you wish to move the database domains to
- customization.DbUser. Specifies the user name to use when connecting to the database where you wish to move the Database Domain to
- customization.DbPassword. Specifies the password to use for the previously specified user name.
You will need to repeat step 6 for each of the database domains you wish to move.
Example 5-7 Editing the wpconfig_dbdomain.properties for the Customization Domain
### Customization Database Properties

### The type of database to be used for WebSphere Portal Customization domain
customization.DbType=oracle

### The name of the WebSphere Portal Customization domain database
### This value should also appear as the database element in DbUrl
### Non-Windows platforms when using DB2 only. This value is the TCPIP
### Alias for the database.
customization.DbName=oracledb

### The WebSphere Portal Customization domain database schema name
### Follow the documentation of the target database management system
### in order to define a valid schema name as restrictions apply for
### some database management systems.
customization.DbSchema=wps_customization

### The name of datasource to be used for WebSphere Portal
### Customization domain
customization.DataSourceName=wpdbDS_customization

### The wp customization domain database URL
customization.DbUrl=jdbc:oracle:thin:@dbids.cam.itso.ibm.com:1521:oracledb

### The database administrator user ID
customization.DbUser=wps_customization

### The database administrator password
customization.DbPassword=password
The datasourceName needs to be unique when transferring to database domains that exist in the same database instance. In the case you added an underscore followed by the database domain name and adopted this naming convention for each of the database domains you moved to Oracle. For example, you changed "wpdbDS" to "wpdbDS_customization" for the Customization
datasource name.
Repeat this step for any other database domains you may wish to move
Run the Configwizard or WPConfig database-transfer task. For the database domains you wish to move, you have now specified where they currently are and where you wish to move them to. As a result, you are now ready to transfer the database domains (in the case Release, Customization, Community and WWM) by running either the Config Wizard or WPConfig database-transfer task. The Config Wizard can be found in... portal_server_root/config/wizardRun configwizard.bat to start the wizard.
Alternatively we can run the following command...
cd portal_server_root/config/directory
WPSconfig database-transfer -DTransferDomainList=release,customization, community,wmmUNIX: ./WPSconfig database-transfer -DTransferDomainList=release,customization,community,wmm

Select the option to "Transfer data to another database" and then specify the WebSphere Application Server Administrator user name and password.
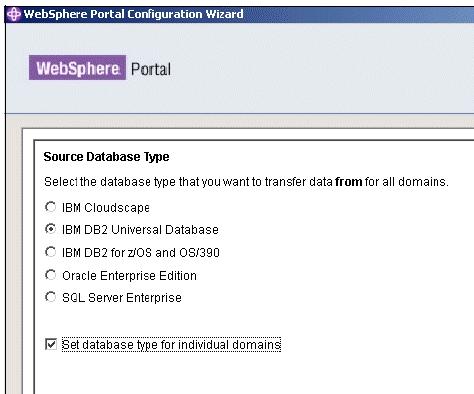
Ensure that "Set database type for individual domains" is selected. This option will allow us to specify the individual database domains you want to transfer to Oracle.
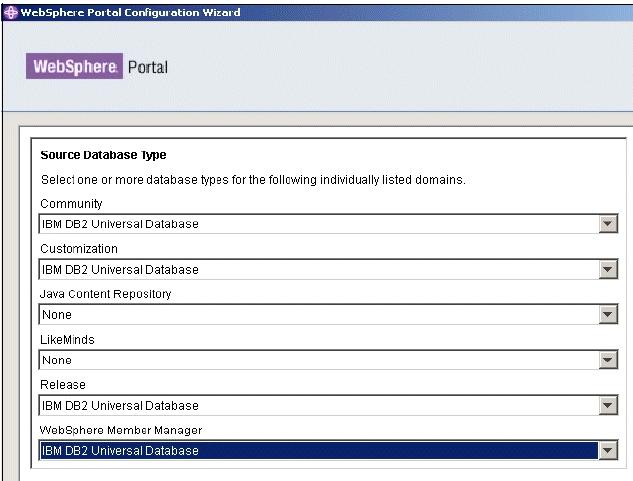
Specify where the database domains you wish to move currently reside. In the case the Release, Community, Customization and WMM domains are all currently stored in DB2.
Ensure you leave any database domains that you do not wish to move set to "None".
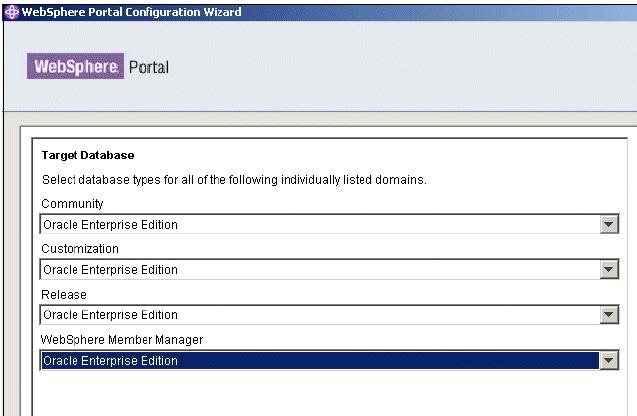
Specify which databases server type will store the database domains you want to move.
In the case the four database domains to be moved will all be stored in Oracle.
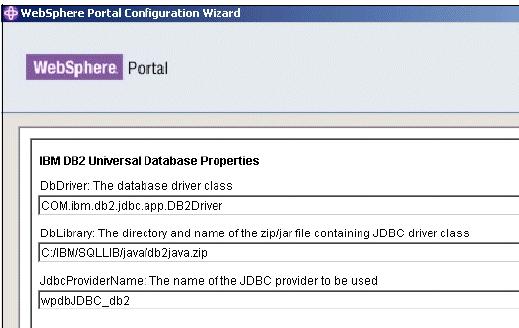
Figure 5-29 shows the DB2 properties that you specified in the wpconfig_dbtype.properties file in step 3 (Example 5-2). These values define how portal server if going to connect to DB2 database servers. Ensure these values are correct before proceeding, otherwise the database transfer process will not be successful.
Figure 5-30 shows the Oracle properties that you specified in the wpconfig_dbtype.properties file in step 3 (Example 5-5).
These values define how portal server if going to connect to Oracle database servers.
Again, ensure these values are correct before proceeding, otherwise the database transfer process will not be successful.
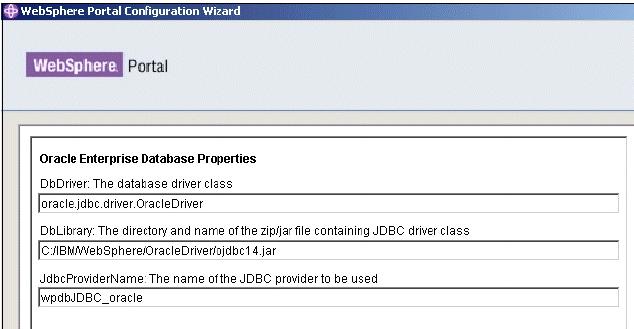
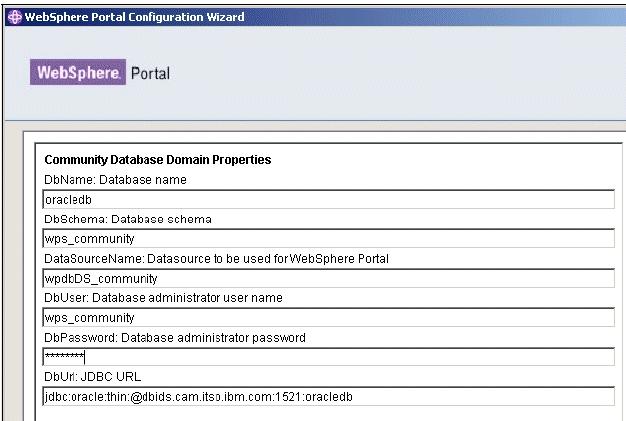
Figure 5-31 shows the details for the first Database Domain you wish to move (in our case Community).
You will need to provide a valid user name and password to connect to the target Oracle database / database server otherwise the database transfer process will fail.
In the case this was the user wps_community and the password was password.
Once the Configwizard has run, for security reasons, any password values you may have specified in the properties files it reads from will be replaced with the generic text string of "ReplaceWithYourDbAdminPwd".

Figure 5-32 shows the details for the next Database Domain you wish to move (in the case Customization). Again, provide a valid user name and password to connect to the target Oracle database / database server otherwise the database transfer process will fail.
In the case this the Oracle user was called wps_customization and the password was password.
Figure 5-33 shows the details for the next Database Domain you wish to move (in the case
Release). Again, provide a valid user name and password to connect to the target Oracle database / database server otherwise the database transfer process will fail.
In the case this the Oracle user was called wps_release with a password of password. .
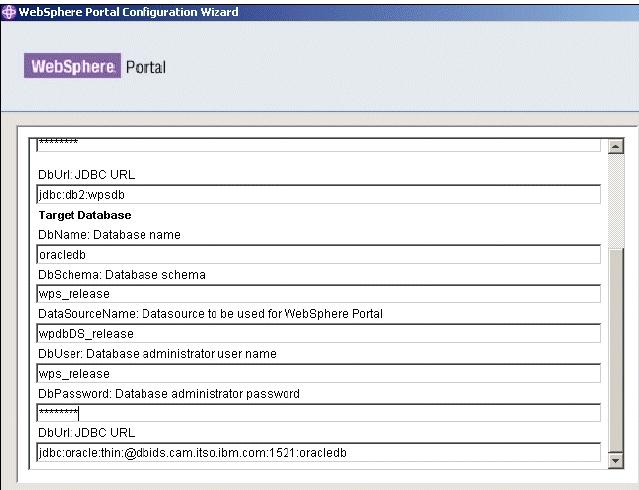
Figure 5-34 shows the details for the final Database Domain you wished to move (in the case WMM).
Again, provide a valid user name and password to connect to the target Oracle database / database server otherwise the database transfer process will fail.
In the case this the Oracle user was called wmmdbuser with a password of password.
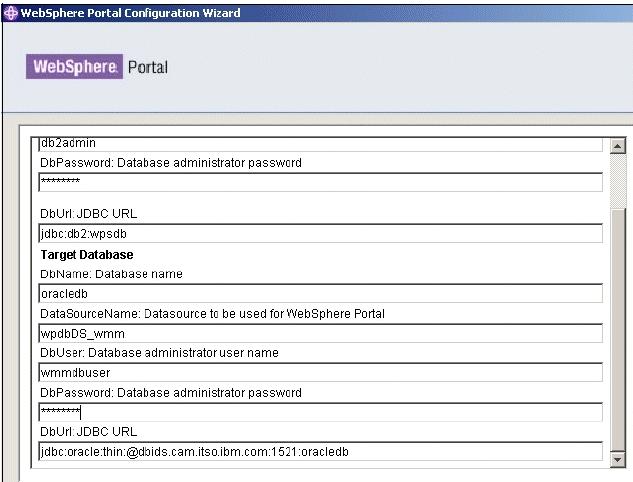
Figure 5-35 shows a summary of the database domains that will be transferred
to the Oracle databases server. It lists where they currently (DB2) are and where the will be moved to (Oracle). click Next to begin the transfer process.


In order to verify that the portal server was using both DB2 and Oracle as its datasources, you followed the instructions in the section entitled, "Testing the JDBC Data Connection on the DMGR".
When following these instructions, make sure that you also create a WebSphere Variable for the ORACLE_JDBC_DRIVER_CLASSPATH, and not just for the DB2_JDBC_DRIVER_CLASSPATH.

Figure 5-37 Successfully testing the JDBC connections to DB2 and Oracle
Example 3 - Sharing Domains between Portal Nodes
Example 3 differs somewhat from the previous two examples because rather than moving database domains, you are now going to get multiple portal server nodes to share a common set of database domains.
This is particularly useful when designing high availability portal environments such as the one described earlier in this chapter in Figure 5-3.
A quick recap of Example 2
In "Example 2, Moving Domains between database types", you successfully moved the remaining database domains from the first DB2 database server to an Oracle database server.
This resulted in the environment looking like Figure 5-38.
As can be seen from Figure 5-38, the portal server is using two database domains (JCR and Likeminds) in DB2 and four database domains (Customization, Release, Community and WMM) in Oracle.
A summary of Example 3
In "Example 3 -Sharing Domains between Portal Nodes", you now wish to show how individual Portal nodes can share/use the same Portal data.
To accomplish this you install a new Portal server as an empty Portal and then used XMLaccess export from the original Portal environment and import into the new Portal environment to create identical Portal environments.
This was done to ensure that both Portal environments' file system configurations for the Portlet applications are the same in hopes to have a good baseline to build from.
Eventually, this new Portal environment will be connected to, and share, the existing DB2 and Oracle database domains used by the original Portal environment. ( The Release domains will not be shared).
This procedure or architecture could be valuable when wanting to maintain identical Portal environments that will be used for pre-production activities.
This approach/architecture can therefore be maintained without the need to constantly use XMLaccess to keep the environments identical.
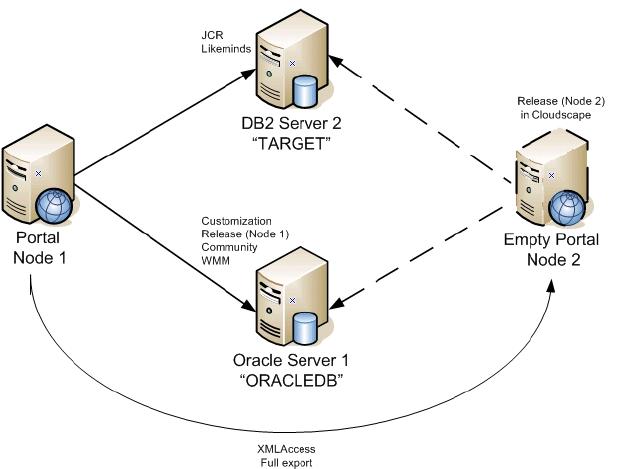
Once configure, you should then be able to log in to either portal (as the WMM Database Domain would be common between both portals), and you should also be able to see exactly the same content.
Steps for sharing database domains between portal servers
- Install an empty portal server on Node 2
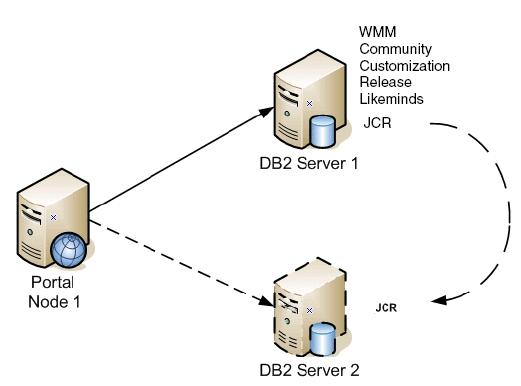
- On the existing portal server (Node 1), you did the following
- Created a test user ("jdelaney") which would be stored in the WMM Database Domain, because you are using a WMM CUR.
Created some content in the form of portal page
As previously mentioned, Release data cannot be shared between portal servers, however you created some Release content in the form of a page, so you could verify that the XMLAccess export from Node 1 and subsequent import in to Node 2 was successful.
– Created a document in the Portal Document Manager on Node 1 which would be stored in the JCR Database Domain
- Having created some content in Node 1, you did a full XMLAccess export and then import in to Node 2 so that both portal servers would have exactly the same content. You verified this by logging in to Node 2 after the XMLAccess import and verifying that you could see the page you had previously created on Node 1 (Figure 5-40).
In the example you built the empty portal server, carried out an XMLAccess importand then connected the new portal server to its new datasources.
As you may recall from Table 5-1, the Release Database Domain cannot be shared between portal servers so in the example you ended up with Node 1 having its Release Database Domain stored in Oracle and Node 2 keeping its Release Database Domain in Cloudscape.
In a typical production environment however you would not want to keep the Release Database Domain in Cloudscape so the steps you used would most likely be as follows
- Run the database Transfer task from the empty portal to an external database whichwould include the release domain
- Carry out the XMLAccess import on the empty portal
- Connect the empty portal to the shared database domains
Using these steps you would avoid the additional overhead of importing all the Release data in to Cloudscape (via XMLAccess) on the empty portal and then having to transfer it again to an external database.
Once the XMLAccess import successfully completed you prepared Node 2 for connection to DB2 and Oracle. This involved
- Installing the DB2 client on Node 2 and cataloguing the remote DB2 database
- Copying the Oracle JDBC driver to Node 2
- Editing the wpconfig.properties file with the relevant WebSphere Application Server and Portal Server credentials required for the database connect process
- Edit wpconfig_dbtype.properties. Similar to examples 1 and 2, on Node 2 you edited the wpconfig_dbtype.properties file to provide information on how to connect to both the DB2 and Oracle database servers
Regardless of which operating system the portal server is using, make sure any file system paths use the forward slash /.
In the case you specified the path of the DB2 library to be used (the library is install with the DB2 client) and you also specified the path to the "Oracle Directory" which you previously created in the WebSphere Application Server root and is where you copied the Oracle JDBC driver to.
Unlike with DB2, Oracle uses a Type 4 JDBC driver and therefore does not require any client software to be install on the portal server in order to allow it to connect to an Oracle database server.
Example 5-8 Editing wpconfig_dbtype.properties for both DB2 and Oracle
### DB2 Properties ### The name of class SqlProcessor will use to import SQL files db2.DbDriver=COM.ibm.db2.jdbc.app.DB2Driver ### The directory and name of the zip/jar file containing JDBC driver class ### Use the system specific file separator names, e.g. for windows semicolon and for unix colon. db2.DbLibrary=C:/IBM/SQLLIB/java/db2java.zip ### The name of jdbc provider to be used db2.JdbcProviderName=wpdbJDBC_db2 ### END: DB2 Properties ### Oracle Properties ### The name of class SqlProcessor will use to import SQL files oracle.DbDriver=oracle.jdbc.driver.OracleDriver ### The directory and name of the zip/jar file containing JDBC driver class ### Use the system specific file separator names, e.g. for windows semicolon and for unix colon. oracle.DbLibrary=C:/IBM/WebSphere/OracleDriver/ojdbc14.jar ### The name of jdbc provider to be used oracle.JdbcProviderName=wpdbJDBC_oracle- Unlike the previous two examples, there was no need in example 3 to edit the wpconfig.dbsource.properties file. This is because you will not actually be transferring any data from CloudScape, rather you are simply pointing the Portal to an existing Database and re-building datasources via the WPConfig connect-database task.
- Edit wpconfig_dbdomain.properties. Even though in this example you are not actually transferring any data from Cloudscape to DB2 and Oracle (we are simply connecting Node 2 to DB2 and Oracle so it can share the existing data with Node 1), you still need to specify where are the database domains are located so the datasources can be built correctly.
Our database domains are split between DB2 and Oracle as follows...
Database Domain Database Server Database Name JCR DB2 TARGET Likeminds DB2 TARGET Release Oracle ORACLEDB Customization Oracle ORACLEDB Community Oracle ORACLEDB WMM Oracle ORACLEDB Example 5-9 shows the values you specified for the Customization Database Domain (in Oracle) and the JCR Database Domain (in DB2).
You updated the values in the wpconfig_dbdomain.properties files for all the database domains listed in Example 5-3 with the exception of the Release Database Domain which we elected to leave in Cloudscape on Node 2.
Example 5-9 Editing wpconfig_dbdomain.properties for DB2 and Oracle
### Customization Database Properties ### The type of database to be used for WebSphere Portal Customization domain customization.DbType=oracle ### The name of the WebSphere Portal Customization domain database ### This value should also appear as the database element in DbUrl ### Non-Windows platforms when using DB2 only. This value is the TCPIP ### Alias for the database. customization.DbName=oracledb ### The WebSphere Portal Customization domain database schema name customization.DbSchema=wps_customization ### The name of datasource to be used for WebSphere Portal ### Customization domain customization.DataSourceName=wpsdbDS_customization ### The wp customization domain database URL customization.DbUrl=jdbc:oracle:thin:@dbids.cam.itso.ibm.com:1521:oracledb ### The database administrator user ID customization.DbUser=wps_customization ### The database administrator password customization.DbPassword=password ### END: Customization Database Properties #### JCR Database Properties ### DbType: The type of database to be used for WebSphere Portal JCR domain jcr.DbType=db2 ### DbName: The name of the WebSphere Portal JCR domain database ### This value should also appear as the database element in DbUrl ### Non-Windows platforms when using DB2 only. This value is the TCPIP Alias ### for the database. jcr.DbName=target ### The WebSphere Portal JCR domain database schema name ### Follow the documentation of the target database management system ### in order to define a valid schema name as restrictions apply for # ### some database management systems. jcr.DbSchema=jcr ### The name of datasource to be used for WebSphere Portal JCR domain jcr.DataSourceName=wpdbDS_jcr ### The wp JCR domain database URL jcr.DbUrl=jdbc:db2:target ### The database administrator user ID jcr.DbUser=db2admin ### The database administrator password jcr.DbPassword=password- Run the Configwizard or WPConfig connect-database task. For the database domains you wish to connect/share you have now specified which existing domains to connect to in order to use the existing database domains used by Node 1 (i.e. DB2 and Oracle).
As a result, you are now ready to connect to the database domains (in the case JCR and Likeminds in DB2 and Customization, Community and WWM in Oracle) by running either the Configwizard or WPConfig connect-database task.
Again, you are not going to connect Node 2 to the Release Database Domain currently stored in Oracle. As previously mentioned in Table 5-1, the Release Database Domain cannot be shared (unless portal servers are in a cluster).
Therefore you opted to leave the Release Database Domain for Node 2 in Cloudscape. In a clustered production environment however, you would typically have the Release Database Domain in a non-Cloudscape database being shared by all cluster nodes.
The Config Wizard can be found in portal_server_root/config/wizard. Run the configwizard.bat file to start the wizard.
Alternatively we can run...
cd portal_server_root/config/ directory
WPSconfig.bat connect-database -DActDbDomainList=jcr,likeminds,customization,community,wmm UNIX: ./WPSconfig.sh connect-database -DActDbDomainList=jcr,likeminds,customization,community,wmmSee the infocenter documented entitled "Connecting to existing database domains" for more information on the command line options.
In the testing you found some problems with the Configwizard. Specifically it appeared that the wizard did not correctly read some of the values you previously specified in the wpconfig_dbtype, dbdomain and sourcedb properties files.
As a result, you re-entered some values by hand in the Configwizard. You may therefore elect to run the wpconfig connect-database task instead.
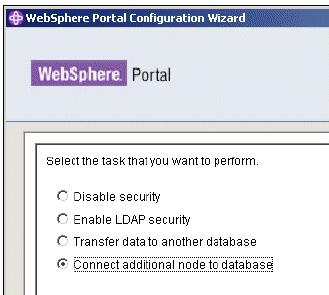
As you are not transferring any data from Node 2 in this example, you simply selected
"Connect additional node to a database".

Specified the WebSphere Application Server Administrator user name and password
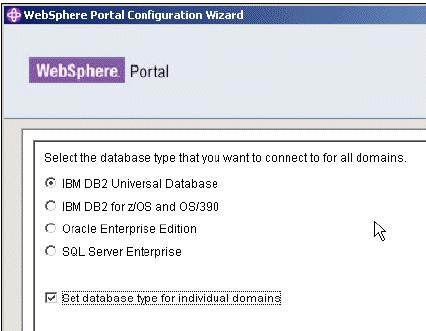
Ensure that "Set database type for individual domains" is selected. This option will allow us to specify the individual database domains you want to connect to.
The screenshot shown in Figure 5-45 may be the cause of some confusion. Specifically the radio buttons for the different types of database servers may lead you to believe that there is no way to specify both DB2 and Oracle at the same time.
Our initial thought when using the Configwizard was that you may have to run it more than once (e.g. once for DB2 and Once for Oracle), however what you discovered is that so long "Set database type for individual domains" is checked, you will find that the radio buttons are ignored and that the Configwizard will let you select different database servers for the various database domains

Figure 5-46 shows how you selected the locations of the database domains you wanted to connect to.
Notice how the Release Database Domain is left as the default "Click to make a selection".
This is because as previously mentioned in Table 5-1, we cannot share Release data between portal servers unless they are all in the same cluster.
This is why you elected to leave Node 2's Release Database Domain in Cloudscape and not connect it to Node 1's Release Database Domain in Oracle.
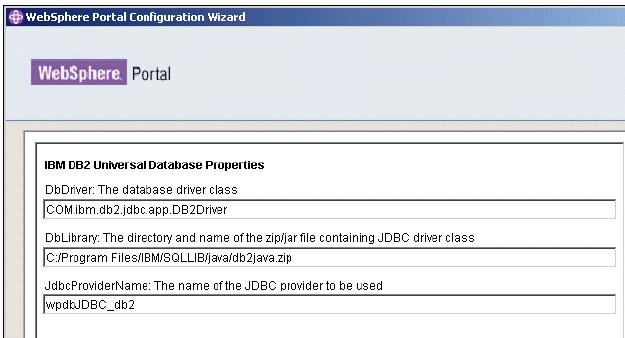
Figure 5-47 shows the DB2 connection properties you previously specified in the wpconfig.dbype.properties file. As mentioned earlier, you found some inconsistencies with the Configwizard and had to enter some of this information again manually.
You encountered the same issue with Figure 5-48 for the Oracle connection properties. Again, you had to manually re-enter some of this information.
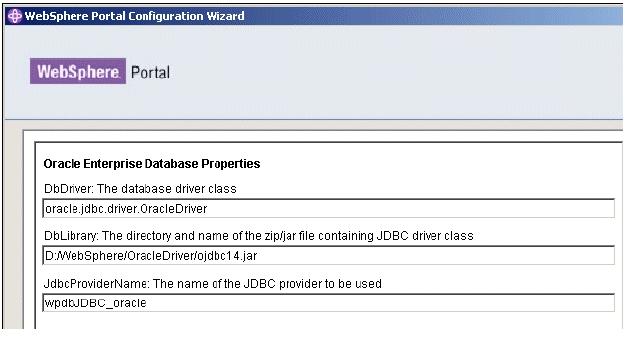
Figure 5-49 shows the properties for the first Database Domain you wish to connect Node 2 to. In the case this was the "Community" Database Domain, currently stored in Oracle.

Again you found some inconsistencies with the Configwizard and had to enter some of this information again manually. This condition could continue to occur in future Configwizard panels. Ensure that all values are populated in the panels before clicking next.
Make sure you specify a valid user name and password to connect to the Oracle database, otherwise the database connect task will not be successful.

Figure 5-50 shows the properties for the next Database Domain you wish to connect Node 2 to. In the case this was the "Customization" Database Domain, also currently stored in Oracle.
Make sure you specify a valid user name and password to connect to the Oracle database, otherwise the database connect task will not be successful.

Figure 5-51 shows the properties for the next Database Domain you wish to connect Node 2 to. In the case this was the "JCR" Database Domain, currently stored in DB2.
Make sure you specify a valid user name and password to connect to the DB2 database, otherwise the database connect task will not be successful.

Figure 5-52 shows the properties for the next Database Domain you wish to connect Node 2 to. In the case this was the "Likeminds" Database Domain, currently stored in DB2.
Make sure you specify a valid user name and password to connect to the DB2 database, otherwise the database connect task will not be successful.

Figure 5-53 shows the properties for the final Database Domain you wish to connect Node 2 to. In the case this was the "WMM" Database Domain, currently stored in Oracle
As you were not using an external LDAP directory in the example, sharing the WMM Database Domain means that users should be able to log in to any of the portal server nodes.
Make sure you specify a valid user name and password to connect to the DB2 database, otherwise the database connect task will not be successful.

Finally, Figure 5-54 shows the summary screen of the database domains you wish to connect Node 2 to.
Testing the shared database domains
Having successfully completed the database domain connect task for Node 2 the environment now looks like Figure 5-56.
You therefore conducted a number of simple test to ensure that Node 2 was in fact successfully using the same content as Node 1.
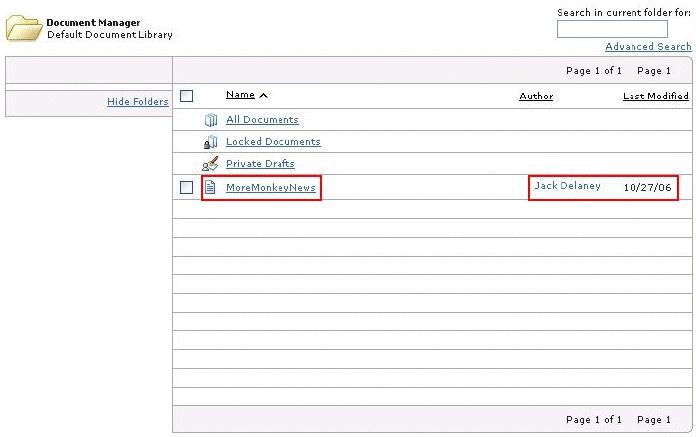
- Test 1. As previously mentioned, you created a test user called "Jack Delaney" (uid=jdelaney) on Node 1. Now that the WMM Database Domain is shared between Node1 and Node 2, you were able to successfully log in to Node 2 with the uid=jdelaney.
- Test 2 . As shown in Figure 5-41, you created some content in the Portal Document Manager on Node 1(which is ultimately stored in the JCR Database Domain). You therefore logged in to Node 2 as the same user that had previously created this content and verified that you could still see and access it
- Test 3. In order to test that the user customizations were being shared between both portal server nodes, you logged in as the test user on Node 2 and modified some of his mail portlet settings.

Log out of Node 2 and logged back in as the test user on Node 1 and verified that you could still see the user customizations

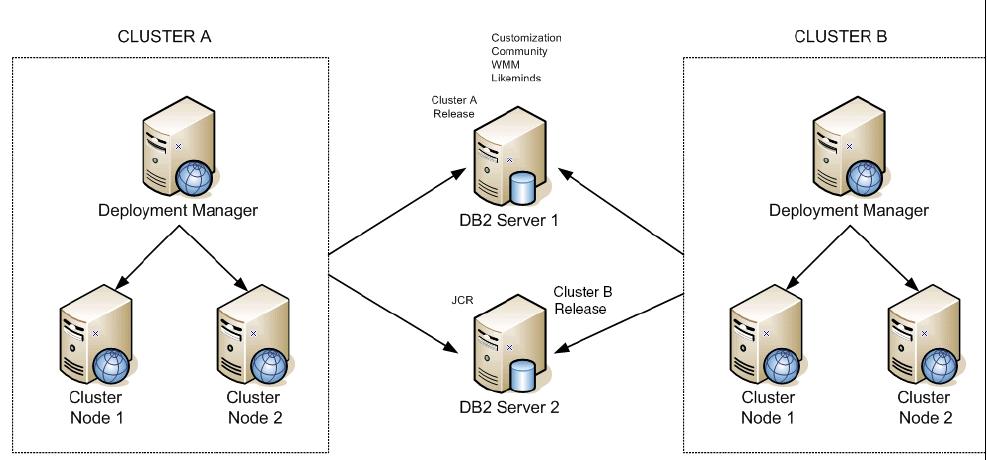
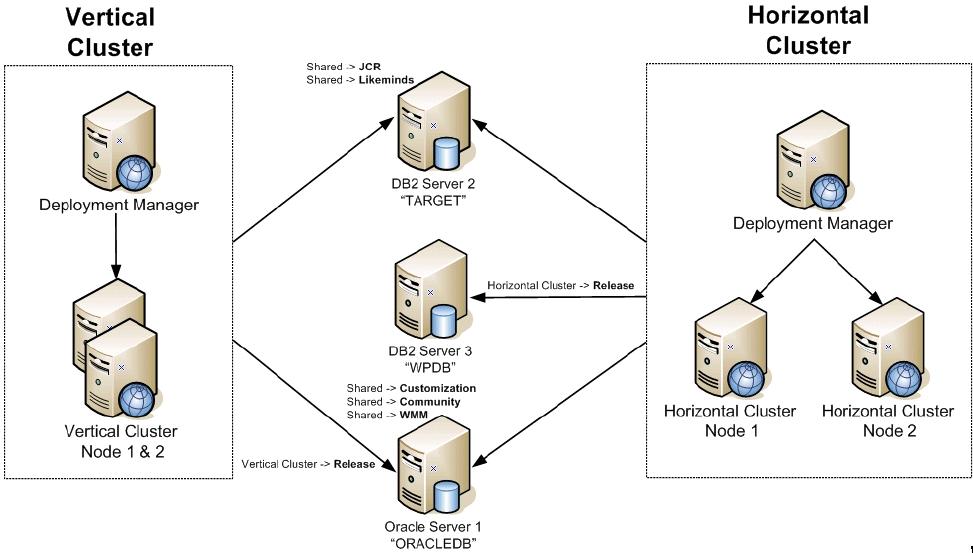
Example 4 - Sharing Domains between separate clusters
Example 4 extends the ideas and steps discussed in example 3 in a very important way.
This time, rather than getting multiple standalone portal server nodes to share a common set of database domains you are going to get multiple portal clusters to share a common set of database domains.
This will allow us to operate a true 24x7 high availability environment as described in Figure 5-3 and Example 5-1.
A quick recap of Example 3
In "Example 3 -Sharing Domains between Portal Nodes", you successfully connected two stand alone portal servers to both DB2 and Oracle
In example 4 you will perform a similar procedure as example 3, but instead with a Vertical and a Horizontal Cluster.
The sequence of steps you will then conduct in example 4 is as follows
- Build a vertical cluster as per the instructions in Chapter 3, "Different Deployment Scenarios: Building Clustered Environments" (in particular, look at Section 3.8, "Vertical Cluster (includes WebSphere Process Server)- Installation and Configuration steps" for specific information on how to create a vertical cluster node).
- You configure the domains of this Vertical Cluster to DB2 and Oracle databases
- This resulted in the environment shown in Figure 5-61
- Finally you will take the Horizontal Cluster that was built in Chapter 3, "Different Deployment Scenarios: Building Clustered Environments" and connect it to the same DB2 and Oracle databases that the Vertical Cluster is currently using. This will result in the final environment looking like the figure below...

The Horizontal Cluster from Chapter 3 already had its own DB2 Database Server configure. This is depicted in Figure 5-62 as "DB2 Server 3" (notice it has a a portal database called "WPDB").
In the example you left the "Release" Database Domain for the Horizontal Cluster on this existing DB2 Server 3 (as Release data cannot be shared).

In Figure 5-62 you will see that the Vertical Cluster has a "Node 1" and a "Node 2". In reality there is only one physical node, with two JVMs running on it. The multiple Nodes therefore refer to the individual JVMs that are running on the same physical server.
Steps for sharing database domains between portal clusters
The steps in this section describe how you connected the Horizontal Cluster to the DB2 and Oracle Database Servers.
You will now reconfigure the Horizontal cluster to connect to the Vertical cluster's current database configuration. The only difference being that we will leave the Horizontal cluster configure to the Release Domain on DB2 Server 3, because again, release data cannot be shared across separate clusters.
The connect-database task only needs to be run once since all cluster members (vertical or horizontal) share the same datasource and driver via the WAS configuration which will get synced to all nodes in the cluster.
- Shutdown WebSphere Portal on the primary node in the Horizontal Cluster, but ensure the nodeagent is still running.
- Make sure the Deployment Manager is running.
- Prepare the primary node in the cluster, for both DB2 and Oracle. Although the primary node in the Horizontal Cluster was already connected to a DB2 Database Server (DB2 Server 3), you had to prepare it for connecting to DB2 Server 2 and the Oracle Server
- This involved the following steps
– On the primary node in the Horizontal Cluster you cataloged the databases on DB2 Server 2 and ensured you could connect to the new "TARGET" database on DB2 Server 2. You repeated this for each subsequent node in the Horizontal Cluster.
This ensured that each portal node in the cluster could connect to the new DB2 Server 2 and its "TARGET" database.
– On the primary node in the Horizontal Cluster you copied the relevant Oracle database driver and checked connectivity between portal and the Oracle database server and its database "ORACLEDB" (refer to the Oracle documentation for the steps on how to confirm database connectivity). Again, this was repeated for all the other portal nodes in the Horizontal Cluster as well as the Deployment Manager to ensure that each portal node in the cluster could connect to the new Oracle Server 1 and its "ORACLEDB" database.
- Edit the wpconfig_dbtype.properties on the primary node. You needed to edit this properties file in order to provide the Configwizard (or connect-database task) with the location of the drivers that will allow it to connect to the destination DB2 and Oracle database servers / databases.
As the Horizontal Cluster was already configure for DB2 Server 3, you only needed to specify details for how to connect to Oracle. in Example 5-10.
For completeness, it is a good idea to copy the wpconfig_dbtype.properties file to every portal node in the cluster. Back up the original wpconfig_dbtype.properties file before copying across the one from the primary node.
Example 5-10 Editing wpconfig_dbtype.properties for Oracle
### Oracle Properties

### DbDriver: The name of class SqlProcessor will use to import SQL files
oracle.DbDriver=oracle.jdbc.driver.OracleDriver

### DbLibrary: The directory and name of the zip/jar file containing JDBC driver class

### Use the system specific file separator names, e.g. for windows semicolon and for unix colon.
oracle.DbLibrary=C:/IBM/WebSphere/OracleDriver/ojdbc14.jar

### JdbcProviderName: The name of jdbc provider to be used
oracle.JdbcProviderName=wpdbJDBC_oracle
- Unlike the previous examples, there was no need in this example to edit the wpconfig.dbsource.properties file. This is because you will not actually be transferring any data from CloudScape, rather you are simply pointing the Portal to an existing Database and re-building datasources via the WPConfig connect-database task.
- Edit wpconfig_dbdomain.properties file on the primary node.
In the case, you wished to connect JCR and Likeminds to a different DB2 server (DB2 Server 2 with a database called "TARGET") and Community, Customization and WMM to an Oracle Server (Oracle Server 1 with a database called "ORACLEDB").
The values you changed in the wpconfig_dbdomain.properties are as follows (and are shown in bold in Example 5-11 for DB2 and Example 5-12 for Oracle) .
- jcr.DbType. Specifies the type of database where the Domain(s) you wish to connect are. In the case you wished to connect to the JCR and Likeminds database domains in DB2.
- jcr.DbName. Specifies the name of the database where the Domain(s) you wish to connect to are. In the case the JCR and Likeminds database domains are in a DB2 database called "TARGET"
- jcr.DbSchema. Specifies the unique name for the schema for this particular Database Domain
- jcr.DataSourceName. Specifies the unique name for the datasource for this particular Database Domain
- jcr.DbUrl. Specifies how to connect to the database containing the database domains you wish to connect to.
- jcr.DbUser. Specifies the user name to use when connecting to the database where the database domains are.
- jcr.DbPassword. Specifies the password to use for the previously specified user name.
You will need to repeat step 6 for each of the database domains you wish to connect to. Example 5-11 shows the values you used for the JCR Database Domain.
Again, for completeness it is a good idea to copy the wpconfig_dbdomain.properties file to every portal node in the cluster. Back up the original wpconfig_dbdomain.properties file before copying across the one from the primary node.
Example 5-11 Editing wpconfig_dbdomain.properties for the JCR Database Domain
# JCR Database Properties

### The type of database to be used for WebSphere Portal JCR domain
jcr.DbType=db2

### The name of the WebSphere Portal JCR domain database
### This value should also appear as the database element in DbUrl
### Non-Windows platforms when using DB2 only. This value is the TCPIP Alias
### for the database.
jcr.DbName=target

### The WebSphere Portal JCR domain database schema name
jcr.DbSchema=jcr

### The name of datasource to be used for WebSphere Portal JCR domain
jcr.DataSourceName=wpdbDS_jcr

### The wp JCR domain database URL
jcr.DbUrl=jdbc:db2:target

### The database administrator user
IDjcr.DbUser=db2admin
### The database administrator
passwordjcr.DbPassword=password
### END: JCR Database Properties
Example 5-12 shows the values you changed for the Customization Database Domain (in bold).
customization.DbType Specifies the type of database where the Domain(s) you wish to connect are. In the case you wished to connect to the Customization, Community and WMM database domains in Oracle. customization.DbName Specifies the name of the database where the Domain(s) you wish to connect to are. In the case the Community, Customization and WMM Database Domains are in an Oracle database called "ORACLEDB" customization.DbSchema Specifies the unique name for the schema for this particular Database Domain customization.DataSourceName Specifies the unique name for the datasource for this particular Database Domain customization.DbUrl Specifies how to connect to the Database Domain customization.DbUser Specifies the user name to use when connecting to the database where the Database Domain is. customization.DbPassword Specifies the password to use for the previously specified user name. You will need to repeat step 6 for each of the database domains you wish to connect to. Example 5-12 shows the values you used for the Customization Database Domain.
Remember, that it is good practice to copy the wpconfig_dbdomain.properties file to every portal node in the cluster. Back up the original wpconfig_dbdomain.properties file before copying across the one from the primary node.
Example 5-12 Editing the wpconfig_dbdomain.properties for the Customization Domain
### Customization Database Properties

### The type of database to be used for WebSphere Portal Customization domain
customization.DbType=oracle

### The name of the WebSphere Portal Customization domain database
###  This value should also appear as the database element in DbUrl
###  Non-Windows platforms when using DB2 only. This value is the TCPIP
### Alias for the database.
customization.DbName=oracledb

### The WebSphere Portal Customization domain database schema name
customization.DbSchema=wps_customization

### The name of datasource to be used for WebSphere Portal
### Customization domain
customization.DataSourceName=wpdbDS_customization

### The wp customization domain database URL
customization.DbUrl=jdbc:oracle:thin:@dbids.cam.itso.ibm.com:1521:oracledb

### The database administrator user ID
customization.DbUser=wps_customization

### The database administrator
password customization.DbPassword=password

### END: Customization Database Properties
7. Run the Configwizard or WPConfig connect-database task.
For the database domains you wish to connect to, you have now specified where you wish to connect the Horizontal Cluster to in order to use the existing database domains used by the Vertical Cluster (i.e. DB2 Server 2 and Oracle Server 1), again, except for the Release Domain.
As a result, you are now ready to connect to the database domains (in the case JCR and Likeminds in DB2 and Customization, Community and WMM in Oracle) by running either the Configwizard or WPConfig connect-database task.
The Config Wizard can be found in...
portal_server_root/config/wizardRun the configwizard.bat file to start the wizard.
Alternatively we can run the following command...
cd portal_server_root/config/
./WPSconfig.sh connect-database -DActDbDomainList=jcr,likeminds,community,customization,wmmIn the testing you found some problems with the Configwizard. Specifically it appeared that the wizard did not correctly read some of the values you previously specified in the wpconfig_dbtype, dbdomain and sourcedb properties files. As a result, you re-entered some values by hand in the Configwizard. You may therefore elect to run the wpconfig connect-database instead.
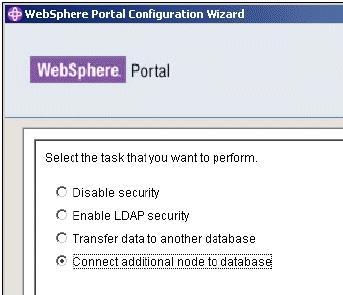
As you are not transferring any data from the Horizontal Cluster in this example, you simply selected "Connect additional node to a database".

Specify the WebSphere Application Server Administrator user name and password
. Ensure that "Set database type for individual domains" is selected. This option will allow us to specify the individual database domains we want to connect to.
Important The screenshot shown in Figure 5-66 may be the cause of
some confusion. Specifically the radio buttons for the different types of database servers may lead you to believe that there is no way to specify both DB2 and Oracle at the sametime.Our initial thought when using the Configwizard was that you may have to run it more than once (e.g. once for DB2 and Once for Oracle), however what you discovered is that so long "Set database type for individual domains" is checked, you will find that the radio buttons are ignored and that the Configwizard will let you select different database servers for the various database domains
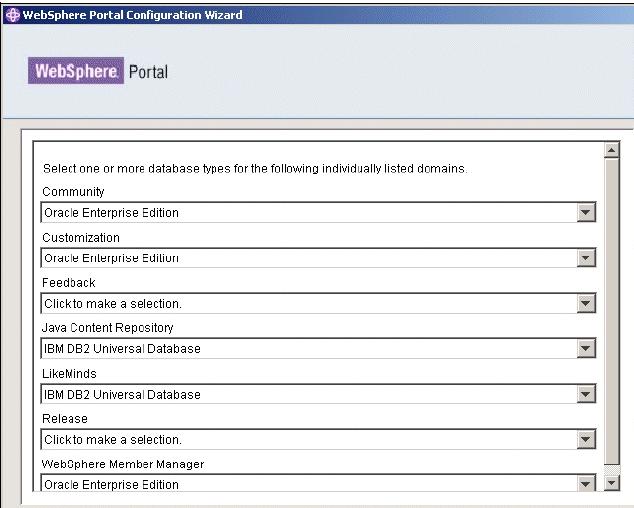
Figure 5-67 shows how you selected the locations of the database domains you wanted to connect to.
Notice how the Release Database Domain is left as the default "Click to make a selection".
This is because as previously mentioned you elected to leave the Release Database Domain in its original DB2 Server (DB 2 Server 3).

Figure 5-68 shows the DB2 connection properties you previously specified in the wpconfig.dbype.properties file.
As mentioned previously, you found some inconsistencies with the Configwizard and had to enter some of this information again manually.
You encountered the same issue with Figure 5-69 for the Oracle connection properties. Again, you had to manually re-enter some of this information.

Figure 5-70 shows the properties for the first Database Domain you wish connect the Horizontal Cluster to. In the case this was the "Community" Database Domain, currently stored in Oracle.
Make sure you specify a valid user name and password to connect to the Oracle database, otherwise the database connect task will not be successful.
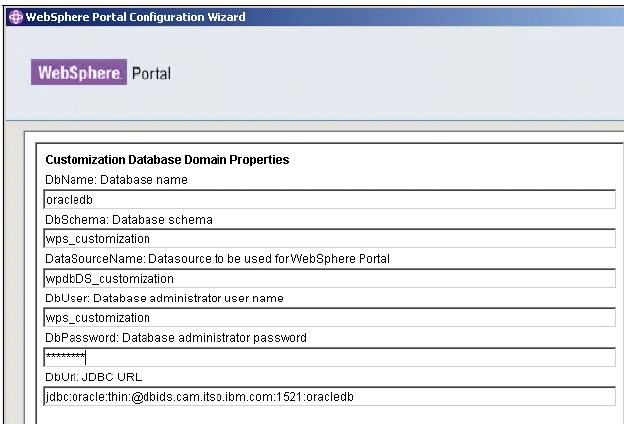
Figure 5-71 shows the properties for the next Database Domain you wish to connect the Horizontal Cluster to. In the case this was the "Customization" Database Domain, also currently stored in Oracle.
Make sure you specify a valid user name and password to connect to the Oracle database, otherwise the database connect task will not be successful.

Figure 5-72 shows the properties for the next Database Domain you wish to connect the Horizontal Cluster to. In the case this was the "JCR" Database Domain, currently stored in DB2.
Make sure you specify a valid user name and password to connect to the DB2 database, otherwise the database connect task will not be successful.
Figure 5-73 shows the properties for the next Database Domain you wish to connect the Horizontal Cluster to. In the case this was the "WMM" Database Domain, also currently stored in Oracle.
Make sure you specify a valid user name and password to connect to the Oracle database, otherwise the database connect task will not be successful.
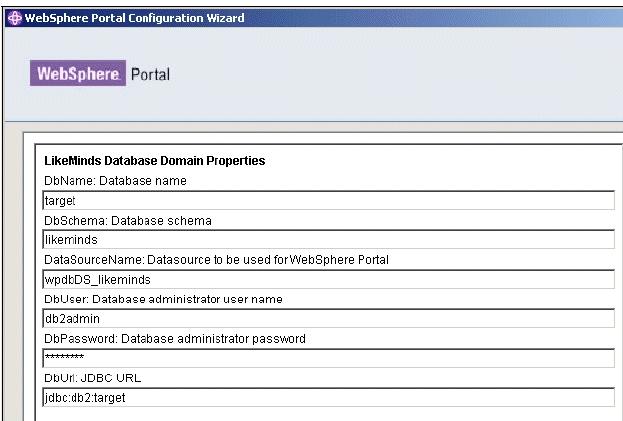
Figure 5-74 shows the properties for the final Database Domain you wished to connect the Horizontal Cluster to. In the case this was the "Likeminds " Database Domain, currently stored in DB2.
Make sure you specify a valid user name and password to connect to the DB2 database, otherwise the database connect task will not be successful.

Finally, Figure 5-75 shows the summary screen of all the database domains you wish to connect the Horizontal Cluster to.

Our environment now looks like Figure 5-77.
Using database domains in a production environment
This section shows how we can take the techniques that you have learned from the previous examples and apply them to building a typical high availability production Portal environment.
You will outline each step involved and refer you back to the relevant section in this (and other) chapters for the particular configuration steps required.
The ultimate goal in this section is to build a multi cluster, high availability Portal environment that is sharing identical content.
This will allow us to provide 24x7 operations and users will not be disrupted in the event of server maintenance or upgrades.
Building a multi cluster high availability portal environment
- A typical starting point for building any portal environment is to install a Portal server (Portal Node 1 in the case), using the default Cloudscape database. Portal Node 1 will serve as the primary node for Cluster A. Since you will be building a cluster decide at this point on how to install Portal.
a. If you want to build a Process Server cluster, install Portal into a federated WAS cell. (See 3.4, "Horizontal Cluster (includes WebSphere Process Server)-Installation and Configuration steps")
b. If you want to build a cluster without Process Server, we can install WAS and Portal together as a standalone environment. (See 3.5, "Horizontal Cluster (without WebSphere Process Server)- Installation and Configuration steps".)- After determining the cluster approach, the next step would then be to transfer the database domains (using either the Config Wizard or the database-transfer task) from Cloudscape to a supported Database Server Instance.
In the case you used DB2 for the database server

See Chapter 3, "Different Deployment Scenarios: Building Clustered Environments" for more information on how to transfer database domains from Cloudscape to DB2.
At this stage we can either transfer all or some of the database domains from Cloudscape to a supported database server. In a well designed Portal environment where you want high availability and good performance, you may want to isolate particular database domains. It is generally recommended and best practice to isolate the JCR database domain.
JCR data is a good candidate for isolation because it has unique usage patterns and capacity requirements in comparison to other database domains, and isolating it gives us far more flexibility for tuning and capacity management.
We can isolate the JCR domain in a number of ways
- We can place the JCR domain on a physically separate database server. This may be applicable for an environment with large amounts of JCR data where you want a greater disaster recovery capability. This is the method you chose in this scenario.
- We can place the JCR domain on the same physical database server but isolate it by putting it in a database on a separate database instance
- We can place the JCR domain on the same physical database server but isolate it by putting it in a different database within the same DB2 instance
We can see that in Figure 5-79, that the JCR domain has been isolated by being transferred from Cloudscape to its own DB2 instance and database ("WPSDB2").

Figure 5-79 Isolating database domains by putting them in separate databases instances and separate databases
Alternatively we can place the JCR domain on the same physical database server and in the same database instance, but have them in different databases
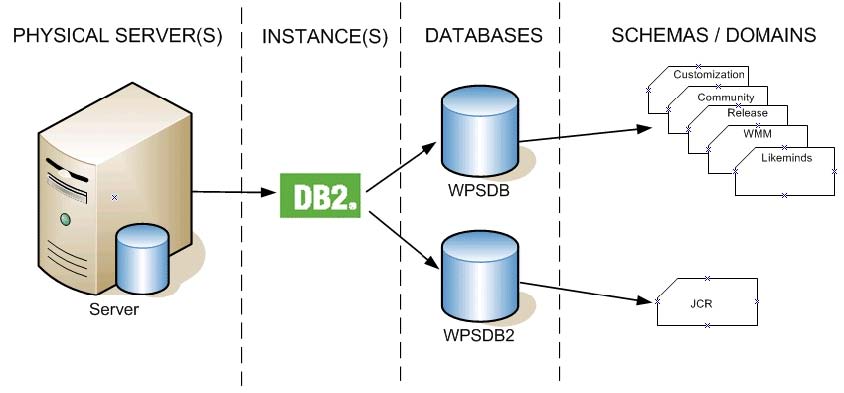
Figure 5-80 shows that the JCR domain has been isolated by being transferred from Cloudscape to its own database ("WPSDB2"). Even though this database is being managed by the same DB2 instance as the other schemas/domains it should provide for increased performance and capacity management.
You opted to put the JCR database domain on a separate physical server, however one of the other options listed above may be more suitable for the environment / requirements.
- Having decided on a method of isolating the JCR domain, the next step for building the high availability Portal environment is to move the JCR Domain to its own database physical server
Step 3 can also be conducted as part of the initial database transfer from
Cloudscape to a supported database server (i.e. as part of Step 2).
You opted to conduct this extra step of transferring the JCR domain from one database server to another to show the reader how this can be accomplished after the initial database transfer has been performed. This approach may be required because business or technical considerations dictate the need to isolate domains after the initial database transfer as occurred.
You may find it more convenient to isolate the domains as part of the initial database transfer from Cloudscape to multiple database servers by applying the techniques learned earlier in this chapter, specifically by editing the wpconfig_dbDomain.properties file to point the JCR domain to a different DB2 server than the other domains.
See the steps outlined in Section 5.4, "Example 1, Moving database domains" for how to move the JCR Domain to a new database server.
- Now that you have isolated the JCR data by having it on a different database server, we can now install a second portal server (in the case Portal Node 2). Again, install Portal Node 2 with the same install approach as used for Portal Node 1, i.e., with Process Server or without Process Server. Portal Node 2 will be the primary node for Cluster B, so it needs to be install the same as Portal Node was install.
As with step 1, Portal Node 2 will initially have all its database domains in Cloudscape. In a production environment you do not want any data left in Cloudscape so the next step for building the high availability environment would be to connect Portal Node 2 to the existing database domains on DB2 Server 1 and DB2 Server 2, which are being used by Portal Node 1.
You would connect Portal Node 2 to all the existing database domains on DB2 Server 1 (customization,community,wmm, and likeminds) and DB2 Server 2 (jcr) with the exception of the Release Domain. At this point the release domain for Portal Node 2 is still in CloudScape.
See Section 5.3, "Examples of moving and sharing database domains" for the steps on how to connect this additional Portal server node to the database servers.

After completing step 4, you now have Portal Nodes 1 and 2 pointing to the same database domains, however, Portal Node 2 still has its Release Domain in Cloudscape.
As previously mentioned, in a production portal environment, you do not want to leave any data in Cloudscape, therefore the next step in building the high availability portal environment would be to transfer Portal Node 2's Release Domain to a database server. You will transfer the release domain for Portal Node 2 to DB2 Server 2.
Section 5.4, "Example 1, Moving database domains" gives details on how to move the JCR Domain to a new database server. We can follow these same steps but substitute the Release Domain values for the JCR Domain values.
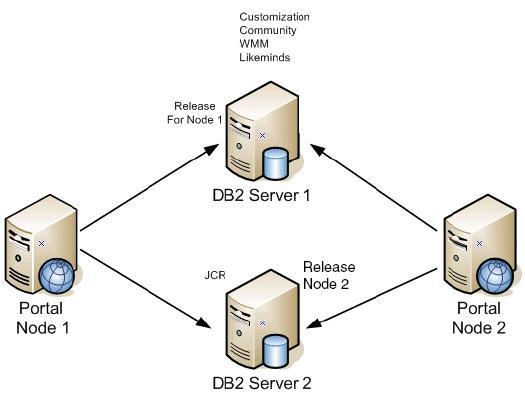
Figure 5-83 Two Nodes connected to the same databases with their own Release domains
- The final step is to build two new clusters (Cluster A and Cluster B in the case) with Portal Node 1 serving as the primary node in Cluster A and Portal Node 2 serving as the primary node in Cluster B. To accomplish the cluster creation, see Chapter 3, "Different Deployment Scenarios: Building Clustered Environments".
- At this point you have install WAS and Portal on both nodes using the install method determined by whether you want a Process Server cluster or a cluster without Process Server and you have configure both primary nodes to external databases. Now you will move forward by following the cluster creation steps after the database configuration as occurred on the primary node.
a. Cluster with Process Server
b. Cluster without Process ServerAll nodes in Cluster A will be configure and sharing the same database domains with Cluster B. Thus Cluster A and Cluster B will be sharing data between the clusters.
As you continue to follow the instructions in Chapter 3, "Different Deployment Scenarios: Building Clustered Environments", you will eventually configure security. For the clusters to share the same data, the security must be configure identically on both clusters by running the security task with the same values in the wpconfig.properties files.
Figure 5-84 shows how the final high availability portal environment will look after the clusters are completed.
The key point to note here is both clusters are serving up users with identical content and their we can now take down a cluster for maintenance or upgrade and direct users to the other cluster without any disruption.