High availability Deployment Manager
The high availability Deployment Manager function provides high availability for the Deployment Manager server and uses a hot-standby model for availability. With this support two or more Deployment Manager's peers may be defined and started in the same cell. One is considered active, also known as primary, and hosts the cell's administrative function, while the others are backups in standby mode. In standby mode, the Deployment Manager cannot be used to perform administrative functions. If the active manager is stopped or fails a standby takes over and is designated the new active Deployment Manager.
The benefit of the HA Deployment Manager function is that it eliminates the Deployment Manager as a single point of failure for cell administration. This is important in environments that have significant reliance on automated operations, including application deployment and server monitoring.
The high availability (HA) Deployment Manager function is configured using a shared file system; each Deployment Manager is installed and configured to run on a different physical or logical machine. The Deployment Managers need not be hosted on homogenous operating platforms, although like platforms are recommended.
A new command line utility is provided with WebSphere Extended Deployment to clone the original cell Deployment Manager into additional Deployment Managers.
Each Deployment Manager shares the same instance of the master configuration repository and workspace area which are located on the shared file system. The file system must support fast lock recovery. The IBM Storage Area Network File System (SAN FS) is recommended, and the Network File System V4 (NFS) is also an option.
The HA Deployment Manager function supports only use of the JMX SOAP connector. The JMX RMI connector is not supported in this configuration.
It is recommended to configure the Deployment Managers into the same core group so that routing information exposed to the ODR is consistent across all Deployment Managers. If the Deployment Managers are placed into separate core groups, the core groups must be connected with a core group bridge.
A typical HA Deployment Manager configuration is built with a pair of Deployment Managers sharing a single WebSphere install and master repository located on a SAN FS. A redundant ODR pair is configured for communication availability. It is also possible to install the WebSphere binaries locally and to put only the Deployment Manager profile onto the shared file system. We might have to configure this way if our Deployment Managers are hosted on different operating system platforms as is the case in our environment.
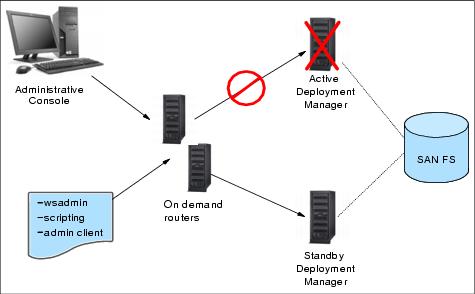
Normal operation includes starting at least two Deployment Managers. A highly available Deployment Manager component runs in each Deployment Manager to control which Deployment Manager is elected as the active one. Any other Deployment Manager in the configuration is in standby mode. The WebSphere Extended Deployment On Demand Router (ODR) is configured with the communication endpoints for the Administrative Console, wsadmin, and scripting. The ODR recognizes which Deployment Manager instance is active and routes all administrative communication to that instance.
In other words, after the HA Deployment Manager is set up, we do not access the Administrative Console on the Deployment Manager system itself any more, but through the ODRs. For example, use the URL :
http://odr1:9060/admininstead of:
http://dmgr1:9060/adminAll administrative operations are performed through the elected active Deployment Manager. The standby Deployment Manager is fully initialized and ready to do work but cannot be used for administration. This is because the administrative function does not currently support multiple concurrent server processes writing to the same configuration. Therefore, the standby rejects any login and JMX requests. However, if the active Deployment Manager is stopped or fails, the highly available Deployment Manager component recognizes the loss of the active Deployment Manager and dynamically switches the standby into active mode so it can take over for the lost Deployment Manager. The active and standbys share work spaces. When a Deployment Manager takeover occurs, work is not lost. When the Deployment Manager takeover occurs, the ODR automatically recognizes the election of the new active Deployment Manager and reroutes administrative requests to the new active Deployment Manager.
While the HA Deployment Manager component is able to detect Deployment Manager failures and initiate takeover, there are edge conditions where each Deployment Manager could temporarily believe it is the active Deployment Manager. To prevent this, the active Deployment Manager holds a file lock in the shared file system. Because of this, the takeover of the active Deployment Manager by the standby takes a brief period of time - approximately equal to the time it takes for the shared file system to detect the loss of the active Deployment Manager and release the lock. SAN FS and NFS both use a lock lease model and have configurable times for lock release for failed lock holders. This can be configured as low as 10 seconds for SAN FS.
Gives us information about the following possible scenarios:
- The redbook sample topology is already configured with an active Deployment Manager, two ODRs and all nodes. Now we want to add the HA Deployment Manager. This scenario assumes that the existing Deployment Manager profile is located on the shared file system. We have tested this scenario while writing the redbook and give we step-by-step instructions on how to configure the second Deployment Manager.
- We create a new cell with an HA Deployment Manager. Here we list the steps that need to be performed. However, we have not performed them in this sequence when configuring our topology.
- We have an existing WebSphere Extended Deployment cell that does not use the HA Deployment Manager function yet. The Deployment Manager profile is not located on the shared file system. We must therefore move the existing configuration onto the shared file system in order to add additional Deployment Managers. We have not tested this configuration but list the steps needed to convert an existing configuration.
Configuring the HA Deployment Manager
Here we show how to add a second Deployment Manager to an existing environment to take advantage of the high availability Deployment Manager function in WebSphere Extended Deployment.
Because we knew from the beginning that we would do this eventually, we have created the profile for our existing Deployment Manager on a shared file system and thus can add the second Deployment Manager to the environment.
If our Deployment Manager profile is not located on a shared file system, then we need to first move the profile to the shared file system.
Prerequisites
We assume the following prerequisites are met for this configuration:
- We have an appropriate shared file system and it is accessible by both Deployment Manager systems.
- We have WebSphere Network Deployment and WebSphere Extended Deployment installed on the shared file system or locally on each Deployment Manager system. >. The existing Deployment Manager profile must be on the shared file system.
In our case, one of our Deployment Managers is on AIX while the other runs on Linux. Therefore we installed the binaries locally on each system and put only the Deployment Manager profile into the shared file system.
- The cell's Deployment Manager is started.
- The On Demand Routers are installed, configured, and running.
Here are the system names and IP addresses that are used in our configuration:
System name IP address odr1 10.2.2.1 odr2 10.2.2.2 dmgr1 10.2.3.1 dmgr2 10.2.3.2
The configuration steps
WebSphere Extended Deployment is installed on the dmgr2 node. dmgr1, odr1, and odr2 are up and running. Now we want to add dmgr2 as an HA Deployment Manager to the environment. Adding dmgr2 into the environment involves these tasks:
- Creating a new Deployment Manager profile on the shared file system for dmgr2.
- Running the xd_hadmgrAdd command from dmgr2's profile directory to convert dmgr2 into an HA Deployment Manager peer.
- Restarting the Deployment Managers and ODRs.
Creating a new Deployment Manager profile
To create a new Deployment Manager profile in WebSphere Extended Deployment:
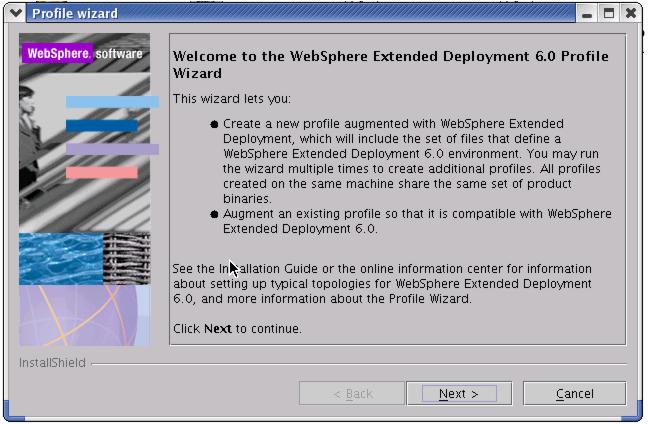
- Because we have installed WebSphere Extended Deployment before creating the profile on our Linux system, we can use the pcatLinux.bin command to create the dmgr2 profile. This command is located in the install_root/bin/ProfileCreator/XD directory. Executing pcatLinux launches the WebSphere Extended Deployment 6.0 Profile Wizard.
- On the Profile type selection panel select to Create a deployment manager profile. Click Next.
- On the following panel, enter dmgr2 as the Profile name and click Next again.
- The Profile directory panel is shown. Here we must specify the path to the WebSphere profiles directory on the shared file system. The directory name defaults to the profile name, so in our case the Profile directory is /opt/IBM /WebSphere/AppServer/profiles/dmgr2. Click Next.
- Now we must enter the node name, host name, and cell name for the second Deployment Manager. Enter dmgr2 as the Node name and the fully qualified host name of our system into the Host name field, in our case this is dmgr2.ibmredbooks.com. Enter any value into the Cell name field. This value does not matter as it will be overwritten when the primary Deployment Manager's configuration is cloned using the xd_hadmgrAdd command. Click Next.
- Verify the ports that are automatically assigned on the Port value assignment panel and click Next again.
- The Profile summary panel is displayed. Click Next to create the new profile.
- Verify that the profile creation was successfully and click Finish.
The xd_hadmgrAdd command
WebSphere Extended Deployment provides a new command that incorporates a new Deployment Manager profile into a cell. The new Deployment Manager profile is converted into an highly available Deployment Manager peer in the same cell as the existing Deployment Manager profile. The command must be run from the new Deployment Manager profile that is being added.
Issue the xd_hadmgrAdd.sh command without any parameters to display the usage of the command.
/opt/IBM /WebSphere/AppServer/profiles/dmgr2/bin >./xd_hadmgrAdd.sh
ADMU0116I: Tool information is being logged in file
           /opt/IBM /WebSphere/AppServer/profiles/dmgr2/logs/xd_hadmgrAdd.log
ADMU0128I: Starting tool with the dmgr2 profile
XHAD1011E: Mandatory parameters missing
XHAD1000I: Usage: xd_hadmgrAdd -hostname <primary_dmgr_host> [-port
           <primary_dmgr_port>] -configRoot
           <fully_qualified_path_to_shared_configuration> -workspaceRoot
           <fully_qualified_path_to_workspace> [-proxyServerJmxSoapAddress
           <JMX_SOAP_host>:<JMX_SOAP_port> ][-proxyServerHttpPort <HTTP_port>
           <HTTP_secure_port> ][-uniquePort] [-user <uid>] [-password <pwd>]
           [-quiet] [-logfile <filename>] [-replacelog] [-trace] [-help]
To add dmgr2 as a HA Deployment Manager peer, follow these steps:
- Switch to the install_root /profiles/dmgr2/bin directory.
- Run the xd_hadmgrAdd command with at least the following parameters:
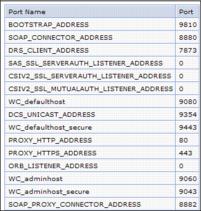
-hostname Enter the IP address of the existing Deployment Manager, in our case 10.2.3.1. -configRoot Enter the path to the existing Deployment Manager's configuration directory, in our case /usr/IBM /WebSphere/AppServer/profiles/dmgr1/config. -workspaceRoot Enter the path to the existing Deployment Manager's profile directory, in our case /usr/IBM /WebSphere/AppServer/profiles/dmgr1. -proxyServerJmxSoapAddress Enter the IP address and JMX Proxy port of our ODR. In our case this is 10.2.2.1:8882. We can find the ODRs port in the Administrative Console as follows
Click Servers | On Demand Routers | ODR_router_name | Ports (under Communications). We need to pick a new port number that is not listed here. If we have more than one ODR, we should use a port number that is not assigned on any ODR.
-proxyServerHttpPort Enter the ODR's port numbers for WC_adminhost and WC_adminhost_secure. Again, we should pick port numbers that are not assigned on the ODRs. In our case they are 9060 and 9043. The -proxyServerJmxSoapAddress and -proxyServerHttpPort ports are used to construct new ODR endpoints. Hence these new ports could conflict with any ODR, application server, Deployment Manager, or Node Agent running on the ODR machines. We are required to ensure the selected ports are free on the ODR machines, or add the -uniquePort option to the command to generate unique port numbers.
-uniquePort makes sure that there are no port conflicts for the WC_adminhost and WC_adminhost_secure HTTP transport channels as well as for the JMX_SOAP_PROXY_ADDRESS endpoint.
We still need to add port numbers to the command syntax but if a selected port is in use on the ODR, this port number is incremented by one until a free port is found.
For example, we could get a port conflict for the 9060 and 9043 adminhost ports if we have application servers configured on the ODR nodes. These ports will however not show up in the ODR port list but only in the port assignment list of the respective application server.
Refer to the command usage or the InfoCenter article xd_hadmgrAdd command to discern if we need additional parameters for our environment. For example, if security is enabled for our cell, then we also must specify the -user and -password parameters to connect to the existing Deployment Manager. Or we must add the Deployment Manager's SOAP port after the -hostname parameter, if we are not using the default port of 8879.
xd_hadmgrAdd example
This example shows the command we have used for our environment. Note that we have not used the -uniquePort parameter. However, if we receive an error that indicates port conflicts, then append this parameter.
/opt/IBM /WebSphere/AppServer/profiles/dmgr2/bin >./xd_hadmgrAdd.sh -hostname 10.2.3.1 -configRoot /usr/IBM /WebSphere/AppServer/profiles/dmgr1/config -workspaceRoot /usr/IBM /WebSphere/AppServer/profiles/dmgr1 -proxyServerJmxSoapAddress 10.2.2.1:8882 -proxyServerHttpPort 9060 9043
The command might run for several minutes. The progress of the command is output to our command prompt window.
ADMU0116I: Tool information is being logged in file
           /opt/IBM /WebSphere/AppServer/profiles/dmgr2/logs/xd_hadmgrAdd.log
ADMU0128I: Starting tool with the dmgr2 profile
XHAD1001I: Connecting to primary deployment manager host 10.2.3.1 using port 8879
#######################################################################################
Comment: The lines between ##### are only displayed when using the -uniquePort parameter
XHAD1028I: CELL_DISCOVERY_ADDRESS is assigned to port 7277
XHAD1028I: BOOTSTRAP_ADDRESS is assigned to port 9809
XHAD1028I: SOAP_CONNECTOR_ADDRESS is assigned to port 8879
XHAD1028I: ORB_LISTENER_ADDRESS is assigned to port 9100
XHAD1028I: SAS_SSL_SERVERAUTH_LISTENER_ADDRESS is assigned to port 9401
XHAD1028I: CSIV2_SSL_MUTUALAUTH_LISTENER_ADDRESS is assigned to port 9402
XHAD1028I: CSIV2_SSL_SERVERAUTH_LISTENER_ADDRESS is assigned to port 9403
XHAD1028I: WC_adminhost is assigned to port 9060
XHAD1028I: DCS_UNICAST_ADDRESS is assigned to port 9352
XHAD1028I: WC_adminhost_secure is assigned to port 9043
#######################################################################################
XHAD1002I: Begin addition of standby deployment manager node dmgr2 to cell xdcell
XHAD1029I: Updating endpoints in On Demand Router odr1
XHAD1028I: WC_adminhost(proxyServerHttpPort) is assigned to port 9060
XHAD1028I: WC_adminhost_secure(secure proxyServerHttpPort) is assigned to port 9043
XHAD1028I: SOAP_PROXY_CONNECTOR_ADDRESS(proxyServerJmxSoapAddress) is assigned to port 8882
XHAD1029I: Updating endpoints in On Demand Router odr2
XHAD1028I: WC_adminhost(proxyServerHttpPort) is assigned to port 9060
XHAD1028I: WC_adminhost_secure(secure proxyServerHttpPort) is assigned to port 9043
XHAD1028I: SOAP_PROXY_CONNECTOR_ADDRESS(proxyServerJmxSoapAddress) is assigned to port 8882
XHAD1030I: Updating endpoints in deployment manager of node dmgr1
XHAD1028I: SOAP_PROXY_CONNECTOR_ADDRESS is assigned to port 8879
XHAD1028I: SOAP_CONNECTOR_ADDRESS is assigned to port 8882
XHAD1003I: Standby deployment manager node dmgr2 has been added successfully to cell xdcell
XHAD1004I: Restart the active deployment manager in node dmgr1
XHAD1005I: Please restart the On Demand Router odr1
XHAD1005I: Please restart the On Demand Router odr2

The command automatically discovers that we have two ODRs in the environment and updates both ODRs.
We are informed that we need to restart the active Deployment Manager and the ODRs.
Configuration changes performed by xd_hadmgrAdd command
The xd_hadmgrAdd command makes the following changes to the cell configuration:
- The new Deployment Manager is configured to use the same configuration repository instance as the existing Deployment Manager, which must be on a shared device with the existing Deployment Manager.
- The new Deployment Manager is configured to use the same specified workspace shared directory, which must be on a device shared with the existing Deployment Manager.
- The On Demand Routers are configured with the following:
- WC_adminhost and WC_adminhost_secure HTTP transport channels.
- JMX_SOAP_PROXY_ADDRESS endpoint.
- The Deployment Managers are reconfigured as follows:
- Their JMX_SOAP_CONNECTOR addresses point to the ODR's JMX_SOAP_PROXY_ADDRESS.
- They have a JMX_SOAP_PROXY_ADDRESS added that holds the same configured host or port as their original JMX_SOAP_ADDRESS.
The address specified using -proxyServerJmxSoapAddress becomes a single point of failure (SPOF). In an HA Deployment Manager environment, Node Agents connect to this address to perform administrative tasks such as synchronizing the local repository with the master repository.
To eliminate the ODR as a SPOF we need at least two ODRs and an IP sprayer fronting them.
If we have an IP sprayer in front of our ODRs, then the Deployment Managers JMX_SOAP_ADDRESS configured host name should point to the IP sprayer instead of to an ODR directly.
Starting the Deployment Managers and ODRs
To finish the HA Deployment Manager configuration, we must now restart the active Deployment Manager and the ODRs and also start the newly configured Deployment Manager.
- >To restart the active Deployment Manager, go to its profile/bin directory and issue the stopManager command. When it has stopped, run the startManager command.
- >To restart the ODRs, open the Administrative Console and go to...
Servers | On Demand RoutersIf we can stop all active ODRs at the same time (because we have no active requests in our WebSphere system), select all ODRs and press the Stop button. Select them again and click the Start button. If our WebSphere system is actively processing user requests, then we should stop and start one ODR after the other.
- >The last step is to also start the new Deployment Manager. Go to the dmgr2's profile /bin directory and issue the startManager command.
The first Deployment Manager that is successfully started becomes the active Deployment Manager while the one started later becomes the standby. If we then stop the active Deployment Manager, or if it fails, the standby takes over and becomes active. It stays active until we stop it or until it fails, that is, the Deployment Manager does not automatically fail back when the original Deployment Manager becomes active again.
Verifying the HA Deployment Manager configuration
There are a few ways to verify that the configuration of the HA Deployment Manager was successful:
Look at the SystemOut.log files of both Deployment Managers. the example below shows an excerpt of SystemOut.log of dmgr2 when it was first started. As we can see here, this Deployment Manager is in standby mode because it was started after dmgr1 was already active.
We then stopped dmgr1 using the stopManager command which causes dmgr2 to take over processing and to become the active Deployment Manager.
************ Start Display Current Environment ************
WebSphere Platform 6.0 [ND 6.0.2.1 cf10533.10] [XD 6.0.0.0 j0529.07]  running with process name
xdcell\dmgr2\dmgr and process id 14908
Host Operating System is Linux, version 2.4.21-20.ELsmp
....
************* End Display Current Environment *************
[11/11/05 17:17:09:059 EST] 0000000a ManagerAdmin  I   TRAS0017I: The startup trace state is *=info.
[11/11/05 17:17:10:740 EST] 0000000a AdminInitiali A   ADMN0015I: The administration service is
initialized.
[11/11/05 17:17:14:264 EST] 0000000a SystemOut     O PLGC0057I: Plug-in configuration service
is started successfully.
....
[11/11/05 17:17:31:103 EST] 0000000a HADMgrMode    I   XHAD0001I: The Deployment Manager
process is in standby mode.
....
[11/11/05 17:18:03:369 EST] 00000029 NGUtil$Server I   ASND0002I: Detected server dmgr started
on node dmgr1
....
[11/11/05 17:19:33:854 EST] 00000035 LogHandle     I   CWRLS0007I: No existing recovery log
files found in /opt/IBM /WebSphere/AppServer/profiles/dmgr2/tranlog/xdcell/dmgr2/dmgr/
transaction/tranlog. Cold starting the recovery log.
[11/11/05 17:19:33:904 EST] 00000035 LogFileHandle I   CWRLS0006I: Creating new recovery log
file /opt/IBM /WebSphere/AppServer/profiles/dmgr2/tranlog/xdcell/dmgr2/dmgr/transaction/
tranlog/log1.
....
[11/11/05 17:20:26:425 EST] 00000035 RecoveryManag A   WTRN0028I: Transaction service
recovering 0 transactions.
[11/11/05 17:20:27:148 EST] 00000038 ApplicationMg A   WSVR0200I: Starting application: IBM
[11/11/05 17:20:27:148 EST] 0000003a ApplicationMg A   WSVR0200I: Starting application: IBM
[11/11/05 17:20:27:150 EST] 00000039 ApplicationMg A   WSVR0200I: Starting application: IBM
....
[11/11/05 17:20:36:540 EST] 00000038 VirtualHost   I   SRVE0250I: Web Module WebSphere Admin
File Transfer Application has been bound to admin_host[*:9060,*:9043,*:9060,*:9043].
[11/11/05 17:20:37:961 EST] 0000003a WebGroup      A   SRVE0169I: Loading Web Module:
adminconsole.
....
[11/11/05 17:20:42:800 EST] 0000003a ServletWrappe A   SRVE0242I: [adminconsole] [/ibm/console]
[action]: Initialization successful.
....
[11/11/05 17:20:43:487 EST] 0000003a VirtualHost   I   SRVE0250I: Web Module adminconsole has
been bound to admin_host[*:9060,*:9043,*:9060,*:9043].
[11/11/05 17:20:56:718 EST] 00000038 ApplicationMg A   WSVR0221I: Application started: IBM
[11/11/05 17:20:56:718 EST] 00000039 ApplicationMg A   WSVR0221I: Application started: IBM
[11/11/05 17:20:58:813 EST] 0000003a WebGroup      A   SRVE0169I: Loading Web Module:
adminconsole redirector.
[11/11/05 17:20:58:903 EST] 0000003a VirtualHost   I   SRVE0250I: Web Module adminconsole
redirector has been bound to admin_host[*:9060,*:9043,*:9060,*:9043].
[11/11/05 17:21:10:169 EST] 0000003a ApplicationMg A   WSVR0221I: Application started: IBM
....
[11/11/05 17:21:20:714 EST] 0000002a NGUtil$Server I   ASND0002I: Detected server dmgr started
on node dmgr2
[11/11/05 17:21:21:447 EST] 0000000a WsServerImpl  A   WSVR0001I: Server dmgr open for
e-business
....
[11/11/05 17:25:38:590 EST] 00000092 HADMgrMode    I   XHAD0002I: The Deployment Manager
process is in active mode.
....
[11/11/05 17:25:40:069 EST] 00000029 NGUtil$Server I   ASND0003I: Detected server dmgr stopped
on node dmgr1
....
- Another item to verify are the port assignments on the ODRs using the Administrative Console. Click Servers | On Demand Routers | ODR_router_name | Ports (under Communications). Notice that WC_adminhost is assigned to port number 9060 and WC_adminhost_secure to 9043. These are the ports that we need to use when connecting to the Administrative Console through the ODRs from now on. For example:
http://odr1:9060/admin

- Verify we can access the Administrative Console through all ODRs in the topology.
- Look at the Runtime Topology in the Administrative Console (Runtime Operations | Runtime Topology). Expand Node Groups | DefaultNodeGroup. Here we should see both Deployment Manager nodes
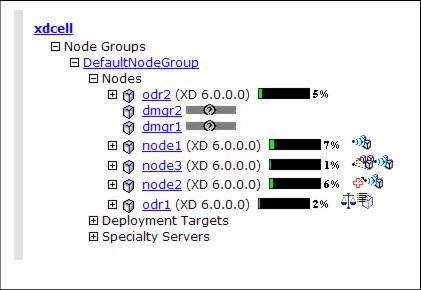
- dmgr2 can also be seen under System administration | Nodes.
- Initiate a failover by stopping the active Deployment Manager. We recommend to check whether all nodes are synchronized before performing this test. Verify that the console is accessible after the failover occurred. Be aware that it might take a while until the failover was successful - this is mainly due to the time it takes for the shared file system to release the lock that the active Deployment Manager holds in the shared file system.
- In the Administrative Console go to...
System administration | Deployment manager Runtime tabThe Node Name field shows which Deployment Manager, dmgr1 or dmgr2 is currently active.
Accessing the HA Deployment Manager Administrative Console
After configuring the HA Deployment Manager we must access the Administrative Console through the ODRs because only they know which of the peer Deployment Managers is currently active. We can either verify the console ports as described above or see the output that was written while the xd_hadmgrAdd command was running. In our case, we saw the following messages (for both ODRs):
Updating endpoints in On Demand Router odr1
XHAD1028I: WC_adminhost(proxyServerHttpPort) is assigned to port 9060
XHAD1028I: WC_adminhost_secure(secure proxyServerHttpPort) is assigned to port 9043
Therefore, in our configuration we now must enter one of the following URLs to access the Administrative Console:
http://odr1:9060/admin
http://odr2:9060/adminIf we try to access the Administrative Console directly on the system that is the current standby, we receive the error message...
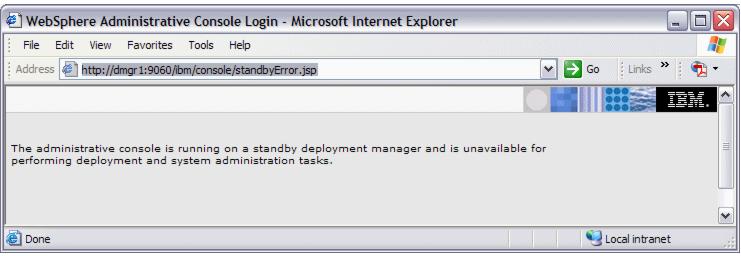
Figure 12-6 Standby Deployment Manager error message
Creating a new cell with an HA Deployment Manager
This scenario assumes that we want to set up a new cell. No configuration is done yet and we need to follow these steps to configure our HA Deployment Manager environment:
- Install WebSphere Network Deployment and WebSphere Extended Deployment on all systems. The HA Deployment Manager systems must have access to a shared file system. For the Deployment Manager systems, we can install the WebSphere binaries locally or on the shared file system.
- Create a Deployment Manager profile on the first Deployment Manager system. The profile must reside on the shared file system.
- Start the Deployment Manager.
- Create a custom profile on the ODR system and federate it with the Deployment Manager.
- Use wsadmin or the Administrative Console to create and configure an ODR on the federated node.
- Create a Deployment Manager profile on the second Deployment Manager system.
- Run the xd_hadmgrAdd command within the Deployment Manager profile on the second Deployment Manager system to convert it into a standby Deployment Manager.
- Restart the Deployment Managers and the ODRs. The first Deployment Manager that starts is the active Deployment Manager, and the other is the standby Deployment Manager.
Converting an existing cell to an HA Deployment Manager configuration
We have not tested this scenario, but these are the steps that must be done in order to convert an existing cell configuration:
- Ensure that we have a shared file system set up that both Deployment Manager systems can access.
- Install WebSphere Network Deployment and WebSphere Extended Deployment on the shared file system. Alternatively, keep the WebSphere binaries locally and create only the Deployment Manager profile on the shared file system.
- Create a Deployment Manager profile using the first Deployment Manager's system information (such as IP address) and with the same cell and node name as the existing Deployment Manager. The profile must be created on the shared file system.
- Use the backupConfig and restoreConfig command line utilities to relocate the existing cell configuration to the shared file system.
- Ensure that the existing cell configuration contains an ODR. If an ODR does not exist, create one.
- Create a Deployment Manager profile using the second Deployment Manager system information.
- Run the xd_hadmgrAdd command within the second Deployment Manager profile to convert it into a standby Deployment Manager.
- Restart the Deployment Managers and ODRs. The first Deployment Manager that starts is the active Deployment Manager, and the other is the standby Deployment Manager.
Removing an HA Deployment Manager from a cell
The xd_hadmgrRemove command removes a highly available Deployment Manager from a cell. The command must be run within the Deployment Manager profile that is being removed.
The command syntax is as follows:
xd_hadmgrRemove -host_name (primary_dmgr_host) [-port (primary_dmgr_port)]
[-user (uid)] [-password (pwd)] [-quiet] [-logfile (filename)]
[-replacelog] [-trace] [-help]
This example shows the output from the command window when removing the HA Deployment Manager from the configuration.
Example 12-5 xd_hadmgrRemove command for dmgr2

/opt/IBM /WebSphere/AppServer/profiles/dmgr2/bin >./xd_hadmgrRemove.sh -hostname dmgr1
ADMU0116I: Tool information is being logged in file
           /opt/IBM /WebSphere/AppServer/profiles/dmgr2/logs/xd_hadmgrRemove.log
XHAD1001I: Connecting to primary deployment manager host dmgr1 using port 8879
XHAD1007I: Begin removal of standby deployment manager node dmgr2 from cell xdcell
ADMU2018I: Node dmgr2 has been removed from the Deployment Manager configuration.

The xd_hadmgrRemove command reconfigures all settings that have been changed when adding the HA Deployment Manager. For example, the WC_adminhost and WC_adminhost_secure HTTP transport channels and the JMX_SOAP_PROXY_ADDRESS endpoint are set back to their original status or removed. Also, after removing the second Deployment Manager we cannot access the Administrative Console through the ODRs any longer.
Repository checkpoint/restore function
The repository checkpoint/restore function allows us to create backup copies of files from the master configuration repository. We can then use these backups to restore our configuration to a previous state in case a configuration change causes operational problems. Thus this function helps reducing recovery time for problems caused by configuration changes.
IBM WebSphere Extended Deployment V6.0 supports two different kinds of checkpoints:
Full checkpoint This is a complete copy of the entire configuration repository. Take a full checkpoint when we have a known working configuration to establish a baseline. Delta checkpoint Delta checkpoints are taken automatically whenever a configuration change is made. This is not a full copy of the configuration repository but contains only changed documents. The delta checkpoint is a before-image snapshot of the configuration files that have been modified during the configuration change. A configuration save marks the end of a configuration change. The big advantage of the repository checkpoint/restore function is that we do not need to stop our environment to take the checkpoint.
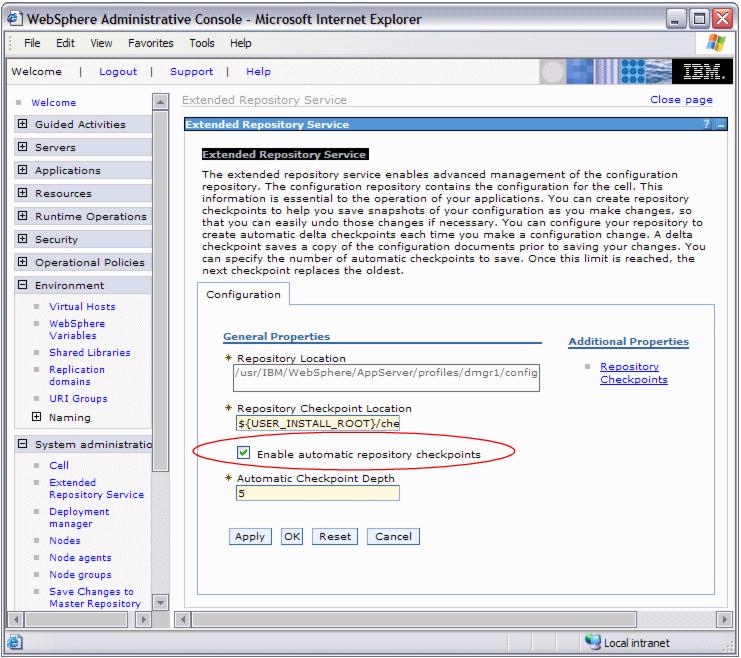
Configuring checkpoints
Go to...
System administration | Extended Repository Service...to configure delta checkpoints and to take full checkpoints.
This panel allows us to configure the following:
- Repository Location
- Configuration Checkpoint Location
Configuration checkpoints are stored in the filesystem. By default they are stored in ${USER_INSTALL_ROOT}/checkpoints. A new subdirectory is created under this directory for each checkpoint (delta or full) with the same name as the checkpoint has in the list of checkpoints.
We can configure another location for the checkpoints, for example on a file system other than the one holding the master repository to facilitate disaster recovery.
The configuration checkpoint location must reside on a shared file system that can be accessed by all Deployment Managers when using the HA Deployment Manager! We have changed the path for our sample topology to /opt/IBM /WebSphere/AppServer/profiles/checkpoints so both Deployment Managers, dmgr1 and dmgr2, are able to access the checkpoints.
- Enable automatic repository checkpoints
Check this box to enable delta checkpoints. This option is not enabled by default. Once this is enabled, a delta checkpoint is taken every time we click the Save link after changing the configuration.
- Automatic Checkpoint Depth
This setting defines the number of delta checkpoints that should be saved. Once this limit is reached, the oldest checkpoint is discarded. The default is 5.
Taking a full checkpoint
Full checkpoints are taken manually by the administrator using the Administrative Console. To take a full checkpoint:
- Log on to the Administrative Console.
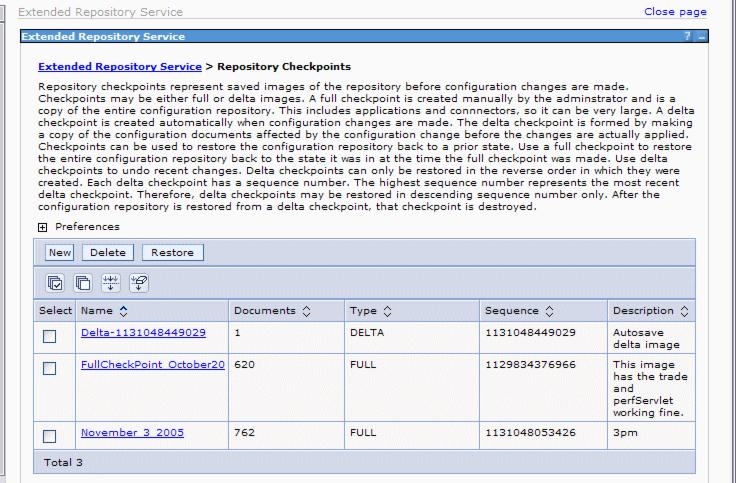
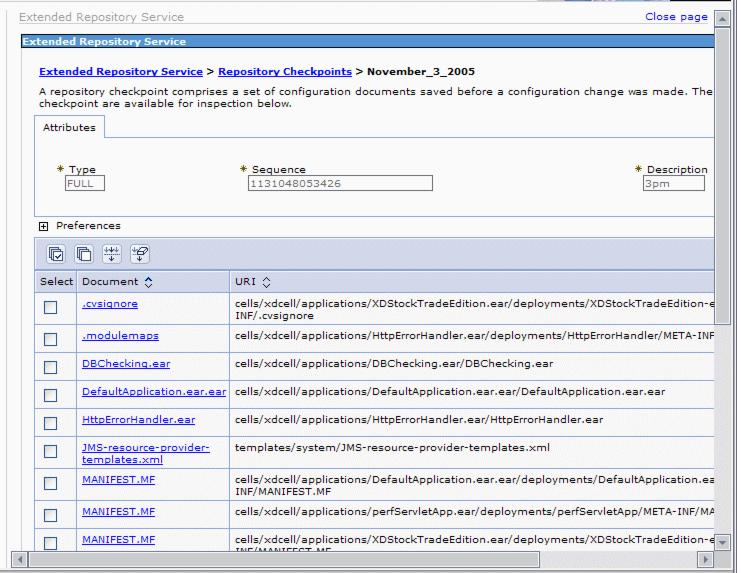
- Go to System administration | Extended Repository Service | Repository Checkpoints.
Here is a Repository Checkpoints panel with two existing full checkpoints and one delta checkpoint.
- Click New to take a full checkpoint.
- Enter a name and description for our new full checkpoint.
The name and description must be meaningful as there are no other means to recognize the date and time the checkpoint was taken.
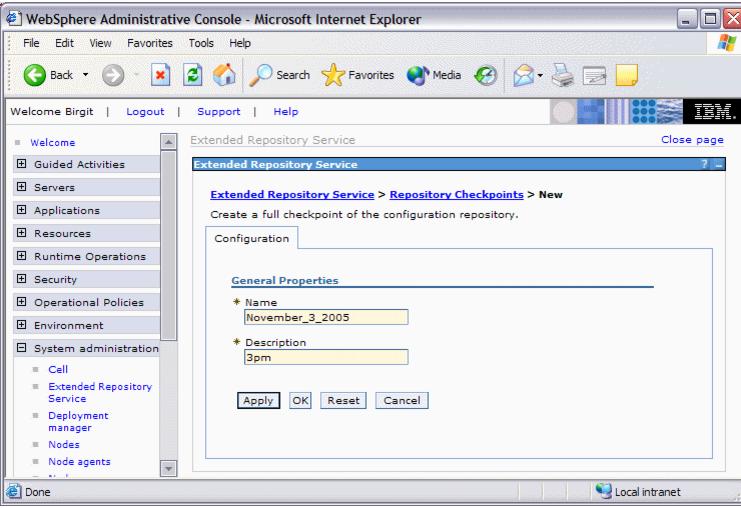
- Click OK. The checkpoint is immediately taken without further confirmation.
Note that the repository is locked while the checkpoint is being created. We have read access only to configuration data while the checkpoint is being created. Any attempt to make a configuration change during this period will fail.
[11/22/05 10:49:04:744 EST] 000000f9 ExtendedConfi A XREP0001I: Creation of full checkpoint Nov22_5pm initiated.
[11/22/05 10:49:09:558 EST] 000000f9 FileRepositor A ADMR0007I: The repository is locked: Locked by CheckpointBuilder for Full Checkpoint Creation..
[11/22/05 10:49:28:755 EST] 000000f9 FileRepositor A ADMR0009I: Document cells/xdcell/repository/checkpoints/Nov22_5pm/checkpoint.xml is created.
[11/22/05 10:49:29:034 EST] 000000f9 FileRepositor A ADMR0008I: The repository is unlocked: Unlocked by CheckpointBuilder for Full Checkpoint Creation..
[11/22/05 10:49:29:442 EST] 000000f9 ExtendedConfi A XREP0002I: Creation of full checkpoint Nov22_5pm completed.
After the full checkpoint was taken, it is displayed in the list of existing checkpoints. This panel also allows us to delete or restore existing checkpoints.
The sequence number in this pane is a good indication to find the most recent or oldest checkpoint. If we click the Sequence column header, we can sort the checkpoints in ascending or descending order.
Clicking a certain checkpoint's name link displays the files that are part of this checkpoint
Restoring repository checkpoints
We can restore both full and delta checkpoints from the same panel. Restore a full checkpoint to restore the entire configuration repository back to the state it was in at the time the full checkpoint was made. Restore delta checkpoints to undo recent configuration changes.
To restore a checkpoint, open the Administrative Console and go to...
System administration | Extended Repository Service | Repository CheckpointsOnce a checkpoint is restored we need to log off and back on to the console or discard our workspace modifications when indicated to do so by a message to avoid conflicts between the updated master configuration and our workspace. Then verify the success of the restoration.
When restoring a checkpoint, the master repository is updated and brought back to the precheckpoint status no matter what we do with our current workspace. So it is not possible to back out of a checkpoint restoration by saving the current workspace and overwriting the files in the master repository.
We recommend to resynchronize our nodes after a checkpoint restoration.
Restoring a full checkpoint
From the list of checkpoints, select the full checkpoint that we wish to restore and click the Restore button. This restores the checkpoint immediately without any reconfirmation.