Configure ODM v8.5 Decision Center
- Create and augment dmgr profile
- Create managed node profiles
- Federate nodes
- Create cluster and add first member
- Add second member to cluster
- Tune JVMs
- Map users and groups
- Backup profiles
- LDAP Integration
- Configure IHS Plugin
- Web Server Configuration
- Tune Decision Center
- Installation options
- Create and augment dmgr profile
- Install ODM on the dmgr host
- Create dmgr profile...
cd ODM_HOME/AppServer/bin/ ./manageprofiles.sh -create \ -templatePath ODM_HOME/AppServer/profiles/profileTemplates/management \ -serverType DEPLOYMENT_MANAGER \ -profileName odmDmgr \ -profilePath ODM_HOME/profiles/dmgr \ -enableAdminSecurity true \ -adminUserName odmAdmin \ -adminPassword odmAdmin \ -cellName odmCell \ -startingPort 49000 - Augment dmgr profile
cd ODM_HOME/AppServer/bin/
./manageprofiles.sh -augment \
                    -profileName odmDmgr \
                    -templatePath ODM_HOME/AppServer/profiles/profileTemplates/rules/management/dc
- Create managed node profiles
- Install ODM on each node host
- On dmgr host, start the deployment manager
- On node1 run...
cd ODM_HOME/bin/ ./manageprofiles.sh -create \ -templatePath ODM_HOME/profiles/profileTemplates/managed \ -profileName node01 \ -profilePath ODM_HOME/profiles/node01 \ -nodeName node01 \ -cellName Node01Cell \ -federateLater true \ -dmgrHost dmgrhost.mydomain.com \ -dmgrPort 49003 - On node2 run...
cd ODM_HOME/bin/
./manageprofiles.sh -create \
                    -templatePath ODM_HOME/profiles/profileTemplates/managed \
                    -profileName node02 \
                    -profilePath ODM_HOME/profiles/node02 \
                    -nodeName node02 \
                    -cellName Node02Cell \
                    -federateLater true \
                    -dmgrHost dmgrhost.mydomain.com \
                    -dmgrPort 49003
- Federate nodes
- On node1 run...
cd ODM_HOME/profiles/node01/bin/ ./addNode dmgrhost.mydomain.com 49003 \ -conntype SOAP \ -username odmAdmin \ -password odmAdmin - On node2 run...
cd ODM_HOME/profiles/node02/bin/
./addNode dmgrhost.mydomain.com 49003 \
          -conntype SOAP \
          -username odmAdmin \
          -password odmAdmin
- On node1 run...
- Create cluster and add first member
- On dmgr server, set...
-
export ODM_HOME=ODM_HOME/ODM
- Edit...
-
ODM_HOME/profiles/dmgr/bin/rules/configureDCCluster.properties
...and set...
-
wodm.dcrules.clusterName=odmDCCluster
wodm.dcrules.db.type=Oracle
wodm.dcrules.db.jdbcDriverPath=ODM_HOME/AppServer/ODMjdbcdrivers/Oracle/ojdbc6.jar
wodm.dcrules.db.name=wasenv
wodm.dcrules.db.hostname=dmgrhost.mydomain.com
wodm.dcrules.db.port=1521
wodm.dcrules.db.user=dbUserid
wodm.dcrules.db.password=dbPassword - Copy rulesTemplateResource.jar from...
-
ODM_HOME/shared/profiles/profileTemplates/rules/lib/
...to...
-
WAS_HOME/profileTemplates/rules/lib/
Copy rulesTemplateResource.jar from...
-
ODM_HOME/shared/profiles/profileTemplates/rules/lib/
...to...
-
WAS_HOME/lib/
- On both nodes...
-
mkdir ODM_HOME/executionserver/applicationservers/WebSphere85
mkdir ODM_HOME/shared/profiles/profileTemplates/rules/lib - Copy all files under...
-
ODM_HOME/executionserver/applicationservers/WebSphere85Ā
...to...
-
ODM_HOME/executionserver/applicationservers/WebSphere85
- Copy all files under...
-
ODM_HOME/shared/profiles/profileTemplates/rules/lib
...to...
-
ODM_HOME/shared/profiles/profileTemplates/rules/lib
- On dmgr, set default server name in...
-
DMGR_PROFILE/bin/rules/configureDCRulesNetworkDeployer.py
For example...
-
deployClusterTools.createCluster(cellName, clusterName, clusterNodeName, clusterNodeName + "-myDCServer")
- Set MaxPermGen heap size in...
-
DMGR_PROFILE/bin/rules/configureDCRulesND.ant
...to...
-
<jvmarg value="-XX:MaxPermSize=256m"/>
<jvmarg value="-Xmx2G"/> - Create cluster and first cluster member...
cd ODM_HOME/profiles/dmgr/bin/ ./configureDCCluster.sh -dmgrAdminUsername odmAdmin \ -dmgrAdminPassword odmAdmin \ -clusterPropertiesFile ODM_HOME/profiles/dmgr/bin/rules/configureDCCluster.properties \ -targetNodeName node01 \ -dmgrHostName dmgrhost.mydomain.com \ -dmgrPort 49003 - To verify cluster create success, log in to admin console and go to...
-
Servers | Clusters | Websphere application server clusters
Verify the first DC cluster member was created on node01...
-
Cluster name | Cluster members
Note that configureDCCluster.sh is used to create decision center cluster and the first cluster member only. It cannot be used to add a node or cluster members to an existing cluster.
- On dmgr server, set...
- Add second node to cluster
- Set clusterNodeName in...
-
DMGR_PROFILE/bin/addNodeToDCCluster.sh
- Set "MaxPermGen" heap size in...
-
DMGR_PROFILE/bin/rules/addNodeToDCCluster.ant
...to...
-
<jvmarg value="-XX:MaxPermSize=256m"/>
<jvmarg value="-Xmx2G"/> - Add node...
cd ODM_HOME/profiles/dmgr/bin/bin/
./addNodeToDCCluster.sh -dmgrAdminUsername odmAdmin \
                        -dmgrAdminPassword odmAdmin \
                        -clusterPropertiesFile ODM_HOME/profiles/dmgr/bin/rules/configureDCCluster.properties \
                        -targetNodeName node02 \
                        -dmgrHostName dmgrhost.mydomain.com \
                        -dmgrPort 49003
On successful execution, second cluster member is created with all resources configured. To verify it, logon to admin console and go to...
-
Servers | Clusters | Websphere application cluster | odmDCCluster | Additional Properties | Members | Details
- Set clusterNodeName in...
- Tune JVMs
Initial Heap Size
4096 MB
Maximum Heap Size
4096 MB
Generic JVM Argument
-XX:MaxPermSize=1024m
To perform, JVM tuning...
-
Servers | Websphere application servers | server name | Process Definitions | Java and Process Management | Java Virtual Machine
Save and synchronize the changes. Perform the same for all JVMs (cluster members and deployment manager).
- Create required groups and map users for decision center
- From Integrated Solutions Console, go to...
-
Security > Global security
- Configure the repository security as follows.
- If Federated repositories is already selected under Current realm definition, verify that Enable application security is selected. Apply and Save to save the changes to the master configuration.
- If Federated repositories is not already selected, click Security Configuration Wizard and configure...
- In Step 1 of wizard, to specify the level of protection, select...
-
Enable application security
...and click Next.
- In Step 2 of wizard, select Federated repositories and click Next.
- In Step 3 of wizard, type a name in the primary administrative user name field and password in the password field, and click Next.
- In Step 4 of wizard, review the security configuration summary and click Finish.
- Click Save to save the changes to the master configuration.
- Restart the server.
- In Step 1 of wizard, to specify the level of protection, select...
- In the side panel, open...
-
Users and Groups | Manage Groups
- Click Create and enter "rtsUser" as the group name. Click Create.
- Click Create Like and create another group named "rtsAdministrator". Click Create.
- Click Create Like and create another group named "rtsConfigManager". Click Create.
- Click Create Like and create another group named "rtsInstaller". Click Create. Click Close.
- In the side panel, open...
-
Users and Groups | Manage Users
- Click Create.
- Enter rtsUser1 as the User ID and assign this new user to a group. To do so:
- Click Group Membership. The page that enables you to select a group opens.
- Click Search. The list of existing groups is displayed.
- Select the rtsUser group and click Add. Click Close.
- Enter a given name and surname for rtsUser1, then enter the rtsUser1 password, and click Create.
- Click Close.
- Create another user named rtsAdmin with password rtsAdmin, and assign this user to the rtsAdministrator and rtsInstaller groups.
- Create another user named rtsConfig with password rtsConfig, and assign this user to the rtsConfigManager group.
- Restart the application server.
- From Integrated Solutions Console, go to...
- Backup profiles
tar -cvf ODM_node01_010614.tar ODM
- LDAP Integration
- Logon to deployment manager admin console and go to...
-
Security | Global Security | Federated Repository | Configure | Add repositories
...and fill in following details.
For New Repository value, select "LDAP repository" from available options. Click on Apply
Repository Name LDAP1_ODM Repository Type LDAP Repository Unique Distinguished name of the baseĀ o=mybaseDN,st=mn,c=us - On next page, fill in details. Keep rest as default and click on Ok. Save the changes.
Primary Host Name cls004.mydomain.com Port 389 Bind distinguished name uid=was1bind,cn=ieewasadmins,o=mybaseDN,st=mn,c=us Bind Password password for bind id - Added registry will be shown under federated repositories
- Ā Verify integration.Ā
Click...
-
Users and Groups | Manage Users | Search
It will list users from Repository
Click on...
-
Users and Groups | Manage Groups | Search
It will list groups from Repository
- Logon to deployment manager admin console and go to...
- Configure IHS Plugin
After installing IHS and Plugin on both node servers, on each node server, edit...
-
IBM/ihs85/ODM/conf/http.conf
...and...
- Change Listen 80 to Listen 8181
- Change ServerName nodename:80 to ServerName fully_qualified_nodename:8181
- Plugin Configuration
Use the WCT toolbox manages to configure plugins.
To move WCT repository to non- shared location.
- Make repository data directory at non-shared location on each node server.
-
cd /IBM/toolbox85/ODM/WCT/
mkdir WCT85data - Edit the WCT configuration file (config.ini) to point to new repository location.
-
/IBM/toolbox85/ODM/WCT/configuration/config.ini
- Make changes in conf.ini file
-
osgi.instance.area.default=/IBM/toolbox85/ODM/WCT/WCT85data/workspaces/WCT85
osgi.configuration.area=/IBM/toolbox85/ODM/WCT/WCT85data/configurations/WCT85 - Save the changes in conf.ini file.
- Make repository data directory at non-shared location on each node server.
- Customize response file to configure plugin
- Make a copy of the old response file.
cd /IBM/toolbox85/ODM/WCT
cp pct_responsefile.txt ODM_node0[1|2]_responsefile.txt - Edit ODM_node0[1|2]_responsefile.txt response file and make the property changes...
configType="local_distributes"
wasExistingLocation="/opt/IBM/WebSphere/AppServer/ODM"
webServerSelected="ihs"
Comment out (#) ihsAdminPort, ihsAdminUserID, ihsAdminUserGroup
webServerConfigFile="/IBM/ihs85/ODM/conf/httpd.conf
webServerConfigFile2=""
webServerPortNumber="8181"
dominoUserID="notes"
webServerDefinition="odmWebServer[1|2]"
wasMachineHostName=""
mapWebserverToApplications="true"
webServerHostName="nodehost.mydomain.com"
webServerInstallArch="64"
profileName="node0[1|2]"
ihsAdminCreateUserAndGroup="false"Comment out (#) ihsAdminUnixUserID, ihsAdminUnixUserGroup, ihsAdminPassword
enableAdminServerSupport="false"
enableUserAndPass="false"
webServerType="IHS" - To create new definition location using customize response file...
/IBM/toolbox85/ODM/WCT/
./wctcmd.sh -tool pct \
            -createDefinition \
            -defLocName odmWebServer[1|2]Location \
            -defLocPathname /IBM/plugins/ODM \
            -response pctenv_responsefile_node0[1|2].txt
- Make a copy of the old response file.
- Configure web server definition in dmgr
Successful execution of above steps creates script...
-
/opt/IBM/plugin85/ODM/bin/configureWebServerName.sh
...where...
Web server name Node Script odmWebServer1 1 configureodmWebServer1.sh odmWebServer2 2 configureodmWebServer2.sh To complete the web server configuration...
- Edit configureodmWebServer[1|2].sh and verify path to .jacl file is correct ...
./wsadmin.sh $PROFILE_NAME_PARAMETER \ $WSADMIN_USERID_PARAMETER \ $WSADMIN_PASSWORD_PARAMETER \ -f 'ODM_HOME/AppServer/bin/configureWebserverDefinition.jacl' \ odmWebServer[1|2] \ IHS \ '/IBM/ihs85/ODM' \ '/IBM/ihs85/ODM/conf/httpd.conf' \ 8181 \ MAP_ALL '/IBM/plugins/ODM' \ managed node0[1|2] nodehost.mydomain.com solaris - Copy scripts to dmgr host, then run...
cd ODM_HOME/profiles/dmgr/bin cp /home/waslwadm/ODMInstall/ihs85/configureodmWebServer[1|2].shĀ ./confugreodmWebServer[1|2].sh -profileName <dmgr_pofile_name> -user <wasadmin_user_id> -password <wasadminpassword>
- To set custom HTTP ports, from WAS console, navigate to...
-
Environment | Virtual hosts
...and, for both nodes, change...
* 80 hostname 80 ...to, for example...
* 8181 hostname 8181 On each node, add entry for nodehost.mydomain.com on port 49019. Used by /teamserver and /decisioncenter.
Remove definitions for ports you do not need.
Save changes
- Run...
-
Environment | Update global Web server plug-in configuration | OK
- Generate plug-in for both servers...
-
Servers | Server Types | Web servers | servers | Generate Plug-in
- Propagate plug-in for both servers...
-
Servers | Server Types | Web servers | servers | Propogate Plug-in
- Restart the web servers.
- Navigate to...
-
Servers| Clusters| WebSphere application clusters
- Restart the cluster.
- Edit configureodmWebServer[1|2].sh and verify path to .jacl file is correct ...
- Tuning of Decision Center
The tuning of Decision Center is accessible in the enterprise console of Decision Center.
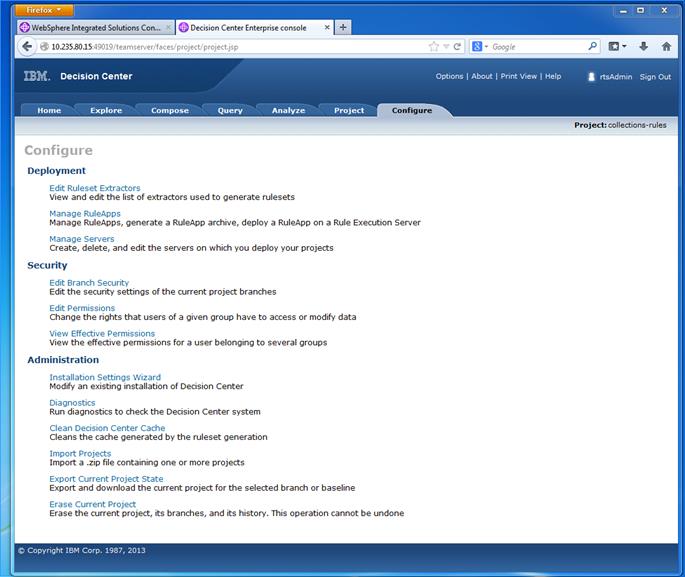
- Installation Options
The installation manager of the enterprise console provides access to the main options of Decision Center...
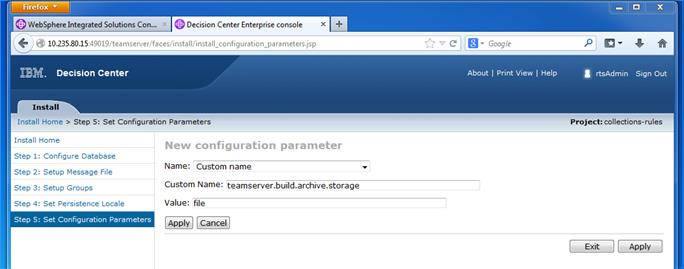
Modifying the build storage option limits the memory usage and stores on disk the cache of compiled business rules so this cache is persistent. To get those results, navigate to the installation manager and set the configuration parameter "teamserver.build.archive.storage" to file instead of memory...
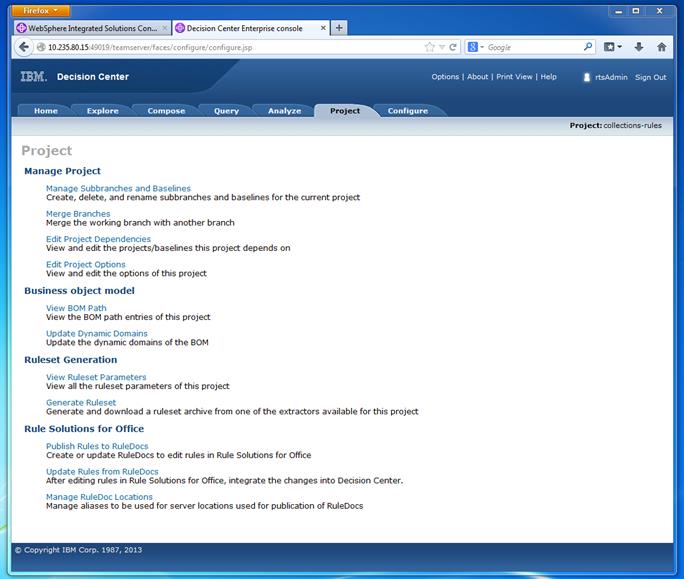
- Project Options
The options of a project are configurable in the Project tab of the enterprise console...
Tuning of the rule project limits memory consumption and CPU usage at rule edition and compilation time. Use the following steps to tune the rule project build:
- Disable the Archive parsing flag option. This can be accessed by selecting Project -> Edit project options -> Check the ruleset archive
- Use Automatic build to avoid a huge ruleset generation cost at first ruleset generation
- Disable Rule analysis checks.
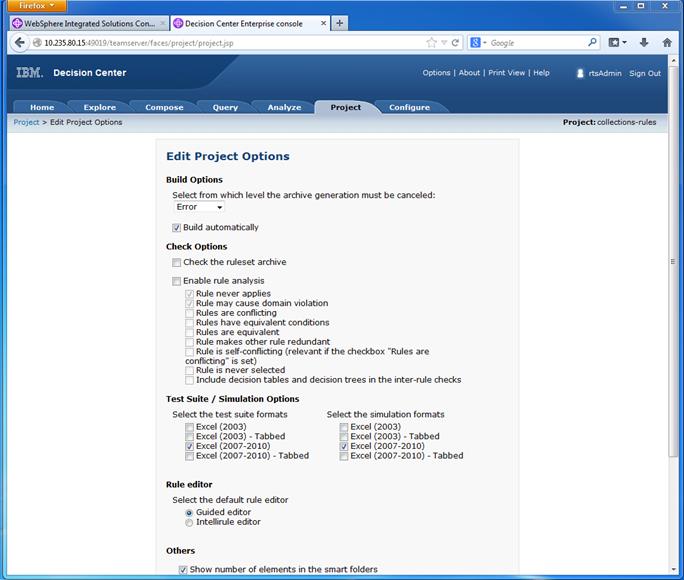
- Disable the Archive parsing flag option. This can be accessed by selecting Project -> Edit project options -> Check the ruleset archive
Links
Āhttps://dmgrhost.mydomain.com:49001/ibm/console
-
ODM - Nodes (User/Password:rtsAdmin/rtsAdmin)
ODM Enterprise console Node1 - http://host1.mydomain.com:49019/teamserver
ODM Enterprise console Node2 - http://host2.mydomain.com:49019/teamserver
ODM Business Console Node1 - http://host1.mydomain.com:49019/decisioncenter
ODM Business Console Node2 - http://host2.mydomain.com:49019/decisioncenter
ODM - Web Servers
-
ODM Enterprise console Node1 - http://host1.mydomain.com:8181/teamserver
ODM Enterprise console Node2 - http://host2.mydomain.com:8181/teamserver
ODM Business Console Node1 - http://host1.mydomain.com:8181/decisioncenter
ODM Business Console Node2 - http://host2.mydomain.com:8181/decisioncenter
ODM - VIP
-
http://odm-vip.mydomain.com/teamserver
http://odm-vip.mydomain.com/decisioncenter