Internet Information Server v8 web server
Stop and Start
Log on to the target machine hosting the IIS web server.
To restart IIS, open a 'cmd" prompt as an administrative user and run "iisreset"
To stop IIS: net stop WAS
To start IIS: net start W3SVC
Alternate restart commands...
-
net stop http
net start http
net start W3SVC
Internet Information Services Manager
To get to Internet Information Services Manager from a Remote Desktop session, open...
-
Control Panel | System and Security | Administrative Tools
Log files
Web server log files...
-
C:\inetpub\logs\LogFiles\W3SVC1
c:\Windows\system32\logfiles\httperr
WAS plugin log...
-
C:\IBM\WebSphere\Plugins\logs\webserver
To view events...
-
Start button | Control Panel | System and Security | Administrative Tools | Event Viewer
Configure the IIS service
- Download and unarchive WAS plugin media
- Open cmd prompt as administrator and run the below command
-
C:\install_files\custom\bin\install_iis_plugins.bat
- Configure Microsoft Internet Information Services (IIS)
- Create the virtual directory as sePlugins (not wpPlugs)
- Install Management Tools

- Check to make sure ISAPI filter and ISAPI & CGI restrictions configurations are in place
- Create the virtual directory as sePlugins (not wpPlugs)
- Create a remote IIS configuration on the portal server...
- From the IIS host, copy...
-
C:\IBM\WebSphere\Plugins\bin\configurewp_webserver.bat
...to the WebSphere Portal host...
-
C:\IBM\WebSphere\AppServer\bin\configurewp_webserver.bat
- Start the WebSphere_Portal process
- On the portal host, run...
-
setupCmdLine.bat
configurewp_webserver.bat
- From the IIS host, copy...
- Run regedit to start the windows registry
- Go to...
...and set...
-
UrlSegmentMaxLength = 0
AllowRestrictedChars = 1
Make sure to set type as DWORD.
Setting 0 makes URLs unlimited
Restart Internet Information Server (IIS)...
net stop WAS
net start W3SVC
net stop http
net start httpHere is a PowerShell script you can run to set values...
-
Set-ItemProperty -Path HKLM:\System\CurrentControlSet\Services\HTTP\Parameters -Name UrlSegmentMaxLength -Value 1500
Set-ItemProperty -Path HKLM:\System\CurrentControlSet\Services\HTTP\Parameters -Name AllowRestrictedChars -Value 0
Restart-Service W3SVC -Force - Open a cmd prompt as an administrative user and run...
-
net stop http
net start httpRepeat for each web server
If that does not work, try...
-
net stop WAS
net start W3SVC
net stop http
net start http
net start W3SVC...or reboot the machine.
- Open WebSphere Customization Toolbox | WebServer Plugin Configuration Tool

- Click Add and fill in your information
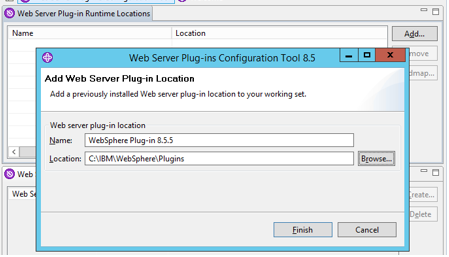
- Create a WebServer Definition

- Copy configurewp_webserver.bat from the IIS host to the WebSphere Portal host
The location of this script on the IIS host is
-
C:\IBM\WebSphere\Plugins\bin\configurewp_webserver.bat
- The target location for this script on the WebSphere Portal host is
-
C:\IBM\WebSphere\AppServer\bin\configurewp_webserver.bat
- On the portal host, run configurewp_webserver.bat
- From the WAS console, generate new plugin-cfg.xml file, then copy the plug-in files to each web server Plugin config directory.
From..
-
C:\IBM\WebSphere\AppServer\profiles\Dmgr01\config\cells\PROD-DMGRCell01\nodes\WebServerNode01\servers\wp_webserver\plugin-cfg.xml
C:\IBM\WebSphere\AppServer\profiles\Dmgr01\config\cells\PROD-DMGRCell01\nodes\PROD-WEB2.PRODSRV.MYCO-node\servers\wp_webserver2\plugin-cfg.xml...to..
-
C:\IBM\WebSphere\Plugins\config\<webserverName>
- plugin-cfg.xml
- Db file
- Stash file
- Restart IIS
- Login to the Dmgr Console and select Environment >WebSphere Variables
- Update the following variables
-
WCM_HOST=<fqdnVIP>
WCM_PORT = 80 - You should be able to hit the portal server via HTTP
- If IIS does not forward requests to portal, create an app pool for Portal

Then link via a service account.

If you get error:
-
ERROR: lib_security: loadSecurityLibrary: Failed to load gsk library from XAS
...to fix...
- Apply the latest Plugin fix pack.
- Install 64 bit Visual C++ Redistributable package.
Configure IIS to use SSL
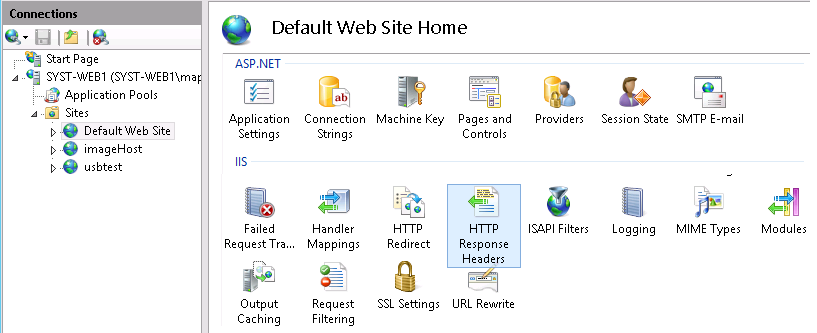
- Open Internet Information Services (IIS) Manager.
-
Control Panel | System and Security | Administrative Tools
- Create self-signed certificate.
-
Features view of the machine | Server Certificates | Actions pane | Create Self-Signed Certificate
In the box...
-
Specify a friendly name for the certificate box
...and type a friendly name for the certificate. For example...
-
myco.myorg.com
...and then click OK.
- Go to...
-
Connections | server name | Sites | website

- Go to...
-
Actions menu | Edit Site | Bindings | Add
- In the Add Site Binding window, set...
Type In the drop-down list, select https. IP address In the drop-down list, select All unassigned. Port Enter 443, unless you are using a non-standard port for SSL traffic. SSL certificate In the drop-down list, select the recently imported SSL Certificate by its friendly name. 
- Click OK.
- Set IIS to ignore client certificate.

- Force use of SSL
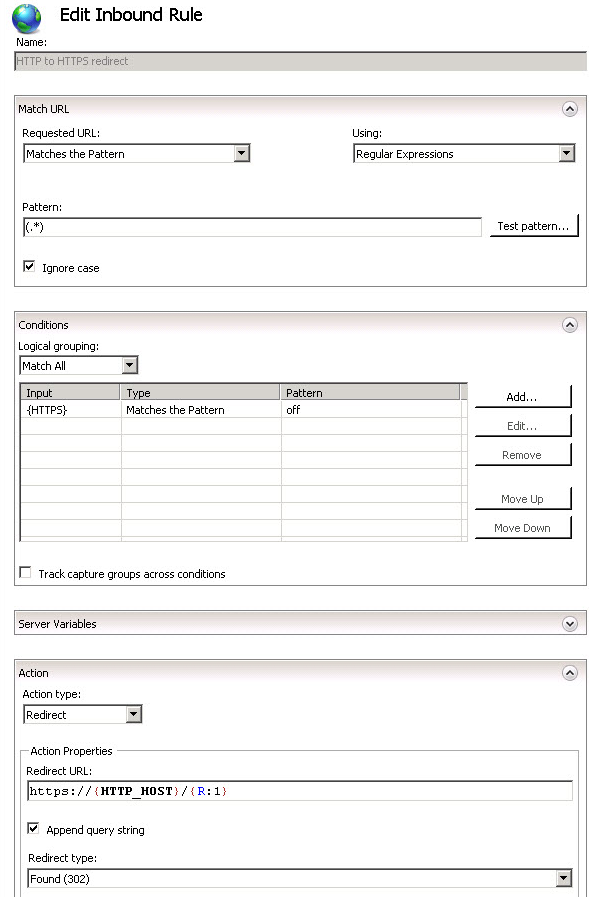
- Install Microsoft URL Rewrite Module
- In IIS Manager, click on your website and select "URL Rewrite" from the Features View.
- Click "Add Rules(s)..." from the Action Pane on the Right.
- Setup the rule...
- Install Microsoft URL Rewrite Module
- Restart IIS: iisreset
See also: IIS 8.0 Centralized SSL Certificate Support: SSL Scalability and Manageability
Certificate signing requests
- Use the IIS Request Certificate panels to create Certificate signing request (CSR) files
- Fill in the following information, then generate a file.
Common Name myco.myorg.com Organization My Org Organizational Unit Office of Information Technology City Des Moine State Iowa Cryptographic service provider Microsoft RSA SChannel Cryptographic Provider Bit Length 2048 - Send file to your certificate authority. They will send back certificate files (*.car)
- Copy *.cer files to target web server(s)
- From IIS Manager, go to...
-
Connections | workstation name | Server Certificates | Actions | Complete Certificate Request
- Change the file type view setting at the lower right corner of the browser window to be able to see *.cer files
The friendly name is not linked to the certificate download from Entrust.net, it is used as an identifier after the certificate is installed. You should provide a unique Friendly Name so that you can easly identify what the certificate is used for.
Select a certificate store for the new certificate: leave the selection set to Personal
- From the left hand side of the IIS Manager, under Connections, Expand the Server Name
- Expand the Sites folder and select the site you wish to bind the certificate to
- From the right hand side under Actions, Select: Bindings...
- From the Site Bindings menu Select: Add
- From the Add Site Binding change the settings listed below:
Type HTTPS SSL Certificate Select the friendly name of the certificate you wish to bind to the site, you can verify that you have selected the corrrect certificate by clicking on View... Once you have configured the settings Select: OK
- Restart the web site
From the right hand side under Actions | Manage Website, Select: Restart
See also: